
Create successful ePaper yourself
Turn your PDF publications into a flip-book with our unique Google optimized e-Paper software.
<strong>May</strong>, 2003Vol. 20, No. 5U.S.A. $3.50<strong>May</strong> 2003Page 1
ABOUT RCSDR/C Soaring Digest (RCSD) is a readerwrittenmonthly publication for the R/Csailplane enthusiast and has been publishedsince January, 1984. It is dedicated to sharingtechnical and educational information. Allmaterial contributed must be exclusive andoriginal and not infringe upon the copyrightsof others. It is the policy of RCSD to provideaccurate information. Please let us know ofany error that significantly affects themeaning of a story. Because we encouragenew ideas, the content of all articles, modeldesigns, press & news releases, etc., are theopinion of the author and may notnecessarily reflect those of RCSD. Weencourage anyone who wishes to obtainadditional information to contact the author.RCSD was founded by Jim Gray, lecturerand technical consultant.RCSD should not be considered to endorseany advertised products or messagespertaining hereto. An advertising rate card isavailable for businesses, and clubs.R/C Soaring Digest556 Funston DriveSanta Rosa, CA 95407phone: (707) 578-7871e-mail: rcsdigest@aol.<strong>com</strong>http://www.b2streamlines.<strong>com</strong>/RCSD.htmlRCSD StaffJerry Slates - Editor/Technical EditorJudy Slates - Managing Editor, SubscriptionsLee Murray - RCSD Index/Database(available on-line)Bill & Bunny Kuhlman - RCSD Web MastersPayPal CoordinatorsFeature ColumnistsBill & Bunny Kuhlman (B 2 ),Lee Murray, Tom Nagel, Mark Nankivil,Dave Register, Steve Savoie, Jerry Slates,Greg Smith, Gordy StahlArtworkGene Zika is the graphic artistwho designs the unique ZIKA clip art.Page 2Copyright © 2003 R/C Soaring Digest.All rights reserved.TABLE OF CONTENTS3 "Soaring Site" ....................................................................................... Judy SlatesEditorial .......................................................................................................... Update on 60 Acres............................................................ New Aeromodelling World Record Attempts - 03.06.2003.............................................................................................. The Baltimore Area Soaring Society5 Flying Techniques .................................................................................... Bill Kuhl........................................................................................................................... Slope Flying Tips6 "On The Wing..." ...................................................................... Bill & Bunny KuhlmanFlying Wing Design & Analysis .............................................................................. Blackbird XC.311 Glider Design ................................................................................. Robert Arrington................................................................................................................................... Hybred Mutt............................................................................................... A modeler's shop, piece milll plane..................................................................................... Or, the main reason you save major parts.12 Scale Event ................................................................... Mark Nankivil & Pete George.................................................................................. Oc-Tow-Berfest 2002 Scale Aerotow Event...................................................... Photography by Mark Nankivil. (Check web page for pdf file!)14 "Tech Topics" ................................................................................... Dave RegisterTechnical Analysis & Design ................................. Hobby Lobby's "WHISPER" 2 Meter SailplaneDon't forget to check out the RCSD web pages each month.Cover photographs are always available for viewing, andusually available for downloading, as well. Special article .pdf filesare frequently available for a limited time, and of course our webmasters update the highlights and status information of each issueas it be<strong>com</strong>es available.4 Cavazos Sailplane Design4 R/C Soaring DigestSpecial Interest Groups19 Eastern Soaring League (ESL)19 International Scale Soaring Assoc.19 League of Silent Flight19 Sailplane Homebuilders Association19 T.W.I.T.T.19 Vintage Sailplane AssociationAdvertiser IndexEventsOTHER GOOD STUFF19 Classified Ads- New Products5 Schedule of Special EventsRCSD ON THE WEBhttp://www.b2streamlines.<strong>com</strong>/RCSD.htmlMonthly Feature Photography & Web Version of the Printed Article (where appropriate)Highlights & Mailing Status of the Current IssueAbout RCSD..................................................................................... Subscription Information................................................... Advertising Rate Card (Adobe Acrobat PDF format)............................................. RCSD Feature Columnists, Reporters, and Editors....................... (E-mail/web addresses, plus general information about their areas of interest)"Getting Started in RC Soaring" ........ Getting started guide - Adobe Acrobat PDF formatLinks to Organizations, Special Interest Groups & ClubsOn-Line Articles - Great articles originally written for the printed version of RCSD......................................... "Trimming Your Sailplane for Optimum Performance" by Brian Agnew.................................................................................................. "Flys Faster" by Dr. Michael Selig.............................. "The Square-Cube Law and Scaling for RC Sailplanes" by Dr. Michael Selig.................................. "Modifying & Building the MB Raven (Parts 1-4)" by Bill & Bunny Kuhlman............................................................. "Butterfly and Moth Airbrushing Tutorial" by Joedy DruliaBookshelf Listings - A listing of recently published books of interest to aeromodelers.Complete RCSD Index, 1984-2002R/C Soaring Digest
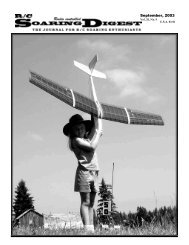
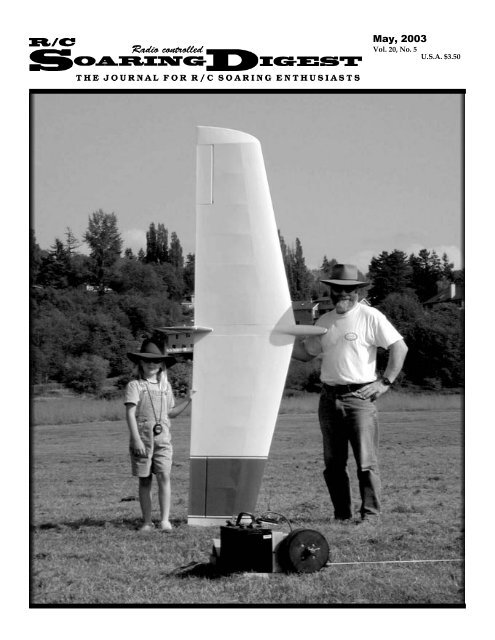
TheSoaringSiteUpdate on 60 AcresIn the March issue of RCSD, wediscussed the threat to a flying sitecalled 60 Acres. Since then, we receiveda heads up from Bill & Bunny,directing us to the web site of TheSeattle Times. The headline on the webpage said, “Sewage plant put on holdfor a year,” by Nick Perry, Seattle TimesEastside bureau. Two paragraphs in thearticle caught our eye:“As well as feeling pressure from cityofficials, county politicians and staffhave been the target of a well-organizedcampaign by the Seattle AreaSoaring Society, which has flownremote-controlled gliders in the southsection of 60 Acres for 30 years. Thesociety has sent out thousands ofletters and e-mails urging that its partof the park remain untouched.”“We are very happy with where it’sheaded,” said Sherman Knight, asociety member and Kirkland lawyer.“But until the county starts breakingground somewhere else, we are still alittle nervous.”Hmmm... We always knew that the SeattleArea Soaring Society was a “well-organized”group! Our best to all of you as thestory continues to unfold!New Aeromodelling WorldRecord Attempts - 03.06.2003And, in another heads up from Bill &Bunny, they forwarded an e-mail messageregarding new aeromodelling world recordattempts. What follows are the details ofthe message.“This is a message from the FAI‘Aeromodelling Information’ mailinglist.” (CIAM Home Page: http://www.fai.org/aeromodelling)“FAI has received the following ClassF (Aeromodels) record claim:Claim number 7793:Sub-class F3B (Glider)<strong>May</strong> 2003F3: Radio controlled flight CategoryType of record: N°158: Distance to goaland returnCourse/location: El Mirage Lake, CA(USA)Performance: 1.90 kmPilot: David L. HALL (USA)Date: 27.05.2003Current record: noneClaim number 7794:Sub-class F5-S (Aeroplane, electricmotor (rechargeable sources ofcurrent))F5: Radio Controlled Flight CategoryType of record: N°174: Distance to goaland returnCourse/location: El Mirage Lake, CA(USA)Performance: 6.21 kmPilot: Gary B. FOGEL (USA)Date: 27.05.2003Current record: noneClaim number 7795:Sub-class F1N (Indoor Glider)F1: Free flight CategoryType of record: N°118-d: Duration(ceiling over 30m)Course/location: Johnson City, TN(USA)Performance: 1 min 23.1 secPilot: Jim BUXTON (USA)Date: 29.05.2003Current record: 1 min 13.9 sec (31.05.00- Leonard George SURTEES,Australia)“The details shown above are provisional.When all the evidence requiredhas been received and checked, theexact figures will be established andthe records ratified (if appropriate).”Good luck, guys!The Baltimore AreaSoaring Societyhttp://www.soarmd.orgThis month’s quick trip via the Internettook us to the east coast and home of theBaltimore Area Soaring Society. Their‘Home’ page describes their interests andactivities; extracts are printed below:Blackbird XC.3Smiling faces following a successfulfirst flight. Alyssa andBill hold the 107 inch span BlackbirdXC at 60 Acres South. Theeight pound five ounce aircraftflew beautifully after being winchlaunched. Detailed coverageincluded in this issue of RCSD!Back CoverPhoto by Doug Brusig.Oc-Tow-Berfest 2002Scale Aerotow EventWalt Torgerson’s 1/4 scaleAirworld Slingsby Kirby Kitetook Best Vintage Sailplane at thisevent!. The model has fiberglasswing skins over the built up wingand tail structure.Photography by Mark Nankivil,St. Louis, Missouri.Page 3
“The Baltimore Area Soaring Society isan AMA sanctioned Club of approximately60 members, formed in 1980 toenjoy the pleasure of silent R/C flight.BASS is sanctioned by the Academy ofModel Aeronautics and is recognizedby AMA as a Gold Leader Club.“Almost all areas of silent flight arepursued within the Baltimore AreaSoaring Society. Our members participatein Thermal Soaring, Slope, HandLaunch and electric powered R/C. Ourmain purpose is to promote friendshipamong modelers and a better understandingof the construction andsuccessful operation of R/C sailplanesand electric aircraft.“Members enjoy the use of BASSsupplied equipment specific to thermalsoaring. BASS maintains both contestand sport winches, retrievers, winchbatteries, battery chargers, retrieverpole, frequency pins and relatedsupplies. In addition to this equipment,BASS even provides a “ClubTrainer” to allow new<strong>com</strong>ers toexperience the thrill of soaring. Membersalso receive the club newsletter,BASS News. This is published 11 timesa year and truly is the “InformationProvider to the Glider Guider”.The Baltimore Area Soaring Societyoperates two Flying Sites north ofMetropolitan Baltimore.“For additional information about theBaltimore Area Soaring Society, selecta member from our informationContact List.”The ‘Home’ page had a link under acategory called “FYI” that took me to a“Soaring Guide.” Written by Bradley J.Smith. “The R/C Soaring Guide”turned out to look more like a book,divided into 3 parts: Soaring forBeginners, Intermediate Soaring, andPlane Reviews. There are 11 chapters:An Overview of R/C Soaring, GettingStarted, Building your First Plane,Learning to Fly, Intermediate Equipment,Intermediate Trimming, IntermediateFlying, Intermediate Competition,Beginner Sailplanes, NostalgiaSailplanes, and Intermediate Sailplanes.It never ceases to amaze me thatthere’s so much information availablevia the World Wide Web. Unfortunately,I don’t have a lot of time to stopand review the information in-depth,such as Bradley’s “Guide.” For those ofyou interested in any of the subjects hecovers, please check it out!I plan to continue to visit web sites tosee how they’ve changed and whatinformation is available. If any of youhave a specific club or personal siteyou’d like to see covered, please let meknow! And, be sure to point out anyspecial information you’d like me toshare with all the readers!Happy Flying!Judy SlatesA MONTHLY LOOK INTO THE WORLD OF SAILPLANE ENTHUSIASTS EVERYWHERER/C Soaring Digest (RCSD) is a reader-written monthly publication for theR/C sailplane enthusiast. Published since 1984, RCSD is dedicated to thesharing of technical and educational information related to R/C soaring.RCSD encourages new ideas, thereby creating a forum where modelers canexchange concepts and share findings, from theory to practical application.Article topics include design and construction of RC sailplanes, kit reviews,airfoil data, sources of hard to find items, and discussions of various flyingtechniques, to name just a few. Photos and illustrations are always inabundance.There are RCSD subscribers worldwide.R/C Soaring Digest556 Funston DriveSanta Rosa, CA 95407e-mail: RCSDigest@aol.<strong>com</strong>http://www.b2streamlines.<strong>com</strong>/RCSD.htmlR/C Soaring Digest Subscription FormUSA: $30 First Class(CA res., please add $2.25 tax.)Canada & Mexico: $30 AirEurope/U.K.: $45 AirAsia/Africa/Pacific/Middle East: $52 AirCheck or Money Order, only, please. U.S. funds.Page 4Name_________________________________________Address___________________________________________________________________________________________________________________________________R/C Soaring Digest
It is my theory that learning newskills as a novice you see thingsmore critically than as a more experiencedperson. Eventually everythingbe<strong>com</strong>es so automatic that you reallydon’t think about what might havebeen a problem as a novice. For me,every slope flying session is a learningexperience. The following slope flyingtips might be helpful to you if you arefairly new to slope soaring.Think About Your Field of Vision<strong>May</strong> 2003Slope Flying Tipsby Bill KuhlBkuhl@luminet.netThink about where you are standingon the hill and your field of vision. Forexample, don’t be standing so low onthe hill that in the course of a normallanding, your plane disappears fromsight on a normal landing. Alternatively,do not stand so far back on thetop of the hill that if your plane wouldsuddenly lose lift that it disappearsfrom your line of sight.Launch it HardLaunch your slope plane straightahead with plenty of force, especiallywhen there are strong gusts. Makesure the trim is correct with test glidesunder calmer conditions before tryingfull-force launches off the slope. Thehard launch makes the controls moreeffective quickly than when using awimpy launch.Don’t Get Caught in a Bad SpotWith strong, gusty wind it is importantto keep your plane flying as fast aspossible to keep it from being blownoff course. This can be especially bad ifyou are flying close to the hill in thedirection of other pilots or spectators.Keeping the Speed UpHow do you keep the speed up on aplane with no motor? Fly smooth,using minimal control inputs for wideturns, and minimal corrections. Whenyou have excessive altitude, this is agood time to point the nose down andtrade altitude for speed. At some pointit might be necessary to add ballast.Avoiding Mid-airsWhen several gliders are sharing arelatively small airspace, there isalways the chance for mid-air colli-sions. Funny, if you have ever flownslope <strong>com</strong>bat, you know how hard itcan be to purposely collide with othergliders. Left to chance, mid-air collisionshappen much too frequent.Try to fly the same direction as most ofthe planes. Chances are that damagewill be way less in a collision with aplane going the same direction. Headoncollisions add the speed of bothplanes to the energy of the impact.At times I try to make a very quickglance to the opposite side of the slopeto gauge the altitude of other planes. Itry to adjust my altitude either higheror lower. Those planes could changealtitude but still I think chances arebetter they will still stay level and acollision will be avoided. If your planedoes collide with another, try to get thenose down to pick up speed rightaway and then try to roll away fromthe hill to regain altitude. In watchingvideo I had taken of a mid-air it wasinteresting to watch in slow-motionhow the planes were tumbling afterimpact. This is why it is important togain speed quickly to regain fullcontrol to pull out.See ya on the slope!SCHEDULE OF SPECIALEVENTSJuly 19-20, 2003Gamblers Gala TD Contest Gardnerville, NVLee Cox, lecofly@charter.net(775) 782-5443www.sierrasilentsoarers.<strong>com</strong>July 19-26, 2003AMA/LSF NATSMuncie, INOctober 10-11, 2003Texas National Tournament (TNT) Dallas, TXwww.SLNT.orgNovember 29-30, 2003Tangerine SoaringOrlando, FLChampionshipswww.orlandobuzzards.orgPlease send in yourscheduled 2003 eventsas they be<strong>com</strong>e available!GONESOARIN’ZIKAPage 5
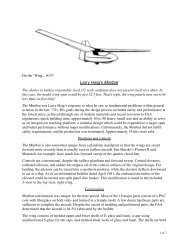
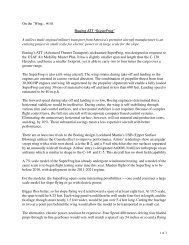
squared@appleisp.nethttp://www.b2streamlines.<strong>com</strong>Blackbird XC.3Construction of our Blackbird XC is<strong>com</strong>plete and test flying was successful.Read all about it!Page 6The frameworkSeveral pictures of the airframe invarious stages of constructionwere included in the last installment.A few photos of the <strong>com</strong>pletedairframe are included in this installment.Several construction points deserveadditional explanation.Flaps: The flaps are constructed of 1/8th inch square spruce sticks glued to1/16th balsa sheet. The outside rectangularframe is just slightly smaller thanthe balsa framed opening in thebottom of the wing. The flap “ribs” areplaced diagonally to provide torsionalresistance and prevent warping. Aplywood mounting plate was added atthe inner end to serve as a mountingpoint for the short control horn. Theupper surface of the truss frameworkwas then covered with 1/16th inchbalsa sheet.The method we used for hinging theflaps is rather unique. The bottoms ofthe wings were turned upward and theflaps put in final position within theirwells. The hinges were then placedevenly across the front of the flap andtheir outlines traced. Using the tracedoutlines as a guide, a Dremel tool witha router base was used to cut away theflap and wing material to the depth ofthe hinge.Very small quantities of thin oil wereapplied to the bearing surfaces of eachhinge and the pin removed. The lightlyoiled hinges were then strung togetherwith a single piece of music wire.A typical flap hinge. The nylon hinge isinset into the balsa sheet covering thewing and flap, and 1/64th inchcontoured plywood plates are thenglued over the hinges to support theUltracoat covering material.(R) Molten lead was poured into the nosethrough use of aluminum dams andtipping the sides at 45 degrees. Each sideholds slightly more than a half pound.With the flap still in placewithin its cavity, the hingeswere arranged in their shallowdepressions. The point ofa #11 X-Acto blade was usedto hold one side of the hingein place while thin CA wasrun around the outline. Thispermanently fixed one half ofthe hinge. All of the flap sidehinges were glued in firstwhile the music wire keptthem all in line and the oilkept extraneous glue fromsticking to the hinge bearingarea. The process was thencarried out on the other half ofeach hinge. Once <strong>com</strong>pleted,the hinges were in a straightline and rigidly fixed to boththe flap and the wing.Side view of the nose of the<strong>com</strong>pleted fuselage. The lead noseweights closely follow the contour ofthe keel and the triangle stock rightin front of the battery pack. Leadsheet is also placed on both sides ofthe battery pack. The receiver isplaced in foam between the batterypack and the rudder servo.A closeup of the flap servo location whichprovides an idea of how the control systemoperates. Full flap deflection is 45 degrees.R/C Soaring Digest
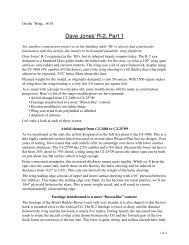
To cover the bare faces of the hinges,we used 1/64th inch plywood cut to arounded airfoil shape using scissorsand a couple of aluminum templates.Thick CA was then applied to eachhinge half and the appropriate plywoodcap glued on - round at thewing, tapered at the flap. The final stepwas to run thin CA around the perimeterof each hinge cover.After removing the music wire guideand covering both the interior andexterior flap surfaces and the wingbottom, the original hinge pins werereinserted and fixed in place bypushing the extended end into a cutslot. The result is relatively clean froman aerodynamic perspective, andsufficiently solid to withstand both thepower of the servo and the expectedair loads.The one thing we now wish we’d donewas to go around each of the plywoodcaps with some spackle to smooth theplywood-balsa interface. As it is, thecovering does not fully attach to thewing surface around the perimeter ofthe cap. No big deal, but in retrospect...Construction jigs: Since the wing itselfhas a straight taper, jigs for setting upthe wing are simple, despite the factthere’s no flat area on the lowersurface of the BW 05 02 09 airfoil.<strong>May</strong> 2003Granddaughter Anna, age three andhalf, steadies the <strong>com</strong>pleted airframefor the camera. The flap structure isobvious in this view.Trailing edge stock serves this purposeextremely well.Trailing edge stock was also usedduring the framing of the vertical finand rudder for the same reason.Spar webbing: Another thing we did(Below) Side perspective of the <strong>com</strong>pleteairframe. The elevon servo can be easilyseen, the flap servo is under the wing rootsheeting. The reflex of the airfoil is evidentin the curvature of the lower surface.differently involved the spar webbing.In the past we’ve carefully cut theplywood and balsa webbing and gluedit into the space between the spars.This time we glued the spar webbingto the rear face of the spar caps beginningwith the first open bay. The sparwebbing in the first bay, where thePage 7
Underside of the Blackbird XC with flapsfully deflected. Granddaughter Anna, agethree and a half, provides some scale.wing rods receptacles are located,retains the interior webbing equivalentto the original Blackbird 2M plans.Trailing edge webbing: Using 1/16thinch balsa sheeting certainly broughtthe overall weight down, but it alsocaused minor structural difficulties insome areas. The major problemappeared at the front of the trailingedge sheeting. Despite the curvedsurface, the sheeting tended to bendtoo easily in our estimation. OurPage 8solution was to add a vertical web of1/16th balsa sheeting inside theleading edge, fully spanning the upperand lower sheeting between adjacentribs. This created a triangular “box”which substantially stiffened the areawith very little weight penalty.Installing radio gearWe had originally chosen the Hitecreceiver for this aircraft, but from thestart were not convinced this was thebest way to go. After reversing one ofthe flap servos and being able to use aY-connector to drive both servos fromthe throttle channel, we gravitatedtoward using the FMA Direct M5because of it smaller size and theconfined area in the nose pod.This arrangement worked out extremelywell. The receiver is wellpadded in a configured piece of foam,held in place with small rubber bands.See the included photo. Four of thefive available channels are used - flapsare on throttle, there’s one elevon onaileron, the other on elevator, and therudder servo is run off the fourth(rudder) channel. Our JR PCM 10transmitter was programmed for V-tailwith rudder to aileron mixing andflaps on the throttle stick.The battery <strong>com</strong>plement, a four cell1400 mAh NiCd pack, is also held inplace with small rubber bands.Servo cables, as mentioned previously,are run through the wing in conduits,and all are twisted to avoid picking upextraneous signals.CoveringThe Blackbird XC we’ve been flyingfor many years was finally in need ofrecovering, so we purchased 25 footrolls of Ultracoat in red and whitesome time ago. This seems like anawful lot of covering, but we used a bitmore than a third of each roll coveringthat airplane. With sufficient materialleft over, it was only natural to use thesame colors on this new XC machine.Asymmetry remains an intriguingscheme for us, and we rapidly decidedupon a contrasting band around theright elevon area. The final patternconsists of a red band over the top ofthe wing and a white band along thebottom. This gives a little bit of contrastat altitude without making thecovering process too <strong>com</strong>plicated.Separation bands of 3/8th inch widthwere applied afterward.Jim Pruitt, a Bremerton resident, hasbeen wanting to get back into modelingafter a rather lengthy respite andhas been following the Blackbird XCconstruction process from the start. Jimvolunteered to help with the coveringjob. A couple of his photos, takenduring the several hours it took to getmost of the covering ac<strong>com</strong>plished, areincluded. Nearly thirty five square feetof covering later, the job was done.R/C Soaring Digest
The right wing,bottom covering inplace, ready for theupper surfacecovering to beapplied. Notice theinterior framing ofthe flap bay.Bottom of the right wing after the coveringwas applied. The flap recess has not beencut out yet, so the hinges are not connected.Each flap is over fifty square inches in area,so substantial servo power is required.<strong>com</strong>puted neutral point. More abouthow this worked out in the nextsection.To make sure the flaps closed securely,we induced a 1/8th inch twist duringthe covering process. The slight twistforces the outer portion to seat firstand the servo brings the flap to thefully closed position. The inner portionis held in place by the servo, and theouter portion by the imparted twist.This method is used on full sizeaircraft, so we anticipated it wouldwork in this application as well. Itdoes.<strong>May</strong> 2003BalancingAaron Coffey’s Panknin spreadsheet,available on our web site, was used todetermine the location of the neutralpoint (NP) and the static margin. Theleading edge of the wing is swept backat ten degrees, so the quarter chordsweep is 7.5 degrees. The root chord is27 inches and the tip chord is 17inches. The spreadsheet shows an areaof 2354 square inches (16.35 squarefeet) for these planform dimensions. Inreality, due to the shape of the wingtips, the area is 2300 square inches (16square feet) and the area is a bit furtherrearward than the simple trapezoidalshape used by the spreadsheet. Thespreadsheet shows the NP as being teninches back from the apex of theleading edge, slightly forward ofwhere it is actually located, so there isa small safety factor built into the<strong>com</strong>putations. A static margin of 5%(0.05) places the CG 1.1 inch forwardof the NP, 8.9 inches from the leadingedge apex. We marked the NP and 5%static margin CG on the bottom of thefuselage using a fine felt tip marker.The balsa blocks which form the nosewere previously hollowed out, leavingample room for lead. We made damsof aluminum sheet and used woodendowels stuck in the mounting pinholes to support them. The nose blockswere supported on wet rags whilemolten lead was poured into thedammed cavities. About 0.4 poundswent into each side. Once hardened,the nose blocks were rigged at a 45degree angle and more lead waspoured in until level with the originalpouring. This filled the nose blocksback to the location of the trianglestock in front of the battery <strong>com</strong>partment.The included photo shows thefinished product, a half pound of leadin each side. Additional flattened leadpieces were placed on either side of thebattery pack, held in place with therubber bands.After adding all that weight, the CGturned out to be slightly more than ahalf inch in front of the marked NP.This is equivalent to a static margin of0.025 or 2.5%. Based on previousexperience, this is a small static margin.The one thing which kept <strong>com</strong>ingto mind, however, is the lower positivepitching moment of the BW 05 02 09airfoil <strong>com</strong>pared to the CJ 25 2 09 whichwe used on the last Blackbird XC. Withless downforce at the rear, a morerearward CG is possible. We just hadto make sure the CG was in front of theWith all of the lead in the nose, theoverall weight came out to be eightpounds five and half ounces, wellbelow the eleven pound FAI maximum.This also <strong>com</strong>pares very favorablywith the ten pound eight ounceweight of the last Blackbird XC. Thewing loading for the <strong>com</strong>pleted aircraftis just eight and a third ounces persquare foot, very low for an aircraft ofthis size.Test flyingFirst, it’s necessary to realize that thisis an incredibly large airplane - thetotal wing area is just a few squareinches short of the FAI maximum.Getting the airplane up to flying speedposes big difficulties, as can be imagined.Luckily, the wind was blowing at60 Acres when we went out for testflying.We talked Doug Brusig into handlingthe transmitter while Bill, Blackbirdoverhead, ran across the field at topspeed. Several trials, nearly releasingthe aircraft in order to feel for pitchinstability, resulted in no untowardtendencies being observed. A pushforward on the fourth attempt and theBlackbird XC was traveling out in aflat glide with some barely visibleelevon deflections from Doug’s handson the transmitter sticks. It appearedfrom the results of the single handlaunch that the 2.5% static margin wasgoing to be right on.The tow hook was initially placed aquarter inch in front of the 5% staticPage 9
margin CG, threequarters of an inch infront of the 2.5% spot.This seemed like agood place to start, sothe Blackbird washooked up to thewinch line. Tensionwas built up and theaircraft was thrownstraight ahead. TheBlackbird immediatelyrotated into a steepclimb. Rapidly pulsingthe pedal was sufficientto maintain theclimb to release. Onceoff the line, no trimwas required forcontinued straight andlevel flight. The mixedrudder was sufficientto get well coordinatedturns from the rightstick alone. Therewasn’t much thermalactivity, but theBlackbird XC turnsgracefully and cruisesthrough the sky in anovertly majesticmanner.The one thing wewanted to test was theaircraft reaction to flapdeflection. Slowlylowering the flapsinitiated a nose upmotion, so they werequickly retracted. Wewere expecting nopitch change at all, sonow must work ongetting the transmitterto mix throttle positionto elevator in theproper proportion. Thetow hook needs to bemoved back as well,and we anticipate itsfinal position will be aquarter inch or so infront of the final CG location.Despite the flap deflection adverselyaffecting pitch, the Blackbird XCperforms exceptionally well. It’s docileenough that Alyssa, our seven year oldgranddaughter who is still perfectingher flying skills with her Highlander,took over the controls for a while onthe third flight. She really likedsteering the gentle giant around theopen blue sky.We’re looking forward to flying theBlackbird XC all Summer and formany years to <strong>com</strong>e._____Suggestions for future columns canalways be sent to us at either P.O. Box975, Olalla WA 98359-0975 or.Page 10R/C Soaring Digest
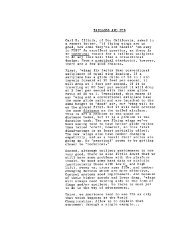
HYBRED MUTTA modeler’s shop, piece mill plane.Or, the main reason you save major parts.by Robert A. ArringtonW. Valley City, UtahIstarted with a Graupner - RC Pilot Ibought from a mail order store.The RC Pilot is a very heavy plane forits 84" wingspan, weighing in at 84 oz.But it would float on very light airwith its jadelski wing. The wing ismade from solid balsa wood with adeep under camber and joined at thefuselage with a double rod. I alsoinstalled Hobby Lobby’s barn doorspoilers. The only draw-back to the RCPilot was its lack of penetrating powerin wind over 25 mph. We were traininga young man to fly when he dovethe plane for a couple hundred feetand then pulled out too hard. Onewing snapped back and the plane wentin. The fuselage and tail feathers were<strong>com</strong>pletely gone but I saved the wings.The next plane was an LS-6 with a 118"wing span by Graupner, purchasedfrom Hobby Lobby. This plane wasvery good looking with sleek lines andI had fun putting it together, but youhad to keep the speed up on it at alltimes and it handled more like a sportscar: temperamental. This plane died ina wing tip stall and the only thing thatwas worth saving was the elevator.The part that brought theeverything together was afuselage I got at an IntermountainSilent Flyers club meeting.One of the members had afuselage from a Cumulus,which had never been used.He was giving it away, so I grabbed itbeing the cheap soul that I am.The first thing I did was work on thebroken wing from the RC Pilot. I usedepoxy and 1 oz. glass to glue the partsback together and then added Kevlarstripes to the bottom of both wings. Iwas lucky to find a 2500 foot roll of 1/4" strip Kevlar at the local thrift storefor $0.50.I then made plywood ends from 1/4" -5 ply to match the inner shape of thewings. I used these ends glued to thefuselage so the wing would match in atthe root. I wanted it to look like thewing and fuselage were made for eachother. Fitting the wing double rodconnection system in took the mosttime and measuring. The existing wingshoulders on the fuselage were parallelwhich made it easy to drill. I thenglued the rods and the new plywoodends to the wing shoulders. In fillingand matching the plywood into thecurves proved to be a lot of handwork.I had to design and make the rudderusing balsa wood. I based it off a stickframe system and shaped it to fit theshape of the plane.Installing the elevators was fairlysimple, using the original full flyingelevator system off of the LS-6.After finishing and installing the radiogear, the plane balanced out with only3 oz. of lead for a total weight of 56 oz.The first flight was just a dream. Ithandles more like a Gentle Lady if youslow it up and yet it will fly in a goodstiff wind. The Kevlar lets me put morestress on it without worrying.Just think of the parts sitting aroundyour own shop. What kind of flyingmutt can you put together? <strong>May</strong> 2003Page 11
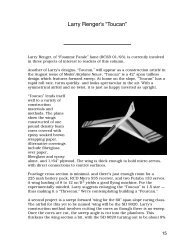
Oc-Tow-Berfest 2002 Scale Aerotow Eventby Mark Nankivil & Pete GeorgePhotography by Mark Nankivilnankivil@covad.netA 1/3.5 scale LS-4<strong>com</strong>ing into land.Thanks to the Midwest Air Wing RCclub and mother nature, Oc-Tow-Berfest 2002 was a smashing success!Modelers from both ends of thecountry showed and towed 180 plustimes during the three day event. Withseveral towplanes available there wasnever a wait for a tow. Twenty pilotsfrom twelve states took full advantageof the “thermal rich environment!” OnSaturday we ran the EMS gold medalduration flying event and four modelerswalked away with gold medalsafter flying for over one hour. Severalothers won bronze and silver medalsfor making it past the twenty and fortyminute mark. The winners of the PilotsChoice Awards were: Peter Goldsmith,Best Towplane for his Towmaule, WaltTorgerson, Best Vintage Sailplane withhis Kirby Kite, and Art Frost won BestModern Sailplane flying his Jantar 2.Thanks to everyone who came andhope to see you next year!Page 12Johnny Berlin ’’s Pegasus (JohnDerstine kit) 110 inchwing span, ZDZ 120motor. AUW of 28 lb.R/C Soaring Digest
Peter George, EMSVentus 2c, 1/3.75scale, 4.8 meterspan, all molded.Richard Ransom, all molded 1/3 scaleSchueler ASH 26, 26 lb.Art Frost’s scratchbuilt 1/4 scaleASK-18.Bernie Coleman’s EMS Duo Discus.Art Frost’s 1/4 scaleJantar 2 based on theViking Modelsfuselage. Beautifulmodel!<strong>May</strong> 2003Peter Goldsmithalso brought alongthis 1/4 scale PiperPawnee towplane.Bernie Coleman’s flying babe kept themodel sailplane pilots <strong>com</strong>pany whilewaiting for the next tow!Page 13
Peter Goldsmith’s 6.7 meterNimbus 2B is the 1/3.5 scalemodel built from theRosenthal kit.The Axel pilot occupyingthe cockpit of PeteGeorge’s EMS Ventus 2c.(L) Peter Goldsmith’s tow planecalled the TowMaule. This was ascratch built ship that flewnicely in Peter’s capable controland shared with much of theweekend’s towing duties.Caroline Goldsmithwith her Roke ASK-18,1/3.75 scale, 4.2 meterspan and 14 lb.. Anac<strong>com</strong>plished pilot inher own right, it surewas nice having herflying with the guys atthe field.Page 14R/C Soaring Digest
Walt Torgerson, 1/4 scale AirworldSlingsby Kirby Kite. The model hasfiberglass wing skins over the built upwing and tail structure.(L) Landing approachwith spoilers up andflaps partially down.Jim Frickie with his IcareNimbus 4D. 1/5 scale,wingspan of 5.3 meters,weighs 10 lb. and uses10 servos!Andrew Jamieson’s AC-4Russia. Based on a Gene Copefuselage and Dale King builtobechi/foam wings, thismodel is 1/3rd scale, spans4.5 meters and weighs 22.5 lb.<strong>May</strong> 2003Page 15
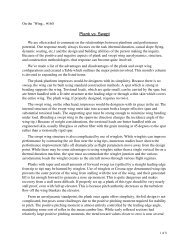
Hobby Lobby’s “WHISPER”2 Meter SailplaneEver since Mark LeVoe stoppedmaking the 2M Super-V, I’ve beenlooking for a good 2M sailplane. Smallfields, convenient transport, etc., allmake the 2M size something thatwould work well for some flying at theend of the work day. Hobby Lobby’s2M WHISPER sailplane looked like ithad some very interesting design ideasso we decided to give it a shot.Construction of the wing is a bitdifferent. Although it’s a hollow corewith a beautiful finish, the skins are abalsa laminate (glass/balsa/glass).Compression and flex strength seemvery good with this architecture.The wing itself is a double taper withsmall reverse Hoerner tips. The airfoilis reported to be a SD7037 and thatappears to be accurate. The finish isvery well done with the color featheringfrom yellow to red at the tips. Thelower surface is solid red withrounded cutouts for the servo cans(supplied with the kit). These areplaced inboard of the respectivecontrol surface.A wiring harness with Deans connectors(4 pin) is supplied along withhorns and linkage for conventionalservo installation. The wing also hascut outs for tubes for ballast (notsupplied) located near the CG. Thewing rod is straight with a slight angleto the wing tubes to provide a verymodest dihedral angle (about 3degrees).The fuselage is glass with the colorapplied in the mold. Although this isbe<strong>com</strong>ing more <strong>com</strong>mon for kits, I’mstill impressed with the quality anddurability of the surface finish producedby this technique. There are acouple of carbon strips along the baseof the fuselage which extend to the tail(on the interior surface). The wingroots are square to the wings with abrass tube through the fuselage for thewing rod and two indexing holes nearPage 16TECH TOPICSDave RegisterBartlesville, Oklahomaregdave@aol.<strong>com</strong>the LE and TE to align the wingmount.The servo cutout in the fuselage isalready done and only requires a littlereinforcing ply or basswood to drop inyour servos. Metal pushrods arealready installed with a screw fittingsoldered on the servo end for theclevis. Mine had a cold solder joint onone fitting which was easy to fix with alow wattage iron. Ample space isavailable ahead of the servos for a500mAh battery. A <strong>com</strong>pact 7 channelRx goes at the aft end of the servos.A nice feature in the fuselage is asealed area in the nose (ahead of thebattery). This can be drilled from thetop and lead shot added to get thebalance just right. After balancing,simply tape over the hole and you’redone.Final note on the fuselage, the towhook is pre-installed. The location isahead of the CG on about a 45 degreeangle which is very conservative for awinch launch.The WHISPER V-tails are built upgeodesic structure. These are precovered,requiring only that the controlsurface be taped and the linkageattached. The V-mount uses two metalrods at the root of the tail that areinserted in metal tubes in the fuselage.The tubes are staggered so the onesfrom either side won’t intersect. TheWHISPER V-tail included angle is 120degrees.A <strong>com</strong>plete hardware set came withthe kit: Hitec servo cans, threaded postlinkages for the wings, angled V-connector for the tail, etc.Since this is the Tech Topics guy, let’stake a look at some of the designnumbers. I’ve captured a few measurementsin Table 1 and calculated someof the associated design coefficients aswell.The first thing to note is that thevolume coefficient for the equivalenthorizontal surface (TVC) is in the midrangeof what I like, while the verticalvolume coefficient (RVC) is pretty low.I also note that the dihedral angle isvery shallow which may provideissues with yaw and roll stability. Withthe large included V-angle and the lowwing dihedral, this could be a problemfor yaw-roll response as well as rollstability while cruising betweenthermals.The wing planform <strong>com</strong>es close to theScheumann ellipse calculation done inthis column a couple of years ago. Itgives a good approximation to anelliptical distribution, which can beconfirmed by running the planform inthe Lift-Roll spreadsheet. Where thereis a discrepancy, the tips are a bitwider than elliptical. As we discusseda few columns ago, this is an appropriatedirection for both Re correctionsand to minimize tip stalls.One final note, the numbers alsoindicate that the tailplane angle is low.This simply means that the distancebetween quarter-chord of the wing andquarter-chord of the tail is a bit shorterthan a typical 2M design. Coupledwith the low RVC, this ship could beboth yaw and pitch sensitive if nottrimmed carefully.There’s not much to say about theequipment installation in the fuselage.I used a couple of S133 servos (Futaba)and they were very tight on the servoarm length. I’d re<strong>com</strong>mend a smallerservo. The HS80/85 and JR341/351would also be tight on the arms soyou’re either going to have to installthese with care or go to an S90, HS55,CS21 or similar size. Since this is a 2MI’d re<strong>com</strong>mend the higher torque gearsets for the CS21.Battery and Rx in the fuselage arestraightforward. A trick learned yearsago is to wrap a piece of electrical tapearound your battery after installation.There’s no way it can inadvertentlyexit the aircraft other than a fatalinteraction with the ground. The Rxused was a standard Futaba 7 channel.R/C Soaring Digest
Aileron control was very slow this day.Turbulence was high and quickresponse was needed. Rudder couplingwas ineffective probably due tothe low dihedral, RVC and TPA.Next day the wind was a lot moreforgiving. Launches again were verygood with excellent zoom at the top. Itwas now noted that the ship had apronounced bank to the right. Thiswas corrected by either aileron trim ora lot of left rudder. Thermal turns wereflat and efficient without ruddercoupling; too much rudder couplingcaused the inboard wing to spiral intothe turn. Aileron throw and differentialwere increased to handle bothadverse yaw and a higher roll rate.Wing servo installation has problems. Iwanted to use the servo cans suppliedbut there were a couple of issues. Theholes are precut in the wing so there’snot much you can do about them.However, they were all cut about 3/8"too close to the trailing edge whichallowed the TE side of the can to stickout of the hole by ~ 1/16" while the LEside of the can was about 1/32" belowthe lip of the hole, I glued a 1/8" pieceof balsa to the back side of each canand then hit it with a belt sander. Youhave to sand the taper through thebottom of the plastic can at the TE endbut after a little work it came out OK.Each well was glued in with Goop andallowed to sit overnight.The next problem with the winglinkage was the hinge line on the flaps.Both the aileron and the flap use amolded in hinge (part of the skin). Itlooks like it’s glass or release cloth; it’sdefinitely not Kevlar. But both hingesare cut on the TOP of the wing. There’sno way to get a 90 degree flap deflectionwith this set up. Even 30 degreesis a stretch. There was even a nice gapseal structure for the flaps, but it’s allwasted with this hinge location.I cut off the flaps, filled the gaps withbalsa and then sanded and tapered<strong>May</strong> 2003until it worked right. However, boththe location of the servo cans and theflap hinges are avoidable problems ifthe manufacturer/supplier used a littleforesight.After sorting out the flaps and servomounting, the wiring harness andconnectors supplied with the kitworked out very nicely. I used FutabaS133 servos for the ailerons and 351’sfor the flaps (metal gears).A problem also cropped up with thelinkage supplied with the kit. Theaileron and flap horns are brass screwswhich allow fine adjustment of theconnection height. However, theyrequire a large, angled hole in thecontrol surface which is awkward.Also, the slop in the threads leads to alot of play in the control. I glued thethreads (CA) to eliminate the excessplay after properly adjusting the servoend points. Bill Masserang (SLNT)suggested getting some metric nutsand jamming them down to take outthat slop.Off to the field for flying.First day out was very windy and cold.Launches on my mini-winch were truebut erratic due to the wind gusts.Release from the hook was fine. Thezoom was outstanding. Even fromshort launches the plane carriedenergy very well.A close look at the setup at homeindicated that the left V-tail incidencewas about 1 degree off from the rightthus explaining the tendency to bankto the right. Additionally, the right V-tail had a warp going in the samedirection. The warp was ironed outwhile the indexing was fixed byrelocating the mounting wire in thestab and then gobbing up the oversizehole with epoxy. These fixes cured thebanking problem.Another day of flying in calm weatherseemed to have things about right. Asport winch or hi-start launch is finewith the tow hook as installed. However,like most 2M ships, this one doesnot really excel at launch by pulling alot of tension and running it fast. Theywork better with a fair amount ofcamber and a pull that tends to kitethem up the line. Use the final third ofthe launch for speed and you’ll getseveral hundred feet more altitude onthe zoom.Now, for the rest of the story.I tried hard to stick to this design asshipped. As you might infer from thewrite-up to this point, there were somefrustrations. I wanted to address thoseat the time but played it by the book tosee how it would <strong>com</strong>e out. After asession or two with a full power winchon a windy day I finally threw in thetowel and decided to fix the problems.First of all, the 120 V-angle just doesn’twork for me. On a hard winch launchit’s really squirrely. Yaw stability ispoor and the forward towhook makesfor some entertaining high speedPage 17
shallow angle launches. After muchtrial and error, the launch angle was<strong>com</strong>pensated with a bunch of camberand about 40% up-elevator launch preset.That last part helped on the launchheight but made the yaw problem a lotharder.First thing was to fix the V-angle.Going back to the spreadsheet indicatedwe could get a decent RVC and amarginal TVC by reducing the V-angleto 100 degrees. This was effected bybending the mounting rods 10 degreeson each side and then gluing them inwith 30 minute epoxy (roughen therods for a good grab).Next, the simple right angle bend forthe control surface coupling on the V-tail blows off on a hard launch. Thesewere converted to z-bends. If the rearmounting rod is cut about in half, thetails can still be removed even with thez-bend.Next, move the tow hook back at leastan inch. The tow hook screws into ametal plate inside the fuselage so thisis pretty easy to do. It takes a littlepatience to catch the threads but afterthat it’s OK. Basically, put it somewherearound the rear edge of theballast cutouts. The exact spot dependson your experience and courage.With the smaller TVC, the neutralpoint has now moved forward. A goodrule of thumb is to keep the CG about5% ahead of the NP so add some leadto that forward <strong>com</strong>partment until theCG is under the center of the ballasttubes.For the ballast tubes, I glued in somethin wall 17/32" brass tubes. Then 0.5"ballast tubes fit nicely in the largerones and can be added or taken outeasily. The tubes length is restricted, so8 oz. of lead is all you can use.Next, I’d toss out the supplied winglinkage. Use normal phenolic or<strong>com</strong>posite tabs by cutting a slot in thecontrol surfaces and epoxy them inplace. The brass fittings supplied arejust too loose and bulky for this sizeplane.Since I had already glued these in, Istuck with them but had to dial themin with a micrometer to be sure eachpost was at exactly the same height forthe flaps. Same thing goes for theailerons. Then use your end pointPage 18adjustment to keep the servo fromstalling against the forward edge of theservo can.Nothing against Hitec; these are greatservo cans. But they require huge holesin the wing and then stick out at thewrong places (as previously noted).Also, the fairing over the servo arm istoo far towards the rear of the can soyou can’t get full forward travel withinthe fairing for flaps. Did I also mentionthe fairings are too narrow for alinkage keeper? I cut off the fairingsjust to get the linkage to work right.Now it’s back to the field to see whatwe’ve got. First thing is that launchrotation is a whole lot better withoutup trim. Noticeably less camber isrequired. Zooms are still great. Theaileron throws can be cut back (about50% negative exponential is good).Yaw stability is much improved withthe tighter V-angle.Interestingly, pitch stability is verygood; maybe better than before. Isuspect the original 120 degree V-anglehas a lot of the tail section in thedownwash from the wing whicheffectively blanks it on launch andcrow. Crow pitch control is noticeablybetter as well.I haven’t figured out how to increasethe wing dihedral but I’m working onit. With the other modifications, it’snow flying pretty good, but improvedroll stability would be desirable forgetting out to the far end of the fieldfor those hard to find thermals. Evenso, several 15+ minute flights weremade during the last outing.With a bit of work on the CG locationand taking out the rudder couplingentirely, this ship is starting to workout better. Exponential is a must forthermals. Although the initial roll ratefor this plane is fast, after about a 45degree bank angle it just seems to wantto quit rolling. So if you want to hotdog, be sure you’ve got plenty ofaltitude.Here’s the wrap-up on thisproject:The Whisper 2M is a reasonable valuefor the price, BUT:1) Toss out the wing linkage and usesomething more reliable andconvenient.2) Toss the servo cans, fill the holeswith Formula 150 or 250 and startfrom scratch.3) The flap hinge is on the wrong sideso you’ll have to either live with ~20 degrees of flap or cut them offand re-mount.4) Watch for warps and misalignmentof the V-stabs. AnotherWhisper in our club had the sameproblem.5) Decrease the included V-angle to100 degrees.6) Install ballast tubes. You’re goingto need them for windy days.7) Be prepared to fly this ship. Evenwith the mods noted, the lowdihedral angle and small TPAdon’t give you great roll stabilityand tracking. The reward, however,is extreme sensitivity tonearby thermals and very flat,tight turns.Once you master all of the above, thisis a pretty ship and quite responsive inthe air. I particularly like the fact that itbreaks down and can be transported inthe original box. It also flies nicely outof small fields. Overall my guess is thatthis was originally a light wind sloperthat has been applied to the thermalduration market. It can <strong>com</strong>e closewith a lot of work. But you WILL haveto do some mods on this one to get itright. Mark’s 2M Super-V is still kingof this class in my book.R/C Soaring Digest
Classified Advertising PolicyClassified ads are free of charge to subscribersprovided the ad is personal in nature and does notrefer to a business enterprise. Classified ads thatrefer to a business enterprise are charged $5.00/month and are limited to a maximum of 40 words.RCSD has neither the facilities or the staff to investigateadvertising claims. However, please notifyRCSD if any misrepresentation occurs. Personalads are run for one month and are then deletedautomatically. If you have items that might be hardto sell, you may run the ad for 2-3 months.For Sale - BusinessPARACHUTES: $12.50 (includes S&H U.S.A.)Send check or money order to Dale King, 1111Highridge Drive, Wylie, TX 75098; (972) 475-8093.Reference MaterialSummary of Low-Speed Airfoil Data - Volume 3 is reallytwo volumes in one book. Michael Selig and his studentscouldn’t <strong>com</strong>plete the book on series 3 before series 4was well along, so decided to <strong>com</strong>bine the two series ina single volume of 444 pages. This issue contains muchthat is new and interesting. The wind tunnel has beenimproved significantly and pitching moment measurementwas added to its capability. 37 airfoils were tested.Many had multiple tests with flaps or turbulation ofvarious configurations. All now have the tested pitchingmoment data included. Vol 3 is available for $35. Shippingin the USA add $6 for the postage and packagingcosts. The international postal surcharge is $8 for surfacemail to anywhere, air mail to Europe $20, Asia/Africa$25, and the Pacific Rim $27. Volumes 1 (1995) and 2(1996) are also available, as are <strong>com</strong>puter disks containingthe tabulated data from each test series. For moreinformation contact: SoarTech, Herk Stokely, 1504N. Horseshoe Circle, Virginia Beach, VA 23451 U.S.A.,phone (757) 428-8064, e-mail .BBS/InternetInternet soaring mailing listserve linking hundreds ofsoaring pilots worldwide. Send msg. containing theword "subscribe" to soaring-request@airage.<strong>com</strong>. The"digestified" version that <strong>com</strong>bines all msgs. each dayinto one msg. is re<strong>com</strong>mended for dial-up users on theInternet, AOL, CIS, etc. Subscribe using soaringdigest-request@airage.<strong>com</strong>.Post msgs. tosoaring@airage.<strong>com</strong>. For more info., contact MichaelLachowski at mikel@airage.<strong>com</strong>.InternationalScale SoaringAssociationT.W.I.T.T.(The Wing Is The Thing)T.W.I.T.T. is a non-profit organization whosemembership seeks to promote the researchand development of flying wings and othertailless aircraft by providing a forum for theexchange of ideas and experiences on aninternational basis. T.W.I.T.T. is affiliatedwith The Hunsaker Foundation which isdedicated to furthering education andresearch in a variety of disciplines. Fullinformation package including one back issueof newsletter is $2.50 US ($3.00 foreign).Subscription rates are $20.00 (US) or $30.00(Foreign) per year for 12 issues.T.W.I.T.T., P.O. Box 20430El Cajon, CA 92021www.twitt.orgSailplaneHomebuildersAssociation (SHA)A Division of the SoaringSociety of AmericaThe purpose of theSailplane HomebuildersAssociation is to stimulate interest in full-sizesailplane design and construction byhomebuilders. To establish classes,standards, categories, where applicable. Todesiminate information relating to constructiontechniques, materials, theory and relatedtopics. To give recognition for noteworthydesigns and ac<strong>com</strong>plishments.SHA publishes the bi-monthly SailplaneBuilder newsletter. Membership cost: $15U.S. Student (3rd Class Mail), $21 U.S. RegularMembership (3rd Class Mail), $30 U.S. RegularMembership (1st Class Mail), $29 for All OtherCountries (Surface Mail).Sailplane Homebuilders AssociationDan Armstrong, Sec./Treas.21100 Angel StreetTehachapi, CA 93561 U.S.A.The League of Silent Flight (LSF) is an internationalfraternity of RC Soaring pilots who have earned theright to be<strong>com</strong>e members by achieving specificgoals in soaring flight. There are no dues. Once youqualify for membership you are in for life.The LSF program consists of five “AchievementLevels”. These levels contain specific soaring tasksto be <strong>com</strong>pleted prior to advancement to the nextlevel.Send for your aspirant form, today:League of Silent Flightc/o AMAP.O. Box 3028Muncie, IN 47302-1028 U.S.A.http://www.silentflight.orgThere is a growing interest in scale soaring inthe U.S. We are dedicated to all aspects ofscale soaring. Scale soaring festivals and<strong>com</strong>petitions all year. Source for informationon plans, kits, accessories and other peopleinterested in scale. For more information:web site: www.soaringissa.orgBooks by Martin Simons: "World's VintageSailplanes, 1908-45", "Slingsby Sailplanes","German Air Attaché", "Sailplanes bySchweizer". Send inquiries to: Raul Blacksten,P.O. Box 307, <strong>May</strong>wood, CA 90270,. To view summary ofbook info.: http://home.earthlink.net/~raulbThe Eastern Soaring League (ESL) is a confederation of Soaring Clubs, spread across the Mid-Atlantic and New England areas, <strong>com</strong>mitted to high-quality R/C Soaring <strong>com</strong>petition.AMA Sanctioned soaring <strong>com</strong>petitions provide the basis for ESL contests. Further guidelines arecontinuously developed and applied in a drive to achieve the highest quality <strong>com</strong>petitionspossible.Typical ESL <strong>com</strong>petition weekends feature 7, or more, rounds per day with separate contests onSaturday and Sunday. Year-end champions are crowned in a two-class pilot skill structureproviding <strong>com</strong>petition opportunities for a large spectrum of pilots. Additionally, the ESL offers aRookie Of The Year program for introduction of new flyers to the joys of R/C Soaring <strong>com</strong>petition.Continuing with the 20+ year tradition of extremely enjoyable flying, the 1999 season will include14 weekend <strong>com</strong>petitions in HLG, 2-M, F3J, F3B, and Unlimited soaring events. Come on out andtry the ESL, make some new friends and enjoy camaraderie that can only be found amongst R/CSoaring enthusiasts!ESL Web Site: http://www.e-s-l.org<strong>May</strong> 2003Page 19
Page 20R/C Soaring Digest