read and save these instructions - Emerson Fans
read and save these instructions - Emerson Fans
read and save these instructions - Emerson Fans
- No tags were found...

You also want an ePaper? Increase the reach of your titles
YUMPU automatically turns print PDFs into web optimized ePapers that Google loves.
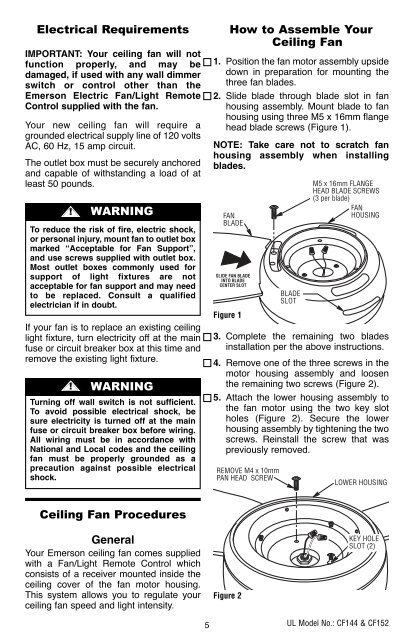
BP7407 44" & 52" Curva Sky 1/11/10 9:54 PM Page 5Electrical RequirementsIMPORTANT: Your ceiling fan will notfunction properly, <strong>and</strong> may bedamaged, if used with any wall dimmerswitch or control other than the<strong>Emerson</strong> Electric Fan/Light RemoteControl supplied with the fan.Your new ceiling fan will require agrounded electrical supply line of 120 voltsAC, 60 Hz, 15 amp circuit.The outlet box must be securely anchored<strong>and</strong> capable of withst<strong>and</strong>ing a load of atleast 50 pounds.! WARNINGTo reduce the risk of fire, electric shock,or personal injury, mount fan to outlet boxmarked “Acceptable for Fan Support”,<strong>and</strong> use screws supplied with outlet box.Most outlet boxes commonly used forsupport of light fixtures are notacceptable for fan support <strong>and</strong> may needto be replaced. Consult a qualifiedelectrician if in doubt.If your fan is to replace an existing ceilinglight fixture, turn electricity off at the mainfuse or circuit breaker box at this time <strong>and</strong>remove the existing light fixture.! WARNINGTurning off wall switch is not sufficient.To avoid possible electrical shock, besure electricity is turned off at the mainfuse or circuit breaker box before wiring.All wiring must be in accordance withNational <strong>and</strong> Local codes <strong>and</strong> the ceilingfan must be properly grounded as aprecaution against possible electricalshock.How to Assemble YourCeiling Fan1. Position the fan motor assembly upsidedown in preparation for mounting thethree fan blades.2. Slide blade through blade slot in fanhousing assembly. Mount blade to fanhousing using three M5 x 16mm flangehead blade screws (Figure 1).NOTE: Take care not to scratch fanhousing assembly when installingblades.FANBLADESLIDE FAN BLADEINTO BLADECENTER SLOTFigure 1BLADESLOTM5 x 16mm FLANGEHEAD BLADE SCREWS(3 per blade)FANHOUSING3. Complete the remaining two bladesinstallation per the above <strong>instructions</strong>.4. Remove one of the three screws in themotor housing assembly <strong>and</strong> loosenthe remaining two screws (Figure 2).5. Attach the lower housing assembly tothe fan motor using the two key slotholes (Figure 2). Secure the lowerhousing assembly by tightening the twoscrews. Reinstall the screw that waspreviously removed.REMOVE M4 x 10mmPAN HEAD SCREWLOWER HOUSINGCeiling Fan ProceduresGeneralYour <strong>Emerson</strong> ceiling fan comes suppliedwith a Fan/Light Remote Control whichconsists of a receiver mounted inside theceiling cover of the fan motor housing.This system allows you to regulate yourceiling fan speed <strong>and</strong> light intensity.5Figure 2KEY HOLESLOT (2)UL Model No.: CF144 & CF152