Pololu - Pololu USB AVR Programmer User's Guide - Roboweb.net
Pololu - Pololu USB AVR Programmer User's Guide - Roboweb.net
Pololu - Pololu USB AVR Programmer User's Guide - Roboweb.net

Create successful ePaper yourself
Turn your PDF publications into a flip-book with our unique Google optimized e-Paper software.
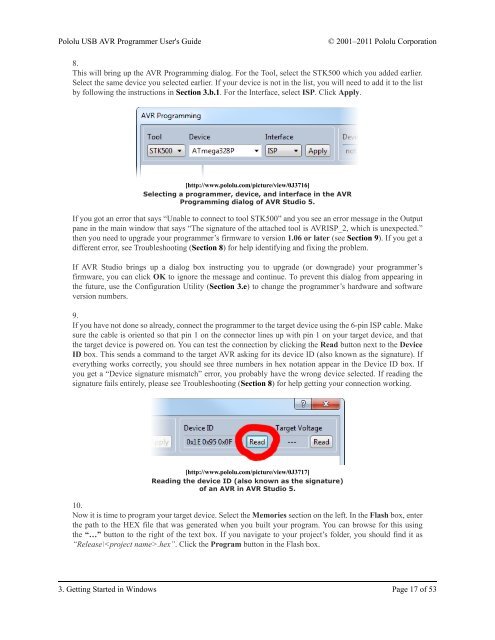
<strong>Pololu</strong> <strong>USB</strong> <strong>AVR</strong> <strong>Programmer</strong> <strong>User's</strong> <strong>Guide</strong>© 2001–2011 <strong>Pololu</strong> Corporation8.This will bring up the <strong>AVR</strong> Programming dialog. For the Tool, select the STK500 which you added earlier.Select the same device you selected earlier. If your device is not in the list, you will need to add it to the listby following the instructions in Section 3.b.1. For the Interface, select ISP. Click Apply.[http://www.pololu.com/picture/view/0J3716]Selecting a programmer, device, and interface in the <strong>AVR</strong>Programming dialog of <strong>AVR</strong> Studio 5.If you got an error that says “Unable to connect to tool STK500” and you see an error message in the Outputpane in the main window that says “The signature of the attached tool is <strong>AVR</strong>ISP_2, which is unexpected.”then you need to upgrade your programmer’s firmware to version 1.06 or later (see Section 9). If you get adifferent error, see Troubleshooting (Section 8) for help identifying and fixing the problem.If <strong>AVR</strong> Studio brings up a dialog box instructing you to upgrade (or downgrade) your programmer’sfirmware, you can click OK to ignore the message and continue. To prevent this dialog from appearing inthe future, use the Configuration Utility (Section 3.e) to change the programmer’s hardware and softwareversion numbers.9.If you have not done so already, connect the programmer to the target device using the 6-pin ISP cable. Makesure the cable is oriented so that pin 1 on the connector lines up with pin 1 on your target device, and thatthe target device is powered on. You can test the connection by clicking the Read button next to the DeviceID box. This sends a command to the target <strong>AVR</strong> asking for its device ID (also known as the signature). Ifeverything works correctly, you should see three numbers in hex notation appear in the Device ID box. Ifyou get a “Device signature mismatch” error, you probably have the wrong device selected. If reading thesignature fails entirely, please see Troubleshooting (Section 8) for help getting your connection working.[http://www.pololu.com/picture/view/0J3717]Reading the device ID (also known as the signature)of an <strong>AVR</strong> in <strong>AVR</strong> Studio 5.10.Now it is time to program your target device. Select the Memories section on the left. In the Flash box, enterthe path to the HEX file that was generated when you built your program. You can browse for this usingthe “…” button to the right of the text box. If you navigate to your project’s folder, you should find it as“Release\.hex”. Click the Program button in the Flash box.3. Getting Started in Windows Page 17 of 53