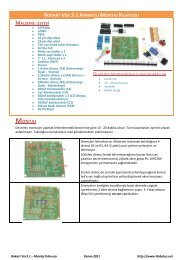
<strong>Pololu</strong> <strong>USB</strong> <strong>AVR</strong> <strong>Programmer</strong> <strong>User's</strong> <strong>Guide</strong>© 2001–2011 <strong>Pololu</strong> Corporation3.c. Programming <strong>AVR</strong>s Using <strong>AVR</strong> Studio 4This tutorial covers <strong>AVR</strong> Studio 4. For a tutorial on the newer <strong>AVR</strong> Studio 5 see Section 3.b.At the time of this writing, all of our tutorials and example projects for the <strong>Pololu</strong> <strong>AVR</strong> C/C++Library [http://www.pololu.com/docs/0J20] require <strong>AVR</strong> Studio 4. Therefore, if you have an Orangutanor 3pi Robot, or wish to use the <strong>Pololu</strong> C/C++ <strong>AVR</strong> Library for some other reason, you probablywant to use <strong>AVR</strong> Studio 4.The following tutorial covers the steps needed to program <strong>AVR</strong>s in Windows using <strong>AVR</strong> Studio 4 and a <strong>Pololu</strong><strong>USB</strong> <strong>AVR</strong> programmer. Specifically, we will write a simple program to blink an LED connected to pin PD1of an <strong>AVR</strong>. On any of the Orangutan robot controllers [http://www.pololu.com/catalog/category/8] and the 3pi Robot[http://www.pololu.com/catalog/product/975], this program will blink the red user LED. If you want to program an <strong>AVR</strong>that does not have an LED connected to pin PD1, the code in this tutorial may need to be modified.In this tutorial, we will be using Win<strong>AVR</strong> and <strong>AVR</strong> Studio 4. Win<strong>AVR</strong> [http://winavr.sourceforge.<strong>net</strong>/] is an opensource suite of software development tools for the Atmel <strong>AVR</strong> series of microcontrollers. It includes the GNUGCC compiler for C and C++. Win<strong>AVR</strong> alone will give you all the tools you need to start programming<strong>AVR</strong>s with the <strong>USB</strong> <strong>AVR</strong> programmer, but Atmel offers <strong>AVR</strong> Studio 4 [http://www.atmel.com/forms/software_download.asp?category_id=163&family_id=607&subfamily_id=760&fn=dl_AvrStudio4Setup.exe], a free integrateddevelopment environment (IDE) designed to work with the Win<strong>AVR</strong> GCC C/C++ compiler. <strong>AVR</strong> Studio 4includes a simulator and other useful tools, and supports the <strong>AVR</strong> ISP protocol used by the <strong>Pololu</strong> <strong>USB</strong> <strong>AVR</strong><strong>Programmer</strong>.You will need to have the <strong>Pololu</strong> <strong>USB</strong> <strong>AVR</strong> <strong>Programmer</strong>’s drivers, Win <strong>AVR</strong>, and <strong>AVR</strong> Studio 4 installed on yourcomputer. If you have not done so already, you can install all of these components by installing the <strong>Pololu</strong> <strong>AVR</strong>Development Bundle (see Section 3.a).If you have an Orangutan or 3pi and want to jump straight in to using your <strong>USB</strong> <strong>AVR</strong> programmer, you can skipsteps 1-3 by downloading the <strong>AVR</strong> Studio project these steps would create. Determine the microcontroller on yourdevice, download the corresponding file below, extract all the files to a directory, open the <strong>AVR</strong> Studio projectfile (BlinkLED.aps), and proceed to step 4.• mega48: BlinkLED_m48.zip [http://www.pololu.com/file/download/BlinkLED_m48.zip?file_id=0J188] (9k zip)• mega168: BlinkLED_m168.zip [http://www.pololu.com/file/download/BlinkLED_m168.zip?file_id=0J189] (9k zip)• mega328: BlinkLED_m328.zip [http://www.pololu.com/file/download/BlinkLED_m328.zip?file_id=0J190] (9k zip)1.Open <strong>AVR</strong> Studio and click New Project. Select <strong>AVR</strong> GCC for the project type. Enter the project nameand initial file name. In the screenshot below, we named our project “BlinkLED” and elected to have afolder called “C:\BlinkLED” created containing the blank file “BlinkLED.c”. Click Next >>. DO NOT click“Finish” yet. If you do accidentally click “Finish”, you will not be able to perform step 2 and will insteadhave to set the device by going to the “Project” menu and selecting “Configuration Options”.3. Getting Started in Windows Page 22 of 53
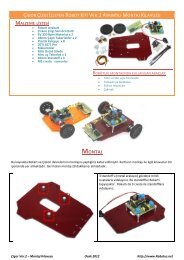
<strong>Pololu</strong> <strong>USB</strong> <strong>AVR</strong> <strong>Programmer</strong> <strong>User's</strong> <strong>Guide</strong>© 2001–2011 <strong>Pololu</strong> CorporationCreating a new <strong>AVR</strong> Studio project, step 12.Select <strong>AVR</strong> Simulator as the debug platform and then select the appropriate device for your target <strong>AVR</strong>.For an Orangutan or 3pi Robot, this will either be ATmega48, ATmega168, ATmega328P, ATmega324PA,ATmega644P, or ATmega1284P depending on which chip your Orangutan or 3pi Robot has. Click Finish.Creating a new <strong>AVR</strong> Studio project, step 23.3. Getting Started in Windows Page 23 of 53