Premier - Printing the History Screen Report - VIP Payroll
Premier - Printing the History Screen Report - VIP Payroll
Premier - Printing the History Screen Report - VIP Payroll

You also want an ePaper? Increase the reach of your titles
YUMPU automatically turns print PDFs into web optimized ePapers that Google loves.
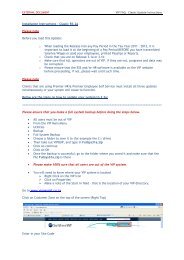
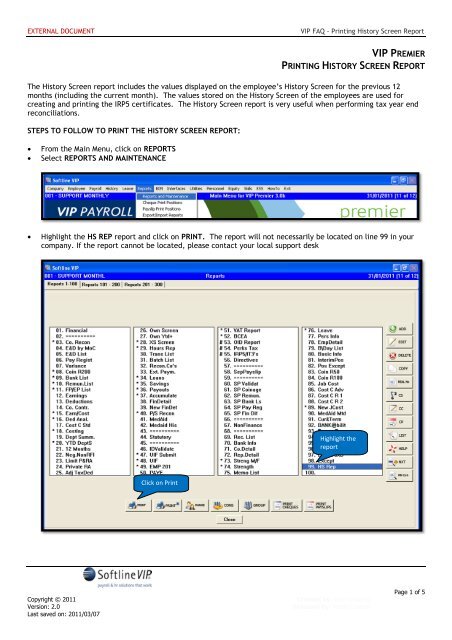
EXTERNAL DOCUMENT<strong>VIP</strong> FAQ - <strong>Printing</strong> <strong>History</strong> <strong>Screen</strong> <strong>Report</strong><strong>VIP</strong> PREMIERPRINTING HISTORY SCREEN REPORTThe <strong>History</strong> <strong>Screen</strong> report includes <strong>the</strong> values displayed on <strong>the</strong> employee’s <strong>History</strong> <strong>Screen</strong> for <strong>the</strong> previous 12months (including <strong>the</strong> current month). The values stored on <strong>the</strong> <strong>History</strong> <strong>Screen</strong> of <strong>the</strong> employees are used forcreating and printing <strong>the</strong> IRP5 certificates. The <strong>History</strong> <strong>Screen</strong> report is very useful when performing tax year endreconciliations.STEPS TO FOLLOW TO PRINT THE HISTORY SCREEN REPORT:• From <strong>the</strong> Main Menu, click on REPORTS• Select REPORTS AND MAINTENANCE• Highlight <strong>the</strong> HS REP report and click on PRINT. The report will not necessarily be located on line 99 in yourcompany. If <strong>the</strong> report cannot be located, please contact your local support deskHighlight <strong>the</strong>reportClick on PrintCopyright © 2011Version: 2.0Last saved on: 2011/03/07Created by: Liezl woodingReleased by: Nadia CoetzerPage 1 of 5
EXTERNAL DOCUMENT<strong>VIP</strong> FAQ - <strong>Printing</strong> <strong>History</strong> <strong>Screen</strong> <strong>Report</strong>• Select to print to <strong>the</strong> printer and click on YES to accept <strong>the</strong> default settings.Select to printto a PrinterClick on YesCopyright © 2011Version: 2.0Last saved on: 2011/03/07Created by: Liezl woodingReleased by: Nadia CoetzerPage 2 of 5
EXTERNAL DOCUMENT<strong>VIP</strong> FAQ - <strong>Printing</strong> <strong>History</strong> <strong>Screen</strong> <strong>Report</strong>• Select <strong>the</strong> printer that you normally print to and click on <strong>the</strong> OK button.Click on OK• Click on CONTINUE to accept <strong>the</strong> defaults.Copyright © 2011Version: 2.0Last saved on: 2011/03/07Created by: Liezl woodingReleased by: Nadia CoetzerPage 3 of 5
EXTERNAL DOCUMENT<strong>VIP</strong> FAQ - <strong>Printing</strong> <strong>History</strong> <strong>Screen</strong> <strong>Report</strong>• The first selection screen will display:• Any of <strong>the</strong> lines can be individually selected. However, <strong>the</strong>re are also tick boxes where <strong>the</strong> following can beselected:o All Earningso All Deductionso All Company Contributions Any/All of <strong>the</strong>se can be selectedo All Perks Tax itemso All Calculation <strong>Screen</strong> itemso All Own screen ItemsORo Items included in a Tax ReconciliationThe Tax Reconciliation option flags all <strong>the</strong> following fields as Yes:o Earnings defined as Monthly Taxableo Earnings defined as Periodic Taxableo Earnings defines as Travel Taxable (<strong>the</strong> full value of <strong>the</strong> Travel Allowance is printed)o Deductions defined as Additional Taxo Deductions defined as Tax on Lump Sumo Deduction line defined as Taxo All Perks Tax itemso Company Contributions defined as Taxableo Calculation <strong>Screen</strong> lines with <strong>the</strong> IRP5 code 4102 (Additional Tax) or 4115 (Tax on Lump Sum)o Own <strong>Screen</strong> lines with <strong>the</strong> IRP5 code 4102 (Additional Tax) or 4115 (Tax on Lump Sum)Copyright © 2011Version: 2.0Last saved on: 2011/03/07Created by: Liezl woodingReleased by: Nadia CoetzerPage 4 of 5
EXTERNAL DOCUMENT<strong>VIP</strong> FAQ - <strong>Printing</strong> <strong>History</strong> <strong>Screen</strong> <strong>Report</strong>Please note: If individual lines have been flagged as Yes to be included in <strong>the</strong> report, <strong>the</strong> total that prints willreflect <strong>the</strong> total for that month as displayed on <strong>the</strong> <strong>History</strong> <strong>Screen</strong> and not <strong>the</strong> total of <strong>the</strong> separate lines thatwere selected.If no fields were selected to print, <strong>the</strong> system will display an error message when trying to Continue. Click onOK to return to <strong>the</strong> selection screen.Once all of <strong>the</strong> necessary fields have been selected, click on CONTINUE• The second selection screen will display:ooThe report can be printed per employee (or range of employees) or any of <strong>the</strong> sort options above canbe used. Leave <strong>the</strong> Employee Code fields blank if all employees should be included in <strong>the</strong> report.The following section can be used to specify: If terminated employees should be included in <strong>the</strong> report If a summary report (totals for <strong>the</strong> company) or a detail report per employee should be printed The range of months for which <strong>the</strong> report must be printed. The end of <strong>the</strong> range will default to<strong>the</strong> current period If cents should be included in <strong>the</strong> amount. If <strong>the</strong>re are any amounts greater than 10000000this option should not be ticked. If not ticked, <strong>the</strong> system will crop <strong>the</strong> leftmost number from<strong>the</strong> amount, e.g. 78151234.46 will print as 8151234.46. If each employee should be printed on a separate pageooClick on CONTINUEClick on YES to printCopyright © 2011Version: 2.0Last saved on: 2011/03/07Created by: Liezl woodingReleased by: Nadia CoetzerPage 5 of 5