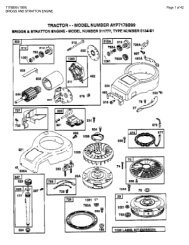
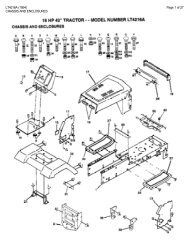
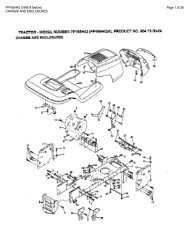
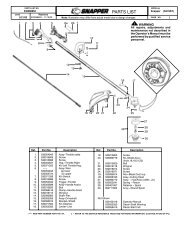
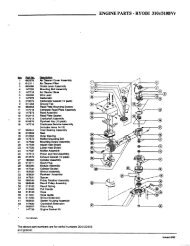
Snapper Lawn Tractor Hydrostatic Drive Electric Clutch Series G ...
Snapper Lawn Tractor Hydrostatic Drive Electric Clutch Series G ...
Snapper Lawn Tractor Hydrostatic Drive Electric Clutch Series G ...

You also want an ePaper? Increase the reach of your titles
YUMPU automatically turns print PDFs into web optimized ePapers that Google loves.
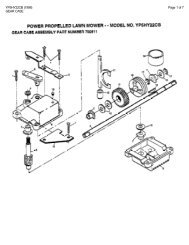
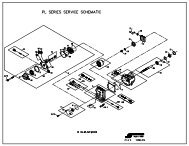
Section 4 - ADJUSTMENT & REPAIRWARNINGDO NOT attempt any adjustments, maintenance orservice with the engine or blades running. STOPblades. STOP engine. Set brake. Remove key.Remove spark plug wire from spark plug and securewire away from spark plug. Engine and componentscan be extremely hot. Avoid burns by allowing engineand components sufficient time to cool.4.2.5. MOWER DECK ADJUSTMENT (LEVELNESS)SIDE-To-SIDE (48” Decks)(Continued From Previous Page)6. Remove both hair pins and washers from swivellocated on rear lift rods and pull rod out of deckbrackets.7. Rotate swivels on both sides up or down toachieve the proper levelness. See Figure 4.7.8. Reinstall swivel into deck bracket. Reinstallwashers and hair pins.9. Tighten nut and bolt on front lift arm securely.4.2.6. MOWER DECK ADJUSTMENT (LEVELNESS)(FRONT To REAR)Before making deck leveling adjustments, check thetire pressure. Add or release air as needed to bringpressure to 12 PSI in front and 12 PSI in rear tires. Iftires are properly inflated and mowing is still uneven,check side-to-side deck levelness first then proceedto front to rear adjustment. Adjust front to rear decklevelness as follows:1. Place machine on a smooth level surface.2. Rotate outside blades so tips are pointed to thefront and rear of deck. Measure the distance fromblade tips to floor. The distance should be the same, orthe rear no more than 1/4” higher than the front. If therear blade tip is lower or is more than 1/4” higher thanthe front, proceed to next Step for adjustment.3. Remove the hair pin & washer from swivel locatedon lift rod. Remove swivel/lift rod from hanger bracket.4. Rotate swivel up or down to achieve the properlevelness.5. Reinstall swivel/lift rod into hanger bracket. Reinstallwasher & hair pin to secure swivel to hanger bracket.See Figure 4.7.REAR LIFT RODREMOVE WASHER & HAIR PIN& ROTATE SWIVEL UP OR DOWNFRONTLIFTRODSWIVELDECKBRACKETSWIVELREMOVE WASHER & HAIR PIN& ROTATE SWIVEL UP OR DOWNFIGURE 4.719