Printer Setup and Workflow for White Ink Printing - Support
Printer Setup and Workflow for White Ink Printing - Support
Printer Setup and Workflow for White Ink Printing - Support

You also want an ePaper? Increase the reach of your titles
YUMPU automatically turns print PDFs into web optimized ePapers that Google loves.
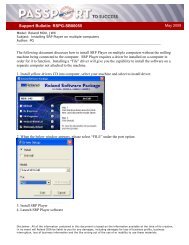
8. Select OK to save the changes you have made to the JobSettings.9. Print the <strong>White</strong> File.The printer will prefeed the amount of media needed,print the white ink, feed the media over the dryer, <strong>and</strong>after 15 minutes, return to the original media position inpreparation <strong>for</strong> printing the Color file. DO NOT removethe media at this time, if media is unloaded <strong>and</strong>reloaded, correct registration between the two files willbe shifted.Color File10. Add Color File to one of the Queues in VersaWorks.11. Double click on the Color File to access the job propertieswindow.12. Navigate to the Quality section, select the same media asyou did <strong>for</strong> the <strong>White</strong> file. ESP-CL : Clear PET Film or SP-CLT : PET Clear Film Adhesive13. Select CMYK [v] On<strong>White</strong> or CMYK [v] On<strong>White</strong> W-Pass asthe mode.14. Select Uni-Direction next to direction.15. Select OK to save the changes you have made to the JobSettings.16. Print the Color File.VersaWorks Settings <strong>and</strong> Procedures (white ink printed last) view throughapplications.Color File1. Add Color file to one of the Queues in VersaWorks.2. Double click on the Color file to access the Job Propertieswindow.3. Navigate to the Layout section <strong>and</strong> check the Mirrorselection.4. Navigate to the Quality section. Select either ESP-CL : ClearPET Film or SP-CLT : PET Clear Film Adhesive.5. Select CMYK [v] Under<strong>White</strong> or CMYK [v] Under<strong>White</strong> W-Pass as the mode.6. Select Uni-Direction next to direction.7. Navigate to the <strong>Printer</strong> Control section <strong>and</strong> check UseCustom Settings. Change the dry time to 15 minutes.8. Navigate to the Cut Controls section <strong>and</strong> check Return toOrigin After Print.