the UL1076 document. - DSX Access Systems, Inc.
the UL1076 document. - DSX Access Systems, Inc.
the UL1076 document. - DSX Access Systems, Inc.

Create successful ePaper yourself
Turn your PDF publications into a flip-book with our unique Google optimized e-Paper software.
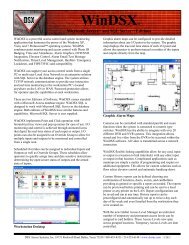
<strong>DSX</strong>-RMS1076Redundant Monitoring SystemUL 1076 Installation ManualAugust 2009Part # <strong>DSX</strong>-RMS1076 Manual Rev A<strong>DSX</strong> <strong>Access</strong> <strong>Systems</strong>, <strong>Inc</strong>. 10731 Rockwall Road Dallas, Texas 75238888-419-8353 Sales, Shipping and Accounting 800-346-5288 Technical Support214-553-6140 Phone www.dsxinc.com 214-553-0689 FAX<strong>DSX</strong>-RMS1076 12/09
ComplianceYou must consult your local fire codes before installing any locking device on doors, gates, or barriers.A construction and fire approval permit may be required before installing any equipment. Call yourlocal Fire Marshall for building code requirements in your area. For UL installations, you must install<strong>the</strong> <strong>DSX</strong> System according to <strong>the</strong> UL Installation Manual and in accordance with <strong>the</strong> National ElectricCode, ANSI / NFPA 70 regulations and recommendations for US Installations. Canadian installationsmust be in accordance with <strong>the</strong> Canadian Electric Code C22.1.The <strong>DSX</strong>-1022, <strong>DSX</strong>-1040CDM, <strong>DSX</strong>-1040PDM, <strong>DSX</strong>-1042, <strong>DSX</strong>-1043, <strong>DSX</strong>-1044, <strong>DSX</strong>-CKI-C,<strong>DSX</strong>CKI-K, <strong>DSX</strong>-DP485 and <strong>DSX</strong>-FRB8 have been tested and found to conform to <strong>the</strong> requirementsof UL 294.The <strong>DSX</strong>-1022, <strong>DSX</strong>-1040CDM, <strong>DSX</strong>-1040PDM, <strong>DSX</strong>-1042, <strong>DSX</strong>-1043, <strong>DSX</strong>-1044, <strong>DSX</strong>-1040-PE-B,<strong>DSX</strong>MCI, <strong>DSX</strong>-LAN, <strong>DSX</strong>-SPS and <strong>DSX</strong>-2PC have been tested and found to conform to <strong>the</strong>requirements of UL 1076.Camera and DVR integration was not tested by UL.
Table of Contents1076 and High Availability OverviewsUL-1076 Requirements ..................................................................................................................... 3High Availability of Communications through <strong>DSX</strong>-RMS1076 Redundant Monitoring System.......... 5High Availability of DataBase using SQL Server 2005 Fail Over Clustering...................................... 6How Failover Clustering Works ......................................................................................................... 7Client Connections and SQL Server 2005 Virtual Server.................................................................. 7<strong>DSX</strong>-RMS1076 Typical Application................................................................................................... 8<strong>DSX</strong>-RMS1076 and SQL ConfigurationExample of Clustered SQL Servers................................................................................................... 9Important Configuration Facts........................................................................................................... 9Create a File Share on <strong>the</strong> Virtual Server.......................................................................................... 10Install Win<strong>DSX</strong> SQL into <strong>the</strong> File Share ............................................................................................ 11Configure SQL 2005.......................................................................................................................... 12Loading Win<strong>DSX</strong>SQL on Primary Comm Server............................................................................... 15Loading Win<strong>DSX</strong>SQL on Backup Comm Server............................................................................... 15Configuring Win<strong>DSX</strong> on Backup Comm Server ................................................................................ 16<strong>DSX</strong> Serial Port Switcher and <strong>DSX</strong>-MCI connections<strong>DSX</strong> Serial Port Switcher .................................................................................................................. 17<strong>DSX</strong>-SPS .......................................................................................................................................... 17<strong>DSX</strong>-SPST ........................................................................................................................................ 17<strong>DSX</strong>-2PC........................................................................................................................................... 17<strong>DSX</strong> Serial Port Switcher Typical Application drawing ...................................................................... 18<strong>DSX</strong> Serial Port Switcher Wiring Diagram......................................................................................... 19<strong>DSX</strong>-MCI Master Communications Interface module........................................................................ 203
UL-1076 RequirementsBasic Requirements1) Data Processing equipment and officeappliance and business equipment usedas central supervisory station equipmentshall comply with:A) The Standard for OfficeAppliances and BusinessEquipment, UL114B) The Standard for Information-Processing and BusinessEquipment, UL478 orC) The Standard for InformationTechnology Equipment, UL19502) The minimum PC Requirements are asfollows:SQL ServersA) Microsoft Server 2003B) SQL Server 2005 Enterprise Sp3C) Pentium 4 - 3GHzD) 1 G MemoryE) Dell Power Vault 220F) 20 Gig disk storage spaceComm ServersA) Microsoft XP SP2 / VistaBusiness Sp1G) Pentium 4 - 3GHzH) 1 G Memory3) The system shall utilize supply linetransient protection complying with <strong>the</strong>Standard for Transient Voltage SurgeSuppressors, UL1449 with a maximummarked rating of 330V.4) The system shall utilize signal linetransient protection complying with <strong>the</strong>Standard for Protectors of DataCommunications and Fire AlarmCircuits, UL 497B, with a maximummarked rating of 50V.5) Modem and Telco communicationsshould not be used for UL Installations.6) The <strong>DSX</strong> Communications Servers andall o<strong>the</strong>r PC related equipment shall beinstalled in a temperature controlledenvironment. The TemperatureControlled Environment must bemaintained between 13-35C (55-95 F)by <strong>the</strong> HVAC System. The HVACSystem must have 24 hours of standbypower. The Standby Power System for<strong>the</strong> HVAC System may be supplied byan Engine Driven Generator alone. Astandby battery in not required to beused.7) All receiving equipment shall becompletely duplicated with provision forswitchover to <strong>the</strong> backup system within30 seconds. The backup system shall befully operational within 6 minutes of <strong>the</strong>loss of <strong>the</strong> primary system. This allows30 seconds for <strong>the</strong> backup system to befully energized and connected tonecessary communication lines ando<strong>the</strong>r devices, followed by 51/2 minutesfor <strong>the</strong> system to boot up, conductmemory tests, file system check,security verifications and prepare for fullsystem operation. The Backup computershall have <strong>the</strong> capabilities of <strong>the</strong>Primary, such as memory, speed and<strong>the</strong> like.8) There will be a minimum of one ULListed Reports Printer.9) Failure of <strong>the</strong> Main Computer System,hard disk, and alarm monitor shall resultin switchover to <strong>the</strong> backup system andshall be indicated by an audible orobvious visual indication.10) A Fault Tolerant System may be used inplace of complete duplication of <strong>the</strong>system if every component in <strong>the</strong> fault4
tolerant system, including <strong>the</strong> softwareand <strong>the</strong> power supply, is duplicated.11) In addition to <strong>the</strong> main power supply andsecondary power supply that arerequired to be provided at <strong>the</strong> centralsupervisory station, <strong>the</strong> system shall beprovided with an uninterruptible powersupply (UPS) with sufficient capacity tooperate <strong>the</strong> computer equipment for aminimum of 15 minutes. If more than 15minutes is required for <strong>the</strong> secondarypower supply to supply <strong>the</strong> UPS inputpower, <strong>the</strong> UPS shall be capable ofproviding input power for at least thatamount of time.12) The UPS shall comply with <strong>the</strong> Standardfor Uninterruptible Power SupplyEquipment, UL 1778, or <strong>the</strong> Standard forFire Protective Signaling Devices, UL1481.13) There shall be a means fordisconnecting <strong>the</strong> input to <strong>the</strong> UPS whilemaintaining continuity of power to <strong>the</strong>automation system.14) The communications polling from <strong>the</strong>Comm Server to <strong>the</strong> Location Mastercontroller cannot be less than onceevery two hundred seconds.15) Signal Priority must always be Alarmfirst, Trouble second, andSupplementary third.16) Abort Delay Time of Entry Exit Doorsshall not exceed 60 seconds.19) Protection for <strong>the</strong> system is intended tobe set from <strong>the</strong> monitoring equipmentonly.20) This application requires Win<strong>DSX</strong> SQLSoftware 4.8.73 or higher.SQL Server RequirementsThis product requires advanced knowledge ofMicrosoft Server 2003 and Microsoft SQLServer 2005 . It is <strong>the</strong> responsibility of you<strong>the</strong> Dealer, or your customer <strong>the</strong> End User, tohave <strong>the</strong> personnel or access to <strong>the</strong> personnelthat are qualified to Install, Configure, andMaintain Microsoft SQL Server in a clusteredenvironment. <strong>DSX</strong> provides <strong>document</strong>ation thatwill assist in creating and configuring <strong>the</strong>Microsoft SQL Server database required by<strong>the</strong> Win<strong>DSX</strong> SQL software.<strong>DSX</strong> tech support CANNOT provide support forMicrosoft SQL Server in a cluster. You musthave someone on hand that can provide <strong>the</strong>SQL Server and networking expertise that willbe required. You will not be able to just “Figure ItOut When You Get There”. SQL Server in acluster is complicated; you cannot just wing itand expect <strong>the</strong> system to perform properly. Ifyou do not have someone on staff with thisknowledge it is strongly recommended that youpay someone to help you.17) The number of Monitored Inputs cannotexceed 1000 per location.18) Any Communications Failure shall betreated as a compromise of <strong>the</strong>Standard Line Security of <strong>the</strong> proprietaryburglar alarm system.5
High Availability through <strong>DSX</strong>-RMS1076Redundant Monitoring SystemCommunications OverviewThe <strong>DSX</strong>-RMS1076 Redundant MonitoringSystem provides continued availability ofSystem Communications and Control through<strong>the</strong> implementation of Primary and BackupCommunication Server PCs. Available only withWin<strong>DSX</strong> SQL <strong>the</strong> Hot-Swap Supervisorprogram runs on <strong>the</strong> Backup Comm Server PCand monitors <strong>the</strong> Primary Comm Server. When<strong>the</strong> Primary fails all communications areredirected to <strong>the</strong> Backup (Redundant) CommServer.LAN connected locations are transparentlytransferred to <strong>the</strong> Backup Server and with <strong>the</strong>use of a <strong>DSX</strong>-SPS Serial Port Switcher alldirect serial port connected Locations are alsoswitched automatically. Win<strong>DSX</strong> SQLWorkstations automatically switch to <strong>the</strong>Backup Server and continually display whichComm Server <strong>the</strong>y are talking to. This featurerequires <strong>the</strong> purchase of <strong>the</strong> Hot Swap CommServer software and optionally <strong>the</strong> <strong>DSX</strong>-SPSSerial Port Switcher.Both Comm Servers are defined in <strong>the</strong> system asei<strong>the</strong>r <strong>the</strong> Primary or Backup Comm Server andboth PCs have static TCP/IP addresses. BothPCs are running at all times. The Backup CommServer PC runs <strong>the</strong> Hot Swap Supervisorsoftware. The Supervisor Software polls <strong>the</strong>Primary Comm Server. Once <strong>the</strong> polls have failedfor a predetermined amount of time <strong>the</strong>Supervisor Program starts an instance of CommServer on <strong>the</strong> Backup PC. The SupervisorSoftware also initiates any hardware switch overthat needs to take place (direct connects) bysending <strong>the</strong> appropriate commands out a serialport to <strong>the</strong> <strong>DSX</strong>-SPS Serial Port Switcher.The Workstation program on all PCs in<strong>the</strong> system will automatically switch to <strong>the</strong>Backup Comm Server when <strong>the</strong> PrimaryComm Server fails. The Workstationprogram has a real time status displaythat shows which Comm Server is online.The Hot Swap Supervisor Software has aStop button that allows <strong>the</strong> BackupComm Server to be shut down, <strong>the</strong>Primary Comm Server to be restarted,and <strong>the</strong> serial port connectedcommunications to be returned to <strong>the</strong>Primary Comm Server.LAN connected Location MasterControllers must have a Dynamic IPMode connection that automaticallycommunicate with <strong>the</strong> Backup CommServer PC.Each <strong>DSX</strong>-SPS will accommodate <strong>the</strong>switching of up to 20 serial ports from <strong>the</strong>Primary Comm Server to <strong>the</strong> BackupComm Server. More than one SPS canbe used where more than 20 serial portsare required.Requirements1. <strong>DSX</strong>-RMS1076 only works with Win<strong>DSX</strong>SQL.2. Backup Comm Server must have 1 moreserial port than what is required for <strong>the</strong> PrimaryComm Server when switching communicationsto direct serial port connected locations.3. The shared Win<strong>DSX</strong> SQL folder must be on<strong>the</strong> SQL Virtual Server.4. The Primary and Backup Comm Server PCsboth require Static TCP/IP addresses.5. LAN modules must be programmed forDynamic communications so that <strong>the</strong>y canrespond to both <strong>the</strong> Primary and BackupComm Servers.6. The Hot Swap Comm Server program isloaded on <strong>the</strong> Backup Comm Server PC.7. The USB Key and Keymon are also run on<strong>the</strong> Backup Comm Server.6
High Availability of DataBaseusing SQL Server 2005 Failover ClusteringFailover Clustering OverviewContinuous uptime in a production environmentis becoming a common security requirement.This information describes Microsoft® SQLServer 2005 failover clustering, one methodof creating high availability. Failover clusteringis available only in SQL Server 2005 EnterpriseEdition.Failover clustering is a process in which <strong>the</strong>operating system and SQL Server 2005 worktoge<strong>the</strong>r to provide availability in <strong>the</strong> event ofan application failure, hardware failure, oroperating-system error. Failover clusteringprovides hardware redundancy through aconfiguration in which mission critical resourcesare transferred from a failing machine to anequally configured server automatically.Failover clustering also allows systemmaintenance to be performed on one computerwhile ano<strong>the</strong>r computer (node) does <strong>the</strong> work.This benefit can also ensure that systemdowntime due to normal maintenance isminimized.The goal of failover clustering is to provide highavailability for an overall solution thataccommodates backups, redundancy, andperformance. If software and/or hardwareproblems occur, failover clustering can enablea production environment to stay up andrunning.7
How Failover Clustering WorksThe clustered nodes use a heartbeat (seediagram on previous page) to check whe<strong>the</strong>reach node is alive, at both <strong>the</strong> operatingsystem and SQL Server level. At <strong>the</strong> operatingsystem level, <strong>the</strong> nodes in <strong>the</strong> cluster competefor <strong>the</strong> resources of <strong>the</strong> cluster. The primarynode reserves <strong>the</strong> resource every 3 seconds,and <strong>the</strong> competing node every 5 seconds. Theprocess lasts for 25 seconds and <strong>the</strong>n startsover again. For example, if <strong>the</strong> node owning<strong>the</strong> instance fails due to a problem (network,disk, and so on), at second 19, <strong>the</strong> competingnode detects it at <strong>the</strong> 20-second mark, and if itis determined that <strong>the</strong> primary node no longerhas control, <strong>the</strong> competing node takes over <strong>the</strong>resource.From a SQL Server perspective, <strong>the</strong> nodehosting <strong>the</strong> SQL Server resource does aLooks-Alive check every 5 seconds. This is alightweight check to see whe<strong>the</strong>r <strong>the</strong> service isrunning and may succeed even if <strong>the</strong> instanceof SQL Server is not operational. The IsAlivecheck is more thorough and involves running aSELECT @@SERVERNAME Transact SQLquery against <strong>the</strong> server to determine whe<strong>the</strong>r<strong>the</strong> server itself is available to respond torequests; it does not guarantee that <strong>the</strong> userdatabases are up. If this query fails, <strong>the</strong> IsAlivecheck retries five times and <strong>the</strong>n attempts toreconnect to <strong>the</strong> instance of SQL Server. If allfive retries fail, <strong>the</strong> SQL Server resource fails.Depending on <strong>the</strong> failover thresholdconfiguration of <strong>the</strong> SQL Server resource,Windows Clustering will attempt to ei<strong>the</strong>rrestart <strong>the</strong> resource on <strong>the</strong> same node or failover to ano<strong>the</strong>r available node. The executionof <strong>the</strong> query tolerates a few errors, such aslicensing issues or having a paused instance ofSQL Server, but ultimately fails if its thresholdis exceeded.Virtual Server will take a short time (probablyseconds). After <strong>the</strong> service is started and <strong>the</strong>master database is online, <strong>the</strong> SQL Serverresource is considered to be up. Now <strong>the</strong> userdatabases will go through <strong>the</strong> normal recoveryprocess, which means that any completedtransactions in <strong>the</strong> transaction log are rolledforward, and any incomplete transactions arerolled back. The length of <strong>the</strong> recovery processdepends on how much activity must be rolledforward or rolled back upon startup.Client Connections and SQL Server2005 Virtual ServersWin<strong>DSX</strong> SQL connects to a SQL Server 2005Virtual Server with <strong>the</strong> SQL Server Name or IPaddress of <strong>the</strong> SQL Server 2005 Virtual Server.The Cluster name, <strong>the</strong> Cluster IP address, oreven <strong>the</strong> individual node names are not usedby <strong>the</strong> connections. From a client or applicationperspective, it does not need to worry aboutwhich node owns <strong>the</strong> resources, becauseconnecting to <strong>the</strong> SQL Server 2005 VirtualServer appears as a normal SQL Server.During <strong>the</strong> failover process, any activeconnections are broken. Win<strong>DSX</strong> SQL checksto see whe<strong>the</strong>r <strong>the</strong> connection exists, and ifnot, reconnects.During <strong>the</strong> fail over from one node to ano<strong>the</strong>r,Windows clustering starts <strong>the</strong> SQL Serverservice for that instance on <strong>the</strong> new node, andgoes through <strong>the</strong> recovery process to start <strong>the</strong>databases. The fail over of <strong>the</strong> SQL Server8
<strong>DSX</strong>-RMS1076Typical ApplicationThis drawing shows <strong>the</strong> typicaldeployment of <strong>the</strong> <strong>DSX</strong>-RMS1076Redundant Monitoring System. Thisapplication depicts two Clustered SQLServer PCs and two Comm Server PCs.The Clustered SQL Servers provide highavailability to <strong>the</strong> DataBase for bothComm Servers and all Client PCs.The Hot Swap Comm Servers providehigh availability to systemcommunications and control betweensystem controllers and all Client PCs.LocationOneControllersFileServer<strong>DSX</strong>-LANModulesLocationTwoControllersBackupFile ServerCommunications to <strong>the</strong> LAN connectedcontrollers is seamlessly switched fromone Comm Server to <strong>the</strong> o<strong>the</strong>r.Communication to <strong>the</strong> direct connectedcontrollers is handled by <strong>the</strong> <strong>DSX</strong>-SerialPort Switcher.PrimaryComm ServerCommPortsBackupComm ServerNot requiredfor LANConnectedLocations<strong>DSX</strong>-SPSLocationThreeControllersLocationFourControllers9
Example of Clustered SQL ServersImportant Configuration Facts<strong>DSX</strong> configured and tested Clustered SQLServers in <strong>the</strong> following manner. Listed belowis <strong>the</strong> equipment used and <strong>the</strong> configuration.PCs - 3 GHZ with 1G of RAM OS – Windows Server 2003 and MS SQLServer 2005 Enterprise. Dell Power Vault 220 shared drive array.The Power Vault can handle up to 14 drivesbut you lose 1 slot when you cluster <strong>the</strong> array.The Power Vault has two drives that aremirrored for <strong>the</strong> quorum files that <strong>the</strong> Clusteradministrator uses. It also has 3 drives that areconfigured Raid 5 for <strong>the</strong> SQL server data files.This raid drive also has our file share resourceso that when <strong>the</strong> SQL server fails over so doesour shared folder. You could also have ano<strong>the</strong>r3 drives for <strong>the</strong> SQL transaction logs if youwanted. There are several hotswap drives forfailover redundancy. Each PC has an LSI MegaRaid card thattalks to <strong>the</strong> PowerVault controller. You couldalso use a Perc Raid controller from Dell. Theimportant thing with <strong>the</strong>se cards is that <strong>the</strong>y areCluster aware and cluster capable. When youconfigure <strong>the</strong> cards <strong>the</strong>y must have a uniqueLUN so one card is LUN 6 and <strong>the</strong> o<strong>the</strong>r cardis LUN 7. Win<strong>DSX</strong> is not compatible withWindows 95, Windows 98, Windows ME,or Windows XP Home Edition, Linux, or<strong>the</strong> MAC operating systems. Win<strong>DSX</strong> SQL must use <strong>the</strong>Enterprise Edition of SQL Server. When using Windows XP turn offSimple File Sharing. You must have Administrator Rightsto properly install <strong>the</strong> Win<strong>DSX</strong> software. To run <strong>the</strong> programs, <strong>the</strong> User musthave Full Control over <strong>the</strong> local folderwhere <strong>the</strong> Win<strong>DSX</strong> software is installed,Full Control over <strong>the</strong> shared resource(Database Path) folder, Full Control over<strong>the</strong>ir Temp folders, and Read rights on<strong>the</strong> local System32 folder underWindows. UNC (Universal Naming Convention– ie \\FileServer\Win<strong>DSX</strong> ) must beused for <strong>the</strong> database path. The Comm Server must have a staticTCP/IP address. The Workstations canbe DHCP.\\\ Both PC’s run <strong>the</strong> cluster administrationprogram and are capable of taking control of<strong>the</strong> cluster. We are using SQL server in anActive/Passive setup. Since this is a standalone system both PC’s are domain controllersand run Active Directory as well as DNSservers. The Heartbeat is facilitated by using asecond Network card in both PCs connectedtoge<strong>the</strong>r via a network HUB.10
<strong>DSX</strong>-SPS Create Serial a File Port Share Switcher &on Two <strong>the</strong> Port Virtual Controller ServerAt this point you have <strong>the</strong> two SQL ServersClustered toge<strong>the</strong>r and ready to start with<strong>the</strong> Win<strong>DSX</strong> specific configuration.First create a file share on <strong>the</strong> virtual serverthat was used for <strong>the</strong> SQL Server DataFiles.1. Open Windows Explorer and create afolder on a shared disk that you want toshare out for users.2. Assign <strong>the</strong> appropriate NTFS file levelpermissions on <strong>the</strong> folder. Make sure that<strong>the</strong> account used to start <strong>the</strong> Cluster Servicehas at least READ rights to <strong>the</strong> folder.Note Do not share <strong>the</strong> folder in WindowsExplorer as you normally would for a fileshare. If you do not grant <strong>the</strong> Clusteraccount <strong>the</strong> appropriate permissions orshare <strong>the</strong> folder through Windows Explorer,it may cause <strong>the</strong> cluster file share to fail.This also includes any administrative sharesthat already exist, you do not want to createshares for <strong>the</strong> root of <strong>the</strong> drive (Q$) forexample.3. Start Cluster Administrator(CluAdmin.exe).4. Select a group that has an existing IPAddress and Network Name resources. If youdo not have <strong>the</strong>se resources created, you willneed to complete this before continuing. Foradditional information, see <strong>the</strong> article numberbelow in <strong>the</strong> Microsoft Knowledge Base:257932(http://support.microsoft.com/kb/257932/)Using Microsoft Cluster Server to create avirtual server.5. Right-click, and select New, <strong>the</strong>nResource.6. Fill in an administrative name anddescription for <strong>the</strong> resource. From <strong>the</strong>11Resource Type pull down, select "FileShare", click Next.Note This is <strong>the</strong> name that will be displayedin Cluster Administrator and is only used foradministrative purposes. This is not <strong>the</strong>share name that users will connect to, give<strong>the</strong> resource a name that will be easy toidentify and manage.7. Select <strong>the</strong> nodes that you want to bepossible owners of <strong>the</strong> resource. Click Nextto leave all nodes as possible owners.Note Possible Owners defines whe<strong>the</strong>r aresource is ever able to failover to a specificnode. Use extreme caution in definingPossible Owners because defining apossible owner for a single resource willaffect <strong>the</strong> failover for <strong>the</strong> entire group.8. Select a Network Name and Physical Diskresource that <strong>the</strong> file share will be dependenton.Note Dependencies serve two functions.a. They define <strong>the</strong> bindings for a resource. Youwant <strong>the</strong> file share to be dependent on <strong>the</strong>Network Name resource that clients are goingto use when connecting to <strong>the</strong> file share. TheIP Address resource that <strong>the</strong> Network Nameresource is dependent upon is <strong>the</strong> IP Addressthat will be used when connecting to this share.You never want a file share resource to bedependent on <strong>the</strong> "Cluster Name" resource.b. They define <strong>the</strong> start order for a resource.You want to make sure that <strong>the</strong> network namethat <strong>the</strong> share is going to be created under and<strong>the</strong> physical disk where <strong>the</strong> folder resides thatis going to be shared are online and availablebefore attempting to bring <strong>the</strong> File Shareonline.When creating a dependency 'Tree' it is best tokeep it as simple as possible. A file shareresource should always be dependent on aNetwork Name that <strong>the</strong> clients will use toconnect to this share and Physical diskresource where <strong>the</strong> folder is located. ThePhysical Disk resource should never be
dependent on anything. The Network Nameresource should be dependent on a IP Addressresource which <strong>the</strong> virtual server will beassociated with. The IP Address resourceshould not be dependent on anything. See <strong>the</strong>following article for additional information:171791(http://support.microsoft.com/kb/171791/) Creating dependencies in MicrosoftCluster Server)9. On <strong>the</strong> File Share Parameters screen fill in<strong>the</strong> following information and click Finish:a. The "Share Name" is <strong>the</strong> name of <strong>the</strong> sharethat will be created for <strong>the</strong> UNC when clientsconnect. This needs to be a valid NetBIOSname, and is recommended to be a valid URLname as well.b. The "Path" is <strong>the</strong> full path on <strong>the</strong> localnode to <strong>the</strong> shared disk where <strong>the</strong> folder islocated. For example: T:\Users.c. The "Comment" is <strong>the</strong> information about<strong>the</strong> share that will appear when a clientbrowses <strong>the</strong> share.10. By default, when resources are created,<strong>the</strong>y are in an offline state. The following stepsare a best practice. Follow <strong>the</strong>m to isolate <strong>the</strong>effect of <strong>the</strong> resource failure on o<strong>the</strong>rproduction resources. This will help until <strong>the</strong>resource is ready to be brought into productionfor users.Install Win<strong>DSX</strong> in File ShareBefore Installing <strong>the</strong> Software in <strong>the</strong> VirtualServer File Share you must login as a user withfull administrator rights. Make sure that <strong>the</strong>Temp and TMP settings are pointed to anactual directory. This is found in ControlPanel/System/Environment.1. To load <strong>the</strong> software, place <strong>the</strong> Win<strong>DSX</strong> CDin <strong>the</strong> CD-ROM Drive. Select “My Computer”on <strong>the</strong> desktop <strong>the</strong>n right click on <strong>the</strong> CD-ROMDrive and select explore. Navigate to <strong>the</strong> InstallDirectory. Open <strong>the</strong> Install Directory anddouble click on Setup.exe. Follow <strong>the</strong>prompts and allow setup to install <strong>the</strong> softwareinto <strong>the</strong> Win<strong>DSX</strong> directory on <strong>the</strong> file share thatwe just created.2. After loading <strong>the</strong> software be sure and run<strong>the</strong> Database program (DB.EXE) first from <strong>the</strong>directory where <strong>the</strong> software was just loaded.After starting <strong>the</strong> database program for <strong>the</strong> firsttime, set <strong>the</strong> DataBase Path to <strong>the</strong> file share on<strong>the</strong> virtual server. Also be sure to assign <strong>the</strong>PC a unique Workstation Name and Numbero<strong>the</strong>r than Workstation 1 and #1. The defaultuser name and <strong>the</strong> default password aremaster - both entered in lower case.a. Right-click <strong>the</strong> resource, and <strong>the</strong>n clickProperties.b. Click <strong>the</strong> Advanced tab, click to select <strong>the</strong>Do not restart button, and <strong>the</strong>n click OK.c. Bring <strong>the</strong> resource online. Make sure that itfunctions correctly.d. After you confirm that <strong>the</strong> resource functionscorrectly, and you are ready to bring it intoproduction, take <strong>the</strong> resource offline. Then,click to select <strong>the</strong> Restart button.e. Bring <strong>the</strong> resource online.12
Configure SQL 2005Use <strong>the</strong>se instructions for setting up Win<strong>DSX</strong>on a Microsoft SQL Server 2005.2. Using <strong>the</strong> Management Studio create anew database called AcsData and save. Set<strong>the</strong> initial size to be 100 Meg. Turn on <strong>the</strong>Automatic File Growth and set <strong>the</strong> growth tomegabytes and 1 Meg. Select unrestricted filegrowth.This product requires advanced knowledge ofMicrosoft SQL Server and Networks. Thisproduct requires advanced configuration. TheDealer or End User must have a Microsoft SQLServer Administrator to install, configure, andmaintain <strong>the</strong> SQL Server on site.1. Using <strong>the</strong> Management Studio, right clickon <strong>the</strong> Name of <strong>the</strong> Server and selectProperties. Make <strong>the</strong> following settings.3. Using <strong>the</strong> Management Studio create anew database called AcsLog. Set <strong>the</strong> initial sizeto be 200 Meg. Turn on <strong>the</strong> Automatic FileGrowth and set <strong>the</strong> growth to By Percent andset <strong>the</strong> percent to 10. Select unrestricted filegrowth.Set for Windows Au<strong>the</strong>ntication13
4. From <strong>the</strong> Management Studio right click onAcsData and select New Query.7. From <strong>the</strong> Management Studio right click onAcsLog and select New Query.5. Next Select File/Open and navigate to <strong>the</strong>virtual server directory where you installed <strong>the</strong>Win<strong>DSX</strong> SQL software. If you have alreadyattempted to run <strong>the</strong> Win<strong>DSX</strong> databaseprogram you will find a sub directory nameMdbStruc. Inside this directory you will find afile called SqlDb.sql. If you do not see <strong>the</strong> subdirectory <strong>the</strong>n we need to run <strong>the</strong> DBSQL.exefile and <strong>the</strong>n cancel at <strong>the</strong> login screen. Nowopen <strong>the</strong> SQLDB.sql file with <strong>the</strong> queryanalyzer.6. Once <strong>the</strong> file has been loaded click onExecute Script in <strong>the</strong> tool bar. This will instruct<strong>the</strong> Query Analyzer to run <strong>the</strong> script. The scriptwill create <strong>the</strong> structures of <strong>the</strong> AcsDatadatabase.8. Next Select File/Open and navigate to <strong>the</strong>virtual server directory where you installed <strong>the</strong>Win<strong>DSX</strong> SQL software. In that directory youwill find a sub directory name MdbStruc. Insidethis directory you will find a file calledSqlLog.sql. Open <strong>the</strong> SqlLog.sql file with <strong>the</strong>query analyzer.9. Once <strong>the</strong> file has been loaded click onExecute Script in <strong>the</strong> tool bar. This will instruct<strong>the</strong> Query Analyzer to run <strong>the</strong> script. The scriptwill create <strong>the</strong> structures of <strong>the</strong> AcsLogdatabase.10. From <strong>the</strong> Management Studio selectSecurity/Logins. Right click and select NewLogin.14
11. Provide a Name that you wish to use forlogging into <strong>the</strong> SQL server from <strong>the</strong>workstations. Select AcsData as <strong>the</strong> defaultdatabase.13. The first time that you run <strong>the</strong> DbSql.exeprogram <strong>the</strong>re will be a short delay and it willpresent a SQL login screen. You enter <strong>the</strong>EXACT name of <strong>the</strong> SQL Server. Once thisdata is entered successfully <strong>the</strong> system willstore it and you will not need to login again.This will need to be done at each Workstation.Note /// Win<strong>DSX</strong> SQL Version 4.7 and higherrequires <strong>the</strong> Software Key Monitor program(KeyMon.exe) and <strong>the</strong> USB Software Key to beinstalled on any PC in <strong>the</strong> System but in thisapplication it must be on <strong>the</strong> Backup Comm.Server.12. Select User Mapping and assign <strong>the</strong>following databases to <strong>the</strong> Login and set <strong>the</strong>appropriate permissions as below.Note/// For Windows Au<strong>the</strong>ntication or NamedPipes select Windows Au<strong>the</strong>ntication. Thisrequires more setup in Windows and AD. Whensetting up <strong>the</strong> Client PCs <strong>the</strong> first timeDBSQL.exe is started it will launch SQLSetup.Enter <strong>the</strong> Name of <strong>the</strong> SQL Server. Do notenter a User Name or Password. Rights andpermissions must be given to <strong>the</strong> user in AD.This will be done on all PCs <strong>the</strong> first time <strong>the</strong>program is run.15
Loading Win<strong>DSX</strong> onPrimary Comm ServerLoading Win<strong>DSX</strong> onBackup Comm ServerBefore Installing <strong>the</strong> Software you must loginas a user with full administrator rights. Makesure that <strong>the</strong> Temp and TMP settings arepointed to an actual directory. This is found inControl Panel/System/Environment.1. To load <strong>the</strong> software, place <strong>the</strong> Win<strong>DSX</strong> CDin <strong>the</strong> CD-ROM Drive. Select “My Computer”on <strong>the</strong> desktop <strong>the</strong>n right click on <strong>the</strong> CD-ROMDrive and select explore. Navigate to <strong>the</strong> InstallDirectory. Open <strong>the</strong> Install Directory anddouble click on Setup.exe. Follow <strong>the</strong>prompts and allow setup to install <strong>the</strong> softwareinto <strong>the</strong> local hard drive of this pc.2. After loading <strong>the</strong> software be sure and run<strong>the</strong> Database program (DBSQL.EXE) first from<strong>the</strong> directory where <strong>the</strong> software was justloaded. After starting <strong>the</strong> database program for<strong>the</strong> first time, set <strong>the</strong> DataBase Path on eachPC to <strong>the</strong> file share created in step 1. Also besure to assign <strong>the</strong> PC a unique WorkstationName and Number o<strong>the</strong>r than Workstation 1and #1. The default user name and <strong>the</strong> defaultpassword are master - both entered in lowercase.Before Installing <strong>the</strong> Software you must loginas a user with full administrator rights. Makesure that <strong>the</strong> Temp and TMP settings arepointed to an actual directory. This is found inControl Panel/System/Environment.1. To load <strong>the</strong> software, place <strong>the</strong> Win<strong>DSX</strong> CDin <strong>the</strong> CD-ROM Drive. Select “My Computer”on <strong>the</strong> desktop <strong>the</strong>n right click on <strong>the</strong> CD-ROMDrive and select explore. Navigate to <strong>the</strong> InstallDirectory. Open <strong>the</strong> Install Directory anddouble click on Setup.exe. Follow <strong>the</strong>prompts and allow setup to install <strong>the</strong> softwareinto <strong>the</strong> local hard drive of this pc.2. After loading <strong>the</strong> software be sure and run<strong>the</strong> Database program (DBSQL.EXE) first from<strong>the</strong> directory where <strong>the</strong> software was justloaded. After starting <strong>the</strong> database program for<strong>the</strong> first time, set <strong>the</strong> DataBase Path on eachPC to <strong>the</strong> file share created in step 1. Also besure to assign <strong>the</strong> PC a unique WorkstationName and Number o<strong>the</strong>r than Workstation 1and #1. The default user name and <strong>the</strong> defaultpassword are master - both entered in lowercase.16
Configuring Win<strong>DSX</strong> onBackup Comm ServerOn <strong>the</strong> backup Comm Server we need to runDBSql.exe from <strong>the</strong> local hard drive and enter<strong>the</strong> SQL Server Login and password. When <strong>the</strong>Win<strong>DSX</strong> Login appears select cancel to close.1. Load <strong>the</strong> USB Key – Hasp Driver –Hdd32.exe located in <strong>the</strong> Win<strong>DSX</strong> SQLfolder on <strong>the</strong> Backup Comm Server.After <strong>the</strong> driver has been loaded plug <strong>the</strong>USB Key into an available USB port on<strong>the</strong> Backup Comm Server.2. Run <strong>the</strong> Keymon.exe program located in<strong>the</strong> Win<strong>DSX</strong> SQL folder on <strong>the</strong> BackupComm Server.3. Copy <strong>the</strong> HotSwap.msi installation filefrom <strong>the</strong> \Utilities folder located on <strong>the</strong>Win<strong>DSX</strong>SQL CD to <strong>the</strong> Win<strong>DSX</strong>SQLfolder on <strong>the</strong> Backup Comm Server andinstall it into that same folder.C. On <strong>the</strong> CommunicationsServer Tab enter <strong>the</strong> “TCP/IPAddress” of this Backup CommServer PC.D. Close and restart <strong>the</strong> program.6. Start <strong>the</strong> HotSwap.exe program in <strong>the</strong>Win<strong>DSX</strong> SQL folder on <strong>the</strong> BackupComm. Server by double clicking on it.A. Close <strong>the</strong> program.B. In <strong>the</strong> Win<strong>DSX</strong> SQL folder<strong>the</strong>re will now be aHotSwapIni.txt file.C. Edit <strong>the</strong> file and change <strong>the</strong> P0to a P1 or P2 to reflect <strong>the</strong>comm. Port that is connectedto <strong>the</strong> <strong>DSX</strong>-SPS.D. Save <strong>the</strong> file and close it and<strong>the</strong>n Restart <strong>the</strong> HotSwap.exeprogram.7. If using <strong>the</strong> <strong>DSX</strong>-SPS Serial PortSwitcher for direct connected locationsmake those connections now as shownin <strong>the</strong> next section.4. From <strong>the</strong> Win<strong>DSX</strong> SQL folder on <strong>the</strong>Backup Comm Server start <strong>the</strong> databaseprogram by double clicking onDBSql.exe. Login and selectSystem\Setup\DataBase Path and set<strong>the</strong> SQL Server name and <strong>the</strong> path to<strong>the</strong> shared folder. Close and restart <strong>the</strong>program.5. Start and Login to <strong>the</strong> Win<strong>DSX</strong> SQLDataBase program. SelectSystem\Setup\System Parameters andedit <strong>the</strong> Workstation Name.A. On <strong>the</strong> General Tab make sure<strong>the</strong> Workstation Name andNumber are unique to all o<strong>the</strong>rWin<strong>DSX</strong> SQL softwareinstallations.B. On <strong>the</strong> Yes/No Options Tabselect “This PC is BackUpComm Server”17
<strong>DSX</strong> Serial Port Switcher<strong>DSX</strong>-SPSThe <strong>DSX</strong>-SPS Serial Port Switcher is <strong>the</strong>hardware that physically switches serial portsfrom a Primary Comm Server to a Backup(Redundant) Comm Server. This occurs inconjunction with <strong>the</strong> Hot Swap Comm Serversoftware that monitors <strong>the</strong> Primary CommServer. When <strong>the</strong> Primary Comm Server fails,<strong>the</strong> Backup Comm Server computer takes over.The HotSwap program running on <strong>the</strong> BackupComm Server sends an ASCII string to <strong>the</strong>SPST module telling it to activate. The SPST inturn signals <strong>the</strong> individual 2PC modules toswitch from Primary to Secondary serial ports.When <strong>the</strong> HotSwap.exe program is instructedto return to <strong>the</strong> Primary Comm Server, <strong>the</strong>Backup Comm Server sends ano<strong>the</strong>r string to<strong>the</strong> SPST to deactivate, <strong>the</strong>reby switchingeverything back to <strong>the</strong> Primary serial ports. Upto 10 <strong>DSX</strong>-2PC modules can be used to switcha total of 20 serial ports per SPS.<strong>DSX</strong>-2PCThe <strong>DSX</strong>-2PC (Two Port Controller) is whereeach serial port from <strong>the</strong> Primary Comm Serverand <strong>the</strong> corresponding serial port from <strong>the</strong>Backup Comm Server connect. The output of<strong>the</strong> 2PC <strong>the</strong>n goes to a direct connect <strong>DSX</strong>controller. This board physically switches <strong>the</strong>circuits from one PC to <strong>the</strong> o<strong>the</strong>r. Each 2PCmodule can switch 2 serial ports. The 2PCrequires +12VDC@56ma for power and has 2trigger inputs that connect to <strong>the</strong> SPST module.Each port on <strong>the</strong> 2PC can be triggeredindependently.Power Requirements<strong>DSX</strong>-SPST – 616ma @12VDC<strong>DSX</strong>-2PC – 56ma@12VDC<strong>DSX</strong>-MCI – 30ma@12VDC<strong>DSX</strong>-LAN – 300ma@12VDC<strong>DSX</strong>-SPSTThe <strong>DSX</strong>-SPST (Serial Port Switch Trigger)board is <strong>the</strong> power distribution and BackupComm Server monitoring board. It recieves+15VDC (Class II Power Limited) from <strong>the</strong><strong>DSX</strong>-1040PDM board and distributes it to <strong>the</strong>2PC boards through 4 - 12VDC, 1A fusedoutputs. The SPST board has an RS-232 portthat connects to an extra port on <strong>the</strong> BackupComm Server. This is <strong>the</strong> port which sends <strong>the</strong>“activate” command. The SPST also has 4relay outputs that are used to “trigger” <strong>the</strong> 2PCboards when <strong>the</strong> “activate” command isreceived.18
<strong>DSX</strong> Serial Port SwitcherTypical Application19
<strong>DSX</strong> Serial Port SwitcherWiring DiagramConnectionsDB-25 DB-9TX -2 -3RX -3 -2Gnd -7 -5DTR-20 -420
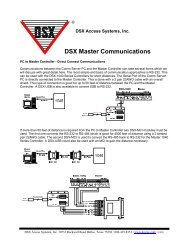
<strong>DSX</strong>-MCI MasterCommunications InterfaceThe <strong>DSX</strong>-MCI is a protocol independentcommunications device that converts RS-232data to RS-485.Mounting and PowerThe <strong>DSX</strong>-MCI is powered by <strong>the</strong> battery backedup 12VDC fused power of <strong>the</strong> <strong>DSX</strong> Controller it isconnected to.The <strong>DSX</strong>-MCI should be located in <strong>the</strong> <strong>DSX</strong>Controller Enclosure. The module can be easilylocated in <strong>the</strong> bottom of <strong>the</strong> enclosure.<strong>DSX</strong>-MCI to <strong>DSX</strong>-1022 ControllerPC to Master RS-485 Terminalsof <strong>DSX</strong>-1022 Master ControllerUp to 4000 feet using2 twisted pair 22 AWGTX+TX-1022PC-MASTER RS-4855150494851504948RX+RX-TX+TX-RX+RX-1Up to 50 feetUsing 2 pairshielded 22 AWG6 7 8 92 3 4 5RXTXGNDFemale12VDC Source12V+GNDRS-232 RXRS-232 TXRS-485 RX-RS-485 RX+RS-485 TX-RS-485 TX+PC / MODEMMCI<strong>DSX</strong>-MCI to <strong>DSX</strong>-1040 Series ControllerPC to Master RS-232 Terminalsof <strong>DSX</strong>-1040 Master Controller6 7 8 9Up to 50 feet using22 AWG, 2 Pair ShieldedMCIPC / MODEMRS-485 TX+RS-485 TX-RS-485 RX+RS-485 RX-RS-232 TXRS-232 RXGND12V+1040 SeriesMasterTX RX GNDMASTER12V+12 3 4 5RXTXGNDUp to 4000 feet using2 twisted pair 22 AWG12VDC of Source12V+GNDRS-232 RXRS-232 TXRS-485 RX-RS-485 RX+RS-485 TX-RS-485 TX+PC / MODEMMCI21