C Sta rt - Müller Elektronik
C Sta rt - Müller Elektronik
C Sta rt - Müller Elektronik

Create successful ePaper yourself
Turn your PDF publications into a flip-book with our unique Google optimized e-Paper software.
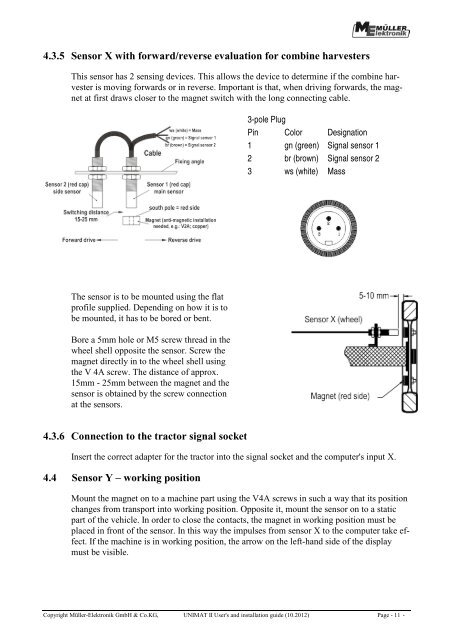
4.3.5 Sensor X with forward/reverse evaluation for combine harvesters<br />
This sensor has 2 sensing devices. This allows the device to determine if the combine harvester<br />
is moving forwards or in reverse. Impo<strong>rt</strong>ant is that, when driving forwards, the magnet<br />
at first draws closer to the magnet switch with the long connecting cable.<br />
The sensor is to be mounted using the flat<br />
profile supplied. Depending on how it is to<br />
be mounted, it has to be bored or bent.<br />
Bore a 5mm hole or M5 screw thread in the<br />
wheel shell opposite the sensor. Screw the<br />
magnet directly in to the wheel shell using<br />
the V 4A screw. The distance of approx.<br />
15mm - 25mm between the magnet and the<br />
sensor is obtained by the screw connection<br />
at the sensors.<br />
4.3.6 Connection to the tractor signal socket<br />
3-pole Plug<br />
Pin Color Designation<br />
1 gn (green) Signal sensor 1<br />
2 br (brown) Signal sensor 2<br />
3 ws (white) Mass<br />
Inse<strong>rt</strong> the correct adapter for the tractor into the signal socket and the computer's input X.<br />
4.4 Sensor Y – working position<br />
Mount the magnet on to a machine pa<strong>rt</strong> using the V4A screws in such a way that its position<br />
changes from transpo<strong>rt</strong> into working position. Opposite it, mount the sensor on to a static<br />
pa<strong>rt</strong> of the vehicle. In order to close the contacts, the magnet in working position must be<br />
placed in front of the sensor. In this way the impulses from sensor X to the computer take effect.<br />
If the machine is in working position, the arrow on the left-hand side of the display<br />
must be visible.<br />
Copyright <strong>Müller</strong>-<strong>Elektronik</strong> GmbH & Co.KG, UNIMAT II User's and installation guide (10.2012) Page - 11 -