You also want an ePaper? Increase the reach of your titles
YUMPU automatically turns print PDFs into web optimized ePapers that Google loves.
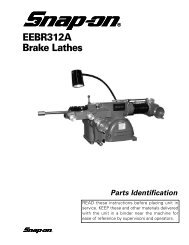
<strong>On</strong>-<strong>The</strong>-<strong>Vehicle</strong>Lathe to <strong>Vehicle</strong> Attachment8.0 Attach a chatter band to the rotor as shown. Thiswill help reduce any unwanted vibrations while refinishingthe rotor, resulting in a better surface finish.8.4 To attach the 800 brake lathe to the vehicle,approach the vehicle with the lathe tilted back on theportable stand system. This provides an easy engagementof the pilot nose into the hub adapter.Pilot Nose8.1 Always disconnect the twist-lock power cordfrom the 800 brake lathe when attaching or removingthe lathe from the vehicle.8.2. Lock the runout adjustment head using thelock pin (yellow).8.5 <strong>On</strong>ce initial engagement has been accomplished,tilt the 800 brake lathe forward mating theface of the lathe with the mounting face of the hubadapter. It may be necessary to rotate the hub adapterso the drive pin can engage one of the three driveholes in the lathe runout adjustment head.8.3 It may be necessary to rotate the runout adjustmenthead, using the motor handwheel, to engagethe lock pin (yellow).8.6 Screw the drivebar into the hub adapter usingthe drivebar star knob (black). Hand tighten; a firmhand tightening is all that is required.AMMCO 800 <strong>On</strong>-<strong>The</strong>-<strong>Vehicle</strong> Brake Lathe • 13