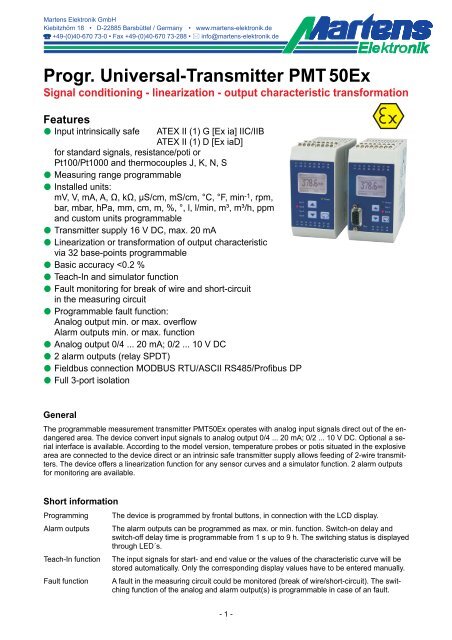
PMT50Ex-V2_0-00- Prospekt - Martens Elektronik GmbH
PMT50Ex-V2_0-00- Prospekt - Martens Elektronik GmbH
PMT50Ex-V2_0-00- Prospekt - Martens Elektronik GmbH

You also want an ePaper? Increase the reach of your titles
YUMPU automatically turns print PDFs into web optimized ePapers that Google loves.
Technical dataModel 2Input: Resistance 0 ... 20 kΩ(Terminals 35, 36, 37, 38; )Fault detection: Break of wireBasic accuracy:
Technical dataFault function: For break of wire or short-circuit detection -belongs to the model-→ Analog output 0 mA, < 3.6 mA or > 21.5 mA programmable→ Alarm output(s) min. or max. function programmableFieldbusModbus: RS485, RTU or ASCII max. 384<strong>00</strong> BaudProfibus: Profibus DPConnection: 9pol. D-SUB connector socket in the frontFor connection at electrical equipments with supply voltage of max. 230VDisplay: Graphic LCD-Display 128x64 pixels, white background illuminatedCase : Polyamide (PA) 6.6, UL94V-0, DIN rail mounting TS 35Weight: Approx. 450 gConnection : Screw terminals 0.14 ... 2.5 mm² (AWG 26 .. 14)Protection: Case IP30, terminals IP20, German BGV A3Connection diagramModel <strong>PMT50Ex</strong>-1 Model <strong>PMT50Ex</strong>-2 Model <strong>PMT50Ex</strong>-3Standard signalsResistance; potentiometerPt1<strong>00</strong>,Pt1<strong>00</strong>0; thermocoupleSupply voltage Analog outputBUSBUSShieldResistance0 ... 20 kΩBUS0/4 ... 20 mA0/2 ... 10 V DC-area2-wiresensor-areaPoti1 kΩ ... 1<strong>00</strong> kΩ,slider current
Control and indicatorsDevice nameMeasured valueInputAlarm output A1Alarm output A2Alarm outputsA3 and A4not availableUp/down buttonsPower-ON LEDParameterbuttonD-SubsocketTX/RX LEDBUS-typeDescriptionThe operation of the device is implemented in 2 levels. The required parameter is called up with the button .The selection within a parameter and the setting-adjustment of a value is implemented with thebuttons and .Button combinations (press buttons simultaneously):+ 1 Parameter back+ Parameter is set to "0" or minimum value.After the switching on the supply voltage, the device initializes itself. In the display the message indicating devicetype and software version is shown. After the initialization, the device is running in the working level. Thepeak value storage is called up and the setpoints of the alarm outputs can be programmed.The configuration level is called up by activation of the button for 2 seconds. In this case, all parameterswhich determine the properties of the device are programmed. After the last menu item, or if no button ispressed for longer than 2 minutes, a skip-back into the working level is implemented automatically and the currentmeasured value is indicated in the display. The configuration level can be exited at any time by holdingdown button for 2 seconds.Error reportsIn case of occurring faults, the messages are shown on the display in plain text. This simplifies the location ofthe error. See explanation page 15.Operational startup reference!The device is preset with an ex-works default setting. Therefore it must be adapted to each special application.See Page 8.$ Requirements- It is necassary to keep the conditions of the ATEX EC-Type Examination Certificate.- The device must be installed in dry and good monitored rooms.- If the intrinsinc safety input is connected to the dust andangered area of zone 20 or 21, it has to be ensuredthat the corresponding devices in this circuit have the requirements of catagory 1D or 2D.- Reparing and design modifications are only allowed at works.- 5 -
Explanations for characteristic curve programmingLinear curve (see page 10)The linear curve needs only one value pair for start- and end value. At this every input value, the correspondingdisplay value has to be assigned. See example:Example:Display [m]InputStart valueEnd valueDisplayStart valueEnd value: Resistance: 0.0 kΩ: 20.0 kΩ: Height [m]: 0.0 m: 1<strong>00</strong>.0 mResistance input [kΩ]In this example, 4 values for input and display range are needed. Every interem value belongs to the curve.Example: an input value of 10.0 kΩ is leading to the display value of 50.0 m.Nonlinear curve (see page 11)The nonlinear curve can have max. 32 value pairs for input and output to emulate the curve. At this, for everyinput value a display value can be programmed. Every interem value belongs to the curve.Example:curve with 5 base-pointsDisplay [m]InputDisplay: 0 ... 20 mA: 0.0 ... 1<strong>00</strong>.0 mBase-point Input value Display value1 0.0 mA 10.0 m2 4.0 mA 50.0 m3 10.0 mA 80.0 m4 14.0 mA 90.0 m5 20.0 mA 1<strong>00</strong>.0 mCurrent input [mA]The curve above shows clearly the classification between input signal and display value. This example has 5value pairs. For every input value the corresponding display value has to be programmed. The procedure is finished,if the button is pressed after the last base-point programming and OFF is selected in the follwingparameter.At the teach-in programming no manually programming of the input values is necassary. At this, for the measuredinput values the actual values will be taken over. This method is ideal if the input signal is unknown but thecorresponding display value is known (capacity gauging of tanks).- 6 -
Note on the representationParameter appears only with corresponding configurationParameter appears only with corresponding equipment versionWorking levelDisplayDescription<strong>PMT50Ex</strong>Input: 5.0k25.0 m<strong>PMT50Ex</strong>25.0 mA1: 2.0 A2: 15.1Input: 5.0kActual-value displaysChange between the two representations for the actual-valuedisplay with the buttons and .Only the current value can either be displayed or, in addition,the adjusted values for the switching points of the alarm outputs.This selection is stored and is also retained after a voltagebreakdown.Peak value displayMAX 55.0 mMIN 0.0 mReset with Peak value displayfor minimum and maximum measured value.Delete with button or with every switch-off of the device.SetpointFault det.InputAlarm output 1MINSetpoint alarm output A1 (switching function MIN or MAX)Allocation of the fault detection in the measuring circuit (it belongs to the model; break of wire orshort-circuit) with buttons and .SetpointMAX16.3mSetpoint alarm output A2 (Schaltfunktion MIN or MAX)Setting possible from -9999 ... 9999 digitswith buttons and .Alarm output 2- 7 -
Configuration levelDisplay<strong>PMT50Ex</strong>25.0 mDescription (represented values are default settings)Input: 5.0k1<strong>PMT50Ex</strong> LanguageInputPress 2s1.1<strong>PMT50Ex</strong> deutschenglishSelect languageUser LanguagedeutschenglishSelection with buttons and .2<strong>PMT50Ex</strong>Language Input2.1Input 0-20 mA4-20 mA SignalInput signalFor the different devices of the <strong>PMT50Ex</strong> are followinginput signals possible:Model 1 Model 2 Model 30 - 20 mA4 - 20 mAResistancePotiPt1<strong>00</strong>Pt1<strong>00</strong><strong>00</strong> - 10 V DC2 - 10 V DCThermo JThermo KThermo NThermo SSelection with buttons and .2.2Decimal placeX X.X Input signalDecimal places resistance inputParameter 2.2 is only available for model 2, if the input signal resistanceis selected.Selection possible with buttons and .The number of the decimal places belongs to the programming of thecharacteristic curve.2.3UnitCFInput signalUnit for temperatureParameter 2.3 is only available for model 3.Selection possible with buttons and .2.4Digital filterOFFDigital filterOFF or in steps of 0.5 s in the range from 0.5 ... 40sSelection with buttons and .Input signalContinue page 9- 8 -
3<strong>PMT50Ex</strong>Input Display3.1Contrast▌▌▌▌▌▌▌▌▌65%DisplayDisplay contrastSetting possible from 0 ... 1<strong>00</strong>% with buttons and .3.2Unit mVVDisplayDisplay unitThe selected unit will be displayed and used for programming of thecharacteristic curve.Installed units:mV, V, mA, A, , k, S/cm, mS/cm, °C, °F, min -1 , rpm, bar,mbar, hPa, kPa, mm, cm, m, %, , l, l/min, m, m/h, ppmand custom.custom = max. 5 characters are free programmable.Selection with buttons and .3.3Custom unitUnit textB/hDisplayCustom unitOnly appears if custom is selectedMaximal 5 characters are programmable (see character set below).Scrolling through the characters is possiblewith buttons and .The selected character will be entered with button . After that, thecursor moves to the next position. Selection procedure as before. If 5characters are entered or no more characters wanted, the parametercustom unit will excited automatically.Character set:8 A B C D E F G H I J K L M N O P Q R S T U V W X Y Za b c d e f g h i j k l m n o p q r s t u v w x y zä ö ü ß. ? ! , : _ % / \ + - * [ ] ( ) < = > " • ← → ↑ ↓ ◄ ► ▲ ▼ °µ Ω ∆1 2 3 -1 -23.4Decimal place0 0.0DisplayNumber of decimal placesFor the different models are following decimal places selectable:Model 1: 0; 0.0; 0.<strong>00</strong>; 0.<strong>00</strong>0Model 2: 0; ^ 0.0; 0.<strong>00</strong>; 0.<strong>00</strong>0Model 3: 0; 0.0Selection with buttons and .3.5Correction0.0 mVDisplay correctionSetting possible from -9999 ... 9999 Digitwith buttons and .DisplayContinue page 10- 9 -
4<strong>PMT50Ex</strong>Display Curve4.1Curve LinearNon-linearInputLinearStart- and end value für input and display must be programmed.The display values are linear to the input signal.Curve Non-linear see parameter 4.2 page 11Selection with buttons and .Consider4.1.1Curve linear ConsiderEnterIn the example with resistance input and unit mEnter4.1.2Curve ManualTeach-InInput valuesManualTeach-InSelection linear curve programmingManualMeasuring and display values have to be entered.Teach-In The measured value will be overtaken automatically.The corresponding display valuehas to be entered manual.Selection with buttons and .4.1.3Start value0.0 k0.0 mInput signal4.1.2.1Teach-InInput values would bechange automatically!all allseveral ProgrammingInput of the input signal at the start value ofthe characteristic curve,with buttons and .several4.1.4Start valueDisplay0.0 k0.0 m4.1.2.2Start valueDisplay0.0 k0.0 m4.1.2.2.1Start value0.0 kTeach-In with 0.0 mDisplayInput of the display value,at the start valueof the characvteristiccurve, with buttonsand .4.1.5End value20.0 k0.0 mInput signalInput of the input signal at theend value of the characteristiccurve,with buttons and .4.1.6End valueDisplay20.0 k1<strong>00</strong>.0 m4.1.2.3End valueDisplay20.0 k1<strong>00</strong>.0 m4.1.2.2.2End value0.0 kTeach-In with 0.0 mDisplayInput of the display value,at the end value ofthe characteristic curve,with buttonsand .Continue page 12Continue parameter 4.3, page 12- 10 -
4<strong>PMT50Ex</strong>Display Curve4.2CurveLinear Non-linearNon-linear32 pair values for input and display values are programmable. Therebyevery arbitrary characteristic curves are programmableSelection with buttons and .Consider4.2.1Curve non-linear ConsiderEnterIn the example with resistance input and unit m4.2.2Curve ManualTeach-InInput valuesEnter4.2.3Base point 10.0 k0.0 mInput valueManualTeach-In4.2.2.1Teach-In AddEditSelection non-linear curve programmingManual Measuring and display values have tobe entered.Teach-In The measured value will be overtakenautomatically. The corresponding displayvalue has to entered manual.Selection with buttons and .Add:For every base point an input value with the correspondingdisplay value has to be programmed.Edit:Several base points are selectable and could bechanged.New:The programming procedure starts withbase point 1.4.2.4Base point 1Display0.0 k0.0 m4.2.2.2Base point 1DisplayAddNew entry0.0 k0.0 m4.2.2.1.1Base point 1Edit0.0 kTeach-In with 0.0 mDisplay4.2.5Base point 220.0 k0.0 mInput value4.2.2.1.2Base point 20.0 kTeach-In with 0.0 mDisplay4.2.6Base point 2Display4.2.7Base point 3Input value20.0 k1<strong>00</strong>.0 mOFF0.0 m4.2.2.3Base point 2Display4.2.2.4Base point 3Display20.0 k1<strong>00</strong>.0 m20.0 kOFF4.2.2.1.3Base point 30.0 kTeach-In with OFFDisplayEnd of programmingThe curve programming procedurewill be finished by pressing the buttonuntil OFF is displayed.Continue page 12Continue parameter 4.3, page 12- 11 -
4.3TableNo.|Input |Display1 | 0.0 | 0.02 | 5.1 | 10.03 | 9.3 | 36.2Base pointsTableThe programmed values are displayed in the table. Scrolling is possiblewith buttons and .5<strong>PMT50Ex</strong>Curve Output5.1Analog output0-20mA 4-20mA(2-10V)Selection analog output0 - 20mA (0-10 V DC) or4 - 20 mA (2-10 V DC)Selection with buttons and .Automatic changeover to voltage signalin case of load impedance > 5<strong>00</strong> Ω.5.2Start value0.0mStart value analog outputSetting possible from -9999 ... 9999 Digitwith buttons and .Analog output5.3End valueAnalog output1<strong>00</strong>.0mEnd value analog outputSetting possible from -9999 ... 9999 Digitwith buttons and .Note:If start value > end value the output works with a decreasingcharacterisitc.5.4Correct. analog output NOYESCorrection analog outputSelection with buttons and .NOYES5.4.1Correct. analog output4.<strong>00</strong>0mACorrection start value analog outputSetting possible in the range±2 mA or ±1 V with buttons and .Start value (2.<strong>00</strong>0V)5.4.2Correct. analog output20.<strong>00</strong>0mACorrection end value analog outputSetting possible in the range±2 mA or ±1 V with buttons and .End value (10.<strong>00</strong>0V)Continue page 145.5Fault action >21 mA10,5V)Continue parameter 5.6 page 13Fault action of the analog output for break of wire orshort-circuit in the measuring circuit.> 21mA at analog output 0-20/4-20 mA
5.6Alarm output 1 OFFLimitFunctionOFFFunction alarm output A1OFFLimit Monitoring of the measuring valueFault det. Break of wire or short-circuitSelection with buttons and .Limit/Fault det.5.6.1Alarm output 1 MINMAXSwitching functionFaultdet.Switching function alarm output A1MIN, MAXSelection with buttons and .Limit5.6.1.1Setpoint2.0mMAXSetpoint alarm output A1Setting possible from -9999 ... 9999 digitwith buttons and .Alarm output 15.6.1.2Switching hysteresis0.1mHysteresis alarm output A1Setting possible from 1 ... 9999 digitwith buttons and .Alarm output 15.6.1.3Switch-on delay time0:<strong>00</strong>:<strong>00</strong>h : mm : ssAlarm output 1Switch-on delay time alarm output A1Setting possible from0:<strong>00</strong>:<strong>00</strong> ... 9:<strong>00</strong>:<strong>00</strong> (h:mm:ss)with buttons and .5.6.1.4Switch-off delay time0:<strong>00</strong>:<strong>00</strong>h : mm : ssAlarm output 1Switch-off delay time alarm output A1Setting possible from0:<strong>00</strong>:<strong>00</strong> ... 9:<strong>00</strong>:<strong>00</strong> (h:mm:ss)with buttons and .Note: The parameter settings for A2 have to beconfigured in the same way.5.7SimulationOutput signal15.0mSimulation of the input signalDer <strong>PMT50Ex</strong> works as actuator. The analog output changes in theprogrammed range.Setting posssible with buttons and .This parameter will not be excited automatically after 120 seconds.Continue page 14- 13 -
6<strong>PMT50Ex</strong>Output Bus6.1Caution!No BUSavailableParameter 6.1 appears, if no fieldbus installed.For configuration of the BUS parameter see separate manual.7<strong>PMT50Ex</strong>Bus Lock7.1Parameter lock OFFCONFIGParameter lockOFF : no parameters lockedCONFIG : Configuration level lockedALL : all parameters lockedSelection with buttons and .8<strong>PMT50Ex</strong>Lock Code8.1Factory settingsCode<strong>00</strong><strong>00</strong>Code for factory settings9<strong>PMT50Ex</strong>Code End<strong>PMT50Ex</strong>25.0 mReturn to the working levelInput: 5.0k- 14 -
Error reportsDescriptionCaution!Parameterlockedswitched onCaution!UndervoltageSupply voltage to lowCaution!XX ParametererrorPlease checkAt the check-up of the parameter memory, XX errors are detectet. The incorrectparameter are resetted to the factoty settings. Please check and correct parametersif necessary.Caution!XX ParametererrorCalibration necessaryAs before, but the factory settings are incorrect. The device must be checkedat works.Change of decimals?Some parameters notrepresentable! Adaptparameters automatically?▲ Yes▼ NoChange of decimal placesWhile changing number of decimal places, some parameters can be converted, buthowever, not represented!Selection "No" : Change of the decimal places is not carried out.Selection "Yes" : Decimal places are changed automatically, where the affected parametersare set to the maximum possible value. A subsequent verification of the acceptedparameters is absolutely necessary.Caution!Input value would be assignedbefore.Please change input value!At the base-point programming the input value is assigned to an display valuebefore.<strong>PMT50Ex</strong>FaultinputInput: 999.9kBreak of wire or short-circuit in the measuring circuit.Text Input: 999.9k is flashing- 15 -
Ordering code1. 2. 3. 4. 5. 6.<strong>PMT50Ex</strong> - - - - - -1. Model/Input1 Standard signals 0/4 ... 20 mA; 0/2 ... 10 V DC2 Resistance from 0 ... 20 kΩ, Poti 1 kΩ ... 1<strong>00</strong> kΩ3Pt1<strong>00</strong>Pt1<strong>00</strong>0ThermocoupleInputs intrinsically safe3-wire3-wireJ (Fe-CuNi)K (NiCr-Ni)N (NiCrSi-NiSi)S (Pt10Rh-Pt)ATEX II (1) G [Ex ia] IIC/IIBATEX II (1) D [Ex iaD]2. Analog outputAO 0/4 ... 20 mA/0/2 ... 10 V DC, isolated-1<strong>00</strong>.0 ... 6<strong>00</strong>.0 °C/-1<strong>00</strong> ... 6<strong>00</strong> °C-1<strong>00</strong>.0 ... 3<strong>00</strong>.0 °C/-1<strong>00</strong> ... 3<strong>00</strong> °C-1<strong>00</strong>.0 ... 8<strong>00</strong>.0 °C/-1<strong>00</strong> ... 8<strong>00</strong> °C-150 ... 12<strong>00</strong> °C-150 ... 12<strong>00</strong> °C-50 ... 16<strong>00</strong> °C3. Alarm outputs<strong>00</strong> not installed2R 2 relay outputs4. BUS configuration<strong>00</strong> not installedMB Modbus RTU/ASCIIPB Profibus DPA1, A2 SPDTRS4855. Supply voltage0 230 V AC1 115 V AC5 24 V DC± 10 % 50-60 Hz± 10 % 50-60 Hz± 15 %6. Options<strong>00</strong> without optionCustom configuration on requst!- 16 -03/08-<strong>V2</strong>.0-<strong>00</strong>