ベルタイマー/BELL TIMER QBT-30 - セイコータイムシステム
ベルタイマー/BELL TIMER QBT-30 - セイコータイムシステム
ベルタイマー/BELL TIMER QBT-30 - セイコータイムシステム

You also want an ePaper? Increase the reach of your titles
YUMPU automatically turns print PDFs into web optimized ePapers that Google loves.
<strong>ベルタイマー</strong>/ <strong>BELL</strong> <strong>TIMER</strong>QBT-30OPERATING INSTRUCTIONSこのたびは、セイコ- 製 品 をお 買 い 上 げいただき、 誠 にありがとうございました。ご 使 用 前 にこの 取 扱 説 明 書 をよくお 読 みのうえ、 正 しくお 使 いください。なお、お 読 みになった 後 はいつでもご 覧 いただけますよう、 大 切 に 保 管 してください。Many thanks for purchasing SEIKO Bell Timer.Before putting your SEIKO Bell Timer system to use, please be sure to carefully readthrough this manual as it has been designed to provide you with information forcorrect handling, use and maintenance necessary for safe, long-lasting and trouble-freeoperation. Keep this manual at hand for ready reference.
-ご 注 意 / CAUTIONS-(1) 本 書 の 一 部 または 全 部 を 無 断 転 載 することは、 禁 止 されております。(2) 本 書 の 内 容 については、 将 来 予 告 なしに 変 更 することがあります。(3) 本 書 の 内 容 については、 万 全 を 期 して 作 成 いたしましたが、 万 一 ご 不 審 な 点 や 誤 りなど、お 気 づきの 点 がありましたらご 連 絡 ください。(4) 本 製 品 がお 客 様 により 不 適 当 に 使 用 されたり、 本 書 の 内 容 に 従 わずに 取 り 扱 われたり、または 当 社および 当 社 指 定 のサ-ビス 部 門 以 外 の 第 三 者 により 修 理 ・ 変 更 されたことに 起 因 して 生 じた 損 害 につきましては、 責 任 を 負 いかねますのでご 了 承 ください。(1) This manual is the property of SEIKO and may not without the express written consent of SEIKObe copied or reproduced in any form, in whole or in part, or used for any purpose other than thatfor which it is supplied.(2) This manual may be subject to change without notice.(3) This manual has been prepared to give complete information necessary for the operation, use,handling and maintenance of MODEL QBT-30. For the purpose of our constant technical manualimprovement program, your questions, advice, suggestions and comments on the descriptions,illustrations, procedures or any matter concerning this manual are highly appreciated.(4) SEIKO shall have no liability to the user in respect of any loss or damages, whether consequentialor incidental, sustained by the user if such loss or damages are:1) due to abuse, misuse, failure to observe instructions given in the manual furnished by SEIKOand neglect of other reasonable care and servicing due to be done by the user irrespective ofsuch instructions, and failure due to deliberate actions or gross negligence or accident;2) caused by changes, modifications, or alterations made without prior written consent of SEIKOor by any person other than authorized by SEIKO; or,3) due to negligence on the part of the user of what should be done or should not be done as agood caretaker of Bell Timer Model QBT-30.- 本 書 で 使 用 の 記 号 について/SYMBOLS AND THEIR MEANINGS-本 書 に 使 用 される 記 号 の 意 味 は 次 の 通 りです。The symbols and terms used in this manual are explained below.危 険DANGER誤 った 取 り 扱 いをしたとき、 死 亡 または 重 傷 を 負 う 危 険 が 切 迫 して生 じることが 想 定 される 内 容 を 示 します。DANGER is used to indicate the presence of an imminent hazardwhich is LIKELY to cause SEVERE personal injury, death, orsubstantial property damage if the instructions under this headingare ignored.警 告WARNING誤 った 取 り 扱 いをしたとき、 死 亡 または 重 傷 を 負 う 可 能 性 が 想 定される 内 容 を 示 します。WARNING is used to indicate such operational procedures,practices, or situations that may result in personal injury or loss oflife if relevant instructions are not followed correctly.I-5974-4
目 次 /Table of Contents1. 安 全 のため 必 ずお 守 りください/ Safety Precautions 12. 概 要 / Overview 43. 製 品 の 特 長 / Features of QBT-30 54. 付 属 品 ・ 予 備 品 / Accessories and Spares 55.システム 構 成 / System Configuration 66. 各 部 の 名 称 と 機 能 / Nomenclature and Functions 77. 取 り 付 け 方 法 / Installation 87.1 取 り 付 け 上 の 注 意 点 / Precautions 88. 取 り 付 けと 結 線 / Installation and Wiring 108.1 取 り 付 けの 位 置 / Mounting position 108.2 取 り 付 け 穴 の 寸 法 / Mounting hole sizes 108.3 壁 面 への 取 り 付 け/ Mounting on the wall 118.4 結 線 / Wiring 139. 操 作 方 法 / Operation 169.1 操 作 部 概 要 / An outline of the control panel 169.2 電 源 の 投 入 / Powering-up 179.2.1 電 源 の 投 入 / Powering-up 179.2.2 システムリセット/ SYSTEM RESET 179.2.3 アナログ 時 計 の 運 針 / Motion of analog clock hands 179.3 現 在 時 刻 の 設 定 方 法 / How to set the present time 189.4 プログラムの 設 定 方 法 / How to set the program 199.4.1 週 間 プログラム/ Weekly program 199.4.2 メロディ 鳴 動 / Playing of melodies 209.4.3 接 点 出 力 制 御 / Dry contact output signal control 229.4.4 メロディ 鳴 動 と 接 点 出 力 制 御 / Control of melody playing and dry 24contact output signal9.4.5 プログラムのコピー/ How to copy a program 269.4.6 プログラムの 消 去 / How to clear a program 279.4.7 プログラムの 全 消 去 / How to clear all the selected programs 279.5 接 点 出 力 方 法 の 切 替 / Changeover of dry contact signal output mode 289.6 メロディの 試 し 鳴 らし/ Melody test 299.7 サマータイムの 設 定 方 法 / How to set the summer time 309.8 タイムリンク(Japan Only) 319.8.1 タイムリンクとは 319.8.2 操 作 方 法 339.8.3 定 期 受 信 349.8.4 手 動 受 信 3410. 標 準 電 波 (Japan Only) 3510.1 標 準 電 波 とは 3510.2 電 波 受 信 可 能 範 囲 は? 3510.3 設 置 場 所 に 関 する 注 意 は? 3510.4 仕 様 3511. 停 電 補 償 / Backup against Commercial Power Failure 3612. 故 障 と 思 われる 前 に/ Troubles You Can Solve Yourself 3613.お 客 様 へのお 願 い/ Daily Servicing by the User 3814. 保 証 について/ Warranty 3815. 仕 様 / Specifications 3916.プログラム 設 定 表 / Programming Table 41I-5974-4
1. 安 全 のために 必 ずお 守 りください/ Safety Precautions製 品 を 安 全 に 正 しくお 使 いいただき、あなたや 他 の 人 々への 危 害 や 財 産 への 損 害 を 未 然 に 防 ぐために、守 っていただきたい 注 意 事 項 を 示 しています。The following precautions must be strictly observed for the safety of yourself and your fellow workers and forthe protection of property from loss and damages.●お 客 様 用 / Safety instructions to the customer危 険 / DANGER取 り 付 け・ 電 気工 事 の 禁 止Prohibitionagainstunauthorizedinstallation andelectricalengineeringworkお 客 様 は 取 り 付 け・ 電 気 工 事 および 文 中 の「 工 事 業 者 様 へ」と 書 かれた 枠 内の 作 業 を 絶 対 に 行 わないでください。 必 ず、 工 事 業 者 様 へご 依 頼 ください。感 電 ・ 火 災 ・ 落 下 の 危 険 があります。Never attempt any of installation work, electrical engineering, and any ofthe jobs instructed to the engineering outfit ("Installation Instructions"). Allof these jobs must always be commissioned to your engineering outfitbecause they involve electric shock hazards, fire hazards and fallinghazards.警 告 / WARNING設 置 場 所 の選 択Selection oflocation異 常 時 の 処 置Actions to takein case oftroubles分 解 ・ 修 理 ・改 造 の 禁 止Prohibitionagainstunauthorizeddisassembly,repair ormodification操 作 時 の 注 意点Operatingprecautionsこの 製 品 は、 屋 外 に 設 置 しないでください。 屋 内 用 のため、 水 が 侵 入 すると、感 電 や 火 災 の 原 因 になります。The Bell Timer QBT-30 is designed for indoor use, and must not beinstalled outdoors. Otherwise, rainwater may infiltrate into the product tocause electric shock or fire accident.浴 室 や 水 場 など 湿 気 の 多 い 所 に 設 置 しないでください。 感 電 や 火 災 の 原 因 になります。It must not be installed in the bathroom or washing area or other dampplaces, either. This may cause fire or electric shock hazard.煙 が 出 たり、 異 臭 がするなど 異 常 が 発 生 したときは、すぐに 電 源 プラグをコンセントから 抜 いてください。 修 理 は、お 買 い 上 げいただいた 販 売 店 もしくは 販 売 会 社 へご 依 頼 ください。そのまま 使 用 すると、 感 電 や 火 災 の 原 因 になります。In case of abnormalities (QBT-30 is giving forth smoke, burnt smell, or ishot to the touch, or showing other abnormal symptoms), shut down QBT-30immediately, unplug the power cord, and call your nearby SEIKO dealer oragent for repair service. If QBT-30 is left to take care of itself, it may result ina risk of electric shock or fire.修 理 は、お 買 い 上 げいただいた 販 売 店 もしくは 販 売 会 社 へご 依 頼 ください。修 理 技 術 者 以 外 の 人 が 分 解 したり 修 理 ・ 改 造 を 行 うと 感 電 や 火 災 の 原 因 になります。Call your nearby SEIKO dealer or agent for repair service. Unauthorizeddisassembly, repair or modification may cause electric shock accidents orfire accidents.操 作 を 行 うときは、 前 扉 を 開 いて 行 いますので、 指 定 の 操 作 部 以 外 、 触 れないでください。 感 電 することがあります。To operate QBT-30, its door needs to be opened to expose internalcomponents. Do not meddle with any parts other than designated controls.Otherwise, fatal electric shock or fire accident may result.1I-5974-4
液 体 禁 止Prohibitionagainst wettingwith liquids(water,chemicals)ぬれた 手 禁 止Prohibitionagainsthandling withwet hands電 源 コード 類の 取 り 扱 いHandling ofpower cord水 や 薬 品 などの 液 体 をつけたり、かけないでください。 万 一 、これらが 内 部に 入 ったときは、 電 源 プラグをコンセントから 抜 いてください。点 検 は、お 買 い 上 げいただいた 販 売 店 もしくは 販 売 会 社 へご 依 頼 ください。そのまま 使 用 すると、 感 電 や 火 災 の 原 因 になります。Never immerse QBT-30 into water or any other liquid, or never splash wateror any other liquid against QBT-30. Should any liquid enter QBT-30, unplugthe power cord, and call your SEIKO dealer or agent for inspection andservicing. If QBT-30 is left to take care of itself, it may result in a risk ofelectric shock or fire.ぬれた 手 で 製 品 の 操 作 や 電 源 の 入 り 切 りをしないでください。 感 電 することがあります。Never operate QBT-30 or POWER switch with wet hands. Otherwise, youmay be killed by electric shock.電 源 プラグを 抜 き 差 しするときは、 電 源 コードを 持 たずに 電 源 プラグを 持 って、 抜 き 差 ししてください。 破 損 し、 感 電 や 火 災 の 原 因 になります。Always hold the plug firm when plugging and unplugging the power cord. Ifyou strain the power cord, it may be damaged to cause fire or electric shockhazard.電 源 コードを 傷 つけたり、 加 工 したり、 重 い 物 をのせたり、 無 理 に 曲 げないでください。 感 電 や 火 災 の 原 因 になります。Handle the power cord with care not to damage it. Never load the powercord with a heavy object. Never bend over the power cord unduly. All thesecould lead to fatal electric shock or fire accident.痛 んだ 電 源 コードやプラグ、 差 し 込 みのゆるいコンセントは 使 用 しないでください。 感 電 や 火 災 の 原 因 になります。Never use the damaged power cord or shoddily-repaired power cord as bytaping. This may cause fire or electric shock hazard.警 告 /WARNING指 定 された 電 圧 以 外 は 使 用 しないでください。 感 電 や 火 災 の 原 因 になります。Use a power supply of a specified rating only. Otherwise, electric shock orfire accident may result.電 源Power supplyアース 線 の確 認Confirmation ofgroundingヒューズ 交 換の 禁 止Prohibitionagainstunauthorizedfusereplacement電 源 プラグをコンセントに 差 し 込 む 前 に、 電 源 端 子 に 結 線 されている 電 圧 が正 しいことを 確 認 してください。 感 電 や 火 災 の 原 因 になります。Before plugging the power cord into the wall outlet, make sure that thepower supplied to the primary terminals of the circuit breaker has aspecified voltage rating. If the rating is other than specified for QBT-30,electric shock or fire accident may result.製 品 のアース 端 子 に、アース 線 が 取 り 付 けてあることを 確 認 してください。アース 線 が 取 り 付 いていないと、 故 障 や 漏 電 のとき 感 電 することがあります。アース 線 は、D 種 接 地 以 上 の 工 事 を 必 要 としますので、 工 事 業 者 へご 依頼 ください。Check to see if a grounding conductor is terminated to QBT-30. If QBT isnot grounded, electric shock accident may result when the product getsfaulty or leaky. The grounding work is required to be of Class D or higherrating, and shall be undertaken by a licensed electrician.ヒューズの 交 換 作 業 は、お 買 い 上 げいただいた 販 売 店 もしくは 販 売 会 社 へご 依 頼 ください。お 客 様 が 交 換 作 業 を 行 うと 感 電 することがあります。Call your SEIKO dealer or agent for fuse replacement service. Do notattempt the fuse replacement yourself unless you are qualified for the job.This is important to prevent fatal electric shock accident.2I-5974-4
外 装 のお 手 入れ 前 の 注 意 点Precautions onthe servicing ofQBT-30 casing内 部 のお 手 入れ 禁 止Prohibitionagainstunauthorizedservicing of theinternalcomponents外 装 をお 手 入 れするときは、 電 源 プラグをコンセントから 抜 いてください。感 電 することがあります。Before cleaning the surface of the casing, be sure to unplug the powercord. Fatal electric shock accident may happen if you attempt to wipe thecasing with a damp cloth.内 部 のお 手 入 れは 行 わないでください。お 買 い 上 げいただいた 販 売 店 もしくは 販 売 会 社 へご 依 頼 ください。お 客 様 が 作 業 をすると 感 電 することがあります。Call your SEIKO dealer or agent for the servicing of internal components.Do not attempt yourself unless you are qualified for the job. This isimportant to prevent fatal electric shock accident.● 工 事 業 者 様 用 / Instructions to the engineering outfit工 事 業 者 様 へ/ For the engineering outfit警 告 /WARNING取 り 付 け 工 事 の 注 意 事 項 / Precautions on installation work取 り 付 け 場 所の 選 択Selection oflocation forinstallation取 り 付 け 場 所の 強 度Load-bearingcapacityコンクリート壁 面 の 取 り付 け 方 法Mounting ontothe concretewall取 り 付 けネジの 締 め 付 けFasteningこの 製 品 は、 屋 外 に 設 置 しないでください。 屋 内 用 のため、 水 が 浸 入 すると、感 電 や 火 災 の 原 因 になります。The Bell Timer QBT-30 is designed for indoor use, and must not beinstalled outdoors. Otherwise, rainwater may infiltrate into the product tocause electric shock or fire accident.浴 室 や 水 場 など 湿 気 の 多 い 所 に 設 置 しないでください。 感 電 や 火 災 の 原 因 になります。It must not be installed in the bathroom or washing area or other electricshock- or fire accident-prone damp places, either.取 り 付 ける 建 造 物 の 構 造 が、この 製 品 の 重 さに 十 分 耐 えられることを 確 かめてください。この 製 品 の 重 さは、 約 2kgです。 強 度 の 弱 い 所 に 取 り 付 けた場 合 、 振 動 などで 製 品 が 落 下 し、 人 身 事 故 にいたることがあります。Make sure that the wall or other structure onto which the product is to bemounted has a sufficient strength to bear up against the load of theproduct. The maximum weight of the product is about 2 kg. If the wallstrength is not sufficient, it may yield to the product weight or externalshocks, letting fall the product to cause fatal accidents.壁 面 がコンクリートの 場 合 は、PYプラグと 木 ネジをご 使 用 ください。 木 ネジだけによる 取 り 付 けは、 絶 対 に 行 わないでください。 風 圧 や 振 動 などで 製品 が 落 下 し、 人 身 事 故 にいたることがあります。Fasten the product onto the wall using anchor plugs (PY plug or the like)and wood screws. Never use the wood screws alone to fasten theproduct. Wood screws may yield under wind pressure and vibrations, andlet fall the product to cause fatal accidents.製 品 の 取 り 付 けネジは 十 分 に 締 め 付 けてください。 締 め 付 けが 不 十 分 だと 風圧 や 振 動 などで 製 品 が 落 下 し、 人 身 事 故 にいたることがあります。Be sure to tighten each wood screw into the anchor plug fully. If thescrews are not fastened securely, the product may come off from the wallas the screws may loosen off under the influence of wind pressure orvibrations, causing fatal accidents.3I-5974-4
● 工 事 業 者 様 用 / Instructions to the engineering outfit工 事 業 者 様 へ/ For the engineering outfit電 気 工 事Electricalengineering接 地 工 事Grounding work端 子 台保 護 カバーの取 り 付 けInstallation ofterminal boardcover電 源 ・ 接 点 出 力 端 子 台 に 結 線 するときは、 電 源 プラグが 抜 かれていることを確 認 してください。 感 電 することがあります。Prior to the wiring of the terminal blocks for power input and contact signaloutput circuits, make sure that the power cord is unplugged. You arewarned against working on live circuits as they involve fatal electric shockhazards.製 品 のアース 端 子 にアース 線 を 取 り 付 けてください。アース 線 が 取 り 付 いていないと、 故 障 や 漏 電 のとき 感 電 することがあります。なお、 接 地 はD 種 接地 以 上 の 工 事 を 施 工 してください。Ground the Bell Timer Model QBT-30 by connecting a groundingconductor to its grounding terminal. This is important for the prevention ofelectric shock hazards in case of troubles such as earth leakage fault.The grounding work must be Class D or higher in rating.電 源 ・ 接 点 出 力 端 子 台 の 結 線 作 業 後 、 端 子 台 の 保 護 カバーをもとの 位 置 に 取り 付 けてください。 取 り 付 いていないと、 感 電 することがあります。After wiring the terminal blocks for power supply and contact signal outputcircuits, be sure to replace the terminal board cover for the protection ofoperators against electric shock.指 定 された 電 圧 以 外 は 使 用 しないでください。 感 電 や 火 災 の 原 因 になります。Use a power supply of a specified rating only. Otherwise, electricshock or fire accident may result.電 源Power supply電 源 プラグをコンセントに 差 し 込 む 前 に、 電 源 端 子 に 結 線 されている 電 圧 が正 しいことを 確 認 してください。 感 電 や 火 災 の 原 因 になります。Before plugging the power cord into the wall outlet, make sure that thepower supplied to the primary terminals of the circuit breaker has aspecified voltage rating.2. 概 要 / Overview<strong>ベルタイマー</strong> QBT-30 は、アナログ 時 計 の 機 能 に 加 え、プログラムにより 任 意 の 時 刻 にメロディの 自 動 演 奏 や 外 部 への 接 点 出 力 を 行 うことが 出 来 ます。これらのプログラムは、 各 曜 日 単 位 に 設 定可 能 な 週 間 プログラム 方 式 となっており、 操 作 が 容 易 になっています。また、オプションのタイムリンク 送 信 機 、あるいは 長 波 受 信 器 を 使 用 することにより、 長 波 標 準 電 波を 定 期 的 に 自 動 受 信 して、 時 刻 を 正 確 に 保 つことが 出 来 ます。SEIKO bell timer Model QBT-30 serves as an analog clock. In addition, QBT-30 is capable of beingprogrammed to play melodies automatically at preset times and/or deliver contact signal output toexternal circuits. A weekly programming system is used to specify the sequence of these operations ona day-of-the-week basis.If SEIKO TimeLink(R) transmitter-receiver or LF radio receiver available as optional feature is used, it ispossible to receive the standard radio wave automatically at regular intervals to keep accurate time forQBT-30 at all times. (Japan Only)4I-5974-4
3. 製 品 の 特 長 / Features of QBT-30■ 内 部 時 計 に 高 精 度 の 水 晶 を 使 用 し、 平 均 月 差 ±3 秒 を 実 現 しています。■ 自 動 調 針 ムーブを 採 用 していますので、 時 刻 合 わせをする 際 にアナログ 時 計 の 針 位 置 合 わせが不 要 です。■ 最 大 60プログラムが 設 定 できますので、 幅 広 い 用 途 にご 使 用 いただけます。■ 独 立 した2チャネルの 無 電 圧 接 点 出 力 を 有 し、 各 種 機 器 の 制 御 にご 使 用 いただけます。■ 全 10 曲 のメロディを 有 しプログラムごとの 曲 選 択 が 可 能 です。■ オプションのタイムリンク 機 能 を 使 用 することにより、 時 刻 合 わせが 不 要 です。また、 将 来 サマータイムが 実 施 された 場 合 も 自 動 的 に 対 応 します。( 別 売 ZA303N または SLR-201とSW-302が 必 要 となります。)■ 下 記 項 目 の 実 施 により、 環 境 に 配 慮 した 製 品 となっています。・「RoHS 指 令 」 適 合 品・ニカド 電 池 の 不 採 用・ 消 費 電 力 の 低 減■ Equipped with a high-precision quartz oscillator, the internal clock operates at a monthlyaverage rate of ± 3 seconds.■ An automatic hand-correction movement is employed, eliminating the need for analog clockhand setting at the time of time setting.■ Up to 60 programs can be set to cover a wide range of applications.■ Two independent channels are available for dry contact signal outputs for control of variousdevices.■ 10 melodies are available for programming.■ (Japan Only) Optional TimeLink(R) function eliminates the need for time setting. QBT-30automatically responds to the implementation of summer time system. (For theimplementation of the daylight-saving system, these options are required: ZA303N orSLR-201, and SW-302)■ Featured by the following, QBT-30 is an environmentally friendly product.・Conforming to RoHS Directive・Elimination of need for Ni-Cd batteries・Reduction of power consumption4. 付 属 品 ・ 予 備 品 / Accessories and Spares付 属 品 ・ 予 備 品Accessories and Spares圧 着 端 子 (M3)Crimp terminal (M3)圧 着 端 子 (M4)Crimp terminal (M4)丸 木 ネジ(M4.1)Round-headed wood screw(M4.1)取 付 原 寸 図Mounting hole drilling templateACコードAC power cord取 扱 説 明 書Operating instruction manual保 証 書Warranty registration card数 量Quantity6 個 /6 pcs.1 個 /1 pc.3 個 /3 pcs.1 枚 /1 sheet1 本 /1 pc.1 部 /1 copy1 枚 /1 card備 考Remarks電 源 ・ 接 点 出 力 端 子 用For power input and contact signal outputアース 端 子 用For grounding本 体 固 定 用For securing QBT-30本 体 固 定 用For drilling QBT-30 mounting holesAC100V 用 ( 国 内 専 用 )For AC100V (Japan only)本 書This manual国 内 専 用(Japan only)5I-5974-4
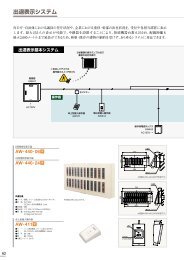
5.システム 構 成 / System Configuration~こんな 使 い 方 ができます/ Illustrated Examples of Uses~QBT-30電 源 入 力Power inputAC90V~120VAC200V~240V照 明 器 具 などLights, etc.CH1CH2LINE OUT外 部 アンプ接 点 出 力 / Contact signal output※ 照 明 器 具 や 外 部 アンプの電 源 制 御 などにご 利 用 いただけます* Available for control ofpower supply to the外 部 スピーカluminaires, externalamplifiers, etc.内 部 スピーカBuilt-in speakerExternalamplifierExternal speakerタイムリンク※ 特 定 小 電 力 無 線SW-302( 別 売 )※ 屋 内 用Japan OnlyZA303N( 別 売 )※ 屋 内 用SLR-201( 別 売 )※ 屋 外 用標 準 電 波標 準 電 波6I-5974-4
6. 各 部 の 名 称 と 機 能 / Nomenclature and Functions電 源 ・ 接 点 出 力 端 子 台 /Terminal blocks for power input andcontact signal outputLINE OUTアース 端 子 / GND terminalアナログ 時 計 / Analog clockスピーカ/ Speaker操 作 部 /Control panel液 晶 画 面 / LCD screenスピーカ/ Speaker● アナログ 時 計● 操 作 部2 針 式内 蔵 デジタル 時 計 と 連 動 して 動 きます。時 刻 設 定 や、タイマープログラムの 設 定 を 行 います。液 晶 画 面 にて、 設 定 内 容 を 確 認 しながら 操 作 ができます。● 液 晶 画 面通 常 は 現 在 時 刻 をデジタル 表 示 します。設 定 中 は、 設 定 内 容 の 確 認 ができます。● スピーカメロディを 鳴 らします。● LINE OUTメロディ 出 力 です。 外 部 アンプに 接 続 します。● 電 源 ・ 接 点 出 力 端 子 台 AC 入 力 用 、 接 点 出 力 用 (2 回 路 )● アース 端 子アースに 接 続 します。● Analog clockTwo-hand typeInterlocked with the built-in digital clock● Control panelUsed for time setting and timer programming.The control panel can be manipulated while visually checking thesettings on the LCD screen.● LCD screenUsually, indicates the present time digitally.During setting up, displays the data being set up for youconfirmation.● SpeakerPlays a melody.● LINE OUTMelody output terminal, to be connected to an external amplifier.● Terminal blocks for power inputand contact signal output For AC power supply, and contact signal output (2channels)● GND terminalTo be connected to the grounding conductor.7I-5974-4
7. 取 り 付 け 方 法 /Installation警 告 / WARNING取 り 付 け・ 電 気工 事 の 禁 止Prohibitionagainstunauthorizedinstallation andelectricalengineering workお 客 様 は、 取 り 付 け・ 電 気 工 事 および 文 中 の「 工 事 業 者 様 へ」と 書 かれた枠 内 の 作 業 を 絶 対 に 行 わないでください。 必 ず、 工 事 業 者 様 へご 依 頼 ください。 感 電 ・ 火 災 ・ 落 下 の 危 険 があります。Never attempt any of installation work, electrical engineering, and any ofthe jobs instructed to the engineering outfit ("Installation Instructions")because electric shock, fire and toppling hazards are involved.● 工 事 業 者 様 用 / Instructions to the engineering outfit工 事 業 者 様 へ/ For the engineering outfit7.1 取 り 付 け 上 の 注 意 点 / Precautions取 り 付 け 場 所 の 選 択 / Selection of location for installation警 告WARNING警 告WARNINGこの 製 品 は、 屋 外 に 設 置 しないでください。 屋 内 用 のため、 水 が 浸 入 すると 感 電 や 火 災 の 原 因 になります。The Bell Timer QBT-30 is designed for indoor use, and must not beinstalled outdoors. Otherwise, rainwater may infiltrate into the product tocause electric shock or fire accident.浴 室 や 水 場 など 湿 気 の 多 い 所 に 設 置 しないでください。 感 電 や 火 災 の 原因 になります。It must not be installed in the bathroom or washing area or other electricshock- or fire accident-prone damp places.温 度 、 湿 度 、 振 動 などを 考 慮 し、 環 境 の 良 い 場 所 をお 選 びください。特 に、 環 境 温 度 は-10℃~+50℃の 間 の 場 所 に 設 置 してください。Select an installation place least susceptible to the influence of temperature, humidity and vibration.The ambient temperature of the selected place should be held within the range of -10℃ to +50℃.取 り 付 け 場 所 の 強 度 / Load-bearing capacity警 告WARNING取 り 付 ける 建 造 物 の 構 造 が、この 製 品 の 重 さに 十 分 耐 えられることを 確かめてください。この 製 品 の 重 さは、 約 2kgです。 強 度 の 弱 い 所 に 取り 付 けた 場 合 、 振 動 などで 製 品 が 落 下 し、 人 身 事 故 にいたることがあります。Make sure that the wall or other structure onto which QBT-30 is to bemounted has a sufficient strength to bear up against the weight ofQBT-30. The maximum weight of QBT-30 is about 2 kg. If the structuralstrength is not sufficient, it may yield to the weight of QBT-30 or externalshocks, letting fall QBT-30 to cause fatal accidents.8I-5974-4
● 工 事 業 者 様 用 / Instructions to the engineering outfit工 事 業 者 様 へ/ For the engineering outfit電 源 / Power supply警 告WARNING指 定 された 電 圧 以 外 は 使 用 しないでください。それ 以 外 の 電 源 を 使 用 すると 感 電 や 火 災 の 原 因 になります。Use a power supply of a specified rating only. Otherwise, electric shockor fire accident may result.交 流 電 源 は 昼 夜 連 続 使 用 しますので、 専 用 電 源 をご 使 用 ください。電 源 はAC90V~AC120Vまたは、AC200V~AC240V、 周 波 数 は 50Hz または 60Hz でお 使 いください。Use an exclusive power supply as the clock system runs 24 hours a day, 365 days a year. The powersupply should provide AC90V - AC120V or AC200V - AC240V, and its frequency should be 50Hz or 60Hz.電 気 工 事 / Electrical engineering work警 告WARNING電 源 プラグをコンセントに 差 し 込 む 前 に、 電 源 端 子 に 結 線 されている 電圧 が 正 しいことを 確 認 してください。 感 電 や 火 災 の 原 因 になります。Before plugging the power cord into the wall outlet, make sure that thepower supplied to the primary terminals of the circuit breaker has aspecified voltage rating. If the rating is other than specified for QBT-30,electric shock or fire accident may result.9I-5974-4
● 工 事 業 者 様 用 / Instructions to the engineering outfit工 事 業 者 様 へ/ For the engineering outfit8. 取 り 付 けと 結 線 / Installation and Wiring8.1 取 り 付 けの 位 置 / Mounting position天 井 / Ceiling( 上 部 /Headroom) 10 cm前 ケースの 開 閉 のため、左 側 と 上 部 を10cm 以 上壁Wall壁 、 天 井 から 離 してください。Provide a clearance of at least10cm at the top and left ofQBT-30 to facilitate theopen-close operation of the frontdoor.10 cm( 左 側 /Clearanceat left)8.2 取 り 付 け 穴 の 寸 法 / Mounting hole sizes210mm302mm※ 取 り 付 け 位 置 は 付 属 の 取 付 原 寸 図 を 利 用 し、ネジを 仮 固 定 することもできます。* Mark off and make the mounting holes by making use of the mounting hole drilling templatefurnished. Or you may fix the mounting wood screws temporarily by making use of themounting hole drilling template.10I-5974-4
● 工 事 業 者 様 用 / Instructions to the engineering outfit工 事 業 者 様 へ/ For the engineering outfit8.3 壁 面 への 取 り 付 け/ Mounting on the wall● 壁 面 がコンクリートの 場 合 / Mounting on a concrete wall※ 市 販 されているPYプラグ( 木 ネジM4.1 用 )を 別 途 ご 購 入 ください。* Prepare PY plugs for M4.1 wood screws. These anchor plugs areavailable on the market.警 告WARNING壁 面 がコンクリートの 場 合 は、PYプラグと 木 ネジをご 使 用 ください。木 ネジだけの 取 り 付 けは、 絶 対 に 行 わないでください。風 圧 や 振 動 などで 製 品 が 落 下 し、 人 身 事 故 にいたることがあります。If the wall is made of concrete, use PY plugs and wood screws formounting QBT-30. Never use the wood screws alone for mounting asthey may come off under the influence of wind pressure or vibrations tocause fatal accidents.PYプラグ/PY plug1 穴 をあけるDrill mountingholes.ドリル 径 : PY プラグ 指 定Drill hole: Specified PY plug2PYプラグを打 ち 込 むDrive PY plugsinto the drilledmounting holes.3 余 分 を 切 断するCut off theexcessprojections.4 付 属 の 木 ネジで 取 り 付 けるMount QBT-30,and secure withthe wood screwsfurnished.木 ネジ/ Woodscrew入 線 孔Cable entry取 り 付 け 孔Mounting hole取 り 付 けネジ( 木 ネジ)Mounting screw (wood screw)PYプラグ( 壁 面 がコンクリートの 場 合 )PY plug (in case QBT-30 is to beinstalled on a concrete wall)11I-5974-4
● 工 事 業 者 様 用 / Instructions to the engineering outfit工 事 業 者 様 へ/ For the engineering outfit● 壁 面 が 木 の 場 合 / Wooden wall「8.2 取 り 付 け 穴 の 寸 法 」を 参 照 して、 上 部 2ヶ 所 に 木 ネジをねじ 込 み、 本 体 を 掛 けます。 次 に 水 平 を確 認 して 下 部 に 木 ネジをねじ 込 んで 締 め 付 けます。 最 後 に 上 部 2ヶ 所 の 木 ネジを 締 め 付 けます。While referring to the mounting hole layout drawing in "8.2 Mounting hole sizes", tighten wood screwsinto two upper mounting holes, and hook the Bell Timer on them. After making sure that the Bell Timer isset level, provisionally tighten a wood screw into the bottom hole. Then, give a final tightening torque tothe upper two wood screws.● 取 り 付 けネジ( 木 ネジ)の 締 め 付 け/ Tightening-up of mounting screws (wood screws)警 告WARNING製 品 の 取 り 付 けネジは 十 分 に 締 め 付 けてください。 締 め 付 けが 不 十 分 だと 風 圧 や 振 動 などで 製 品 が 落 下 し、 人 身 事 故 にいたることがあります。Be sure to tighten each wood screw into the anchor plug fully. If thescrews are not fastened securely, QBT-30 may come off from the wall asthe screws may loosen off under the influence of wind pressure orvibrations, causing fatal accidents.12I-5974-4
● 工 事 業 者 様 用 / Instructions to the engineering outfit工 事 業 者 様 へ/For the engineering outfit8.4 結 線 / Wiring● 結 線 作 業 の 注 意 事 項 / Wiring precautions警 告WARNING電 源 ・ 接 点 出 力 端 子 台 に 結 線 するときは、 電 源 プラグが 抜 かれていることを 確 認 してください。 感 電 することがあります。Prior to the wiring of the terminal blocks for power input and contactsignal output circuits, make sure that the power cord is unplugged.You are warned against working on live circuits as they involve fatalelectric shock hazards.警 告WARNING電 源 ・ 接 点 出 力 端 子 台 への 結 線 作 業 後 、 端 子 台 の 保 護 カバーをもとの位 置 に 取 り 付 けてください。 取 り 付 いていないと、 感 電 することがあります。After wiring the terminal blocks for power supply and contact signaloutput circuits, be sure to replace the terminal board cover for theprotection of operators against electric shock.● 電 源 線 の 結 線 / Connection of power lineAC100V~AC120V でご 使 用 の 場 合Supply voltage rating: AC100V~AC120VAC200V~AC240V でご 使 用 の 場 合Supply voltage rating: AC200V~AC240V付 属 のACコードAC power cordfurnishedアースGND wireM3 圧 着 端 子M4 圧 着 端 子 ( 付 属 品 )( 付 属 品 ) M3 crimpM4 crimp terminalterminal(furnished)CH1 CH2 AC200V AC100V C FG(furnished)CH1 CH2 AC200V AC100V C FGアースGND wireM4 圧 着 端 子( 付 属 品 )M4 crimpterminal(furnished)※ 付 属 のACコードは 使 用 しないでください。* For AC200V-AC240V, do not use the ACpower cord furnished.警 告WARNING製 品 のアース 端 子 に、アース 線 が 取 り 付 けてあることを 確 認 してください。アース 線 が 取 り 付 いていないと、 故 障 や 漏 電 のとき 感 電 することがあります。アース 線 は、D 種 接 地 以 上 の 工 事 を 必 要 としますので、工 事 業 者 へご 依 頼 ください。Check to see if a grounding conductor is terminated to QBT-30. If QBTis not grounded, electric shock accident may result when the productgets faulty or leaky. The grounding work is required to be of Class D orhigher rating, and shall be undertaken by a licensed electrician.13I-5974-4
● 工 事 業 者 様 用 / Instructions to the engineering outfit工 事 業 者 様 へ/ For the engineering outfit● 接 点 出 力 の 結 線 / Wiring of contact signal output terminals外 部 機 器 (ブザー・ 蛍 光 灯 など)を 接 続 する 場 合For termination of external deices (buzzer, fluorescent luminaire, etc.)AC100VAC100V接 続 する 機 器 の 容 量 をよく 確 かめてから 結 線 してください。Make sure of the load capacityof equipment to be handled bythe Bell Timer before wiring.ブザーBuzzer接 点 容 量 /Current-carrying capacityof contacts(CH1,CH2)AC125V/5A,AC250V/3ADC30V/5ACH1 CH2 AC200V AC100V C FG照 明LuminaireM3 圧 着 端 子( 付 属 品 )M3 crimpterminals(furnished)● メロディを 外 部 スピーカで 鳴 らす 場 合 / Using an external speaker to play melodiesアンプ( 別 売 )Amplifier (option)オーディオケーブル( 市 販 品 )Audio cable(available on the market)スピーカ( 別 売 )Speaker (option)差 し 込 むInsertCH1 CH2 AC200V AC100V C FGLINE OUT14I-5974-4
● 工 事 業 者 様 用 / Instructions to the engineering outfit工 事 業 者 様 へ/ For the engineering outfit● アンプの 入 / 切 をタイマー 制 御 する 場 合 / ON-OFF control of amplifier by timerアンプ( 別 売 )Amplifier (option)オーディオケーブル( 市 販 品 )Audio cable(available on the market)スピーカ( 別 売 )Speaker (option)アンプ/ Amplifier“A”SW差 し 込 むInsertまたはCH2/or CH2CH1 CH2 AC200V AC100V C FGM3 圧 着 端 子( 付 属 品 )M3 crimpterminal(furnished)10 秒10 secondsLINE OUT10 秒 前 出 力 を“ON”にすると、メロディが 鳴 る10 秒 前 にアンプの 電 源 を 入 れることができます。( 詳 しくは「9. 操 作 方 法 」を 参 照 )By turning on the "10 SEC. ADVANCEWARMUP" switch, you can warm up theamplifier 10 seconds ahead of melodyplaying. (For details, refer to "9. Operation"below.)LINE OUT(メロディ/melody)アンプ 電 源Amplifier power supply外 部 スピーカの 音 量 は、 通 常 はライン 出 力 レベルを最 大 にしたうえで、 外 部 アンプのボリュームで 調 整 してください。Normally, the volume of the external speaker is adjustedwith the volume knob of the external amplifier with theLINE OUT LEVEL knob set at MAX.外 部 アンプのボリュームVolume of externalamplifier( 最 大 に) ( 音 量 調 整 )(Turn to MAX.) (Volume adj.)15I-5974-4
9. 操 作 方 法 / Operation9.1 操 作 部 概 要 / An outline of the control panel123465910781213111 液 晶 画 面2 モードスイッチ3 設 定 用 ボタン4 コピー・ 消 去5 曜 日6 タイムリンク 受 信7 タイムリンク 制 御8 サマータイム9 試 し 鳴 らし10 音 量11 接 点 出 力 制 御12 ライン 出 力 レベル13 システムリセット: 現 在 時 刻 や 設 定 画 面 を 表 示 します。: 現 在 時 刻 や 設 定 画 面 にモードを 切 り 替 えます。: 設 定 値 を 変 更 したり、 決 定 するときに 使 用 します。: プログラムをコピーしたり、 消 去 するときに 使 用 します。: プラグラムを 実 行 する 曜 日 を 入 力 するときに 使 用 します。: タイムリンクの 受 信 状 態 を 表 示 します。: タイムリンクにより 時 刻 を 受 信 するときに 使 用 します。: サマータイムの 実 施 、 解 除 に 使 用 します。: メロディの 試 し 鳴 らしのときに 使 用 します。: 内 蔵 スピーカの 音 量 調 整 用 のツマミです。: 接 点 出 力 の 制 御 に 使 用 します。: メロディの 出 力 レベルの 調 整 用 のツマミです。: システム 全 体 のリセットです。16I-5974-4
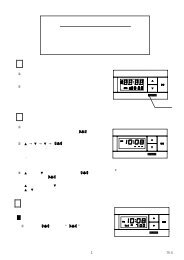
1 LCD screen: Displays the present time and the program setting screen.2 MODE switch: Used for changeover of present-time display mode to andfrom program setting screen display mode.3 SET/SELECT/CANCEL buttons : Used to change or set the parameters.4 COPY/PASTE/CLEAR/ALL CLEAR buttons: Used to copy and clear programs.5 Day-of-the-week buttons(DAY buttons): Used to enter the day of the week when a program is to berun.6 LINK -Japan Only-: Displays the TimeLink signal reception status.7 TIMELINK control -Japan Only- : Used when receiving the time-of-day signal via TimeLink.8 SUMMER TIME: Used to turn on/off the summer time system.9 MELODY TEST: Used for trial run of melodies.10 VOL: Sound volume adjusting knob for the built-in speaker.11 Dry contact output signal control : Used for the control of contact signal output.12 LINE OUT LEVEL: Melody output level adjusting knob.13 SYSTEM RESET: Used to reset the entire system.9.2 電 源 の 投 入 / Powering-up9.2.1 電 源 の 投 入 / Powering-up正 しく 結 線 ができましたら、 電 源 プラグをコンセントに 差 し 込 み、 電 源 を 投 入 してください。本 体 に 電 源 スイッチはありませんので、 大 本 の 電 源 を 入 れることにより 動 作 を 始 めます。When the wiring has been completed correctly as specified, plug the power cord into the wall outletto power up the Bell Timer.The Bell Timer has no POWER switch, and it is required to close the main circuit breaker to power upthe Bell Timer system.9.2.2 システムリセット/ SYSTEM RESET電 源 を 投 入 したら、 必 ずシステムリセットを 押 してください。3~4 秒 後 、 液 晶 画 面 に 時 刻 が 出 ます。(この 時 の 時 刻 は、まだ 現 在 時 刻 ではありません)After closing the main circuit breaker, be sure to press the SYSTEM RESET button.In 3 to 4 seconds, the time will be displayed on the LCD screen.(Note that the time displayed is not the present time yet.)9.2.3 アナログ 時 計 の 運 針 / Motion of analog clock hands電 源 を 投 入 した 後 、1 分 以 内 にアナログ 時 計 が 早 送 りで 動 作 を 始 めます。なお、この 早 送 りは、 液 晶 画 面 に 表 示 された 時 刻 と 一 致 するまで 続 き、その 後 通 常 動 作 となります。※ 早 送 りを 始 めたときのアナログ 時 計 の 位 置 と、 液 晶 画 面 に 表 示 される 時 刻 との 関 係 によっては一 致 した 時 に 停 止 せず 早 送 りを 続 けることがありますが、その 後 再 び 一 致 したときに 停 止 します。※ 早 送 りをしている 最 中 でも、 次 ページ 以 降 の 操 作 をすることができます。In one minute after closing the main circuit breaker, the hands of the analog clock will start running ina fast feed mode.This fast feed motion will continue until the hands are brought in synchronism with the time on theLCD screen.* Depending on the relationship between the fast feed start position of the analog clock hands andthe time on the LCD screen, the fast feed may continue even after coincidence of hands with thetime displayed, but will cease to continue when the coincidence occurs again.* You can carry out the operations described in the pages to follow even while the analog clock isrunning in the fast feed mode.17I-5974-4
9.3 現 在 時 刻 の 設 定 方 法 / How to set the present time例 )2006 年 4 月 20 日 ( 木 ) 15 時 30 分 に 設 定 する。Ex.) To set the Bell Timer at 15:30, Thursday, April 20, 2006, follow the steps below:1 モード 切 替 / Mode selectモードスイッチを 時 刻 設 定 に 合 わせます。液 晶 画 面 が 点 滅 します。Set the MODE select switch to TIME.The LCD screen will flicker.2 設 定 開 始 / Setting start決 定 ボタンを 押 します。年 桁 が 点 滅 し、 設 定 が 可 能 となります。Press the SET button.The year digits will flicker to show readiness forsetting.3 現 在 日 時 の 設 定 /Calendar setting年 月 日 時 分 秒 を 設 定 します。Set the year, month, date, hour, minute andseconds.【 入 力 時 の 注 意 】年 桁 : 2000~2099 年 の 範 囲 で 下 2 桁を 設 定 してください。時 桁 : 24 時 制 で 設 定 してください。曜 日 : 自 動 的 に 設 定 されます。[Precautions on data entry]Year digits : Enter two least significant digitswithin the range of 2000 to2099.Time digits : Enter the data in the 24-hourformat.Day of the week : Automatically set.4 カウントスタート/ Count start時 報 等 に 合 わせて 決 定 を 押 します。決 定 を 押 したタイミングから、 内 部 時 計 がカウントを 開 始 します。Press the SET button in tune with the time signal.As soon as the SET button is pressed, the built-inclock will start counting.5 設 定 終 了 / End of settingモードスイッチを 通 常 に 戻 します。通 常 でない 場 合 、プログラム 動 作 を 実 行 しません。アナログ 時 計 は、デジタル 時 計 に 連 動 して、 自動 的 に 調 針 します。Set the MODE switch back to NORMAL.Unless the MODE switch is at NORMAL, the systemwill not perform any programmed operation.The hands of the analog clock will be correctedautomatically as interlocked with the digital clock.※ 日 時 設 定 (3. 現 在 日 時 の 設 定 )を 中 止 する 時 は、キャンセルを 押 してください。To abort the setting of time and date ("3. Calendarsetting"), give a push to the CANCEL button.設 定 桁 の 値 を「1」 増 加Increment the setting digit.設 定 桁 の 値 を「1」 減 少Decrement the setting digit.設 定 桁 ( 点 滅 )の 移 動Used to shift the flickering digit(setting digit).18I-5974-4
9.4 プログラムの 設 定 方 法 / How to set the program9.4.1 週 間 プログラム/ Weekly program1 週 間 の 任 意 の 時 刻 に、メロディ 鳴 動 ・ 接 点 出 力 のプログラムを 作 成 し、 実 行 することができます。以 下 の3 種 類 の 週 間 プログラムを「 最 大 60プログラム」まで 設 定 可 能 です。It is possible to prepare and run a program that plays melodies and delivers dry contact outputsignals at any scheduled times of a week.Up to 60 programs of the following three types can be set for QBT-30.1 1 週 間 の 任 意 の 時 刻 に、メロディを 鳴 らす。 → P.202 1 週 間 の 任 意 の 時 刻 に、 接 点 出 力 を 行 う。 → P.223 1 週 間 の 任 意 の 時 刻 に、メロディを 鳴 らし、 接 点 出 力 を 行 う。 → P.241 Playing a melody at any scheduled time of a week → P.202 Generating dry contact output signal at any scheduled time of a week → P.223 Carrying out the playing of a melody and the generation of a drycontact output signal at any scheduled time of a week → P.24- メロディ/ Melodies -・ プログラム 設 定 ができるメロディは、 下 表 の10 曲 です。The programmable melodies are of the following 10 tunes:MELODY No. 曲 名 /Title of music 曲 の 長 さ/Length1 ウェストミンスターの 鐘 / Westminster Chime 40 秒 /sec.2 エーデルワイス/ Edelweiss 42 秒 /sec.3 小 さな 恋 のメロディ/ Melody Fair 43 秒 /sec.4 チムチム・チェリー/ Chim Chim Cheree 40 秒 /sec.5 ビビディ・バビディ・ブー/ Bibbidi-Babbidi-Boo 30 秒 /sec.6 夕 焼 け 小 焼 け/ Yuyake Koyake 40 秒 /sec.7 家 路 / Going Home 45 秒 /sec.8 別 れの 曲 / Etude Op.10,No.3 45 秒 /sec.9 美 女 と 野 獣 / Beauty and the Beast 44 秒 /sec.10 ア・ホール・ニュー・ワールド/ A Whole New World 41 秒 /sec.・ 内 蔵 スピーカの 音 量 調 節 は、 音 量 ツマミで 設 定 します。・ 外 部 スピーカの 音 量 調 整 は、ライン 出 力 レベルツマミを 最 大 にしたうえで、 外 部 アンプのボリュームで 設 定 します。・ The volume of the built-in speaker can be adjusted with the VOL. knob.・ Normally, the volume of the external speaker is adjusted with the volume knob of the externalamplifier with the LINE OUT LEVEL knob set at MAX.- 接 点 出 力 / Dry contact output signal -・ 外 部 の 機 器 をタイマー 動 作 させることができます。・ 接 点 出 力 は2チャンネル(CH1/CH2)で、プログラムごとに 出 力 CHを 設 定 します。・ 出 力 CHは、「CH1のみ 出 力 」「CH2のみ 出 力 」「CH1・2 両 方 出 力 」から 選 択 することができます。・ External devices can be controlled by QBT-30 via dry contact output signals.・ The dry contact output signals are available in 2 output channels (CH1/CH2), and any of thesechannels can be assigned to each specific program.・ The dry contact output signal can be delivered through CH1 alone or CH2 alone, or throughboth CH1 and CH2.19I-5974-4
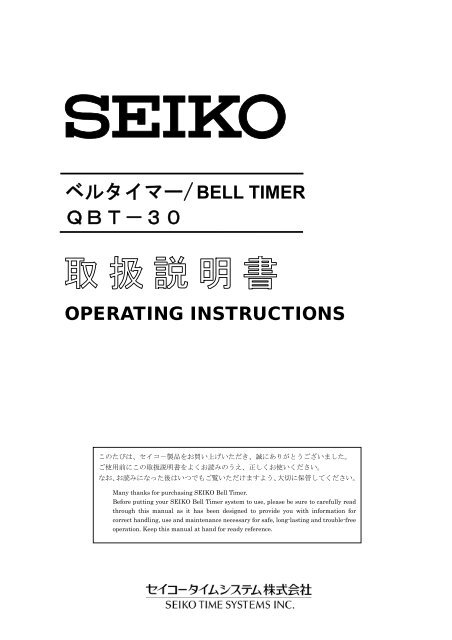
9.4.2 メロディ 鳴 動 / Playing the melodies例 )プログラムNo.3に 以 下 のプログラムを 設 定 する 場 合曜 日 ・ 開 始 時 刻 : 月 曜 日 ~ 金 曜 日 の 8:45 にメロディ : No.2(エーデルワイス)を 鳴 らす接 点 出 力 : なしEx.) To schedule Program No. 3 as follows:Day of the week and start time : 8:45 every weekdayMelody: No. 2 (Edelweiss)Dry contact output signal : None1 モード 切 替 / Mode selectモードスイッチをプログラム 設 定 に 合 わせます。(プログラムNo.1が 表 示 されます)Set the MODE switch to PROGRAM. (ProgramNo.1 will be displayed.)2 プログラムNo. 設 定 /Program No. selectプログラムNo.3を 選 び、 決 定 を 押 して 入力 を 開 始 します。Select Program No. 3, and press the SET buttonto start entry of data.3 曜 日 設 定 / Day-of-the-week select曜 日 ボタンで 月 ~ 金 曜 日 を 設 定 します。Select the days of the week (Mon.-Fri.) using thecorresponding DAY buttons.【 入 力 時 の 注 意 】各 曜 日 ボタンは 押 す 度 に、「 設 定 」と「 未 設 定 」を 繰 り 返 します。[Precautions on the data entry]The status of each specific day of the week willbe toggled between "selected [ - ]" and"deselected [ ]" every time when the DAYbutton is pressed.4 開 始 時 刻 設 定 / Start time select開 始 時 刻 8 時 45 分 を 設 定 します。Select the start time at 8:45.【 入 力 時 の 注 意 】時 桁 は、24 時 制 で 設 定 してください。[Precautions on data entry]Select the hours digits in the 24-hour format.5 メロディ 設 定 / Melody selectメロディNo.2を 設 定 します。Select Melody No. 2.設 定 桁 の 値 を「1」 増 加Increment the selected digit.[-]: 設 定[-]: denotes"selected"status.設 定 桁 ( 点 滅 )の 移 動Used to shift the flickeringdigit (selected digit).設 定 桁 の 値 を「1」 減 少Decrement the selected digit.20I-5974-4
6 決 定 / Setting設 定 内 容 を 確 認 した 後 、 決 定 を 押 します。After making sure that the data items selected arecorrect, press the SET button.未 設 定 項 目 がある 場 合 、 液 晶 画 面 全 体 が 点 滅 します。もう 一 度 、 設 定 内 容 をご 確 認 ください。1 曜 日 が 設 定 されていますか?2 メロディNo.が 設 定 されていますか?If there are any data items yet to be selected, theentire LCD screen will flash. Again check the dataitems selected.1 Are the days of the week selected?2 Is Melody No. selected?7 設 定 終 了 / End of settingモードスイッチを 通 常 に 戻 します。通 常 でない 場 合 、プログラム 動 作 を 実 行 しません。Turn the MODE switch back to NORMAL.Unless the MODE switch is selected at NORMAL,the program will not work.※ プログラム 設 定 (3. 曜 日 設 定 ~5.メロディ 設定 )を 途 中 で 中 止 する 時 は、キャンセルを 押 してください。To abort programming ("3. Day-of-the-weekselect" through "5. Melody select") halfway, pressthe CANCEL button.※ プログラム 設 定 中 、 試 し 鳴 らしを 押 すと 設 定 中のメロディを 鳴 らすことができます。By pressing the MELODY TEST button duringprogramming, you can play a melody beingselected.21I-5974-4
9.4.3 接 点 出 力 制 御 / Dry contact output signal control例 )プログラムNo.4に 以 下 のプログラムを 設 定 する 場 合曜 日 ・ 開 始 時 刻 : 土 ・ 日 曜 日 の 14:00 にメロディ : なし接 点 出 力 : CH1 から 4 時 間 (14:00~18:00) 出 力 するEx.) To schedule Program No. 4 as follows:Day of the week and start time : 14:00 on Sat. and Sun.Melody: NoneDry contact output signal : Output from CH1 for 4 hours (14:00 - 18:00)1 モード 切 替 / Mode selectモードスイッチをプログラム 設 定 に 合 わせます。(プログラムNo.1が 表 示 されます)Select the MODE switch at PROGRAM.(Program No. 1 will be displayed.)2 プログラムNo. 設 定 /Program No. selectプログラムNo.4を 選 び、 決 定 を 押 して 入力 を 開 始 します。Select Program No. 4, and press the SET buttonto start entry of data.3 曜 日 設 定 / Day-of-the-week select曜 日 ボタンで 土 ・ 日 曜 日 を 設 定 します。Select Sat. and Sun. by pressing respective DAYbuttons.【 入 力 時 の 注 意 】各 曜 日 ボタンは 押 す 度 に、「 設 定 」と「 未 設 定 」を 繰 り 返 します。[Precautions on data entry]The status of each specific day of the week will betoggled between "selected" [ - ] and "deselected"[ ] every time when its DAY button is pressed.4 開 始 時 刻 設 定 / Start time select開 始 時 刻 14 時 00 分 を 設 定 します。Select the start time at 14:00.【 入 力 時 の 注 意 】時 桁 は、24 時 制 で 設 定 してください。[Precautions on data entry]Select the hours digits in the 24-hour format.5 メロディNo. 取 り 消 し/Melody No. deselectメロディNo.を[-]にします。[-]の 場 合 、 開 始 時 刻 になってもメロディは鳴 りません。Deselect the melody No. The status of thatmelody No. will be turned "deselected [ - ]".If the melody No. is deselected, it will not beplayed even when the start time is reached.設 定 桁 の 値 を「1」 増 加Increment the setting digit.設 定 桁 の 値 を「1」 減 少Decrement the setting digit.[-]: 設 定[-]: denotes"selected"status.設 定 桁 ( 点 滅 )の 移 動Used to shift theflickering digit (settingdigit).22I-5974-4
6 出 力 CH 設 定 / Output channel select出 力 CHをCH に 設 定 します。Select CH as output channel.【 入 力 時 の 注 意 】出 力 CHは、4 種 類 から 設 定 可 能 です。CH1のみ 出 力 : [CH]CH2のみ 出 力 : [CH]CH1・2 両 方 出 力 : [CH]出 力 なし:[CH ]( 表 示 なし)[Precautions on data entry]The following four combinations of outputs are available:CH1 output only:[CH]CH2 output only:[CH]Output from both CH1 and CH2 : [CH]No output:[CH ](no indication)7 出 力 時 間 設 定 / Output duration select出 力 時 間 を4h00m00s に 設 定 します。Select the output duration at 4h00m00s.【 入 力 時 の 注 意 】出 力 時 間 は、1 秒 間 ~24 時 間 まで 設 定 できます。[Precautions on data entry]The output duration can be selected within the range of 1second to 24 hours.8 決 定 / Setting設 定 内 容 を 確 認 した 後 、 決 定 を 押 します。After making sure that the data items selected are correct,press the SET button.未 設 定 項 目 がある 場 合 、 液 晶 画 面 全 体 が 点 滅 します。もう 一 度 設 定 内 容 をご 確 認 ください。1 曜 日 が 設 定 されていますか?2 出 力 CHが 設 定 されていますか?3 出 力 時 間 が0h00m00s になっていませんか?If there are any data items yet to be selected, the entireLCD screen will flash. Again check the data items selected.1 Are the days of the week selected?2 Are output channels selected?3 Isn't the output duration selected at 0h00m00s?9 設 定 終 了 / End of settingモードスイッチを 通 常 に 戻 します。通 常 でない 場 合 、プログラム 動 作 を 実 行 しません。Turn the MODE switch back to NORMAL.Unless the MODE switch is selected at NORMAL, theprogram will not work.※ プログラム 設 定 (3. 曜 日 設 定 ~7. 出 力 時 間 設 定 )を途 中 で 中 止 する 時 は、キャンセルを 押 してください。To abort programming ("3. Day-of-the-week select"through "7. Output duration select") halfway, press theCANCEL button.23I-5974-4
9.4.4 メロディ 鳴 動 と 接 点 出 力 制 御 / Control of melody playing and dry contact output signal例 )プログラムNo.5に 以 下 のプログラムを 設 定 する 場 合曜 日 ・ 開 始 時 刻 : 月 ・ 水 ・ 金 曜 日 の 17:30 にメロディ : No.7( 家 路 ) を 鳴 らす接 点 出 力 : CH2 から 50 秒 間 出 力 する(アンプ 起 動 )Ex.) To schedule Program No. 5 as follows:Day of the week and start time : 17:30 on Mon., Wed. and Fri.Melody: No. 7 (Going Home)Dry contact signal output : Output from CH2 for 50 sec. (amplifier activated)1 モード 切 替 /Mode selectモードスイッチをプログラム 設 定 に 合 わせます。Select the MODE switch at PROGRAM.2 プログラムNo. 設 定 /Program No. selectプログラムNo.5を 選 び、 決 定 を 押 して 入力 を 開 始 します。Select Program No. 5, and press the SET buttonto start entry of data.3 曜 日 設 定 / Day-of-the-week select曜 日 ボタンで 月 ・ 水 ・ 金 曜 日 を 設 定 します。Select Mon., Wed., and Fri. by pressing respectiveDAY buttons.【 入 力 時 の 注 意 】各 曜 日 ボタンは 押 す 度 に、「 設 定 」と「 未 設 定 」を 繰 り 返 します。[Precautions on data entry]The status of each specific day of the week will betoggled between "selected" [ - ] and "deselected"[ ] every time when its DAY button is pressed.4 開 始 時 刻 設 定 / Start time select開 始 時 刻 17 時 30 分 を 設 定 します。Select the start time at 17:30.【 入 力 時 の 注 意 】時 桁 は、24 時 制 で 設 定 してください。[Precautions on data entry]Select the hours digits in the 24-hour format.5 メロディ 設 定 / Melody selectメロディNo.7を 設 定 します。Select Melody No. 7.設 定 桁 の 値 を「1」 増 加Increment the setting digit.設 定 桁 の 値 を「1」 減 少Decrement the setting digit.[-]: 設 定[-]: denotes"selected"status.設 定 桁 ( 点 滅 )の 移 動Used to shift theflickering digit(setting digit).24I-5974-4
6 出 力 CH 設 定 / Output channel select出 力 CHをCHに 設 定 します。Select CH as output channel.【 入 力 時 の 注 意 】出 力 CHは、4 種 類 から 設 定 可 能 です。CH1のみ 出 力 : [CH]CH2のみ 出 力 : [CH]CH1・2 両 方 出 力 : [CH]出 力 なし:[CH ]( 表 示 なし)[Precautions on data entry]The following four combinations of outputs are available:CH1 output only:[CH]CH2 output only:[CH]Output from both CH1 and CH2 : [CH]No output:[CH ](no indication)7 出 力 時 間 設 定 / Output duration select出 力 時 間 を0h00m50s に 設 定 します。Select the output duration at 0h00m50s.【 入 力 時 の 注 意 】出 力 時 間 は、1 秒 間 ~24 時 間 まで 設 定 できます。曲 の 長 さよりも 少 し 長 めに 設 定 します。[Precautions on data entry]The output duration can be selected within the range of 1second to 24 hours.The output duration should be made a little longer than theplaying time of the music piece.8 決 定 / Setting設 定 内 容 を 確 認 した 後 、 決 定 を 押 します。After making sure that the data items selected are correct,press the SET button.未 設 定 項 目 がある 場 合 、 液 晶 画 面 全 体 が 点 滅 します。もう 一 度 設 定 内 容 をご 確 認 ください。1 曜 日 が 設 定 されていますか?2 メロディNo.が 設 定 されていますか?3 出 力 CHが 設 定 されていますか?4 出 力 時 間 が0h00m00s になっていませんか?If there are any data items yet to be selected, the entireLCD screen will flash. Again check the data items selected.1 Are the days of the week selected?2 Is Melody No. selected?3 Are output channels selected?4 Isn't the output duration selected at 0h00m00s?9 設 定 終 了 / End of settingモードスイッチを 通 常 に 戻 します。通 常 でない 場 合 、プログラム 動 作 を 実 行 しません。Turn the MODE switch back to NORMAL.Unless the MODE switch is selected at NORMAL, theprogram will not work.※ プログラム 設 定 (3. 曜 日 設 定 ~7. 出 力 時 間 設 定 )を途 中 で 中 止 する 時 は、キャンセルを 押 してください。To abort programming ("3. Day-of-the-week select"through "7. Output duration select") halfway, press theCANCEL button.※ プログラム 設 定 中 、 試 し 鳴 らしを 押 すと 設 定 中 のメロディを 鳴 らすことができます。By pressing the MELODY TEST button duringprogramming, you can play a melody being selected.25I-5974-4
9.4.5 プログラムのコピー/ How to copy a program例 )プログラムNo.3( 設 定 済 )をNo.6( 空 )にコピーする。Ex.) To copy the data "from Program No. 3 (done)" "to Program No. 6 (empty)", follow the stepsbelow:1 モード 切 替 / Mode selectモードスイッチをプログラム 設 定 に 合 わせます。Select the MODE switch at PROGRAM.2 コピー 元 プログラム 設 定 /"From-program" selectプログラムNO.3を 選 びます。Select Program No. 3 as a "from-program."3 コピー/ Copyingコピーを 押 します。画 面 が 点 滅 し、コピーしたことをお 知 らせします。Press the COPY button. When the copying isdone, the LCD screen will flash.4 コピー 先 プログラム 設 定 /"To-program" selectプログラムNO.6を 選 びます。Select Program No. 6 as a "to-program."5 貼 り 付 け/ Pasting貼 り 付 けを 押 します。プログラムNO.3の 内 容 が、プログラム No.6にコピーされます。貼 り 付 け 後 、 必 要 な 部 分 を 変 更 してください。Press the PASTE.Program No. 3 will be pasted to Program No. 6.After pasting the data, correct it if necessary.26I-5974-4
9.4.6 プログラムの 消 去 / How to clear a program例 )プログラムNo.5を 消 去 する。Ex.) To clear Program No. 5, follow the steps below:1 モード 切 替 / Mode selectモードスイッチをプログラム 設 定 に 合 わせます。Select the MODE switch at PROGRAM.2 消 去 プログラム 設 定 /Selecting a program to be clearedプログラムNo.5を 選 びます。Select Program No. 5.3 プログラム 内 容 消 去 /Clearing the program data消 去 を 長 押 しします。プログラム 内 容 が 消 去 されますHold down the CLEAR button for a while.The program data will be cleared.9.4.7 プログラムの 全 消 去 / How to clear all the selected programs1 モード 切 替 / Mode selectモードスイッチをプログラム 設 定 に 合 わせます。Select the MODE switch at PROGRAM.2 プログラム 全 消 去 / All clear全 消 去 を 長 押 しします設 定 されている 全 てのプログラムが 消 去 されます。Hold down the ALL CLEAR button for a while.All the programs selected will be cleared.27I-5974-4
9.5 接 点 出 力 方 法 の 切 替 / Changeover of dry contact signal output mode■ 出 力 方 法 の 切 替 / Changeover of output mode接 点 出 力 CH1/2 各 々について、 出 力 方 法 を 自 動 / 切 / 手 動 から 選 択 することができます。自 動 :プログラムに 従 った 接 点 出 力 を 行 います。切 :プログラムに 関 係 なく、 接 点 出 力 を 強 制 的 に 停 止 させます。手 動 :プログラムに 関 係 なく、 接 点 出 力 を 強 制 的 に 行 います。For each of the dry contact output channels CH1 and CH2, any one ofthe following modes can be selected:AUTOOFFMANUAL: Contact output is generated according to a program in action.: Forces contact output off without regards to programs.: Forces contact output on without regard to programs.■ 10 秒 前 出 力 /10 sec. advance warm-up出 力 方 法 が 自 動 の 場 合 にのみ 有 効 です。10 秒 前 出 力 スイッチが 入 の 時 、プログラムで 設 定 された 開 始 時 刻の10 秒 前 から 出 力 します。The switch is enabled only when the output mode is AUTO.When the -10sec. switch is ON, an output will be generated 10 secondsahead of the start time preset in the program.例 )/ Ex.)左 図 の 設 定 の 場 合 、CH1からは9 時 59 分 50 秒 ~10 時 30 分 00 秒 の「30 分 10 秒 間 」 出 力 されます。With the settings at left, an output will begenerated for 30min.10sec. from 9:59:50 to10:30:00.28I-5974-4
9.6 メロディの 試 し 鳴 らし/ Melody test例 )モードスイッチが 通 常 中 に、MELODY No.6( 夕 焼 け 小 焼 け)の 試 し 鳴 らしを 行 う。Ex.) To play Melody No. 6 (Yuyake-Koyake) with the MODE switch selected at NORMAL,follow the steps below:1 モード 切 替 / Mode selectメロディの 試 し 鳴 らしは、モードスイッチが通 常 で 行 うことができます。Melody test can be made with the MODE switchat NORMAL.2 試 し 鳴 らしモードへの 移 行 /Activation of melody test mode試 し 鳴 らしを 押 します。液 晶 画 面 に「MELODY No.1」が 点 滅表 示 されます。Press the MELODY TEST button."MELODY NO. 1" will flash on the LCD screen.3 メロディ 選 択 / Melody selectメロディNo.6を 選 択 します。Select Melody No. 6.4 試 し 鳴 らし 開 始 / Melody test試 し 鳴 らしを 押 すと、メロディNo.6( 夕 焼け 小 焼 け)が 鳴 ります。試 し 鳴 らし 中 、 再 度 試 し 鳴 らしを 押 すと 停 止 します。Press the MELODY TEST button, and Melody No.6 (Yuyake-Koyake) will be played.When the MELODY TEST button is pressed againduring melody test, the melody test will be toggledoff.5 試 し 鳴 らしモードの 終 了 /End of melody test mode「1 分 間 」どのスイッチも 押 さないと、 液 晶 画面 の「MELODY No.」が 自 動 的 に 消 えます。If none of the switches have been pressed for oneminute, "MELODY NO." will disappear from theLCD screen.29I-5974-4
9.7 サマータイムの 設 定 方 法 / How to set the summer timeサマータイムの 設 定 方 法 は、タイムリンクスイッチの 状 態 によって 異 なります。The procedure for setting up the summer time varies depending on the status of the TIME LINKswitch.■ 自 動 設 定 / Auto mode –Japan Only-タイムリンクスイッチが 入 の 時 、サマータイムは 自 動 的 に 設 定 されます。タイムリンクについての 詳 細 は、『9-8 タイムリンク』を 参 照 してください。■ 手 動 設 定 / Manual modeタイムリンクスイッチが 切 の 時 、サマータイムボタン 操 作 で 手 動 で 設 定 します。When the TIME LINK switch is OFF, the summer time needs to be set manually.1 サマータイムの 開 始 / Start of summer timeサマータイムボタンを 長 押 しします。Hold down the SUMMER TIME button for awhile.「SUMMER TIME」 表 示"SUMMER TIME"displayedデジタル 時 計 : +1 時 間アナログ 時 計 : 1 時 間 早 送 り液 晶 画 面 :「SUMMER TIME」 表 示Digital clock : +1 hourAnalog clock : Fast feed by 1 hour.LCD screen : "SUMMER TIME" displayed2 サマータイムの 終 了 / End of summer timeサマータイムボタンを1 秒 間 押 します。Hold down the SUMMER TIME button for 1second.「SUMMER TIME」 消 去"SUMMER TIME"disappears.デジタル 時 計 : -1 時 間アナログ 時 計 : 11 時 間 早 送 り液 晶 画 面 :「SUMMER TIME」 消 去Digital clock : -1 hourAnalog clock : Fast feed by 11 hoursLCD screen : "SUMMER TIME" disappears30I-5974-4
9.8 タイムリンク –Japan Only-9.8.1 タイムリンクとはタイムリンクとは、 標 準 電 波 から 取 得 した 正 確 な 時 刻 を 無 線 を 使 って 伝 達 するシステムです。タイムリンクを 使 用 することで、 常 に 正 確 な 時 刻 で 動 作 します。タイムリンクを 使 用 するには 以 下 の2つの 方 法 があります。■ タイムリンク 送 信 機 ZA303N を 使 用建 物 内 の 窓 際 にZA303Nを 置 き、 標 準 電 波 を 受 信 します。屋 内 は、タイムリンクで、 約 40mの 伝 達 が 可 能 です。( 障 害 物 のない 場 合 )標 準 電 波屋 内ZA303Nタイムリンク窓障 害 物 のない 場 合 、 約 40m障 害 物 があったり、 距 離 が 遠 いなどの 理 由 で、タイムリンクの 電 波 が 届 かない 場 合 は、途 中 にZA303Nを 置 いて、 中 継 させることもできます。標 準 電 波屋 内タイムリンクタイムリンク窓31I-5974-4
■ 長 波 受 信 器 SLR-201 と タイムリンクプロ 中 継 器 SW-302 を 使 用建 物 内 の 窓 際 で 標 準 電 波 が 受 信 できない 場 合 は、 屋 外 にSLR-201を 取 り 付 けます。屋 内 はSW-302を 使 用 し、タイムリンクで、 約 40mの 伝 達 が 可 能 です。( 障 害 物 のない 場 合 )標 準 電 波SLR-201タイムリンクプロ屋 内タイムリンクSW-302窓障 害 物 のない 場 合 、 約 40m障 害 物 があったり、 距 離 が 遠 いなどの 理 由 で、タイムリンクの 電 波 が 届 かない 場 合 は、途 中 にSW-302または、ZA303Nを 置 いて、 中 継 させることもできます。標 準 電 波タイムリンクプロ屋 内タイムリンク窓32I-5974-4
9.8.2 操 作 方 法1 事 前 準 備<strong>ベルタイマー</strong> 本 体 の 操 作 の 前 に■ZA303Nをご 使 用 の 場 合a)ZA303Nの 取 扱 説 明 書 に 従 い、 窓 際 で 標 準 電 波 を 受 信 させて、 現 在 時 刻 を 取 得させます。b) 送 信 ボタンを 押 し、タイムリンクを 手 動 送 信 します。※ZA303Nは、 手 動 送 信 の 操 作 により30 分 間 タイムリンク 送 信 した 後 に 自 動 停 止します。 自 動 停 止 後 は1 時 間 ごとに1 回 タイムリンクを 送 信 します。■SLR-201とSW-302をご 使 用 の 場 合a)SLR-201を 屋 外 に、SW-302を 屋 内 に 取 り 付 けます。SW-302は電 源 を 投 入 します。b)SLR-201が 起 動 するのを 待 ちます。※SLR-201は、 日 光 が 当 たると 充 電 を 開 始 し、 十 分 に 充 電 されると 自 動 的 に起 動 します。 起 動 には 良 く 晴 れている 場 合 でも 約 30 分 程 度 かかりますので、<strong>ベルタイマー</strong>をご 使 用 になる 前 日 までに 取 り 付 けされることをお 勧 めします。c)SLR-201が 起 動 後 に 送 信 するタイムリンクプロによって、SW-302に時 刻 がセットされたことを 確 認 します。※SW-302の 液 晶 画 面 に 現 在 時 刻 が 表 示 されていることで 確 認 できます。※SW-302は、10 分 ごとに1 回 タイムリンクを 送 信 します。詳 細 は 各 製 品 の 取 扱 説 明 書 をご 覧 ください。以 上 で 準 備 は 完 了 です。2ここから<strong>ベルタイマー</strong> 本 体 の 操 作 に 入 ります。タイムリンクスイッチを 入 に 合 わせます。タイムリンク 受 信 が 点 滅 し、タイムリンクの 受 信 を 開 始 します。タイムリンクの 受 信 に 成 功 すると、タイムリンク 受 信 が 点 灯 になります。受 信 に 成 功 したら30 分 経 ってもタイムリンク 受 信 が 点 滅 のままの 場 合 、タイムリンクが 受 信 できません。タイムリンク 受 信 が 点 灯 にならない 場 合<strong>ベルタイマー</strong> 本 体 を 受 信 できる 位 置 に 移 動してください。※ZA303NやSW-302を 移 動 することも 可 能 ですが、その 場 合 は 事 前 準 備からやり 直 しとなります。30 分 以 上 点 滅 のまま設 置 場 所 の 変 更 が 必 要33I-5974-4
9.8.3 定 期 受 信タイムリンクの 受 信 に 成 功 した 後 は、1 時 間 ごとに 定 期 受 信 を 行 います。この 定 期 受 信 により、 常 に 正 しい 時 刻 を 保 ちます。※ 定 期 受 信 は 自 動 的 に 行 われますので、 操 作 は 不 要 です。なお、 定 期 受 信 が24 回 (24 時 間 ) 以 上 連 続 して 失 敗 した 場 合 に、タイムリンク 受 信 が 消 灯 します。この 場 合 、 前 頁 の“タイムリンク 受 信 が 点 灯 にならない 場 合 ”と 同 様 に設 置 場 所 の 見 直 しを 行 ってください。9.8.4 手 動 受 信モードスイッチが 通 常 で、タイムリンクスイッチが 入 の 時手 動 受 信 ボタンを 押 すことにより、 直 ちにタイムリンクを 受 信させることができます。モードスイッチが 通 常 中 に 手 動 受 信 ボタンを 押 すことにより、直 ちにタイムリンクを 受 信 させることができます。手 動 受 信 は、タイムリンクスイッチを 入 にした 場 合 と 同 様 に受 信 が 成 功 するまで、タイムリンク 受 信 が 点 滅 を 続 けます。手 動 受 信 は 通 常 、 使 用 する 必 要 はありません。<strong>ベルタイマー</strong> 本 体 を 移 動 した 場 合 などにタイムリンクの 受 信 確 認 として使 用 してください。34I-5974-4
10. 標 準 電 波 –Japan Only-10.1 標 準 電 波 とは独 立 行 政 法 人 情 報 通 信 研 究 機 構 (NICT)が 運 用 しており、 高 精 度 の 時 刻 情 報 およびカレンダー情 報 が 入 った 電 波 です。標 準 電 波 は、 国 内 の 次 の2カ 所 から 送 信 されております。1 福 島 県 南 部 の おおたかどや 山 にある 送 信 所周 波 数 40kHz2 福 岡 県 と 佐 賀 県 の 県 境 にある はがね 山 にある 送 信 所 周 波 数 60kHz標 準 電 波 の 詳 細 については、 独 立 行 政 法 人 情 報 通 信 研 究 機 構 (NICT)のホームページをご 参 照 ください。ホームページアドレス http://jjy.nict.go.jp/10.2 電 波 受 信 可 能 範 囲 は?送 信 所 から 約 1000kmの 範 囲 です。はがね 山送 信 所 (60kHz)おおたかどや 山送 信 所 (40kHz)1000km 範 囲10.3 設 置 場 所 に 関 する 注 意 は?標 準 電 波 の 受 信 は 自 動 で 行 っていますが、 受 信 可 能 な 範 囲 であっても、 天 候 、 時 間 帯 、 地 形 や 建 物の 影 響 などにより 正 常 に 受 信 できない 場 合 があります。また、 設 置 場 所 の 周 囲 から 発 生 する 電 波 ノイズの 影 響 により、 受 信 が 妨 害 されることがあります。( 電 気 機 器 ・ 変 電 所 ・ 高 架 ・ 工 事 現 場 ・ 交 通 量 の 多 い 場 所 ・・・・などの 近 傍 はなるべく 避 ける)このような 電 波 の 受 信 不 良 が 頻 繁 に 発 生 する 場 合 は、 長 波 受 信 器 の 設 置 場 所 や 配 線 経 路 を 変 更 するなどの 対 策 を 行 ってください。10.4 仕 様○ 修 正 精 度±100ms 以 下○ 受 信 周 波 数 40kHz/60kHz ( 自 動 選 択 )○ 感 度50dBuV/m 以 下35I-5974-4
11. 停 電 補 償 / Backup against Commercial Power Failure本 製 品 は、 充 電 式 のリチウム 電 池 を 内 蔵 し、 停 電 時 の 動 作 補 償 を 行 っています。なお 停 電 中 の 動 作 は 以 下 のようになります。アナログ 時 計液 晶 画 面各 種 操 作プログラム 実 行停 電 補 償 時 間: 運 針 を 続 けます: 表 示 が 消 えます: 操 作 できません: 実 行 されません: 24 時 間※プログラムの 内 容 は、 停 電 時 間 に 関 わらず、10 年 間 保 持 されます。停 電 補 償 時 間 を 越 えた 停 電 が 発 生 した 場 合 、または 充 電 時 間 (24 時 間 )が 不 十 分 だった 場 合 は、時 計 が 止 まることがあります。その 場 合 は、 停 電 が 復 帰 してから、システムリセットボタンを 押 してください。The Bell Timer Model QBT-30 has a built-in rechargeable lithium battery as a backup againstcommercial power failure.Even during commercial power failure, the basic performance will be maintained except forfunctional degeneration as follows.Analog clock : Continues running.LCD screen : Turned offControl functions : DisabledPrograms : Will not runBackup time : 24 hours* The program data will be preserved unaffected by commercial power failure for 10 years.Should the commercial power failure continue in excess of the backup time, or the battery is notrecharged for 24 hours, the clock may run down.In such a case, press the SYSTEM RESET button after restoration of power supply.12. 故 障 と 思 われる 前 に/ Troubles You Can Solve Yourself● まず、 次 のことを 確 認 して 下 さい。Before calling your agent or dealer for service, check the following list for possible troublesthat you yourself can remedy without difficulty by following the instructions written in thismanual.(1) 液 晶 画 面 に 何 も 表 示 しない/ Nothing is displayed on the LCD screen.・ACコードが 正 しく 接 続 されていますか?・ 規 定 の 電 源 が 供 給 されていますか?・ Is the AC power cord connected in position?・ Is the power supply rating right for the Bell Timer?(2) ボタン・スイッチを 押 しても 動 作 しない/The Bell Timer does not respond to the operation of any button or switch.・はじめにシステムリセットボタンを 押 してください。・ Press the SYSTEM RESET button at first.36I-5974-4
(3) 音 が 出 ない/ No sound is generated.( 内 蔵 スピーカの 場 合 )・ 音 量 ツマミを 最 小 にしていませんか?( 外 部 スピーカの 場 合 )・ライン 出 力 レベルのツマミを 最 小 にしていませんか?・ 外 部 アンプの 電 源 は 入 っていますか?・ 外 部 アンプのボリュームを 最 小 にしていませんか?In case of built-in speaker:・ Isn't the VOL knob turned to a minimum?In case of external speaker:・ Isn't the LINE OUT LEVEL knob turned to a minimum?・ Is the external amplifier turned on?・ Isn't the volume of the external amplifier turned to a minimum?(4) プログラムが 実 行 されない/ The program will not run.・プログラムは 入 力 されていますか?・モードスイッチが 通 常 の 位 置 にあることを 確 認 してください。・ 時 刻 ( 日 付 ・ 時 間 )は 合 っていますか?・ 外 部 配 線 は 正 しくされていますか?・ 停 電 中 ではありませんか?・ Has a schedule of operations incorporated into the program?・ Make sure that the MODE switch is at NORMAL.・ Is the time (date, time) correct?・ Is the field wiring correct?・ Isn't the commercial power supply off?(5) アナログ 時 計 が 狂 う/ The analog clock gets out of order.・ 液 晶 画 面 の 時 刻 は 合 っていますか?・システムリセットボタンを 押 してください。・Is the time displayed on the LCD screen correct?・Press the SYSTEM RESET button.(6) 停 電 復 帰 後 、 時 計 が 狂 う/The clock gets out of order after recovery from commercial power failure.・24 時 間 以 上 の 停 電 ではありませんでしたか?・ 復 帰 後 にシステムリセットボタンを 押 してください。・Hasn't the commercial power failure continued for more than 24 hours?・Be sure to press the SYSTEM RESET button after recovery from power failure.以 上 の 確 認 で 直 らないとき、またはその 他 の 異 常 が 発 生 したときは、お 買 い 上 げいただいた販 売 店 もしくは 販 売 会 社 へご 連 絡 ください。If the above troubleshooting still fails, or if other troubles occur, call your nearbySEIKO dealer or agent for service.37I-5974-4
警 告WARNING修 理 は、お 買 い 上 げいただいた 販 売 店 もしくは 販 売 会 社 へご 依 頼 ください。 修 理 技 術 者 以 外 の 人 が 分 解 したり 修 理 ・ 改 造 を 行 うと 感 電 や 火 災 の原 因 になります。Call your nearby SEIKO dealer or agent for repair service. Unauthorizeddisassembly, repair or modification may cause electric shock accidentsor fire accidents.13.お 客 様 へのお 願 い/ Daily Servicing by the User外 装 の 手 入 れの 仕 方 / Care of enclosure外 装 の 汚 れがひどいときは、 水 でうすめた 中 性 洗 剤 を 少 量 やわらかい 布 につけて 拭 き、拭 いた 後 で 乾 拭 きをしてください。ベンジン、シンナー、ミガキ 粉 、 各 種 ブラシなどは 使 わないでください。If the enclosure is found soiled, clean with a soft cloth soaked with a small quantity of neutralsyndet diluted with water, and then polish with a dry cloth.Never use solvents (benzene, thinner, or the like), abrasives (polishing powder or the like),and bristle brushes.14. 保 証 について/ Warranty● この 製 品 の 修 理 用 部 品 の 保 存 期 間 は、 通 常 7 年 を 基 準 としています。 正 常 なご 使 用 であればこの 期 間 は 原 則 として 修 理 は 可 能 です。 修 理 用 部 品 とは、 製 品 の 機 能 を 維 持 するのに 不 可 欠な 製 品 本 体 の 部 品 です。● 修 理 の 可 能 な 期 間 はご 使 用 条 件 によりいちじるしく 異 なり、また、 精 度 も 元 通 りにならない場 合 がありますので、 修 理 ご 依 頼 の 際 はお 買 い 上 げいただいた 販 売 店 もしくは 販 売 会 社 へご 相 談 ください。● 修 理 のとき、 部 品 ・その 他 の 付 属 品 などは 一 部 代 替 部 品 を 使 用 させていただくこともありますので、ご 了 承 ください。● その 他 ご 不 明 の 点 がありましたら、お 買 い 上 げいただいた 販 売 店 もしくは 販 売 会 社 へお 問 い合 わせください。● In principle, the spare parts for the Bell Timer Model QBT-30 will be available for 7 yearsafter sale, and your Bell Timer will be repaired within this period if it becomes faultyunder normal conditions of use. The spare parts here refer to the parts and componentsessential for the functions of the Bell Timer.● The period for which repair services are available varies over a wide range depending onhow your Bell Timer has been used. It should be noted that even if repair services aremade available, the timing accuracy may not be reinstated. For details, consult yourSEIKO dealer or agent.● It is to be understood that SEIKO reserves the right to use substitutions for parts oraccessories for the purpose of repair service.● If you should have any question or inquiry, please do not hesitate to consult your SEIKOdealer or agent.38I-5974-4
15. 仕 様 /Specifications時 計 部タ イ マ ー内 蔵 水 晶 精 度 平 均 月 差 ±3 秒 (+5~+35℃)表示アナログ 2 針 式デジタル 年 月 日 、 曜 日 、 時 分 秒 (24 時 制 ) 液 晶 表 示時 刻 設 定操 作 パネルからのキー 入 力※タイムリンク 使 用 時 は 不 要時 刻 修 正 標 準 電 波 による 修 正 (オプション)プ ロ グ ラ ム 数 最 大 60プログラム設 定 単 位 1 分 単 位設 定 方 式 操 作 パネルからのキー 入 力 ( 液 晶 表 示 ガイダンス)接 点 出 力 独 立 2チャネル( 無 電 圧 接 点 )AC125V 5A接 点 容 量 AC250V 3ADC30V 5A接 点 出 力 時 間 1 秒 単 位 で 設 定 可 ( 最 大 24 時 間 00 分 00 秒 )メ ロ デ ィ曲目10 曲メロディNo.01 ウェストミンスターの 鐘 (40 秒 )No.02 エーデルワイス(42 秒 )No.03 小 さな 恋 のメロディ(43 秒 )No.04 チムチム・チェリー(40 秒 )No.05 ビビディ・バビディ・ブー(30 秒 )No.06 夕 焼 け 小 焼 け(40 秒 )No.07 家 路 (45 秒 )No.08 別 れの 曲 (45 秒 )No.09 美 女 と 野 獣 (44 秒 )No.10 ア・ホール・ニュー・ワールド(41 秒 )内 蔵 スピーカ 8Ω 500mWラ イ ン 出 力 150mV(47kΩ)入 力 電 源 AC90V~AC120V、AC200V~AC240V消 費 電 力 約 4.0W動 作 温 度範 囲-10℃ ~ +50℃停 電 補 償時 計 部 :24 時 間プログラム:10 年外 形 寸 法 W270×H372×D58.5 単 位 :mm構 造取 付 方 法 壁 掛 型外 装 仕 上 樹 脂 製 アイボリー質 量 約 2.0Kg( 本 体 のみ)安 全 規 格 電 気 用 品 安 全 法39I-5974-4
Clock unitTimerTiming accuracy ofbuilt-in quartz oscillatorIndicationTime settingTime correctionNumber of programsSetting unitSetting systemContact signal outputCurrent-carryingcapacity of contactsContact output durationMean monthly rate: ±3 sec.(+5~+35℃)Analog : 2-hand typeDigital : Year, month, date, day of the week, hour, minuteand seconds (24-hour format); LCD displayBy keying data from the control panel.Correction by standard radio wave (Japan Only)60 max.In 1-minute incrementBy LCD screen-guided keying of data from the control panel2 independent channels (dry contact signal)AC125V / 5 AAC250V / 3ADC30V / 5AAdjustable in seconds (Max. duration: 24h00m00s)MelodyTitle of the music10 TunesMelody No.01No.02No.03No.04No.05No.06No.07No.08No.09No.10Westminster Chime(40 Sec.)Edelweiss(42 Sec.)Melody Fair(43 Sec.)Chim Chim Cheree(40 Sec.)Bibbidi-Babbidi-Boo(30 Sec.)Yuyake Koyake(40 Sec.)Going Home(45 Sec.)Etude Op.10,No.3(45 Sec.)Beauty and the Beast(44 Sec.)A Whole New World(41 Sec.)Built-in speakerLine output8Ω / 500mW150mV (47kΩ)Input Power supply AC90V~AC120V, AC200V~AC240VPowerconsumptionapprox. 4.0WOperatingtemperaturerange-10℃ ~ +50℃CommercialClock : 24 hourspower failurebackup Programs : 10 yearsConstructionAppliedsafety law orregulationOverall dimensionsInstallationExternal finishMassW270×H372×D58.5 (mm)Wall mounted typeSynthetic resin, ivory-coloredapprox. 2.0 kg (main body)Electrical Appliance and Material Safety Law (Japan Only)40I-5974-4
16.プログラム 設 定 表 / Programming Table曜 日開 始 時 刻 メロディ 接 点 出 力 /Contact outputプログラム No.Day of the week Start time No.出 力 時 間ProgramNo. 日 月 火 水 木 金 土時 : 分 Melody CHOutput duration(H) : (M) No.時 間 : 分 : 秒Sun Mon Tue Wed Thu Fri Sat1 2 (H) : (M) : (S)1 : : :2 : : :3 : : :4 : : :5 : : :6 : : :7 : : :8 : : :9 : : :10 : : :11 : : :12 : : :13 : : :14 : : :15 : : :16 : : :17 : : :18 : : :19 : : :20 : : :21 : : :22 : : :23 : : :24 : : :25 : : :26 : : :27 : : :28 : : :29 : : :30 : : :31 : : :32 : : :33 : : :34 : : :35 : : :36 : : :37 : : :38 : : :39 : : :40 : : :41 : : :42 : : :43 : : :44 : : :45 : : :46 : : :47 : : :48 : : :49 : : :50 : : :51 : : :52 : : :53 : : :54 : : :55 : : :56 : : :57 : : :58 : : :59 : : :60 : : :備 考Remarks41I-5974-4
42I-5974-4
43I-5974-4
当 製 品 に 関 するお 問 い 合 わせおよび 修 理 依 頼 は、お 買 い 上 げいただいた 販 売 店 もしくは 下 記 へご 連 絡 ください。Any question, inquiry or request for repair you may have about theBell Timer should be placed with your SEIKO dealer or agent orwith the following:東 京 03(5646)1601東 北 022(261)1323名 古 屋 052(723)8531広 島 082(245)2571札 幌 011(640)6280信 越 0263(27)8601大 阪 06(6445)8804九 州 092(475)1291URL http://www.seiko-sts.co.jp44I-5974-4