SNMP - Tools4Ever.com
SNMP - Tools4Ever.com
SNMP - Tools4Ever.com

You also want an ePaper? Increase the reach of your titles
YUMPU automatically turns print PDFs into web optimized ePapers that Google loves.
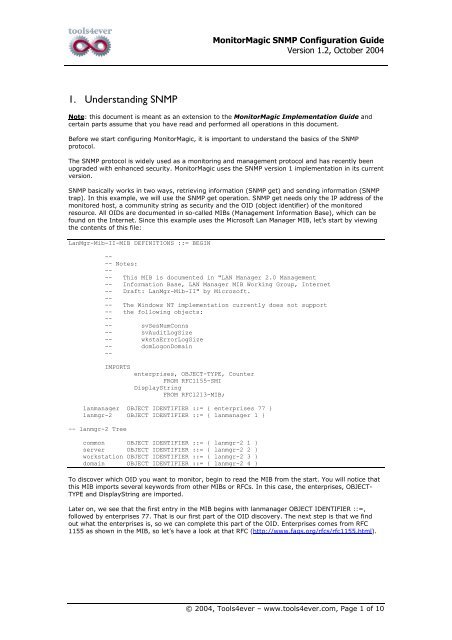
MonitorMagic <strong>SNMP</strong> Configuration GuideVersion 1.2, October 20041. Understanding <strong>SNMP</strong>Note: this document is meant as an extension to the MonitorMagic Implementation Guide andcertain parts assume that you have read and performed all operations in this document.Before we start configuring MonitorMagic, it is important to understand the basics of the <strong>SNMP</strong>protocol.The <strong>SNMP</strong> protocol is widely used as a monitoring and management protocol and has recently beenupgraded with enhanced security. MonitorMagic uses the <strong>SNMP</strong> version 1 implementation in its currentversion.<strong>SNMP</strong> basically works in two ways, retrieving information (<strong>SNMP</strong> get) and sending information (<strong>SNMP</strong>trap). In this example, we will use the <strong>SNMP</strong> get operation. <strong>SNMP</strong> get needs only the IP address of themonitored host, a <strong>com</strong>munity string as security and the OID (object identifier) of the monitoredresource. All OIDs are documented in so-called MIBs (Management Information Base), which can befound on the Internet. Since this example uses the Microsoft Lan Manager MIB, let’s start by viewingthe contents of this file:LanMgr-Mib-II-MIB DEFINITIONS ::= BEGIN---- Notes:---- This MIB is documented in "LAN Manager 2.0 Management-- Information Base, LAN Manager MIB Working Group, Internet-- Draft: LanMgr-Mib-II" by Microsoft.---- The Windows NT implementation currently does not support-- the following objects:---- svSesNumConns-- svAuditLogSize-- wkstaErrorLogSize-- domLogonDomain--IMPORTSenterprises, OBJECT-TYPE, CounterFROM RFC1155-SMIDisplayStringFROM RFC1213-MIB;lanmanager OBJECT IDENTIFIER ::= { enterprises 77 }lanmgr-2 OBJECT IDENTIFIER ::= { lanmanager 1 }-- lanmgr-2 Tree<strong>com</strong>mon OBJECT IDENTIFIER ::= { lanmgr-2 1 }server OBJECT IDENTIFIER ::= { lanmgr-2 2 }workstation OBJECT IDENTIFIER ::= { lanmgr-2 3 }domain OBJECT IDENTIFIER ::= { lanmgr-2 4 }To discover which OID you want to monitor, begin to read the MIB from the start. You will notice thatthis MIB imports several keywords from other MIBs or RFCs. In this case, the enterprises, OBJECT-TYPE and DisplayString are imported.Later on, we see that the first entry in the MIB begins with lanmanager OBJECT IDENTIFIER ::=,followed by enterprises 77. That is our first part of the OID discovery. The next step is that we findout what the enterprises is, so we can <strong>com</strong>plete this part of the OID. Enterprises <strong>com</strong>es from RFC1155 as shown in the MIB, so let’s have a look at that RFC (http://www.faqs.org/rfcs/rfc1155.html).© 2004, Tools4ever – www.tools4ever.<strong>com</strong>, Page 1 of 10
MonitorMagic <strong>SNMP</strong> Configuration GuideVersion 1.2, October 2004The root of every OID starts with Internet:internet OBJECT IDENTIFIER ::= { iso org(3) dod(6) 1 }directory OBJECT IDENTIFIER ::= { internet 1 }mgmt OBJECT IDENTIFIER ::= { internet 2 }experimental OBJECT IDENTIFIER ::= { internet 3 }private OBJECT IDENTIFIER ::= { internet 4 }enterprises OBJECT IDENTIFIER ::= { private 1 }This concludes that “enterprises” makes up for 1.3.6.1.4.1.If we continue reading the Microsoft Lan Manager MIB, we see that enterprises is followed by number77, so our OID for the lanmanager enterprise reads 1.3.6.1.4.1.77.2. <strong>SNMP</strong> object typesIn <strong>SNMP</strong>, monitored resources can be represented in different ways, for instance using a textual stringor a number. However, there are several important types to distinguish, and they have considerableimpact on the configuration in MonitorMagic. To find out which type a certain OID is, look at the OIDdocumentation in the MIB, then the SYNTAX field.The most important type where MonitorMagic needs additional configuration is the COUNTER type.This type will only increase and at a certain point in to reset to 0 and start counting again. This type iswidely used for resources such as bytes/second through a network interface. To get the actual value,you would have to get the COUNTER value at 2 points in time, and then detract them to get theincrease over the period of time. MonitorMagic has a special feature to automate this calculation,which we will discuss shortly later on.© 2004, Tools4ever – www.tools4ever.<strong>com</strong>, Page 2 of 10
MonitorMagic <strong>SNMP</strong> Configuration GuideVersion 1.2, October 20043. Locating the OID for your resourceLet’s go back to the Microsoft Lan Manager MIB and go through its contents. When scrolling throughthe file, we at some point get to the content as shown below:svShareTable OBJECT-TYPESYNTAX SEQUENCE OF SvShareEntryACCESS not-accessibleSTATUS mandatoryDESCRIPTION"The table of shares on this server."::= { server 27 }svShareEntry OBJECT-TYPESYNTAX SvShareEntryACCESS not-accessibleSTATUS mandatoryDESCRIPTION"A table entry corresponding to a single share on this server."INDEX { svShareName }::= { svShareTable 1 }SvShareEntry ::= SEQUENCE {svShareNameDisplayString ,svSharePathDisplayString ,svShareCommentDisplayString}svShareName OBJECT-TYPESYNTAX DisplayString (SIZE (1..12))ACCESS read-onlySTATUS mandatoryDESCRIPTION"The name of the share."::= { svShareEntry 1 }svSharePath OBJECT-TYPESYNTAX DisplayString (SIZE (1..255))ACCESS read-onlySTATUS mandatoryDESCRIPTION"The local name of this shared resource."::= { svShareEntry 2 }svShareComment OBJECT-TYPESYNTAX DisplayString (SIZE (0..255))ACCESS read-onlySTATUS mandatoryDESCRIPTION"A <strong>com</strong>ment associated with this share."::= { svShareEntry 3 }In this example, I would like to get the svShareName resource, which represents the name of aparticular share. When looking through this section, you will notice that the svShareName is actuallyan entry in a table, named svShareTable. This table has several entries which all have a columnnamed svShareName, and we’re interested to get all share names on a server.To get the OID for this resource, we start at the table root and work our way up to the top of the MIB.This table is represented by “server 27”. When looking at the top of the MIB, we see:lanmgr-2 OBJECT IDENTIFIER ::= { lanmanager 1 }server OBJECT IDENTIFIER ::= { lanmgr-2 2 }Conclusion: the table root OID = 1.3.6.1.4.1.77.1.2.27© 2004, Tools4ever – www.tools4ever.<strong>com</strong>, Page 3 of 10
MonitorMagic <strong>SNMP</strong> Configuration GuideVersion 1.2, October 20044. Creating an <strong>SNMP</strong> policy in MonitorMagicIn the previous chapters we have found out what we want to monitor and where to start. We can nowuse MonitorMagic to put everything together.Create a policy called “<strong>SNMP</strong> Shares”. In this policy, create a new “Snmp Get” monitor. In thefollowing window, click Add to define a new <strong>SNMP</strong> OID. Specify the host IP address, <strong>com</strong>munity stringand the OID found in the previous chapter, as shown below.Click the Advanced button to access the advanced <strong>SNMP</strong> configuration. In this window, select theoptions as shown below:In the next dialog, we can test the results of the <strong>SNMP</strong> query on the svShareTable resource.© 2004, Tools4ever – www.tools4ever.<strong>com</strong>, Page 4 of 10
MonitorMagic <strong>SNMP</strong> Configuration GuideVersion 1.2, October 2004In this dialog, make sure to append .1 after the OID to make sure that MonitorMagic starts at thetable root for each entry and click GET DATA. You will see results similar to the data shown below.We see that the second column contains the name and corresponds with the information from theMIB, where svShareName was also the second column. We are now sure that we can monitor thisresource correctly, so click OK to exit this window. In the next dialog, toggle the switch “Generatemonitors for all rows”, and then click the Edit button in the Object Identifier specification frame. Inthis dialog, you can enter a description for the svShareName resource, which will be displayed in theglobal alarm window and in e-mail notifications, so it is important to enter a clear description.Tools4ever re<strong>com</strong>mends copying and pasting the information from the MIB, which would result in:“The name of the share.” Click OK to return to the <strong>SNMP</strong> monitor specification, and then click OK toreturn to the list of <strong>SNMP</strong> monitors. Modify the name to “svShareName”, and then click OK to confirmthe new policy. Now, apply the policy by dragging it to a custom <strong>SNMP</strong> host in the network tree.© 2004, Tools4ever – www.tools4ever.<strong>com</strong>, Page 5 of 10
MonitorMagic <strong>SNMP</strong> Configuration GuideVersion 1.2, October 20045. Configuration for COUNTER data typesWhen monitoring resources with a COUNTER data type, MonitorMagic requires extra configuration asshown in the screenshot below. When you enable this calculation method, MonitorMagic willautomatically retrieve the contents of the OID you selected, wait until the second evaluation haspassed and then perform the calculation. The result will be stored in the variable%RESULT_DATA_DATA_CALCULATED_VALUE%, while the original data is stored in the%RESULT_DATA_DATA_OBJECT_X%.© 2004, Tools4ever – www.tools4ever.<strong>com</strong>, Page 6 of 10
MonitorMagic <strong>SNMP</strong> Configuration GuideVersion 1.2, October 20046. Using the GET ALL featureTo perform diagnostics, MonitorMagic can get all the <strong>SNMP</strong> information from a device using the GETALL feature. To use this, access the Get All window, specify a host address, <strong>com</strong>munity string andstart OID. To get all the <strong>SNMP</strong> information, use 1.3.6 as start OID. To get only private enterprisesinformation, use 1.3.6.1.4.1 as start OID. As you can see below, the <strong>SNMP</strong> information starts with1.3.6.1.2.1.1.1.0, which is the root of the MIB-II convention. Every known <strong>SNMP</strong> supported devicemust return this basic information, such as host name, description and uptime. The 1.3.6.1.2.1.1.1.0OID is an excellent OID to see if a device supports <strong>SNMP</strong> at all, since this must return a value at alltimes.© 2004, Tools4ever – www.tools4ever.<strong>com</strong>, Page 7 of 10
MonitorMagic <strong>SNMP</strong> Configuration GuideVersion 1.2, October 20047. Multiple OIDs in a single monitorIn some cases, there is a need to monitor multiple OIDs in a single monitor. For instance, you want tomonitor the bandwidth consumption on a network interface. When you receive an alarm action, youwant to know which interface was responsible for a certain amount of traffic. So there’s already aproblem, since the value and the name of the interface are 2 OIDs.Let’s have a look at the policy “MonitorMagic – <strong>SNMP</strong> examples”. The first monitor, the Disk usagetable, contains multiple OIDs for a single monitor. Go to the properties of the monitor, click the Editbutton and then access the Advanced properties. You will see a list of 3 OIDs listed: Used, Size andName.This means the following:Value for OID1 will be stored in %RESULT_DATA_DATA_OBJECT_1%Description for OID1 will be stored in %RESULT_DATA_DESCRIPTION_OBJECT_1%Value for OID2 will be stored in %RESULT_DATA_DATA_OBJECT_2%Description for OID2 will be stored in %RESULT_DATA_DESCRIPTION_OBJECT_2%Value for OID3 will be stored in %RESULT_DATA_DATA_OBJECT_3%Description for OID3 will be stored in %RESULT_DATA_DESCRIPTION_OBJECT_3%© 2004, Tools4ever – www.tools4ever.<strong>com</strong>, Page 8 of 10
MonitorMagic <strong>SNMP</strong> Configuration GuideVersion 1.2, October 2004When applying this policy on a “Manual <strong>SNMP</strong> host”, notice that by default the monitor window willonly display the first description and data object, along with the data calculated value. The datacalculated value contains the result of any additional calculation such as when using a COUNTER typeOID, as discussed earlier. By default, the data calculated value contains the same value as the firstdata object, converted to a numeric value. You will also notice that the data calculated value for thesecond and third monitor is empty. This is because these monitors use the COUNTER type and need asecond evaluation to determine the change since the last evaluation. When you refresh thesemonitors, the data calculated value will appear.To access the other data and description objects, select an <strong>SNMP</strong> monitor, right-click and selectDisplay, as shown below. Now add the data and description objects in the right column.© 2004, Tools4ever – www.tools4ever.<strong>com</strong>, Page 9 of 10
MonitorMagic <strong>SNMP</strong> Configuration GuideVersion 1.2, October 2004The final result will look similar to the screenshot below:© 2004, Tools4ever – www.tools4ever.<strong>com</strong>, Page 10 of 10