CUB7T1 Data Sheet/Manual PDF - Southern Automation Sales
CUB7T1 Data Sheet/Manual PDF - Southern Automation Sales
CUB7T1 Data Sheet/Manual PDF - Southern Automation Sales

You also want an ePaper? Increase the reach of your titles
YUMPU automatically turns print PDFs into web optimized ePapers that Google loves.
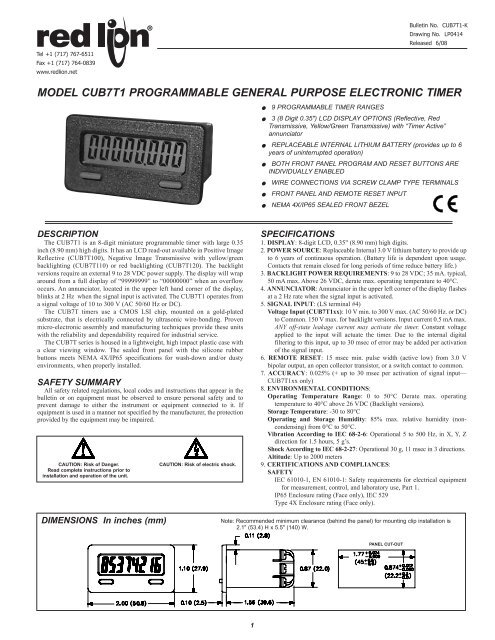
BATTERY INSTALLATION1. Remove all power to the unit before removing battery cover.2. To remove the battery cover, push upward in the direction of the arrow onthe rear cover (See drawing at right), until the cover unlatches. Pull thecover straight out from unit to fully remove.3. Remove old battery* and replace it with an RLC battery (BNL10000).Observe proper polarity when replacing the battery as shown in the drawing.4. Replace the cover. The battery cover is keyed so that it cannot be placedupside down. The arrow on the rear of the cover should point toward the topof the CUB7T when properly installed.* - Dispose of properly.WARNING: Lithium battery may explode if incinerated.EMC INSTALLATION GUIDELINESAlthough this unit is designed with a high degree of immunity toElectroMagnetic Interference (EMI), proper installation and wiring methodsmust be followed to ensure compatibility in each application. The type of theelectrical noise, source or coupling method into the unit may be different forvarious installations. In extremely high EMI environments, additional measuresmay be needed. The unit becomes more immune to EMI with fewer I/Oconnections. Cable length, routing and shield termination are very importantand can mean the difference between a successful or a troublesome installation.Listed below are some EMC guidelines for successful installation in anindustrial environment.1. Use shielded (screened) cables for all Signal and Control inputs. The shield(screen) pigtail connection should be made as short as possible. Theconnection point for the shield depends somewhat upon the application.Listed below are the recommended methods of connecting the shield, in orderof their effectiveness.a. Connect the shield only at the panel where the unit is mounted to earthground (protective earth).b. Connect the shield to earth ground at both ends of the cable, usually whenthe noise source frequency is above 1 MHz.c. Connect the shield to common of the unit and leave the other end of theshield unconnected and insulated from earth ground.2. Never run Signal or Control cables in the same conduit or raceway with ACpower lines, conductors feeding motors, solenoids, SCR controls, andheaters, etc. The cables should be run in metal conduit that is properlygrounded. This is especially useful in applications where cable runs are longand portable two-way radios are used in close proximity or if the installationis near a commercial radio transmitter.3. Signal or Control cables within an enclosure should be routed as far away aspossible from contactors, control relays, transformers, and other noisycomponents.4. In extremely high EMI environments, the use of external EMI suppressiondevices, such as ferrite suppression cores, is effective. Install them on Signaland Control cables as close to the unit as possible. Loop the cable through thecore several times or use multiple cores on each cable for additionalprotection. Install line filters on the power input cable to the unit to suppresspower line interference. Install them near the power entry point of theenclosure. The following EMI suppression devices (or equivalent) arerecommended:Ferrite Suppression Cores for signal and control cables:Fair-Rite # 0443167251 (RLC #FCOR0000)TDK # ZCAT3035-1330ASteward #28B2029-0A0Line Filters for input power cables:Schaffner # FN610-1/07 (RLC #LFIL0000)Schaffner # FN670-1.8/07Corcom #1VR3Note: Reference manufacturer’s instructions when installing a line filter.5. Long cable runs are more susceptible to EMI pickup than short cable runs.Therefore, keep cable runs as short as possible.WIRING CONNECTIONSThe electrical connections are made via screw-clamp terminals located on theback of the unit. All conductors should meet voltage and current ratings for eachterminal. Also, cabling should conform to appropriate standards of goodinstallation, local codes and regulations. It is recommended that power suppliedto the unit be protected by a fuse or circuit breaker. When wiring the unit, usethe battery cover to identify the wire position with the proper function. Strip thewire, leaving approximately 1/4" bare wire exposed (stranded wires should betinned with solder). Insert the wire under the screw-clamp and tighten down thescrew until the wire is clamped in tightly. Each terminal can accept up to two#14 AWG wires.WARNING: Lithium battery may explode if incinerated.CAUTION: All leads will be at the same line potential as the inputleads.3
L.S. INPUT; VOLTAGE VERSIONSThe CUB7T accepts most machine control voltage signals. The input acceptsAC (50/60 Hz) or DC control voltages from 10 to 300 V. The unit times whenvoltage is applied between the LS input and Common. Any off-state leakagecurrent may activate the timer.WARNING: Any lead may be at hazardous live input potential.External wiring and devices connected to the unit must be ratedthe same as applied signal input voltage and be properlyisolated from Class 2 or SELV circuitry.RESET AND PROGRAM OPTIONSConnecting a wire from the RST EN (Reset Enable) or the HS (ProgramEnable) Input terminals to Common will enable the front panel Reset orProgram buttons respectively.Pulling the “RST.” input low causes the timer to reset. The “RST.” can bepulled low by either a mechanical switch or solid-state transistor switch. TheSwitch load is 15 µA (max. voltage drop 0.5 V) when ON. The OFF-stateleakage current must be less than 2 µA.Note: The RC protection circuit on the “RST.” Input causes a delay ofapproximately 15 msec in Reset response.BACKLIGHT OPTIONOptional backlight versions of the CUB7T require an external 9 to 26 VDCpower supply. The external supply is connected between the V+ and commonterminals as shown in the drawing.WARNING: When connecting the wiring for a backlit CUB7Tmeasuring an AC input voltage, the neutral of the single phaseAC signal is connected to Terminal 1 (COM), and line (hot) isconnected to Terminal 4 (LS). The DC supply for thebacklighting is connected as shown in the drawing. Three phaseAC applications require an isolation transformer.APPLICATIONA laundromat owner wants to monitor the cost of operating his dryers.He needs to know how many hours each dryer has operated. A <strong>CUB7T1</strong>00(Voltage Input; Positive Image Reflective) is mounted on the back panel ofeach dryer. The signal input is connected across the motor of the dryer. TheCUB7T will accumulate time while the dryer is running. On a regular basisthe owner records the cumulativeoperating hours for eachdryer and calculates ifhe needs to make anynecessary adjustments. Thetimer can be reset via keyswitch.TROUBLESHOOTINGFor further technical assistance, contact technical support at theappropriate company numbers listed.ORDERING INFORMATIONMODEL NO.*CUB7TBNLVOLTAGEINPUTDESCRIPTIONTimer; Positive Image ReflectiveTimer, w/Yel-Grn BacklightingTimer; w/Red BacklightingReplacement 3 V Lithium BatteryPARTNUMBER<strong>CUB7T1</strong>00<strong>CUB7T1</strong>10<strong>CUB7T1</strong>20BNL10000*Battery is included with unit.