
You also want an ePaper? Increase the reach of your titles
YUMPU automatically turns print PDFs into web optimized ePapers that Google loves.
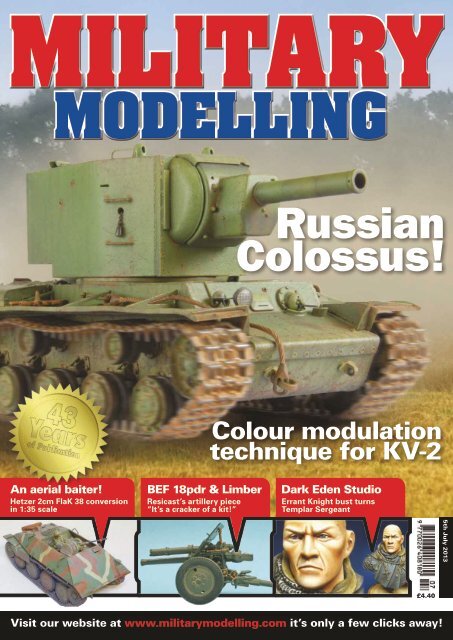
MILITAR YMODELLINGRussianColossus!Colour modulationtechnique for KV-2An aerial baiter!Hetzer 2cm FlaK 38 conversionin 1:35 scaleBEF 18pdr & LimberResicast’s artillery piece“It’s a cracker of a kit!”Dark Eden StudioErrant Knight bust turnsTemplar Sergeant5th <strong>July</strong> <strong>2013</strong>£4.40Visit our website at www.militarymodelling.com it’s only a few clicks away!
✁SUBSCRIBE TODAYand SAVE up to 22%PLUS RECEIVE A FREESpraycraft SP20 All-Purpose AirbrushHURRYOFFER ENDS2nd August <strong>2013</strong>The SP20 All Purpose Airbrush is simple to use and easy to maintain, with3 quick-change spraying tips for fine, medium or broad strokes. Great for usewith most paints, acrylics, enamels, inks and lacquers.The SP20 Airbrush has a ergonomic lightweight resin handle. Adjustable for varying linewidths from fine to broad strokes. Easy to clean removable spray tips, quick-change nozzlesystem for easy spray effect changes. Fixed hose connects to airbrush propellant. Can be usedwith compressor (adaptor included). External mix (Air/Paint mixed outside the airbrush).PRINT SUBSCRIPTION BENEFITS:• 13 PRINT EDITION ISSUESDELIVERED TO YOUR DOOR• FREE SPRAYCRAFT SP20ALL-PURPOSE AIRBRUSH• PLUS! SAVE UP TO 22%OFF THE SHOP PRICE• EXCLUSIVE DISCOUNT ON ALLORDERS AT MYHOBBYSTORE.CO.UKO.UK*Digital Only Package also availableailable* Gift for UK subscribers only,while stocks last08456 777 807 quote ref. V469Alternatively, you can completethe form below and return, withpayment, to the address providedSubscribe online at: www.subscription.co.uk/mtml/V469YOUR DETAILS:DIRECT DEBIT subscriptions (UK ONLY):CODE V469Mr/Mrs/Miss/Ms..............................Initial....................Surname ..................................................... I would like to subscribe to The <strong>Military</strong> <strong>Modelling</strong>,Address ..................................................................................................................................................... print subscription, paying £11.25 every 3 months by Direct Debit.BEST OFFER...................................................................................................................................................................... Instructions to your bank or building society to pay by Direct Debit.Originator’s reference 422562Postcode .......................................................................Country ..............................................................Tel ...................................................................................Mobile...........................................................Name...of bank .....................................................................................................................................................Email ..............................................................................D.O.B................................................................Address of bank .................................................................................................................................................................................................................................................................................................................................PRINT SUBSCRIPTION PACKAGE – UK ONLY:I would like to subscribe to The <strong>Military</strong> <strong>Modelling</strong>, print subscription,................................................................................................................. Postcode ............................................for 1 year (13 issues) with a one- off payment of £49.00Account holder ...................................................................................................................................................PRINT SUBSCRIPTION PACKAGE – OVERSEAS:Signature ............................................................................................. Date .....................................................I would like to subscribe to The <strong>Military</strong> <strong>Modelling</strong>, print subscription,for 1 year (13 issues) with a one-off payment:Europe (inc Eire) £65.00 ROW Airmail £65.00Sort codeAccount numberFor all Canadian, North and South American subscriptions please call 001 877 363 1310 or go to www.expressmag.com Instructions to your bank or building society: Please pay MyTimeMedia Ltd.Direct Debits from the account detailed in this instruction subject to the safeguards assured bythe Direct Debit Guarantee. I understand that this instruction may remain with MyTimeMedia Ltd and ifFOR DIGITAL ONLY SUBSCRIPTION VISITso, details will be passed electronically to my bank/building society.WWW.MILITARYMODELLING.COM/SUBSCRIBEReference Number (Official use only)PAYMENT DETAILS:SAVE 15%TERMS & CONDITIONS: Offer ends 2nd August <strong>2013</strong>. Subscriptions will begin with the first available issue. Please continue to buyPostal Order/Cheque Visa/Mastercardyour magazine until you receive your acknowledgement letter. Initial 12 month non-refundable contract applies. Refund requestsmust be in writing to the Publisher and will not be given on accounts with less than £20 credit. A £5 admin charge will apply and willPlease make cheques payable to MyTimeMedia Ltd and write code V469 on the back be deducted from any refund. Refunds will only be given at the Publisher’s sole discretion. *UK offer only. Should your subscriptionoffer include a gift, please allow up to 60 days for delivery of your gift. Gifts are available while stocks last; we reserve the rightCardholder’s name ................................................................................................................................ to substitute the gift with items of a similar value. We will use the contact details supplied to communicate with you regardingyour <strong>Military</strong> <strong>Modelling</strong> subscription. Your details will be processed by MyTimeMedia & <strong>Military</strong> <strong>Modelling</strong> in full accordance with allCard no:relevant UK and EU data protection legislation. MyTimeMedia & <strong>Military</strong> <strong>Modelling</strong> may contact you with information about our otherproducts and services. If you DO NOT wish to be contacted by MyTimeMedia & <strong>Military</strong> <strong>Modelling</strong> please tick here: Email PostPhone . If you wish to be contacted by carefully chosen 3rd parties, please tick here: Email Post Phone .Valid from............................... ......................... Expiry date.................... .............................................Signature ..................................................................... Date .................................................... ............SAVE 22%Please note that banks and building societies may not accept Direct Debit instructions from some types of account.SEND TO: MILITARY MODELLING SUBSCRIPTIONS, TOWER HOUSE,SOVEREIGN PARK, MARKET HARBOROUGH, LEICS LE16 9EF
Openingtimes for ShopMonday - Saturday9.30am - 5.30pmClosed WednesdayLSA Models Mail Order151 Sackville Road, Hove, East Sussex, BN3 3HDTel/Fax: U.K. 00 44 (0) 1273 705420 • Mobile: 07973 551470orders@lsamodels.co.uk • www.lsamodels.co.ukd6719August releasesLEPTY/PEPE-SETS53091 HMS Dreadnought 1907 1/350 tru £19.5053094 HMS Dreadnought 1907 railings 1/350 tru £15.00BIGY / BIG-ED setsBIG5316 Bismarck 1/200 tru £138.50BIG5317 Kriegsmarine crew 1/200 £66.00d6745NewPostage RatesPostage charges (within UK)•Large Letter - £1.50•Small Parcel 1kg - £3.50•Small Parcel 2kg - £5.00•Med Parcel 1kg - £6.50•Courier up to 25Kg - £8.00Oversea items at cost,ask for quote.New Dragon due May/JuneD6743 1/35 German Brandenberg Troops £14.99D6772 1/35 SdKfz 234/4 Panzerspahwagen £49.99D6749 1/35th 15cm Stug Inf Wagen 33 £TBAD7236 1/72 Flakpanzer V 'COELIAN' £19.99D7487 1/72 Flakpanzer 341 mit 2cm Flak £21.50D7490 1/72 Panzerfahre Gepanzertw £19.99D7492 1/72 VK.45.02(P) £19.99D6742 Gebirgsjagers Crete 41 £14.99D6593 Stug III Ausf G Late Dec 44 £49.99D6766 Maultier Ambulance £49.99D6483 3.7cm Flak 37 £19.50D6712 IJN Type 2 (Ka-Mi) Late £54.99D6555 Jap Army Inf Peleliu 44 £15.99D6774 25 Pdr Field Gun Mk II w/limber £35.99D6772 SdKfz 234/4 £49.99D6777 Type 95 Light Tank Hokuman £TBAD6779 Panzer IV Ausf D DAK £TBAD3544 M-48 A3 Model B £TBAD6745 S.A.S Jeep £TBAD6719 5cm Pak 38 (sf) 1T Halftrack £TBAD6480 Panzer I with mine layer £TBAD6744 Soviet Inf winter 44 £TBAD7497 1/72nd Panzer IV Ausf H w/schurzen £TBAD7506 1/72nd Panther D late £TBAD6321 Hummel Late Prod £TBAD75045 1/6th Panzer II Ausf C £325.00ITALERI May-June7068 M-48 A2C £10.996170 WW11 Japanese Inf £7.506391 M-60 Blazer £25.50TrumpeterTP01555 T-62 ERA model 1962 £32.99TP05556 BMP-1P IFV £27.99TP05571 2S1 Russian S/P Howitzer £37.99TP05326 USS Indianapolis CA-35 1945 £49.99TP02519 MSTA-S £TBAMirror Models (future releases)MM35800 US Diamond T 968A 4T Truck £TBA(hard & soft tops)MM35801 US Diamond T969 Wrecker£TBAMM35803 US Diamond T 968 Cargo (hard top) £TBAMM35851 US Caterpillar D7 Tractor£TBAnMM35122 CMP CGT Field Art Tractor cab 13 £TBAMM35603 Marmon Herrington Mk II£TBAMM35900 Morris Commercial C8 Quad£TBAMM35121 CMP C8A Heavy Utility Cab 13 £TBAMM35901 Morris Commercial CS8 GS£TBAMM35161 CMP C60L GS Truck cab 13£TBAMM35106 CMP C15TA Ambulance£DueMM35104 CMP C15A Water Tank£TBALorry cab 11 & 12MM35105 CMP F15 Ford Truck£TBAMM35107 CMP F15 Italian service Ford£TBAMM35851 US Caterpillar D7 Tractor£TBAMM35300 Italian 20mm Breda Gun£TBAMM35200 Russian T-20 Art Tractor£TBAMM35831 US Indian 741B M/Cycle£TBAMM35204 Russian Fuel Trailer£TBAMM35126 CMP Ford F.A.T cab 13£TBAMM35821 US M5 High Speed Tractor£TBAMM35181 CMP F60L Ford Workshop Lorry £TBAMM35151 CMP C30 Chevy GS Truck£TBA<strong>July</strong> releasesBIGY Y/BIBIG-ED setsBIG3580 LVT-4 1/35 AFV £51.00Bronco ModelsBM35065 Panzer 35T (SKP) £TBABM35127 SdKfz 233 7.5cm (1942) £PhoneBM35139 M-24 Chaffee Korean £37.99BM35109 Su-152 Sept 43 £36.99BM35110 KV-85 £PhoneBM35124 8 Rad PzFunkwagen SdKFZ 263 £PhoneBM35062 Versuchsfl akwagen 88mm £36.99BM35113 Su-152 Early £36.99BM35143 Panzer 1 Ausf F (VK1801) £TBABM35165 Italian Topolini open top w/lady £TBABM35166 M-24 Chaffee Indochina £TBABM35140 WWII Brit/Commonwealth Correspondents £11.99BM35144 MkIII Valentine MkIX £TBABM35154 Panzer II Ausf J £TBABM35156 Italian Topolino DAK w/German fi gs £21.99BM35162 US M-22 Locust T9E1 £24.99BM35039 DFS-230 Glider w/German Para’s £TBAAB3551 25 Pdr Ammo Set No 27 Limber W/Cover £13.99AB3562 WWII Brit Field Access set £TBAAB3563 T97E2 Track links (M48/60) £TBAMasterBoxMX35097 Vickers Gun Team £10.99MX35077 U.S Artillery Crew £9.99MX35102 German Inf Eastern front No1 £11.99MX35137 German Inf on march £11.99MX35149 German playing Football £8.99MX3202 Pilots of the Luft WWII £9.99Mini ArtUMA35137 Pushing Russian Soldiers £8.99UMA35147 L1500a Kfz 70 Personnel car £29.99UMA35148 Op Market Garden Netherlands 44 £8.99UMA35151 U.S Horsemen Normandy 44£TBAUMA35132 German Tank Crew £8.99UMA35089 101st Airborne 1944£TBAUMA35140 Soviet Art Tractor Late £29.99UMA35152 AEC Mk I A/Car£TBAUMA35150 Merc Benz 1500A Cargo£TBAUMA35145 BZ-38 Refueller£TBAUMA35149 Gaz 03-30£TBAUMA35156 Gaz 05-193£TBAUMA38001 European Tram£TBAUMA35155 AEC Mk II A/Car £32.99UMA35558 Euro Farmyard £32.99UMA16030 Ernst Udet WWI Ace £11.99UMA35163 German Para’s & Tankers Italy 43 £8.99Riich Models (future releases)RV35014 East Meets West Figs £8.50RV35011 U/Carrier MkI w/Crew £31.99RV35018 6 Pdr MkIV A/Tank Gun £TBARV30009 M1/6 Pdr Ammo Set £TBARV35024 Artillery Tractor CT3 601 (r) £TBARV35025 STZ-5 NATI Katyushka £TBARV35006 M-109 A6 Palindin SPG £TBATamiyaTA35329 JGSDF Type 10 MBT £TBAMeng ModelsSS-002 D9R Doobt Bulldozer £TBATS-003 AMX-30B French BMT £44.99TS-004 French AUF 1 S/P Howitzer £51.99TS-005 Mervaka Mk3 w/Dalet mine roller £51.99TS-006 Russian T-90A MTB £TBAVS-003 Gaz 233 014 Tiger £TBAHS-001 Middle East fi gs £6.99SPS-001 Rubber Tyres for Diorama’s £TBASPS-002 Drink Bottles £TBAAFV ClubAF35263 SdKfz 263 £42.99AF35S66 German Duster M-42A1 £49.99AF35163 Bofors 40mm M1 £29.99AF35S67 AAV7A1 Ram/RS w/EAAK £TBAAF35S54 Churchill MkIII w/QF 75mm MkV Gun £TBAAF35228 Schwimmwagen 128 £TBAAF35236 AEC Matador £TBAAF35246 US .50 Cal M/G set £TBAAF35257 German Fuel/Water tank set £TBAAF35258 WWII British Fuel Tank set £TBAAG35039 Nato 155mm How Ammo £TBAAF35049 AEC Dorchester Early £TBAAF35236 AEC Matador Early £TBAAF35158 Hunting Crew (5) £TBAAF35145 T-34/85 model 44/45 £TBAAF35273 AEC A/car Mk III £TBAAF35186 Flak 28 4cm A/A Gun (German bofors) £TBAPanda ModelsPH16001 Panzer 38T Ausf E/F £84.99Hobby BossHBB83801 U.S White 666 Cargo (hard top) £TBAHBB85503 U.S M-19 Tank Transporter£TBAHBB83804 Panzer I Ausf F (VK1801) £24.99HBB82601 Tiger I (1/16th) £69.99ICM ModelsRIC24011 1/24th Type G4 Personnel Car £33.50RIC24012 1/24th Type G4 w/tilt £33.50RIC24021 1/24th Admiral Cabro £29.99RIC24022 1/24th Admiral w/tilt £31.50RIC35401 Type 2,5-32 1.5T light truck £24.50RIC35405 Type LG Army Truck £26.80RIC35476 Kapitan 2 Door Staff car £17.80RIC35478 Kadett K38 German Staff car £15.50RIC35479 Moskvitch 401-420 Soviet Car £TBARIC35526 L1500S LLG WWII Fire Truck£TBARIC35527 L1500S LF8 German Fire Truck £TBARIC35534 Type 770K Touring car open top £TBARIC35536 Packard Twelve (series 1408) Car £TBARIC35538 Type G4 WWII Staff car£TBARIC35632 WWII German Firemen (4) £7.99RIC35633 WWII German Road Police£TBARIC72911 BTR-60PB £7.99RIC35671 WWI Inf Weapons/Equipment£TBAAcademyTW13280 Panzer 35 (T) £TBAKinetic ModelsKN61010 RG-31 Mk 3 Canada £TBAKN61011 4x4 MRAP Truck £TBAKN62001 1/48th R-11 US/NATO Fuel Truck £TBANew BooksPanzerwrecks No 15 £17.00Stug III on the battlefi eld £23.00
HISTOREX AGENTS have been established since 1967With 46 years of trading we are one of the longest runningModel Soldier Mail Order House's around today.The 2nd book of the SMH series, which is publicedevery 3 months, is dedicated once again to miniaturefigures. As in the first book, you will find articles onpainting with acrylics, oils or enamels, plus variousmixed techniques and instructions on how to makegroundwork and scenery for presentation. In thisvolume a “Masteclass Figure Gallery” is introducedwith many important pieces by Louis D'Orio.Contributors: Alexandre Cortina Bonastre, LouisD’Orio, Grigoris Marmatakis, Massimo Pasquali,Ernesto Reyes Stalhuth.Scale Model Handbook -FIGURE MODELLING 1 £13.95The 1st book from Scale Model Handbook series onfigures gathers representative samples of manyhistorical periods, as well as different forms oftechniques. Here you will find the painting ofcommercial pieces using acrylics, oils or enamels,sculpting, conversions, work on ground presentationand scenery, historical texts. Indeed, many differentaspects of figure modelling have been covered.Contributors: Pietro Balloni, Alexandre CortinaScale Model Handbook -FIGURE MODELLING 2Scale Model Handbook - £13.95FIGURE MODELLING 3The 3rd edition in the SMH series is also dedicated tominiature figures. Well-known artists from around theworld have worked on the articles to give you all theirknowledge on miniature modelling and inspire you onyour next projects. Award-winning models,step-by-step, techniques and history all gathered in a52-page book with binding and matt laminated coverof superior quality. Contributors: Grigoris Marmatakis,Manolis Mitsotakis, Christos Panagiotopoulos,Ernesto Reyes Stalhuth, Christos Stamatopoulos,Kazufumi Tomori.Rinaldi Studio PressTANKART Vol. 1WWII German Armor£19.95There are many "how-to" books in today's world of scalemodeling, but none has covered the "why", as well as, the"how-to" processes… the modeler's artistic approach, untilnow. In TANKART, a painting and weathering guide book series,the focus is on taking real-life observations of paint andweathering effects and incorporating the best techniques toreplicate them. Within this first volume, WWII GermanArmor, I will go deeper into my thoughts about the why ofcertain steps as it relates to German camo schemes. Combinedwith my education in design, my passion for learning &teaching, and some clear informative photography, we havestrived to produced a book which focuses on the importanceof telling the story of each vehicle. To bring these ideas to liferequires a spectrum of processes and techniques which arecovered in great detail; including the Hairspray Technique andmy new Oil Paint Rendering -- techniques that can be combinedin an layered array to tell the story of each model.The book is 8.5w" x 9.5l" format, 208 pages. There are 5 modelsfeatured inside, 2 dedicated technique chapters, plus a specialbonus figure modeling chapter by world renowned modelerMarijn van Gils2744 120mm Chopper Crew Vietnam £21.452745 1/32nd A-7D Corsair II Full New Cockpit (Trumpeter) £24.902746 1/35th Mid-East Pick-Up Stowage-Crew £27.452747 1/35th German 75 mm PaK Crew-Ammo-Gear £27.452748 1/35th SWS Ammo - Crew - Stowage £28.252749 120mm Recon Vietnam £21.452750 1/32nd Floodlight - Generator Cart Airbase £28.252751 1/32nd Generator - Gas Turbine EPU Airbase £31.802752 1/35th Fallschirmjager at Casino Vignette £28.252753 1/35th Shermans WWII Crew-Ammo-Stowage- £25.852754 1/35th Panzerwerk Heavy Factory Lathe with Figure £48.552755 120mm British Para WWII £20.202756 1/32nd Airbase Compressor (Markings not Included) £23.452757 1/35th Burn! WWII Vignette £25.852758 1/32nd Bomb Trailer with Snakeeyes £20.202759 120mm German WWII Tank Gunner £24.252760 1/35th 105 Howitzer Vietnam Ammo-Crew-Gear £25.852761 1/35 Point Blank Char B1 Bis (Tamiya) £20.202762 120mm German Officer WWII Whermacht £20.202763 1/35th 105mm Howitzer M101 WWII Crew-Ammo £31.552764 1/35th Fire Base Charly Base, Ammo, Gear, Figures £53.402765 120mm British Chindid Burma WWII £ TBA2766 1/35th Nebelwerfer Base Ammo Crew Gear £ TBA2767 1/35th Battle for Berlin Panther Dug-In £ TBAScale Model Handbook -FIGURE MODELLING 4The 4th edition in the SMH series is dedicated tominiature figures. Here you can find information andinstructions on how to paint female complexion usingacrylics and oils, the construction of a 2-figurevignette and insights on making japanese patterns.Two WWII German themes on field grey andcamouflage together with a very interesting articleabout a discontinued fantasy bust are completing thisexquisite edition. Contributors: Grigoris Marmatakis,Aleksander Michelotti, Ernesto Reyes Stalhuth,Christos Stamatopoulos, Kazufumi Tomori.Scale Model Handbook -FIGURE MODELLING 6Scale Model Handbook - £13.95FIGURE MODELLING 5The 5th book from SMH series is coming with manyarticles about box art painted figures. Learntechniques and tips from the masters on how to paintyour models using either brushes or airbrush andmake your own scratch-built figure, following theinstructions of a master sculptor. This edition iscompleted with an article on how to paint metallicsurfaces without using metallic colours! Contributors:Mike Butler, Fernando Ruiz Ceano, Javier González(Arsies), Grigoris Marmatakis, Aleksander Michelotti,Ernesto Reyes Stalhuth, Aleksandr Zelenkov.£13.95This is the Sixth Edition in the Scale Model HandbookSeries, a series of modelling books dedicated tominiature figures. Again, we’ve varied the themes andhistorical periods of the subjects and presented moresculpting and painting techniques.CONTRIBUTORSANTONIO FDEZ (PIQUI), JAVIER GONZÁLEZ(ARSIES), IGOR KORDYUKOV, RADEK PITUCH,ERNESTO REYES STALHUTH, KAZUFUMITOMORI, ALEX VARELA (IGUAZZU).Scale Model Handbook -FIGURE MODELLING 7£13.95This is the Seventh Edition in the Scale ModelHandbook Series, dedicated to miniature figures. Inthis latest issue we offer the excellent work of ErnestoReyes Stalhuth, Javier González (Arsies), KazufumiTomori, Grigoris Marmatakis and ChristosStamatopoulos in addition to the work of three newcontributors - Sergey Popovichenko, Roman Navarroand Man Jin Kim.In this issue a variety of themes and techniques isfeatured; creating bases and scenic settings, paintinga modern camouflage uniform and combining acrylicand oil colours for skin tones and leather clothing.Mario Eens started modelling at anearly age and has been passionateabout modelling ever since. Thispassion has led him to taking part inmodelling competitions and resulted inwinning gold medals at majorinternational shows (Euro Militaire,AMT, The Red Devils Awards, WorldExpo). Mario has been writing in deptharticles on his models for years andnow he has dedicated his first DVDproduction to the aspect of airbrushinga model. In multiple chapters he showsall of the necessary abilities required todo complex camouflage patterns onyour own. Topics range from the choiceand maintenance of your airbrush andtools, to paint thinning, colour changes,masking a model, airbrushing a basecoat and troubleshooting.As if that wasn't enough, it also showsyou 10 different camo patterns.TANKART Vol. 2WWII German ArmorAdam Wilder - Authentic MetalWell known AFV modeller AdamWilder has teamed up withMXpression to share some of histrademark techniques. He showsall the secrets needed to giveplastic the unique look of metal.Starting with surface texturingand weld seams he then moveson to raw steel, polishedstainless steel and a primedFerdinand upper hull. Afterfinishing a heavily rusted exhaustAdam finally creates the superrealistic sidewall of a burnt M113.This DVD will surely be a greatinspiration for beginners andAPML1 BOOK Model Laboratory 1 SdKfz 171 Panther G £5.75APML2 BOOK Model Laboratory 2 Junkers 88 A-4 £6.70EMP3 BOOK Euro Modelismo Tanks in Russia 1941/42 £16.55EMP4 BOOK Euro Modelismo Rarities <strong>Modelling</strong> Armoured £14.90EMP8 BOOK Euro Modelismo German Army Uniforms £34.70EMP13 BOOK Euro Modelismo STUG 3 £20.65EMP14 BOOK Sculpting Figures - Body Language £14.05EMP15 BOOK Euro Modelismo Vignettes & Sceneries - £30.15EMP16 BOOK Euro Modelismo Tanks in Russia Part 3 £16.55EMP21 BOOK Tanks in Russia IV. £18.25EMPDAK BOOK D.A.K. Deutsches Afrila Korps £15.75PANZ38 BOOK Panzer Aces Issue 38 £8.95PANZ39 BOOK Panzer Aces Issue 39 £8.95PANZ40 BOOK Panzer Aces Issue 40 £8.95PANZ41 BOOK Panzer Aces Issue 41 £8.95PAP1 BOOK Panzer Aces Profiles 1 - Guide to camouflage £16.25model sceneGrass matsMSF534 1/35th Steppe - late summer with stones £16.05MSF541 1/35th Embankment - Spring £14.20MSF542 1/35th Embankment - Early Summer £14.20MSF543 1/35th Embankment - Late Summer £14.20MSF551 1/35th Embankment - Spring with dry turfs £14.20MSF600 1/35th Forest Floor - Basic £13.30MSF601 1/35th Forest Floor - Spring £17.90MSF602 1/35th Forest Floor - Early Summer £17.90MSF603 1/35th Forest Floor - Late Summer £17.90MSF610 1/35th Forest Floor - Pinewood £16.05MSF620 1/35th Forest Floor - Blueberries £17.90MSF630 1/35th Heathland £17.90MSF712 1/35th Early Summer Stony Steppe few stones £17.00MSF713 1/35th Late Summer Stony Steppe few stones £17.00MSF722 1/35th Early Summer Stony Steppe more stones £17.00MSF723 1/35th Late Summer Stony Steppe more stones £17.00MSF732 1/35th Early Summer Stony Steppe many stones £17.00MSF733 1/35th Late Summer Stony Steppe many stones £17.00Sales@HistorexAgents.com advanced modellers alike!£6.75£19.95
HISTOREX AGENTS have been established since 1967With 46 years of trading we are one of the longest runningModel Soldier Mail Order House's around today.LIFE MINATURESSGF122 54mm Storm Raider £24.50SGF123 54mm License to Kill £23.40SGF124 54mm Bronze Age Warlord C.800 BC £21.15SGF125 54mm Vercingetorix 52 BC £19.05SGF126 54mm Football Player £21.10SGF127 54mm Drummerboy American Civil War 1858 £23.65SGF128 54mm US Revolutionary Infantryman 1780 £27.00SGF129 54mm Starship Captain £21.70SGF130 54mm The Cimmerian King £23.60SGF131 54mm Touareg Warrior 1916 £46.05SGF132 54mm General Ulysses S Grant 1864 £25.30SGF133 54mm Prussian Officer 1878 £23.60SGF134 54mm Saxon Warrior 400 AC £25.30SGF135 54mm Fredrick the Great 1760 £24.25SGF136 54mm Grenadier, 1st Red Life Lange Kerls, 1720 £26.40SGF137 54mm Robin Hood £24.25SGF138 54mm Egyptian Infantryman, 19th Dinasty £24.25SGF139 54mm Moctezuma II, 1520. £27.40SGF140 54mm Julius Caesar 44 BC £26.40SGF141 54mm Swashbucler 1 £24.25SGF142 54mm Swashbucler 2 £24.25SGF143 54mm The Misfit £30.60SGF144 54mm B General G.A. Custer 1863 £26.40SGF145 54mm Outback Avenger £24.25SGF146 54mm Cornicen AD 125 £24.25SGF147 54mm The Trophy 1871 £26.40SGF148 54mm Atlanta 1864 £30.75SGF149 54mm Alonso de Contreras, 1620´s £26.40SGF150 54mm Teddy Roosvelt 1898. £26.40SGF151 54mm Spanish Cavalry Officer. Cuba, 1898 £26.40SGF153 54mm Aquilifer 31 BC £26.40SGF154 54mm US Cavalry Officer, 1876 £27.15SGF155 54mm The Tall Man £27.15SGF156 54mm Clayton Moore, That Masked Man £73.85WS01 54mm Ithanoir Blade of Eternity £21.20WS02 54mm Volgor The Skull Hunter £29.70WS03 54mm Drunegar Runekeeper £24.50WS04 54mm Khaerus the Summoner £24.50WS05 54mm Beelphegor The Soul Reaper £24.50WS06 54mm Ainariel Arrow of Light £28.35WS07 54mm Horthak Black Crow £28.35WS08 54mm Leogante Wings of Redemption £31.55WS09 54mm Mad Karnik & Stonebrain Gozbog £37.80WS10 54mm Menhom Dark Shaddow £28.55WS11 54mm Orohg Broken Fang £26.45WS12 54mm Astaroth The Annihilator £38.40WS13 54mm Luriel Sacred Fist £27.25WS14 54mm Brogan the Bonecrasher £27.25WS15 54mm Urmuth Scars of War £27.25WS16 54mm URU, The Juggernaut £36.90WS17 54mm Arilth, Silent Shadow £35.90WS18 54mm Rhonen, Panther Claws £27.25WS19 54mm Falkar, Wandering Sword £30.50WS20 54mm Bestor Savage Claws £27.25WS21 54mm White Wolf £26.40WS22 54mm Sulnar - Burning Wind £26.40WS23 54mm Dagor Ancient Fury £30.60WS24 54mm Nallach, Evil Shadow £29.70WS25 54mm Olfo Fast Feet £26.40WS26 54mm Verthandi Burning Ice £29.80WS27 54mm Grandar Firebeard £26.40WS28 54mm Daramis, Healing light. £31.55WS30 54mm Sorondil Dragon Hunter £26.50WS31 54mm ZWEOTHEL,QUEEN OF DARKNESS £29.95WSS01 54mm Varathar Dark Guardian £74.40WSS02 54mm Zorabeth, Morning Mist. £74.40WSS03 54mm Beelphegor Fire Wings £177.7554-225 54mm Crusader Knight in Holy Land XIII Century £25.5554-226 54mm Gunslinger £25.5554-227 54mm Mohawk Warrior £25.5554-228 54mm Duke of Brunswick, Infantry Regiment 1809 £25.5554-229 54mm Ashigaru, Azuchi-Momoyama Period £25.5554-230 54mm Absarokee Warrior (Crow) £18.5554-231 54mm Chinese General, Han Dinasty £25.5554-232 54mm British Light Dragoon, Officer 11th Regt. £25.5554-233 54mm Legio I Flavia Minerva £25.5554-234 54mm Charles A J Flahaut 1812 £25.5554-235 54mm Fratres Militiae, XIII century £25.5554-236 54mm Rodeo Girl £25.5554-237 54mm Umbrian Warrior £25.5554-238 54mm Noble Gallic Warrior £25.5575-42 75mm Montezuma Aztec Emperor £38.3575-43 75mm Landsquenect Standard-bearer £34.9575-44 75mm Officer of the Lancers of the line, France 1811 £38.3575-45 75mm Hernan Cortes £34.9575-46 75mm Officer 71st Infantry Regiment Higlands £38.3575-47 75mm Celt Warrior IV Cent BC £38.3575-48 75mm Greek Mercenary £38.3575-49 75mm British Officer, 1870-85 £38.3575-50 75mm Roman Tribune, III c. B.C. £34.9575-51 75mm Highlander Warrior XII-XIII £38.3575-52 75mm Officer of Carabiniers, France 1811 £38.3575-53 75mm Maya Warrior £38.3575-54 75mm American Native Scout £38.3575-55 75mm Kavas Bashi, 1780-1820 £43.4575-56 75mm Pawnee Warrior £34.9575-57 75mm Araphao Warrior £34.9575-58 75mm Aide de Camp du Marechal Souchet £38.3575-59 75mm Izinduna Zulu 1879 £38.3575-60 75mm Warrior of Tlaxcala £38.3575-61 75mm Ninja Warrior £38.3575-62 75mm Gallic Gladiator from the Servile revolt £38.3575-63 75mm Iberian Warrior £38.3575-64 75mm Roman Vexillifer £38.3575-65 75mm Noble Sioux Warrior £38.3575-66 75mm Spanish palace guard £38.3575-67 75mm Ambiorix £38.3575-68 75mm French Zouave, 1866-85 £38.3575-69 75mm Knight from the middle ages £38.3575-70 75mm Greek Hoplite £38.3575-71 75mm Nubian Palace Guard £38.3575-72 75mm MURMILLONE GLADIATOR £38.3575-73 75mm Korean Warlord £38.3575-74 75mm Turkish soldier Kalyoncu £38.3575-75 75mm French Gentilhomme, the Duellist £38.3575-76 75mm Iroquois warrior £38.3575-77 75mm Scottish Gentleman £38.3575-78 75mm Frankish Warrior £38.3575-79 75mm Japanese Ashigaru £38.3575-80 75mm Rissalder Major 1st Skinners Horse £38.3575-81 75mm Maya Warrior, 16th Century £38.3575-82 75mm Hajuduk Serb 1804-13 £38.3575-83 75mm Germanic Warrior £38.3575-84 75mm Quadi Warrior £38.3575-85 75mm Marshal Emmanuel de Grouchy £38.3575-86 75mm Warrior Mughal, 17th-18th Century £38.3575-87 75mm Mongolian Archer £38.3575-88 75mm Officer of the Empress ' Dragoons, 1815 £38.3575-89 75mm Samurai Warrior £38.3575-90 75mm Bersrker Viking £38.3575-91 75mm Napoleonic Horse Guide in Egypt £38.3575-92 75mm Aristide greek general, Plataea 479 A.C. £38.3575-93 75mm French Revolutionary, 1789 £38.3575-94 75mm Officer of the Tsar's Guard, Russia 1830 £38.3575-95 75mm Grenadiers of the guard, Sergeant E Bearer, £38.3575-96 75mm Provocator £38.3575-97 75mm Pirate £38.3575-98 75mm Scottish Nobleman, 13th Century £38.3575-99 75mm Slavic Warrior £38.35FIGURE INTERNATIONALFi46Seewebsitefor moredetailsNewFormatLMB001 War Photographer Vietnam 1971 £38.00LMB002 Joachim Peiper £38.00LMB003 USMC 1st Division Gudalcanal 1942 £38.00LMB004 Waffen SS Infantyman Ardennes 1944 £38.00LMB005 Never Surrender - Winston Churchill £41.00LMB006 German 6th Army, Stalingrad 1942 £39.00YOUNG MINIATURESScale Figure Model CompanyYH1813 1/10th Ramses II, BC 1279 (Resin) £30.00YH1814 1/10th Royal Navy Captain 1806 "Lucky Jack" £30.00YH1815 1/10th Athenian Warlord 490 B.C (Resin) £33.00YH1816 1/10th La Hire - Battle of Patay 1429 £38.00YH1817 1/10th Alexander The Great 330 BC £30.00YH1818 1/10th Sioux Indian £33.00YH1819 1/10th Aztec Warrior £33.00YH1820 1/10th The Pirate - Before Sunset £38.00YH1821 1/10th Blackfoot Raven Bearer £38.00YH1822 1/10th Celtic Warriors 1st C. BC Battle of Beast £33.00YH1823 1/10th Black Beard 1718 Queen Anne's Revenge £38.00YH1824 1/10th Sparta - Battle of Thermopylae 480 B.C £38.00YH1825 1/10th Goguryeo Heavy Cavalry Officer 5th C AD £38.00YH1826 1/10th 92nd Gordon Highlanders Waterloo 1815 £38.00YH1827 1/10th Templar Knight in Jeruslem £38.00YH1828 1/10th Celtic Warrior Hallstatt 6th Century B.C £38.00YH1829 1/10th Roman Cavalry Officer 180 B.C. £40.00YH1830 1/10th Norman Knight Hastings 1066 £38.00YH1831 1/10th Polish Winged Hussar 17th Centry £44.00YH1832 1/10th Zaporozhian Cossacks 1676 £40.00YH1833 1/10th Gladiators (II) 1st Century AD £38.00YH1834 1/35th Roman Signifer 1st Century A.D(II) £44.00YM1825 1/10th German Infantry Russian Front WWII £38.00YM1826 1/10th Max Wunsche Western Front 1944 £76.00YM1827 1/10th Soviet Mountaineer Officer 1942 £40.00YM1828 1/10th German Fallschirmjager Ardennes 1944 £38.00YM1829 1/10th German MG34 Gunner 1941 £55.00YM1830 1/10th US Navy Seal Afghanistan 2005 £40.00YM1831 1/10th German Waffen SS Officer 1944 £38.00YM1832 1/10th British LRDG 1942 - North Africa £38.00YM1833 1/10th Luftwaffe Bomber Crewman, 1940 £44.00YM1834 1/10th British Paratrooper Northwest Europe £38.00YM1835 1/10th British Tank Crew WWII £38.00YM1836 1/10th German Gebirgsjager 1942 £40.00YM1837 1/10th British Infantryman Somme 1916 £40.00YM1838 1/10th THE CHOSIN FEW USMC KOREAN WAR £40.00YM1839 1/10th German DAK Infantry North Africa WWII £38.00YM1840 1/10th German Waffen SS Battle of Kursk 1943 £38.00YM1841 1/10th US Paratrooper WWII 17th Airbone £40.00YM1842 1/10th British SAS North Africa 1941 £44.00YM1843 1/10th Flying Tigers 1942 £38.00YM1844 1/10th German Fallschirmjager Monte Cassino ‘44 £44.00Sales@HistorexAgents.com www.HistorexAgents.com£6.75
Tankograd 9020. Challenger 1The Last Cold War Era Tank ofBritainís Armoured Corps.Illustratedwith 128 colour photographs and5 b&w photographs,64 pages.£13.99Tankograd 4019. DeutschePanzereinheiten in der OZAKGerman Armoured Formations inthe OZAK 1943-45. Illustratedthroughout with 137 black & whitephotographs + graphics,64 pages. £13.99German Panzers and Allied Armourin Yugoslavia in World War Two200 pages, this book is illustratedwith 358 black-and-whitephotographs, most of whichare hitherto unpublished.Hardback. £34.99Allies in BattledressOrganisation-Uniforms-Insignia-Tanksand Vehicles-Armament-Equipment.Hardback, 152 pages. Very well illustrated.Published by Histoire and Collections.£32.501945 German Colors,Camoufl age Profi le Guide72 pages, more than 180 colorrenderings showing the manycamoufl age patterns used oncommon vehicles, and odditiesused by the German forces. £18.99Tankograd 5041.Fahrzeug-Graffi ti GECON-ISAFPersonalised Vehicle Markingsduring the German Missionin Afghanistan.Illustrated with 159 colourphotographs, 64 pages. £13.99Sturmgeschutz III on the Battlefi eldWorld War Two Photobook Series.This book has over 100 photos of theSturmgeschutz III on the Battlefi eld.Hardback, 111 pages. £23.99Tankograd 7027. Svenska ArmÈnVehicles of the Modern SwedishArmy. Illustrated throughout with135 colour photographs + graphics,64 pages. £13.99Tankograd 3019.1st Armored DivisionVehicles of the 1st Armored Divisionin Germany 19w71-2011.Illustrated with 101 colour photographsand 17 b&w photographs,64 pages. £13.99SS-Panzerkorps in the battle forKharkov 01-03.1943First book from a new series on thehistory of the Waffen-SS, titled SS-Panzerkorps in the battle for Kharkov01-03.1943. The book has 560pages (entirely printed in color) andwill have 510 photographs (includingapproximately 30 color), 240 profi les(2D and 3D), 65 maps, 200 drawings,55 tables. £94.99Painting Pin -Up FiguresA complete Guide for Basic to AdvancedPin-Up Painters. Published by AndreaPress. 86 pages, full colour. £21.99“Kampfraum Arnheim” (Battle Zone Arnhem),is a unique in-depth photographic documentation of the German groundforces which opposed the Allied Airborne landings in Holland inSeptember 1944. Hardback, 306 pages. £60.00MILITƒRFAHRZEUG 2-<strong>2013</strong>Neuer 5-Tonner Hauber,Forsvarsmuseet Oslo, Leopardenim Waldkampf, Schienen-LKW derWehrmacht, Newsletter,U.S. Army: <strong>Military</strong> Police,British Army-Warthog.Please note:This is now full German Text onlyFully illustrated. £9.99Tankograd 5042. Fahrzeug-Graffi tiIFOR-SFOR-EUFORPersonalised Vehicle Markingsduring the German Mission on theBalkans. Illustrated with 139 colourphotographs, 64 pages.£13.99Tank Art Volume 1.WWII German Armor by MichaelRinaldiThere are many “how-to” books intoday’s world of scale modeling, butnone has covered the “why”, as wellas, the “how-to” processesÖ themodeler’s artistic approach, untilnow. Paperback, 208 pages,full colour. £19.99<strong>Modelling</strong> Trees Part OneBroadleaf Trees 92 pages,full colour. £19.95Panzerwrecks 15What naval forces were knockingout Panzers in Paris? Why would aPz.Kpfw.IV wear T34 tracks? How doyou move a 70 ton Jagdtiger? Wheredid the Patton Museum Panther comefrom? The answers to these andother questions are to be found herein Panzerwrecks 15, with 132 rarephotographs sourced from around theworld. 96 pages. £16.99Super Model International No. 3published by Kagero.With hundredsof colour photos, including archivalshots and current museum pieces,supporting colour profi le artwork.78 pages. £10.99Tankograd 1007.Panzer-KraftwagenThis is the most comprehensivepublication published on that subjectso far. 96 pages this publication isillustrated with 152 black & whitephotographs. £21.99Warpaint 91.The Mikoyan-Gurevich MiG-21,also known by its NATO codename‘Fishbed’, is undoubtedly aphenomenon in the fi eld of militaryaviation - designed over 50 yearsago, it remains in serviceeven today. £25.00Tank Art Volume 2There are 5 models featured inside, 4dedicated technique chapters, plus aspecial bonus fi gure modeling chapterby Radek Pituch. Inside features over500 color photos reproduced in alarge format. £20.99<strong>Modelling</strong> Trees Part TwoConifers 92 pages, full colour. £21.95LEOPARD 2 MAINTENANCEThe pictorial walkarounds aimat showing the tank is variousstages of disassembly as carriedout in the using units on companyand battalion level. Among theprocedures shown are track removal,removing the turret andthe engine or dismantling the add-onarmour components.These works are usually notaccessible to the public.222 colour photographs plus 1/35scale drawings. £19.99M7B2 Priest in DetailA restoration Masterpiece at theArtillery Museum Brasschaat by JanHorak, Frantisek Koran, Michel VonLoon. Chapters include: History, M7B1Walkaround, M7B2 Walkaround,M7B2 Restoration, M7B2 InteriorDetails,Suspension Details.83 pages, full colour. £21.99Major Credit cards accepted and cheques payable to: Bookworld Wholesale Ltd.
Painting MiniaturesThe famous modeller DaniloCartacci describes how to painthistoric fi gures in an easy andeffective way. Topics are divided inchapters. This volume representsa milestone for historic fi gurespainters, and is rich in hintsand tips. £25.99The Battleship BuildersThe launch in 1906 of HMSDreadnought, the world’s fi rst all-biggunbattleship, rendered all existingbattle fl eets obsolete, but at the sametime it wiped out the Royal Navy’snumerical advantage, so expensivelymaintained for decades.Hardback. 320 pages. £30.00Chieftain Main Battle TankDevelopment and Active Servicefrom Prototype to Mk.11. This bookpublished by Kagero has 72 Archivephotos, 137 color photos,20 painting schemes. £12.99Advanced Techniques Volume 6Painting and Weathering <strong>Military</strong>Vehicles. The latest issue of theAdvanced Techniques series, ismade of four chapters dedicatedto vehicles worn and weathered bytime and man. 128 pages,full colour. £24.99Enamel Weathering Techniques.Washes,fading and oils. DVD.In this extensive DVD, we have clearlyexplained each one of the mostpopular techniques that arecurrently used worldwide. After seeingthis complete DVD, the modeller willno longer have any doubts, and hewill know exactly what each one ofthe oil and enamel producttechniques mean. £16.99Weathering techniques.DVD.A DVD narrating all secrets andtechniques to paint winter vehicles.Detailed explanations for allprocess, like the base color, fadings,mud, dust, chipping and more.Many new techniques explained likethe famous hairspray technique,streaking effects or mud. 3 differentcamo schemes: very faded wintercamo over green, new winter camoover dark yellow and white snakesover dark yellow. £16.99Scale Model HandbookFigure <strong>Modelling</strong> 6This is the Sixth Edition in theScale Model Handbook Series, aseries of modelling books dedicatedto miniature fi gures. Again, we’vevaried the themes and historicalperiods of the subjects andpresented more sculpting andpainting techniques, 50 pages,full colour. £14.99Images of War SpecialThe Centurion TankPat Wareís highly illustrated historyof this remarkable tank coversits design and development, itstechnical specifi cations and themany variants that were produced.He tells the story from the designbrief of 1943, through testingand trials to the tank’s entry intoservice. Paperback,127 pages. £14.99Building Dioramas Stone ObjectsFollowing on from the fi rsttwo volumes, we bring youthe third book in the series,which concentrates on stoneobjects, chapters include, FlowerHolders,Tombstones, Fountains,waterworks, Equestrian Monument,and Mausoleum. £12.99Lets Build a Diorama Volume2This book presents ways to createspectacular dioramas out of everydaymaterials, household waste or realplants. The methods are simple, thetools and materials used here canbe found in ordinary hobby storesand they are quite cheap too, soexperimenting with them cannot bea problem. More than 300 photosillustrate the different stages ofthe progression. £12.99Lets Build a Diorama Volume 1This book is for those modellerswho want to try for themselvesto do this part of modelling. Theauthor, L·szlÛ AdÛba builds withthe simplest tools and cheapestmaterials, ensuring that you canexperiment with them withoutworrying. More than 250 pictureslead you step-by-step throughthe different phases of theconstruction from the base tothe roof tiles. £12.99Tanks in Russia IV.Step by step modelling book,Chaptersinclude: Pz.Kpfw. V Panther Ausf.A, 5.SS-Pz.Div. ìWikingî: Perfi les:Pz.Kpfw. V Panther Ausf. A: Pz.Kpfw.Vi tiger Ausf. E , 2. Pz.Rgt., SS-Pz.Gren.Div. ìDas Reichî: Perfi les:Pz.Kpfw. Vi tiger Ausf. E: Pz.Kpfw.Vi tiger Ausf. E , Sch. Pz.Abt. 509 :Pz.Kpfw. VI tiger Ausf. E , Sch. Pz.Abt.509 winter version: IS-1 (KV-85),Training unit in the vicinity of theKirovski factory: IS-1. £18.99Building and DetailingScale Commercial AircraftMark Stanton takes the readerthrough the construction of 21kits, ranging from the de HavillandDH 4 and Handley Page HP 42of the inter-war years, throughthe Fokker F27 Friendship andBristol Britannia of the 1950s, toConcorde and the Airbus A340.Detailed instructions guide themodeller through every stage ofthe build process, accompaniedby step-by-step photographs ofthe beautiful completedmodels. £16.99Armoured Warfare inNorthwest EuropeThis latest volume in AnthonyTucker-Jones’s series of photographichistories of armoured warfare recordsin graphic detail the role playedby tanks, infantry fi ghting vehiclesand self-propelled artillery duringthe decisive campaign in northwestEurope in 1944-5. In a sequenceof over 200 archive photographshe shows how American, Britishand Canadian and Polish armoureddivisions spearheaded the assault onthe Third Reich. Paperback. £14.99Armoured Warfare and Hitler’sAllies 1941-1945Illustrated here are the panzersdeployed by Bulgaria, Finland,Slovakia, Hungary, Italy andRomania on the Eastern Front andin the Balkans. Hungary’s homemadearmour included the Toldi andTuran tanks and Zrinyi self-propelledguns. The Italians produced CV-33tankettes, Semovente self-propelledguns, Autoblinda and Lanciaarmoured cars and a series oftanks. Romanian and Czechtanks and assault guns were alsodeployed. Paperback. £14.99F.A.Q 2Improved step by step guideexplaining all weathering techniquessuch mud, dust, rust, chipping, oil,fuel and chapters like compositionin dioramas, terrains, vignettes andmuch more. The defi nitive modellingguide where you will fi nd manydifferent examples explaining thesame technique. More than 1400color photos and over 300 pagesexplaining all new techniques andsome of the classic ones. £58.99Weathering in 1 Hour DVD.Finally a DVD that’s different fromthe rest. Most modellers, especiallywhen starting out in the world ofpaint effects, have wondered what thecomplete process of painting a modelconsists of. From start to fi nish. Untilnow our DVD’s have only shown partsof the action, seconds or minutes of asmall fraction of the process. But onthis DVD we show you the completeprocess of weathering a Sdkfz 222,from Hobby Boss. £16.99AFV Acrylic Techniques DVD.For the fi rst time,all techniquesfor painting military vehicles usingonly acrylics are shown on thisDVD. Running Time 56 minutes.£16.99Static Model Manual Volume 6This sixth volume of the StaticModel Manual series providesanswers to many areas of doubtthat beset the modeller when thatfateful moment comes to pick upthe airbrush. 100 pages,full colour. £18.99Static Model Manual Volume 5This new book will explainhow to paint the fi gures.For many modellers it is diffi cult to“give life” to a fi gure with color.This book is designed to clearlyexplain the procedures for obtainingexcellent fi gures. Step by step photos,secrets, tricks, shortcuts, everythingis here on these pages to help youachieve the best results! £19.99Airbrushing and FinishingScale ModelsBrett Green details the prerequisitesof airbrushing, including the differenttypes of spray equipment and airsources available, offering adviceon appropriate thinners, paint ratiosand air pressures to ensure the mostappropriate paint coverage acrossa range of different airbrushingapplications. £19.99Weathering German Ships. DVD.Discover how to make the mostrealistic effects in German ships, likestreaking, rust,chipping, shadowsand lights. Also some of the advancedtechniques like the hairspray method,damage effects, camoufl ages,grease and more. £12.99UK Postage: single book £1.95, two or more books £4.00. Overseas Airmail please allow 15% of order value.The Battleship Bismarck in 3D.This title by Kagero has fi nally beenre-printed, Paperback, 98 pages,full colour. £18.99Marmon Herrington“Marmon-Herrington” by WilliamMarshall is the most comprehensivesingle volume ever published on thisvehicle type and contains details ofthe South African ReconnaissanceCars used by Allied and Axis forcesduring W.W.II. It contains informationresearched over a period of morethan twenty years.Hardback, 175pages, Black/White photographs,colour walkaround section. £35.99
BriefingNotice BoardInformation and diary datesThe Editor welcomes copy for publication in ‘NoticeBoard’. This service is free of charge. Obvious ‘for sale’notices, either private or trade will not be accepted.These restrictions do not apply to bona-fide museumsand collections or traders wishing to pass on informationabout the availability of products to readers.Would secretaries of clubs and societies please allowa three-month lead time for time-sensitive notices.Please note: under no circumstances will copy beaccepted by telephone. All notices must be in writing,by letter or e-mail.Please send all copy for ‘Notice Board’ direct to theEditor at the address listed under ‘Editorial’ on thecontents page.Euro Militaire <strong>2013</strong>This year’s Euro Militaire takes place over the weekend ofSeptember 21st and 22nd. Most of the trade stands have nowbeen reserved with newcomers Nocturna Models, Heroes &Villains Miniatures, Origen Art, Aurea Domus, MiniaturasFortes, and Armour Master Models trading this year. There areonly a few stands remaining to book (details on the website).Early Bird Tickets are now available on the websitewww.euromilitaire.co.uk or call 0844 848 8822 now! Lines openMon-Fri 10.00am – 4.00pm (not weekends or bank holidays).New ModelZonestore in LondonIn March, national model andhobby retailer ModelZoneannounced the closure oftheir flagship ModelZonestore located in Holborn,Central London due to theredevelopment of the building.After 25-years, it was sad newsindeed for loyal customersand many flocked from all overLondon and the surroundingareas to visit the store beforethe doors closed for a finaltime. However, after a month ofsearching for a new site, the modeland hobby store announced anew location at 52-56 New OxfordStreet just a stone’s throw awayfrom the old site. The new storeofficially opened on Monday 3rdJune and the first 30 customersthrough the doors received a freegoody bag filled with ModelZonestock worth over £75!ABOVE: King Alfonso 1925 Rolls-Royce20hp Tourer.Cotswolds steamand vintageThe Gloucestershire Steam& Vintage Extravaganza, nowin its 39th year, will takeplace once again at SouthCerney Airfield, Cirencester.From Friday 2nd - Sunday 4thAugust <strong>2013</strong> the extravaganzawill attract more than 15,000visitors and raise money forlocal and national charities. Theshow has grown dramatically inrecent years and is now widelyregarded as one of the biggestand best steam, vintage andcountryside events in the UK.One of the largest arrays ofexhibits can be found in themilitary vehicle section. Fromthe messenger’s motorcycleto the front line’s armoureddivisions, this particulardisplay at South Cerney mostcertainly covers all the bases.For the most part the displaysdate from World War Twoand feature lovingly restoredvehicles of all description,which are as iconic today asthey were in a time when theywere used for real purpose.Post-war military vehicles arealso represented well, andbring together a living historyfor all ages to explore and learnmore about.The modern day army is alsowell represented, with the hostsat the airfield presenting variousdisplays in amongst the oldervehicles that have travelledmany miles to attend. This year’smilitary section consists of over100 vehicles of all sizes and agesand should prove fascinating toboth young and old alike.Reduced advance tickets areavailable from:www.glossteamextravaganza.com/gloucester-steam-buytickets.htmlClassic cars atWar & Peace RevivalWith its move to FolkestoneRacecourse for <strong>2013</strong>, War &Peace is inviting classic cars fromthe 1930s to 1960s as part of itsnew Home Front Vintage Villagedisplays. All classic cars from acrossthese decades are welcomed tocome and join in for all or part ofthis fantastic five-day vintage andmilitary spectacular at its newhome at Folkestone Racecourse –formerly RAF Westenhanger.Classic vehicle entries areflowing in daily and enthusiasts willsee vehicles from many differentmarques to suit all tastes includingRolls-Royce, Sunbeam, Triumph,Aston Martin, Oldsmobile, MG,Austin, Rover, Buick, Ford, Jaguar,Chevrolet, Morris Minor, Cadillac,Daimler, Bentley and many more!The cars will have pride of placeon the gentle grounds of theoriginal racecourse in front of theMain Grandstand.So come along and show offyour pride and joy to a new andappreciative audience and joinin the vintage atmosphere atFolkestone Racecourse. Entry toThe War & Peace Revival is free toclassic car exhibitors visiting for theday, while those wishing to camponsite and join in with the exclusiveevening entertainment pay just£25 for up to two adults and twochildren for the whole five days!In its new home, The War &Peace Revival will feature anexciting new area dedicated tothe wartime Home Front. Visitorscan listen to demonstrations andsee displays covering the dailylives of the men and women atwork and more importantly thosein their homes and volunteeringin many roles. A new vintagemarket place will be the focusfor vintage and retro clothes,homewares and memorabilia.The War & Peace Revival willbe held at Folkestone Racecourse,near Hythe, Kent from 17-21st <strong>July</strong>.12<strong>Military</strong> <strong>Modelling</strong> Vol.43 No.7 <strong>2013</strong>
BriefingDragon’s forthcoming ‘big’1:6 scale PzKpfw II Ausf C.Another BA-64 armoured car from Vision Models, this one adapted for railway use.Cyber-hobby.com’s Orange Value T-34/85 kit will come with a set of RussianTank rider figures.Tamiya’s new 1:35 scale Japanese Type 10 tank.This MK.IX Valentine from Bronco is bound to prove popular with British AFV fans.Tamiya’s forthcoming 1:32 scale Vought F4U-1 Corsair ‘Birdcage’.Dragon’s forthcoming 1:35 scale SdKfz 165 Hummel Late Production.Latest kit news!An interesting variety in someof the news items we haveseen recently, and kits we canexpect to see in the not toodistant future. Vision Modelsare set to do another variationon their 1:35 scale BA-64armoured car, this time onewith the railway adapters tocreate the BA-64 3Zhd. Tamiyaare planning to release a newUS Destroyer in 1:700 scale,the USS Hammann, along witha modern Japanese Type 10tank in 1:35 scale and in theirlarge 1:32 scale aircraft range, aVought F4U-1 Corsair ‘Birdcage’.Dragon are set to be busy witha new Hummel in 1:35 scale, anA most useful set of WWII British Field Accessories is due from Bronco.Afrika Korps Panzer IV Ausf Dalso in 1:35 scale and to top it,another of their large 1:6 scaleAFVs, a Panzer II Ausf C. At thesame time in theircyber-hobby.com range, oneof their Orange Value kits willfeature a T-34/85 completewith a set of Russian Tank riderfigures, which sets you up fora good diorama scene. In 1:72scale, Dragon will be doing aPanzer IV Ausf H with schürzen.Bronco have announced aforthcoming Valentine Mk.IXin 1:35 scale, along with anaccessory set of WW2 BritishArmy field equipment. Both verywelcome for British AFV fans.Robin BucklandMMwww.militarymodelling.com13
WebsiteLEFT & ABOVE: Gary Radford’s FV432 walkround will be useful for builders of theforthcoming 1:24 scale kit from KFS.ABOVE: Trumpeter’s 1:35 scale IT-1 built by Andy Claesens.ABOVE: A look at the Panzer II belonging to theNational Armor and Cavalry Heritage Foundation.RIGHT & BELOW: Robert Cote’s build of Dragon’s‘big’ 1:6 scale Panzer II Ausf B kit.www.militarymodelling.comNews from the <strong>Military</strong> <strong>Modelling</strong> website and forumIf you would like to submit an item for the website email Robin Buckland atrobin.buckland@mytimemedia.com or come and join our online presenceat militarymodelling.com the world of military modelling at your fingertipsOur current Group Build isproving popular on theforum at the moment,appropriately covering thesubject of Bomber Command,as we come to the 70thAnniversary of the famous Damsraid by 617 Sqn. It is proving tobe another very popular topic,with a good variety of aircraftbeing covered by our membersaround the world.We have had the opportunityadd some more referencearticles recently, including awalkround of the FV432 foranyone considering the new1:24 scale kit of the FV432 byKit Form Services. We have alsoincluded a set of photos showingthe PzKpfw II Ausf F now heldas part of the National Armor andCavalry Heritage Foundation atFort Benning, Georgia.Add the extra news andreviews and you will always findsomething new in our onlinehome. Our forum remains afriendly and lively place to gettips and advice for modellinga whole variety of subjects. Itis interesting that we continueto see a regular stream of newmembers who are returning tothe hobby after a break thanksto work, family and othercommitments which hit us inadult life.Robin BucklandM14<strong>Military</strong> <strong>Modelling</strong> Vol.43 No.7 <strong>2013</strong>
Historical miniatures for collectorsBuy online: www.centuriontoysoldiers.co.uk Email: sales@centuriontoysoldiers.co.uk_tsc_ads.indd 60 08/05/<strong>2013</strong> 22:18:56
AFVPainting aFraser Gray paints Trumpeter’s 1:35 scale KV-2using the ‘colour modulation technique’.The Soviet Union’s invasion of Finland gavethe Russians an opportunity to field evaluate‘‘one of their new tank designs, the KV(named in honour of the Soviet General Kliment”Voroshilov). The tank performed well, althoughthe 76mm gun was not entirely effective whenencountering fixed fortifications.To address the problem, the Leningrad Kirovfactory simply replaced the turret armed with the76mm cannon with a huge new turret mounting a152mm howitzer. To distinguish the two tanks theKV equipped with the 76mm gun was known asthe ‘small turret’ and the new fire-support KV wasknown as the ‘big turret’ The crews nicknamedthe fire support tank ‘Dreadnought’ because theturret, covered in bolts and reinforcement flanges,resembled the turrets on the British Dreadnoughtclass of warship. Two KVs equipped with the ‘bigturret’ were sent back to the Finnish front withdisappointing results. The tall turret was found tobe top heavy and nearly impossible to traverse onuneven ground.To deal with the ‘big turrets’ shortcomings, a refinedversion known as the ‘lowered turret’ was produced.The new turret was simpler to manufacture andentered series production. The clumsy designation ofThe tall turret wasfound to be top heavyand nearly impossibleto traverse onuneven ground.the KV tanks was then changed, the tank equippedwith a 76mm gun received the official designation KV-1and the tank armed with the 152mm gun ‘loweredturret’ became the KV-2. The KV with the ‘big turret’was never officially redesignated.The KV-2 and the remaining KVs armed withthe ‘big turret’ continued in service with theRed Army during the Nazi invasion of the SovietUnion, Operation “Barbarossa“. Initial Germanencounters with the KV-1 and 2 were a shock forthe Wehrmacht. The Germanswere dismayed as roundsfrom their 37mm, and 50mmanti-tank guns bounced offthe tanks. On occasionsthe KV-1 and 2 simplyran over and crushedGerman anti-tank gunsand their crews. The short75mm gun of the PanzerIV was also ineffectiveagainst the ‘Russian Colossus’as the Germans called the tank. TheKV-1 and 2 were eventually overcome,because of Soviet’s poor tactical use of thetanks. Without infantry support the tanks were16 <strong>Military</strong> <strong>Modelling</strong> Vol.43 No.7 <strong>2013</strong>
AFVoutflanked, and destroyed with heavy artillery orStuka bombardment.The lack of fuel and mechanical problemsresulted in large numbers of KV-2s being capturedintact by the Germans. The captured tanks weremodified by fitting a Panzer III cupola, and fought onas the PzKpfw 754(r). The last known action foughtby a KV-2 was in 1945, in defence of Krupp’s Essenfactory from advancing American troops.To paint a Dreadnought!To continue my interest with Adam Wilder’s Colourmodulation techniques, I was looking for a modelthat had large flat surfaces, was well-detailed andquick to build. I therefore found Trumpeter’s kit ofthe KV-2 to be ideal for my painting project.Colour modulation is a term coined by AdamWilder, to describe a painting technique ofexaggerating the effects of light falling onto a model,to create interest and volume. Colour modulationworks particularly well on monochromatic paintschemes. The techniques are described in detailin Adam’s DVD F.A.Q. Vol. 2 Modulation Style byNight Vision Creations and is available from MIGProductions - migproductions.comI have painted my KV-2 model using myinterpretation of Adam’s techniques shown on theDVD. Colour modulation is a great improvementover the ‘cloud’ method (airbrushing a lighter shadeinto the middle of each panel) that I had previouslyused to paint my models.Building the KV-2Trumpeter’s kit is great built straight from the box,but I felt I could improve the appearance of themodel by replacing the engine air intakes on therear deck of the model with Eduard’s set 35 825 forthe KV-2. In order to give my model individuality, Imodified the intakes to match the very early patternfitted to some KV-2s. I used extra mesh salvagedfrom a disaster when I tried to solder the photoetchedintakes! The KV-2 was finished ‘closed-up’so the rest of the photo-etch, such as the hatchlocking mechanism, was saved for a future project.Apart from the air intake parts I only used thebrackets for the headlamp and claxon from the set.The only other extra work I carried out wasrunning a blunt 10a scalpel blade across the edgeof the armour plate edges to represent the marksleft by an acetylene torch. I also used the 90’s retrotechnique, of lightly running a burr in a motor toolover the model to represent the pitting found onarmour plate. The trackguards were carefully bentto represent battle damage. When the adhesive‘‘...I was”looking for amodel that had largeflat surfaces...Soviet Giant!www.militarymodelling.com17
AFV12had set, I used my hands to carefully apply pressurein opposing directions along the length of thetrackguards, one section at a time, to representbattle damage. The amount of damage to thetrackguards is appropriate for a tank with such ashort service life.Photos 1 & 2. The Trumpeter KV-2 kit isstraightforward to build. The tracks are very welldetailed and supplied ‘link & length’. To avoid anyfurther difficulties later on in the construction of themodel, the tracks were assembled and dry-fitted tothe model.3Photo 3. While the cement was still drying thetracks were placed onto the running gear. To makea complete circuit, both ends of the track weresecured with wire. I have encountered problemsin the past with both plastic independent links andlink & length tracks. As the solvent dries the plasticcontracts, making the tracks slightly short for aperfect fit. Wiring the tracks into position preventsthe problem.Photo 4. Although almost impossible to see, thereare a number of ejector pin marks on the undersideof the trackguards. I filled them with super glue andtalcum powder. The paste soon sets and the fillercan be rubbed smooth with emery paper.4Photo 5. The top of the trackguards have some sinkmarks, caused when the hot sprue is removed fromthe injection-moulding machine. A slurry of Revell Puttyand liquid polystyrene cement was used as a filler.Photo 6. Located on the rear engine deck are aseries of tie downs. The rings are made from finecopper wire that I found littering the pavementaround telephone junction boxes. The wire was518<strong>Military</strong> <strong>Modelling</strong> Vol.43 No.7 <strong>2013</strong>
AFV6is a dangerous procedure. To avoid a serious injury,the safest way to open up the vents, is to make aseries of holes with a drill held in a pin vice aroundthe perimeter of the screen.Photo 9. A series of small cuts, safely separate theplastic between the holes, and the waste can besafely removed. The frame can then be cleaned upin preparation for the photo-etched screen.7Photo 10. The turret is simple to construct.I decided to invest in a replacement gun tube.The Aber Russian 152mm gun barrel (item 35L-44)is a great improvement, and even features the riflingon the bore of the massive howitzer.89twisted around a drill shank to form the rings. It’sless of a chore if you attach the rings while theparts are on the sprue.Photo 7. The inside of one of the stowage boxeswas thinned with a burr fitted to a power tool. Thethin plastic can then be punctured with a compassneedle to simulate battle damage.Photo 8. Because of the quality of modernconstruction kits, very little significant improvementis made to the model, by replacing detail with aftermarketphoto-etched parts. However, replacing theintegrally moulded mesh of the air intake vents withphoto-etch considerably improved the appearanceof the model. Cutting into plastic with a craft knife10www.militarymodelling.com19
AFV1112131415Photos 11 & 12. The photo-etched engine screensare a great improvement, and allow the louvres to beviewed behind the mesh. The retaining cable for thelarge engine inspection hatch was made from twistedwire. Three strands of wire were anchored in a viceand then a hand drill was then used to braded thewire into cable. A series of cuts were made along theedge of the armour plate with a worn 10A blade, torepresent the marks made by a cutting torch.Photos 13 & 14. The tow cable is from the Karayarange (item TCR07), combined with the kit-suppliedshackles. The crude injection-moulded post attachedto the headlamp and horn was replaced with thebrackets supplied in the photo-etched set. Theelectrical connections for the headlamp and claxonwas made from fine fuse wire and plumbed in to thekit supplied electrical conduit.Photo 15. The author’s completedmodel ready for painting.20<strong>Military</strong> <strong>Modelling</strong> Vol.43 No.7 <strong>2013</strong>
AFV16PaintingPhoto 16. The model was broken down andwashed in warm water and detergent. The axlesfor the roadwheels have been wrapped in TamiyaMasking Tape to prevent the accretion of paint,creating difficulty installing the running gear ontothe axles. The model was then mounted on asimple frame and primed in Halfords’ Grey PlasticPrimer. The entire model was then given a basecoatof Tamiya NATO Black XF-69, applied with anairbrush in several light coats, allowing the paint tobuild up opacity without hiding the model’s detail.Photo 17. Tamiya paints dry rapidly and I was ableto move on to the next stage of colour modulationpainting process. The model was given a light coatof Tamiya J.A. Green XF-13. I took care not to floodthe shadow areas of NATO Black XF-69 allowing thenatural overspray to blend the two colours.Photo 18. To create interest and variety in amonochrome camouflage scheme the engine bayaccess door is isolated with Tamiya Masking Tape.Here I have introduced Tamiya J.A. Grey XF-14 withJ.A. Green XF-13 and airbrushed from a low angle,to give volume to the air-filter blister.Photo 19. The painting process is continuedwith more masking and airbrushing. The colourmodulation is a laborious painting technique, but bydividing the model up into small sections at a time,progress was made.‘‘Tamiya”paints dryrapidly and I wasable to move on tothe next stage...171819
AFV202122232425Photos 20 & 21. The transmission inspectionhatches are airbrushed. To create contrast I addeda small amount of Games Workshop Goblin Greento the airbrush’s reservoir. To increase the contrastbetween the two engine deck sections, I used apaper mask to airbrush Tamiya Yellow Green XF-4on the panel line near the exhaust stubs.Photo 22. A compass cutter was used to cuta mask for the engine transmission inspectionhatches, and a blend of Tamiya J.A Green XF-13lightened with J.A. Grey XF-14 was sprayed just tocatch the edge of the hatch near the exhaust stubs.Photo 23. Once the masking tape has beenremoved, you can see the volume and contrast myinterpretation of the colour modulation has createdin the engine deck, in comparison to the basicgreen, of the as yet un-modulated areas.Photos 24 & 25. Further highlights were added tothe engine air intake grilles. This time I increased theproportion of Yellow Green XF-4, to raise the contrastof the intakes with the rest of the engine deck.Photo 26. Identical painting techniques were usedto paint the forward section of the hull deck.Photo 27. The driver’s entry hatch was separatedfrom the rest of the decking with Tamiya MaskingTape and given identical highlights to thetransmission inspection hatches.Photo 28. The glacis plate is masked, and the firstcoat of paint has been airbrushed.Photo 29. The same techniques are applied to thepainting of the glacis plate as were used on theengine decking.22<strong>Military</strong> <strong>Modelling</strong> Vol.43 No.7 <strong>2013</strong>
AFV2627282930Photo 30. Areas of natural highlight, such as the topof the driver’s vision port are highlighted, creatingvolume and contrast.Photo 31. The turret is the perfect for airbrushingusing the colour modulation method.31www.militarymodelling.com23
AFV32393334Photo 32. I decided to experiment paintingthe turret. Instead of following the usualpractice of a vertical vignette (light at thetop graduating to dark) I airbrushed adiagonal vignette.Photo 33. When I had airbrushed theturret sides, I protected my work withTamiya Masking Tape and airbrushedthe front plate of the turret.Photo 34. The front plate was thenmasked, and the armour covering thehowitzer trunnions was then painted using thecolour modulation technique.Photo 35. The effectiveness of using the colourmodulation technique can be appreciatedeven at this early stage. The painted areashave volume and interest in comparisonto the as yet unpainted areas.Photos 36 - 38. The periscopehorns and crew entry hatch are nowairbrushed and masked. Notice howthe lighter shade at the front of40the turret roof contrasts with the darker vignetteon the rain guard above the howitzer mantlet,creating contrast between the various componentsof the turret.Photos 39 & 40. The howitzer is airbrushed usinggraduated vignettes. The portion on the mantletthat is shaded below the rain guard has been leftin the undercoat of NATO Black XF-69 to provide asharp contrast with the light green of the rain guard.3536372438
AFV4142Photo 41. I used the diagonal vignette technique toairbrush the trackguards and stowage boxes.Photo 42. Essentially the colour modulationprocess is completed. Lighter shades applied witha paintbrush pick out detail like the bolt heads andindividual lifting rings.Photo 43. The wheels were airbrushed inLifecolor UA701 Rust Dark Shadow, and thenLifecolor paints UA 702 Rust Base Color,UA 703 Rust Light Shadow 1 and UA 704 RustLight Shadow 2 were applied, almost dry, with asponge to give a rusted appearance.43www.militarymodelling.com25
AFV444546Photo 44. The wheels weregiven a coat of hairspray. Eachwheel was randomly airbrushedin a combination of greens that I had used to paintthe hull and turret. Occasionally I would add TamiyaWhite XF-2 to the airbrush’s reservoir, to createfurther variation of colour. As soon as the paint wastouch dry, an old chisel-edged brush was dipped inwarm water and worked on to the paint surface ofeach wheel. As the paint lifts, it exposes the rustcoloured basecoat giving a realistic corroded anddamaged appearance.Photo 45 & 45a. The tracks were undercoatedin Halfords’ Grey Plastic Primer, and a wash ofLifecolor UA 701 Rust Dark Shadow diluted withdetergent was applied to the tracks. I repeatthe procedure several times to build upthe opacity of the washes.45a46a4747aPhoto 46 & 46a. Further washes of Lifecolor UA702 Rust Base Color, UA 703 Rust Light Shadow 1and UA 704 Rust Light Shadow 2 diluted with waterand detergent are then randomly applied to thetracks, gradually building up a rusted appearance.Photo 47 & 47a. When you are satisfied with theappearance of the tracks, spot washes of MIGProductions P034 Russian Earth, P232 Dry Mud,and P037 Gulf War Sand can be randomly appliedto create further interest to the tracks. The trackshoes, where they come in contact with the groundand running gear are polished with graphite powderfrom an artist’s pencil, applied with my finger.26<strong>Military</strong> <strong>Modelling</strong> Vol.43 No.7 <strong>2013</strong>
AFV48Photo 48. The running gear is dry-fitted to themodel. The overall appearance of the model is almostluminous! An application of a protective coat of acrylicvarnish will darken the appearance of the model.Photo 49. The entire model is airbrushed withseveral light coats from my last bottle of JohnsonWax Klear floor shine to protect the model fromthe corrosive effects of spirit-based washes.Tamiya Clear X-22 would work just as well, but isconsiderably more expensive!To be continued.49
Show reportABOVE: Registration tables.ABOVE RIGHT: Ramrod station.AMPS <strong>2013</strong>Steven Andreano reports on the Armor Modeling andPreservation Society International Convention.This year’s show was held in Atlanta, Georgiafrom Thursday 18th April to Saturday 20thApril. AMPS shows are by design always heldnear a <strong>Military</strong> Ground forces museum of somekind. The first day featured a trip to the Motor Poolat the Fort Benning US Army base. A treat I missedbut many of those who attended describe as wow!(Don’t miss Robin Buckland’s report on this in aforthcoming issue, Ed.)The show was well attended with 144 modellersentering 430 models and figures. A little downfrom the previous year this show was the first inthis region of the country as the Society growsand expands past its traditional North and Mideastroots. Keeping with its new location the theme was;Models named after American Civil War Officers.The show featured a number of Seminarsincluding Adam Wilder sharing metal finishing tipsand David Doyle on research. Also included was avendor area that filled two rooms and spilled outinto the hallway.AMPS uses a modified open system awardingGold, Silver, or Bronze medals, judging each modelon its own merits. Models are dropped off atthe Ramrod Station outside of the judging room.A 1:144 scale Tiger I ready for judging. Coloured playingcards provide a reference to the time a model was entered.Several founding and current club officers join <strong>Military</strong> <strong>Modelling</strong>’s Robin Buckland for dinner.Left to right; the author, Howie Belkin, Stephen ‘Cookie’ Sewell, Current President Roy Chow, Una andRobin Buckland, Chief Judge Mike Petty.28
Models awaiting judging. AMPS attractsall scales from 1:144 to 1:16 and projectsranging from Out of the box to Scratchbuilt.Show reportJudging in progress.Teams of four judges sit at tables and are broughtthe models by runners. Vignettes, Dioramas andFigures are judged in place in the main room.All projects are judged on a scale of 1 to 10 withthe lowest individual score being dropped so aperfect score would be 30. Awards are earned bya point scale depending on the level the modellerenters; Basic, Intermediate, or Advanced withhigher point totals needed to medal. There arealso levels for Juniors and Masters. While thismay sound complicated it is actually easier, morefun, less stressful, and more rewarding than 1st,www.militarymodelling.com29
Show reportModels can be displayed in a variety of ways from simply without basesto complex diorama type settings highlighting articulating suspensions.30<strong>Military</strong> <strong>Modelling</strong> Vol.43 No.7 <strong>2013</strong>
Raffle table.Show report2nd and 3rd place judging. First off, there are nohard choices, no searching for flaws to eliminate acontender. You’re just rewarding good work. Thisallows judges more time to study the entries. Notto find mistakes but to learn how the modeller didthings and offer constructive criticism in the form ofwritten feedback. The results are usually a positiveexperience for both judges and entrants.I hope that the accompanying photos convey aflavour of the wide and varied Tank and AFV modelsthat were to be seen and admired at the show.People interested in our club or contest can findmore information about us at amps-armor.org MM31
Show reportABOVE LEFT: The main vendor’s room. ABOVE RIGHT: The awards ceremony in full swing.32<strong>Military</strong> <strong>Modelling</strong> Vol.43 No.7 <strong>2013</strong>
Show reportTheme awardwinner; Sci-FiGeneral Wheelerarmoured car.www.militarymodelling.com
AFVAn Aerial Baiter!Peter Gillson adds to his 1:35 scale Hetzer collectionwith the 2cm FlaK 38 anti-aircraft version.ABOVE & BELOW: The author’scompleted Hetzer conversion.Some conversions, such a post-war trainingHetzer I have built, are made from a donorkit and a conversion kit which has beenspecifically designed to fit it. While there is nothingwrong with such conversions I sometimes feelthat it is more like building a kit from two suppliersrather than a real conversion. This project is more ofwhat I think of as a conversion, a model built fromkits which are not designed to go together - in thiscase the Tamiya Hetzer and Dragon 2cm FlaK 38anti-aircraft gun.Even though this is a fairly simple conversionI had to tackle it in four sub-assemblies: thesuperstructure, hull, the FlaK 38, and finally themounting unit for the FlaK.ResearchAs with any conversion it is important to gatheras much information as possible before startingany building. The book Gunpower 30 Jagdpanzer38, Volume 2 was the starting point and my mainsource of information. The book includes a fewphotos, some side view drawings as well asnarrative about the vehicle.The photos and drawings of the vehicleshow details of the exterior and these weresupplemented by the section in the book aboutthe Bergepanzer Hetzer from which the originalvehicles were converted. The interior was slightlymore difficult as there is little in the book about theinternal structure and fittings of the actual vehicle,nor of the Bergepanzer Hetzers. Fortunately Ihave a copy of Osprey’s <strong>Modelling</strong> the Hetzerwhich includes a chapter on modelling theBergepanzer Hetzer using the NewConnection conversion kit. Thesereferences provided sufficientinformation about the Hetzeritself, internal and external,while the 2cm anti-aircraftgun looked pretty standard.Unfortunately there is noinformation about the way the gunis mounted within the hull of theHetzer, and the only information I couldgather from the photos was the amount of the gunshowing above the vehicle’s sides. The method ofmounting would therefore have to be guessed afterthe Hetzer itself was converted.34<strong>Military</strong> <strong>Modelling</strong> Vol.43 No.7 <strong>2013</strong>
AFVSuperstructureOn the Bergepanzer Hetzerthis was a cut-down versionof the normal tank and it wastempting to just ‘jump in’ and cut thesuperstructure, but before this couldbe done some work was required. Thecannon aperture would need to be closedand the front plate thickened to more like thescale thickness so it would look correct whencut. The front armour of the Hetzer was 60mm thickwhich equates to a fraction under 2mm in 1:35 scale. Ihad some odd bits of plastic card just under 1mm thickand so used these across the whole of the inside ofthe front armour, this would both thicken the armourand provide a backing to help fill the cannon opening.When dry, some plastic card the same thickness asthe kit part were glued on the plastic I had just fixedacross the aperture to fill in the space. When drySylmasta A+B Epoxy Putty was used to completelyfill in the odd gaps and then the front was sandedusing very fine wet and dry sandpaper to produce acompletely smooth front plate.The superstructure was now ready to be cut andthis was probably the easiest part of the conversion.Referring to the scale drawings I was able to markon the kit parts where the superstructure had to beremoved. Using a razor saw I cut the superstructurea millimetre or two above the line. With most of thewaste plastic cut away I carefully sanded the restdown to the line, initially using quite course sandpaperthen finishing with finer paper. The method I used wasto tape the sandpaper to a flat surface and rub the kitpart along the paper.Referring the plans and information about theBergepanzer Hetzer I was able to make the smallrear roof strip and then finish the superstructurewith etched-brass for the mudguards and sideskirts, and used off-cuts of plastic for variousBergepanzer Hetzer fixtures.Glacis platefilled withplastic cardand putty.making a one-part mould of the resinfirewall and cast a part out of resin.Fortunately the firewall was a reasonablefit with the lower hull, but unfortunatelythis did not fit very well with the Tamiyasuperstructure so a little filler would beneeded. The firewall was glued into thehull and spare pieces of plastic card wereused to form support brackets which would behidden by the superstructure. When the glue hadcured I laid a long, thin roll of putty along the topof the firewall, then dusted it with talcum powderto act as a release agent. The superstructure waspressed into place squashing the A+B Epoxy Putty,ensuring a good fit. When the putty had partlycured the superstructure was removed and theputty was trimmed to neaten the join.Inside of the glacis platecovered with plastic card.BELOW: The box art from L.Z. Models1:35 scale Bergepanzer Hetzer kit.The author used a part from this kit toproduce a new firewall as describedin the text.FirewallThe original vehicles were conversions of theBergepanzer Hetzers which had a flat, ratherthan staggered firewall so this would have tobe built from scratch. Fortunately I had boughtthe Bergepanzer Hetzer kit from L.Z. Models ofGermany, item 35401 (www.lzmodels.com) whichhad just been released and was able to cheat byThe one-part mould of the firewall.My completed home cast firewall.www.militarymodelling.com 35
AFVABOVE: The complete mounting unit with the Italeripart for comparison. BELOW: The box art for Italeri’sSdKfz 140 “Gepard” Flakpanzer 38(t) kit.ABOVE: The complete mounting unit with the Italeri part for comparison.2cm FlaK 38 would need to be fitted. The problemwas, what type of mounting would be used? Sincethe references do not give any information it wastime for an educated guess. The nearest vehicleI could think of which mounted the 2cm FlaK 38was the SdKfz 140 “Gepard” Flakpanzer 38(t),and fortunately amongst my pile of ‘plastic loftinsulation’ (otherwise known as the unmade kits!)I had an Italeri kit of the vehicle (item 6461) – it hasalso been kitted by Dragon, Tristar and Alan HobbiesLtd, Ed. A quick look at the instructions identifiedthe mounting unit which was removed from thesprue and brought downstairs.ABOVE: Underside of the octagonal unitshowing all of the small bracing parts.BELOW: Dragon’s box art for their2cm Flak 38 kit.Transmission areaFortunately I have collected a number of kits ofHetzers, PzKpfw 38(t) tanks or variants, many ofwhich contain interior details, so I raided one ofthese for the driver/transmission area and installedit into this model. At this stage I also added someenhancements – bolt heads where the suspensionblocks would be, cables etc. References say thatthe vehicles were not fitted with radios which saveda little fitting out.With the transmission and firewall in place I knewthe size of the fighting compartment where the2cm FlaK 38This was a Dragon kit (item 6546) which was builtaccording to the instructions with no changes to itother than not fitting the gun to the base.MountingThis is a raised octagonal base mounted on arectangular plate with spaces which would have heldboxes of ammunition for the FlaK. Using the kit partas a template a copy was made out of plastic card.The raised octagonal part was very tricky, consisting ofmany small pieces so a number of bracing pieces werealso used. Surprisingly it took the best part of a weekof evenings to make. At this stage I was not 100%sure the height the unit would be above the hull floorso I deliberately used a piece of plastic card for thebase which was both wider and longer than I needed,to ease cutting to size. It was not, at this stage gluedto the octagonal base.The only hint I had for the height of the mountingunit in the references I had was from the photo andside elevation drawings from which you can seethe amount of the FlaK visible above the top of thesuperstructure. To match this I placed a large lumpof Blu-Tack on the floor of the hull and placed theoctagonal mounting plate onto it, then put the gun inplace and finally placed the superstructure on the hull.Slowly, and with constant reference to the photos Ipushed the octagonal plate down until the amount ofgun showing above the edge of the superstructurelooked like the amount in the plans and photos.36<strong>Military</strong> <strong>Modelling</strong> Vol.43 No.7 <strong>2013</strong>
AFVABOVE: The firewall glued in and theFlaK 38 mounting unit in place.LEFT: Rear view of the firewall, clearlyshowing all of the bracing and the‘sausage’ of filler.Removing the gun and superstructure I was able tomeasure the height of the base of octagonal unit toknow the height of the baseplate. A couple of plasticsupports were then glued to the hull sides and themounting baseplate was cut to width and test-fitted.It was clearly too long and so was cut to length, againreferencing the photos to try and match where thegun looked in the plans/photos. The location of thedriver’s seat required a corner to be cut out. All of thisis speculation but it does seem logical that existingparts would be used and what better than the SdKfz140 Flakpanzer 38(t) Gepard 2cm FlaK 38?‘‘Removing”the gunand superstructure Iwas able to measurethe height of the base ofoctagonal unit...Firewall glued in place along with theFlaK mounting and the FlaK 38 placedon the unit.www.militarymodelling.com37
AFVRIGHT: All four sub-assembliescompleted.ABOVE: All of thesub-assemblies inplace; note the amountof filler used to fill in thegun aperture.The AK Interactive base colour used topre-shade the driver’s area.BELOW: All primed andready for painting.PaintingKeeping the four sub-assemblies separate, a coupleof thin coats of Games Workshop Skull White wasused as a primer and then left to dry overnight.I had recently bought some sets of paints fromthe Spanish company AK Interactive, and one setwas to replicate the red primer seen on Germanvehicles. The base colour from this set was appliedto the majority of the interior, not only to the interiorof the hull, but also the inside of the superstructure,as a pre-shading coat. The second set I bought andwas keen to try was their Dunkelgelb set whichconsists of six shades. Their Light Base shade wasapplied to the majority of the interior, the FlaK andthe mounting unit - keeping the coat thin so that thepre-shading would show through to provide somecontrast. The Light Base shade was then appliedin a patchy manner to break up the surfaces and toprovide some general highlight areas.A green/blue-grey was mixed from Vallejo coloursto match the colour of German transmission unitsand the unit was painted with the colour, adding alittle black produced a shadow tone while a littleDunkelgelb lightened it a little for the highlights.The seat was painted in various shades of brownto replicate leather after which the whole of theinterior was given a wash of very thinned VandykeBrown oil paint. When dry a few highlights wereadded, just enough to add a little interest sincemost of this area would be unseen when the modelwas finished.All of the photos show the vehicle had the latewar3-colour scheme so I decided to use myLifecolor paint set German WW2 tanks – Set1. After masking off the interior of the hulland exterior of the hull and superstructurewere given a thin coat of Dunkelgelb (RAL7028), painting mainly where the colourwould be masked and not over-sprayed bythe subsequent colours. When dry someareas were thinly covered with Blu-Tack andthe superstructure sprayed with the German red/brown (RAL 8017) which was also left to dry beforefurther Blu-Tack making applied for the final green(RAL 6003) to be applied in the same way. Althoughmost focus was on the separate superstructure I hadto also remember to paint and mask the hull front,rear and the rear mudguards in the same way. At thesame time the wheels were each painted in one ofthe three colours - photos clearly show each of thewheels to be a single colour.38<strong>Military</strong> <strong>Modelling</strong> Vol.43 No.7 <strong>2013</strong>
AFVLEFT: The interior with its basecoat ofAK International Dunkelgelb base colour.BELOW: The hull masked off ready tobe airbrushed.ABOVE: The completed, shaded and weathered interior.The contrast between the three colours oftenlook too stark and so I gave the superstructure athin dusting of Dunkelgelb, holding the airbrushabout 30cm from the surface which just tonesdown the colours a little, muting them slightly.Disaster – well nearly!I can be a little heavy handed and I managed to knockoff two of the side skirts, breaking the mountingpieces in the process. Using some thin metal – froma tube of tomato puree – I made some replacementmounting strips and re-fixed the side skirts.A mixture of Tamiya Flat Brown XF-10 and FlatEarth XF-52 was applied to the sub-structure,including the tracks, behind the wheels and aroundthe edges of the wheels as well as part way up thefront and rear hull plates to replicate dirt and dustwhich would gather on the vehicle.The hull, superstructure and gun mounting unitwere now glued in place. The eagle-eyed may havenoticed that until now the exhaust has not beenadded. Now this could be remedied and it waspainted with various shades of red and orange usinga stippling action to create a random rust effect. Ipurposely allowed the paint to be thick in places tocreate a texture to the surface. For this I cut an oldbrush so the end was square.LEFT: Disaster averted! A tomatopuree tube was used to make newskirt supports.BELOW: The hull after the red brownwas applied.www.militarymodelling.com39
AFVThe superstructureafter the red brownwas applied.More Blu-Tack, this time tomask off the areas where thered brown was to be kept.Green has beenairbrushed over thewhole model.The wheels were each painted in a single colour.WeatheringI decided not to add any chips, scratches or rustmarks. I know that this is ‘off trend’ at the momentbut these vehicles were not in service for longso they would have featured little wear and teardamage. The only weathering was to give the wholevehicle a series of very thin washes of diluted oilpaint to bring out the detail. Normally I use a verydiluted wash of Vandyke Brown, working around avehicle a small area at a time, firstly moistening thearea with white spirit, then applying the wash with afine sable brush, finally dubbing off any excess withanother brush. This time I decided use the sametechnique but tried a number of different shadesof brown: Vandyke Brown, Raw Umber and BurntUmber were each diluted into a very thin wash and Iused any one of the three randomly as I worked myway around the vehicle. To be honest I do not thinkthe use of different colours was very noticeable, soABOVE LEFT: After all of the masking has been removed, the contrast is quite sharp. ABOVE RIGHT: A clear photo of the interior with the FlaK in place.BELOW: The ‘earth’ colour applied to the substructure.40<strong>Military</strong> <strong>Modelling</strong> Vol.43 No.7 <strong>2013</strong>
AFVABOVE: Fitting the netting using my ‘helping hands’. ABOVE RIGHT: The completed FlaK 38.ABOVE: The exhaust added.The exhaust painted various shades of orange.I will probably revert to only using Vandyke Brown infuture, but new ideas are always worth trying.A 4B pencil was rubbed over the tracks to pickout highlights and to produce the polished shine ofmetal caused by constant use. The substructurewas then given a very light dusting of a lightenedversion of the earth colour I had used to addcontrast to the dirty areas, after which a littlegunmetal acrylic paint was dry-brushed over thetracks, adding contrast to the shiny metal.Final detailsThe only parts left were the etched-brass and plasticframe to make the netting which was used to catchspent ammunition cases. I had deliberately left theseuntil last to avoid damaging them. They were notdifficult to assembly, just veryfiddly and the use ofmy ‘helping hands’was essential.With these in placethe FlaK was given acouple of washes ofVandyke Brown andthen highlighted by drybrushingwith the pureDunkelgelb colour beforefixing into the vehicle.ABOVE: The FlaK 38 placedinto position.RIGHT: Netting added tothe FlaK 38ABOVE: After a light coat of the basecolour to slightly subdue the contrastbetween the three camouflage colours.BELOW: The author’s completed model.ConclusionMaking the octagonal mountingwas very frustrating, and was probablythe most complicated part of the build. Withhindsight I think that I would have been better tohave used the mounting and the 2cm FlaK 38 from theItaleri “Gepard” then retained the rest in the sparesbox. Overall though, the result is quite a nice lookingvariant of the Hetzer and a satisfying conversion. MMwww.militarymodelling.com41
AFVOrdnance QF18pdr Field GunJohn Prigentbuilds the Resicastkit as a BEF gunserving in Franceduring 1940.TOP: The author’s completed 18pdrgun placed in a scenic setting courtesyof Photoshop.BELOW: The finished gun showing itsstowed rope and aiming stake.Icouldn’t resist treating myself to Resicast’s 1:35scale 18pdr and Limber kit (item 35.1218) at the2012 On Track show, and it’s a cracker of a kit!Although introduced in 1904 and of course usedduring WW1, the ordnance QF 18pdr remained inservice with the British Expeditionary Force (BEF)in France in 1940, where 216 had to be left behindat evacuation. It was also used in WW2 during theearly Western Desert fighting as well as in EastAfrica, Malaya and Hong Kong. The original barreltype was replaced several times by improvedversions, which can’t really be told apart, but therewere several variations of its carriage.The original Mk.2 carriages with ‘pole’ trailsremained in service to the end, though withmodifications for mechanised towing whichredesignated them as Mk.2P. This Martin Parryconversion replaced the original large-diameterwooden horse-traction wheels with new pneumatictyredsteel ones on stub axles mounted below theoriginal axles. Extra braces ran from the stub axlesback to the pole trail to prevent them twisting.This conversion kept the gun at its original firingheight and was also applied to its limber. The Mk.3carriages weren’t built, while Mk.4 had a box trailand Mk.5 a split trail.Resicast’s kit produces the Mk.2P carriage. Shellweight was actually 18.5lb, not 18, and with thecase added the loader had to handle 23lb. Rangewas 7,800 yards with the pole carriage’s trail dugin but this was a field gun for direct fire, not ahowitzer, so elevation was only -5 to +16 degrees.It did have a limited traverse without moving thetrail, 4.5 degrees to each side. Both telescope andpanoramic sights were used.What’s in the box?The kit includes 50 resin parts for the gun and 16more for its ammunition limber, plus 12 resin caseends to go into shallow holes if you choose to showthe limber doors open (the other holes are deeperto denote those where the shells have been takenout), and an etched-brass fret of 40 parts; manyspares of fragile parts are included as well, a verywelcome thought in case of accidental breakage.The icing on the cake is the inclusion of six eachof turned brass shells and case ends to populate ascenic base! All are packed into 11 resealable bags,interleaved with bubblewrap for extra protection inthe very sturdy box, so there’s little risk of damagein the post.The instructions are excellent, in Resicast’s usualstyle with step-by-step photos of the build andsome historic photos as well. A PDF file with them42<strong>Military</strong> <strong>Modelling</strong> Vol.43 No.7 <strong>2013</strong>
AFVon is also available from Resicast on request, so ifany images in your own kit’s instructions are notquite clearly printed there’s no need for guesswork.Most resin parts have numbers on their castingblocks, as listed at the start of the instructions;although a few are mislabelled in the assemblyphotos there’s no real problem in identifying them.Those casting blocks are very easy to remove, justscribe along the part bottom and clean up with aknife – no sawing or filing required!Top and bottom views of theassembled carriage. Note how theoriginal braces from the main axles runinside the brackets on the pole trail,while the added ones from the stubaxles run to the outside of the brackets.Building the carriageWork starts with the trail and gun cradle. You canset the cradle at a slight angle if you wish, but Idecided to go for zero traverse. This leaves a gapbetween the arm at the rear of the cradle and the‘tube’ on the trail that lines up with it, which I filledwith a short piece cut from the spare B3 rod tocomplete the traverse mechanism when I fitted itshandwheel later in the assembly sequence. Thecradle sits on flat surfaces, but take care to get itvertical. Two identical parts A5 then fit into locatingslots on the trail sides and are followed by the axlesand the shield struts that slide onto them. Here’sone of those mislabelling points, but they’re easy tosort out since the struts face forward and have slotsthat fit onto the axles; just check the instructions’photos to see which way round they go and notethat the bracing rods that come next run diagonallyback from axle to trail to their mounts on the axlesmust face the right way.Those bracing rods are next, all mine were arrowstraight but a bath in hot water will deal with anywarps you may find. They’re easy to fit, but don’tremove as ‘flash’ the tabs at the ends of the B19swhich are to go onto the ledges of the A5s. Addthe brake drums and rod B18 that runs betweenthem; the drums should have their open holes forB18 facing aft and it will be easiest to dry-fit thedrums so you can turn them on their axles to giveB18 clearance below the trail and above the bottombracing rods, and then add the super glue to fixeverything in place. Note that B18’s plain end goesto starboard and the square knob on its other endpoints aft – the brake levers fit on either side of thatknob, on top of the rounded projections. Now thegunshield can go on.Barrel and controlsThe barrel is a lovely piece of work, and simplyslips onto the recuperator slide. Don’t fix thebreech A16 first, it must line up with the end ofthe recuperator so fit it after mounting the barreland its securing half-hoops. Note that the twoholes on B6, the recuperator end cap, go atthe top – they’re not ‘air bubbles’! Ipainted the inside of the carriageand the underside of the barrelnow, since reaching thoseareas would be tricky aftercompletion, then dry-fitted thebarrel; its trunnions simply clipinto holes inside the carriagebut you need to set elevationcorrectly at the next stage.The instructions’ centre pagespread deals with the gun controls.ABOVE: The barrel and its recuperator cylinder. For this gun the recuperator and trunnions are on top ofthe barrel, reversing the usual appearance. The breech needs to be added with barrel and recuperatoralready together like this to make sure it top lines up with the end of the recuperator.ABOVE: This is where the two handbrake levers fit.The two holeson top of therecuperator endpiece should beon top like this.www.militarymodelling.com43
AFVThe brake drums need to be dry-fitted to make sure their actuating crossrod fits under the trail andbetween the two sets of axle braces.The gun before fitting the sighting telescope.I pre-painted the areas that would be hard to reach after the barrel and carriage were united. Theelevation arc, the connecting rod between its drive gear and that of the handwheel at its bottom, andthe breechblock have all been fitted.Here you need to skip a bit out of sequence andadd the elevation rod B3 that runs between holesin the round projections on carriage and barrel. Thatsets the elevation at zero, but you could cut a bitoff its top to get some elevation if you wish. Nowcheck that the barrel is squared off in all directionsand run a bit of thin super glue into the trunnionsto hold everything in place. The rest of these twopages covers the gun controls, breechblock andgunner’s shoulder guard with no problems, but notethat the elevation arc B13 should be right againstthe round projection on the barrel so needs to haveits mounting block trimmed slightly. It is shown thewrong way round in the photo at the bottom of thepage, so don’t copy that alignment.Here the shield is in place with its etched bracket for the sight’s travel case. A second elevationhandwheel was mounted on this side for the loader to use.Now for the sightsPart R is the panoramic sight and fits onto the sideof the elevation arc with the telescope B22 outsideit. Here there’s a glitch in the instructions: partsB16 and B17 are marked as not for use, but docome in here. B16 goes between the arc and thetelescope and B17 runs from the rear end of the’scope down to the lower end of B3. You also needto add a bit of round sprue to the port trunnionon the carriage to extend it out to below thetelescope, with a diagonal arm from the front ofthe telescope’s mounting bar to join it. I hope thisis clear in my model photos, but the arrangementis very hard to make out in photos of preservedguns so I may not have it quite correct. Thetelescope also needs its connection to the mountof the elevation handwheel, which is part B17,44<strong>Military</strong> <strong>Modelling</strong> Vol.43 No.7 <strong>2013</strong>
AFVABOVE: Another view of the gun before the sighting telescope was attached. INSET: I added the front support to the telescope, plus its support that goes to the elevation arc.and to the elevation arc which is part B16 – bothmarked “not required” in the instructions but theyare needed. I had already discarded them whenGeorge Moore who built the master pointed themout to me. Many thanks, George!The gun is now almost complete and just needsa few more parts to be added which are clear inthe instructions, but etched part P3 isn’t shown;it goes on the front of the upper gunshield, wherea location mark can be seen. You can also addthe tiedowns that were fitted to the front of thegunshield, one pair to hold the top of the gunropeand two pairs each side of it plus an extraone below the barrel to secure the aiming stake.Etched tiedowns are provided, but of coursethey’re flat, not round, with very little gluingsurface and no location holes on the shield toaccept their legs.I decided to make my own tiedowns instead;they’re quite easy to make. Strip the insulationfrom some electrical flex and you’ll find multiplestrands of thin copper wire – different flexes havedifferent thicknesses of wire, so there’s plenty ofchoice. I bought 1 metre each of several differentflexes from a DIY shop years ago to provide copperwire and expect them to last for many more yearsbefore I need more.First, cut a length of the wire and roll it under asteel ruler to straighten it. Then take your tweezersand identify a place along them that will give you thewidth of tiedown that you need – I chose the pointat 1mm, which gives a slightly wider tiedown toaccept a strap. Mark this place so all your tiedownswill be the same size; a bit of masking tape wrappedround one side of the tweezer is all you need. Now,to copy my 1mm tiedowns, cut a 3mm length ofwire and centre it against your marker, then hold ittightly to avoid slipping. Use small smooth-jawedpliers to pinch halfway along one protruding end ofthe wire, and at the same time press it down towardthe tweezers. The squeezing will give you a flattiedown base for gluing. Turn it round and repeatthe process. Now you should have a neat, flat-basedtiedown that can easily be super-glued into place onthe shield. But if it has not worked first time, just callthat a practise piece and make some more until youget the hang of it.Make at least 23 plus some spares, you’ll needseven for the gunshield and the rest for the limberand anyway some may be lost to tweezer launchwhile you glue them in place.Making the tiedowns – first step is to mark the point on yourtweezers that will give the desired size.Making the tiedowns – pressing the firstleg into shape.Making the tiedowns – turn the piece around and press thesecond leg into shape. I actually cut my wire to length so Icould squeeze the ends to make the tiedown feet, but for thisdemonstration I left the wire long to make it easier to see.And here’s the tiedown ready to cut off and have its feet squeezed.Here are the tiedowns forthe rope carried on thefront of the gunshield.www.militarymodelling.com45
AFVABOVE & RIGHT: Here are the supports for the aiming post.Here’s the underside of the limberwith its braces in place.LimberThis is another very nice set of castings, and reallyneeds no note from me except to remind youto check the photos carefully as the main limberdoors E6 and E7 are handed, not identical. Theirouter corners are curved, while the inner ones areright-angled. Resin part V goes under the end ofthe limber trail. The resin case ends can be placedwherever you want them, and there are etchedbrassclips to finish them off. However, there are notie-downs on the limber top due to the difficulty ofcasting them in place, and you might like to add the16 here as well as those on the gunshield; they arealso shown in one of the photos provided with theinstructions as well as in my model photo below.ABOVE: Now the limber has its tiedowns in place.LEFT: This is the limber with main parts fitted.46<strong>Military</strong> <strong>Modelling</strong> Vol.43 No.7 <strong>2013</strong>
AFVABOVE: The stages of making a buckle.At left the bent wire, in the centrethe wire’s end cut off and the bucklesqueezed flat in pliers, and at right abuckle added to the end of a strap.Simply cutting that strap short andgluing it to the strap already on thestowed item will provide the ‘tail’ ofthe strap hanging out of the buckle.LEFT: This is how the doors fit on thelimber. The lower ones hang straightdown, but the larger ones rest at an angle.BELOW: This is how the connectionruns from the elevation gear to thesight telescope.StowageHaving added the tiedowns in a workable form Idecided to use them and create the stowage strapsand their buckles. My straps are simple 1 mmwidths of thin metal foil, pre-painted in a leathercolour for this model and slipped through thetiedowns after the gun and limber were painted.The foil from many wine bottles can be used tomake the strips, or you could use good-qualitywriting paper that has a smooth surface or eventhe wrappers from the contents of good-qualitychocolate boxes (now that’s a good excuse forbuying your nearest and dearest a box of choccies!),but even the thinnest plastic strip won’t accept thebends you need to make either around stowage orfor empty straps to hang properly.Straps, of course, need buckles and you canmake them in the same way as the tiedowns,using the 1mm mark on the tweezers but thistime using longer bits of wire and not squeezingit with your pliers. Instead, hold the wire so a littlesticks out at one side and use the back of yourthumbnail to press the other end down againstyour tweezers. Now turn the wire so that longerpart is in the tweezers and repeat the process,then do it again and you should have a buckle withfour equal sides. Twitch them to a proper squareand lay the buckle on your cutting mat, then hold itsteady while you cut through the wire at the centreof one side. Squeeze the buckle flat in your pliersand it’s done! As with the tiedowns, practise toget the best results and make one for each of yourtiedowns plus some spares. For empty straps justadd a buckle to one end of each strap but if youwant the straps to go around anything you’ll needto superglue them round it and cut off both ends,then add the buckle on top of one of those endswww.militarymodelling.com47
AFVThe ‘business end’ of the limber with a few shells still in it. It is uncertain whether the brass retainingclips had canvas grab-straps attached to them to make it easier to remove them from the limber.and superglue it in place with the end hanging out.I hope you can see what I mean from the results inmy model photos.The 18pdr gunshield carried a rope, for which Iused crochet thread; the ‘ecru’ colour is just rightfor clean rope and most good sewing and craftshops will have a selection of thicknesses. Also onthe gunshield are two brackets for the aiming post,not included in the kit but easy to make with shortbits of plastic strip. Their exact shapes aren’t easyto make out in photos, but you can see my versionsin the model photos; for the left-hand one just makean L with strip and add an outer side with a holedrilled through it for the end of the stake. The righthandone is another L, mounted on a backplate.The stake itself is plastic rod cut a little longer thanthe width of the shield and with one end cut to apoint. The other end needs a disc punched fromthin sheet with its centre strip cut out so it’s still around disc when cemented to the rod. Don’t copymy black and white stripes, I didn’t realise until afterit was mounted on the gun that I had them wrong;they should start with a black stripe at the top ofthe disc not a white one.This is the front of the limber with its stowage in place. The leather grab-straps seem to have variedfrom limber to limber, some like these and the tops of others much closer together.Colours and markingsI decided that my gun was serving with the BEFin 1940 France, so it and its limber would havebeen Khaki Green G3. A few photos show adarker pattern, just on the front of the gunshield,and one of which is included among Resicast’speriod photos so I copied that pattern using DarkGreen G4. The limber was also G3, and I usedthe DOA acrylic paints for both of them. I haven’tfound period photos that show gun and limberdetails in colour, but preserved examples in WW1configuration can be seen on the Internet by asimply Google search for ‘18pdr’ so I used thosefor the detail painting on the twin assumptions thatthe restorations were accurate and that no changeswere made by 1940. The sighting telescope andpanoramic sight seem to have been brass, and allstowage straps as well as the padding inside thelimber doors all appear to be light brown leather.Another view of the limber showing more clearly how its stowage was arranged.At this angle the gun appearsvery ‘busy’ indeed!48<strong>Military</strong> <strong>Modelling</strong> Vol.43 No.7 <strong>2013</strong>
AFVABOVE & BELOW: Views of the gun and limber posed together, withtwo of the turned brass shells.INSET RIGHT: The left side of the painted gun. Handwheels appearto have always been plain brass.If you want to build your 18pdr in Egypt its originalcolour would probably have been Middle Stone,perhaps with a brushed diagonal pattern of stripesin Dark Sand on the gunshield; it might have beenrepainted in the Caunter scheme during 1941. Mwww.militarymodelling.com49
Figures1TemplarSergeantIan Succamoreturns a waywardknight into areligious crusader!The subject of this article is a product of ‘DarkEden Studio’, a sub-section of El GrecoMiniatures (www.elgrecominiatures.co.uk)which is designed to cater for the fantasy figurepainter. Their figures are designed to have somesemblance of historic accuracy with a leaningtowards the fantasy idea. The bust was sculptedby Matt Grech and is entitled ‘Errant Knight’, but Idecided to paint him as a Templar.The history of the Templars is well-documented,and a period of history that has many legends mixedin with facts and romantic ideals. I decided not toget caught up in this as it was not my intentionto go into the history side on this occasion. Myknowledge of the Templars is fairly limited, but it ismy understanding that the Templar Knights werenobly born, wore white, and were not permitted toshave (the fashion was to wear your hair long andshave, so the Templars liked to stand out from thecrowd, and the bigger the beard the greater theapparent masculinity). The less nobly born membersof the order could only attain a Sergeant’s status,wore black, and were permitted to shave. All havethe emblem of the red cross. With my knowledgesomewhat exhausted I decided to paint him as aSergeant. This meant I had to paint him black, didnot need to sculpt a beard, and a red cross wasrequired on his chest. This was enough for me togo on so I began the cleaning up process.PreparationThe bust comes in two resin pieces, the head andtorso (Photo 1). The sculpting is crisp and clean andlooks natural, especially the face, and only a fewmould lines need to be removed with a hobby knifeand wet and dry paper. The parts were then pinnedand primed ready for painting. I use Citadel Miniatures’Skull White for priming. From a spray can it is quickand easy and dries nice and smooth, if you keepthe coating thin. I also masked off the base of theneck and inside the collar with Blu-Tack, to ensurethey glued together successfully when the bust wascompleted. It was after the priming that I noticed afingerprint in the back of his head. This is a testamentto the casting process as the details in a fingerprintare very fine, and to reproduce it in miniature is quiteimpressive. Anyway, this was then removed withsome wet and dry paper, and then re-primed.50<strong>Military</strong> <strong>Modelling</strong> Vol.43 No.7 <strong>2013</strong>
Figures2 3HeadTo begin with the whole head was introduced tomy airbrush. I use an Iwata Revolution CR. I use theairbrush to get an even coverage of paint withoutany brush marks. The first colour used was theSecondary Base colour from the Lifecolor (LC) FleshSet. This was sprayed on in a similar way to themethod used for pre-shading AFVs. To this wasadded some of the Primary Base colour from theLC Flesh Set, which was then sprayed on as thebase colour. The Primary Highlight colour from theLC Flesh Set was then added to the pot with theremains of the paint not yet sprayed. This was thensprayed on from above at an angle of 45 degrees.The Secondary Highlight from the LC Flesh Set wasthan added to the mix and sprayed from an evenhigher angle. The result of this extensive layingdown of base colours can be seen in Photo 2. Atthis point everything looked extremely light, but thiswould all be darkened up with the addition of theshadows and tones.EyesIf the eyes do not look right on a bust, then thewhole thing will look wrong. The eyeballs werefirstly blocked in with the 2nd highlight of theflesh set. The corners and lower portions of theeyeballs were then shaded using the base colourwith Andrea Color (AC) Wood. These were thenshaded further by adding a minute amount of LCBlack to the previous shadow colour. A wash of LCTerracotta was then added to the lower portions ofthe eyeball. This wash was then repeated, buildingup the intensity of the colour towards the lowereyelid and towards the nose.The irises were painted by firstly painting avery dark blue circle in his eye, missing out theupper portion of the circle which is hidden underthe upper eyelid. Being right-handed I always findit easier to start with the his right eye as when Ipaint his left eye, my hand then does not get in theway of matching up the two eyes. This is an easymethod of ensuring that both eyes are looking inthe same direction. I also usually start with a dot inhis right eye, then a dot on his left. I then graduallybuild up the size of these dots until the right size isobtained. I use AC Prussian Blue for this phase. Ihave made him look slightly to his right as his headis also rotated in that direction. Therefore, there ismore white of his eyeball on show to the left-handside of his eye. I have painted a white highlight ontohis eyeball on the left side to accentuate this. Thiswhite highlight, Vallejo (AV) Off White, is little morethan a white line following the contour of the circleof the iris which is blended into the eyeball towardsthe left-hand side of the eye.The colour intensity of the iris was then increasedby adding AV Napoleonic Blue to the Prussian Bluein increasing stages, but adding it to the circle ofthe iris in a decreasing area, gradually working theintensity to the right-hand side of the iris, but notright to the edge, which leaves a dark blue ringaround the iris. Examining Photo 3 closely you cansee that the irises have more of the Sky Blue colouron the right-hand side. The final area of the iris waspainted with AV Napoleonic Blue neat from the poton the right-hand side of the iris only.A pupil was then added with LC Black, againstarting on his right eye with a dot, then moving tothe left one, then back to the right again, and so onuntil the right shape had been formed and the twoeyes looked symmetrical. A catch light was nowadded with AV White in the 2-o’clock position, i.e.on the opposite side of the iris to where the lightestcolour of the iris is situated. The catch light is righton the boundary between the pupil and the iris.Lastly a thin dark brown line from AV Burnt Umberand LC Black was painted on the lower part of theupper eyelid to represent eyelashes.‘‘If the eyes”do notlook right on a bust,then the whole thingwill look wrong.www.militarymodelling.com51
Figures45 679810HighlightsWith the eyes done and the basic skin tones laiddown I turned my attention to adding more detailedhighlights using combinations of the Primary andSecondary Highlight colours from the LC Flesh Set(Photos 4 – 6). These were brush painted onto theexisting highlight areas. Different mixes were used toaccentuate different areas such as the lower eyelids,the creases at the corners of the eyes, the top of thecheeks (at the apex of the cheek and also next to thenose under the lower eyelid), and the contours of theear. The same attention was also given to the areasaround the mouth, top lip, creases on the forehead,and nose. Highlights were also added to the neck tocreate smaller creases to accentuate the movement ofhim turning his head to look to his right.More definition was added to the scar on theback of his head at this stage too. Many layers ofhighlight colour were used in different mixes toaccentuate different areas of the face. There wasno methodology to it, I just added paint where Ithought it was needed. It is at this stage I feel thatthe character of the face really begins to develop.I could not say exactly how many layers of paint Ihad added at this stage, but when I did try to countthem I stopped at 10 different tones!Shadows and TonesThe combinations of colours continued with theshadows. I began with enhancing the base toneswith the Secondary Base colour from the LC FleshSet. These were added to all the shadow areas tomaintain the uniformity. They were also used toenhance the creases around the eyes, forehead, andneck areas that were defined using the highlights.Gradually deeper shadows were then applied using theSecondary Base, followed by a mix of the SecondaryBase plus the Primary Shadow colour from LC’s Fleshset, then using the neat Primary Shadow colour,followed by the Primary Shadow colour mixed withthe Secondary Shadow colour, then neat SecondaryShadow, then the Secondary Shadow mixed withLC Black, then finally an almost Black (with only tinyamounts of the Secondary Shadow). Again I amunsure how many levels of colour are used as theywere constantly ‘tweaked’ during the whole process.Hopefully, a comparison of Photos 7 – 10 will givea better idea of where these colours were applied,52<strong>Military</strong> <strong>Modelling</strong> Vol.43 No.7 <strong>2013</strong>
Figures11 12as describing them would be pretty tricky. Suffice tosay that all the paint, shadows and highlights, wereadded using paint thinned considerably with water. Thewatered-down paint was also added very sparingly,using an almost dry brush to build up the colourintensity gradually. By going back over the same areain this manner then intensifies the depth of the toneand rarely leaves any hard edges.A 5-o’clock shadow was added using the LCFlesh Set Primary Highlight, mixed with LC Blackand AV Burnt Umber. This was thinned down to awash and then added just as sparingly as the othershadows, to the areas of beard growth. Becausehe is a ‘baldy’ I did not want to extend this tonetoo far around his jaw line and, as I wanted him tobe completely bald, I did not add any to his headas I had other plans for the top of his head. The5-o’clock shadow was then deepened under hisnose using several washes of LC Black and AVBurnt Umber. This colour was then used to add hiseyebrows, and the mole on his chin. The mole wasthen highlighted with neat AV Burnt Umber, andshaded with neat LC Black.Some ‘liver spots’ were added to the top of hishead, basically some brown discolouration of theskin in select areas. These were first added usingthe Secondary Base colour in large spots, someof which were then deepened using the PrimaryBase colour, both from the Flesh Set. These spotwashes were then feathered out in places using awet brush. I tried to make them as random in area,shape and size as possible.Veins were painted randomly on his temple usinga little AC Prussian Blue mixed with the PrimaryHighlight colour from the Flesh Set. Random jaggedlines were haphazardly painted as if one grew outfrom another. Washes of the Secondary Base orthe Primary Highlight from the Flesh Set were thenused to cover these over with an opaque layer, as ifthe veins were close to the surface of the skin.The shadow under the lower eyelid wasenhanced using the Primary Shadow colour mixedwith very small amounts of LC Black. This wasgradually applied to darken this area in a similarway to that of someone who is lacking sleep. Theintensity of this colour was deepened in the areanext to the nose using the Secondary Shadowcolour mixed with LC Black.The tip of the nose and under the cheekbonesreceived a wash of LC Terracotta. This works tobring out the ‘peachiness’ in those areas.The lips also received a wash of Terracotta. Theyalso received a series of vertical lines which originatedfrom the deep shadow painted between the lips.Terracotta plus the Primary Highlight colour were usedto simulate cracks and lines in his lips. These lineswere then accentuated using Terracotta mixed withBlack, i.e. adding a vertical shadow next to the verticalhighlight. This shadow ranged in density from thedeepest portion at the segregation of his lips, to thelighter areas at the bottom edge of his lower lip.The scar on the back of his head now receivedthe same Terracotta treatment, to make the areaseem inflamed.Blood and DirtFresh areas and spots of blood were added ingeneral around his head using AC Dark Red,trying hard not to overdo it. The ‘blood’ was thenhighlighted using AC Dark Red mixed with thePrimary Highlight, and shadowed using AC Dark Redmixed with LC Black. The shadow colour for theblood was also used to represent dried blood aroundthe wound sites, which were further shadowed withtiny amounts of LC Black. The Primary Highlightcolour was used to highlight the edges of the woundsites, to give the skin a ‘raised’ look.Dirt was painted on using the ‘Pointillism’method. This involves adding paint in a series ofdots of varying size and shape. If you paint lots ofdots together it intensifies the colour – and viceversa. Dots of LC Black, AV Burnt Umber, AC Woodand AV Iraqi Sand were all used, remembering tohighlight and shadow each dot, or area of dots.This technique was used sparingly as I did not wantto overdo it. Subtle is better than overdone in myopinion (Photos 11 & 12).‘‘...I did not”add anyto his head as I hadother plans for thetop of his head.www.militarymodelling.com53
Figures13‘‘...I decided”to try andweather the coat bymaking it look worn,dirty and frayed.ClothesThe head was not attached at this point, but wasessentially finished. Although it cannot be seen inthe photos, a satin varnish was used on the templesand the forehead to simulate sweat. A gloss varnishwas also used over the satin varnish to showgreater concentrations of sweat at the temples, andrivulets of sweat rolling down his cheeks. The eyeswere also covered in a gloss varnish to give them amoist look. The varnishes I used are from Vallejo.With the head removed the base tones for theclothes were airbrushed on. The brown cloak wasairbrushed in a similar method to the head. AVBurnt Umber mixed with LC Black was used as apre-shade, sprayed into the areas of shadow. NeatAV Burnt Umber was then sprayed at a 45-degreeangle from above. This was then followed by addingAV Iraqi Sand to the Burnt Umber and spraying thisat a greater angle. More Iraqi Sand was then addedfor the next coat, followed by more Iraqi Sand until Iwas happy with the colour.At this stage the chainmail was undercoatedin neat LC Black. The leather inner part of hischainmail (visible at the neck) was painted in abase coat of AV Ochre Brown. His black tunic waspainted in using LC Black mixed with AC Wood anda tiny amount of AV Off White.I began painting the clothes with the black tunic. Overthe base mix of LC Black, AC Wood and AV Off White,I painted the highlights by simply adding increasinglymore AV Off White. Only small amounts of Off Whitewere added so the highlight was built up gradually, inmuch the same way as the intensity of the shadowswere built up on the face. A greater amount of OffWhite was added to the highlights at the edges ofthe garment to suggest frayed cloth. Shadows beganwith LC Black mixed with just AC Wood. The darkestshadows were neat LC Black.At this point I decided against painting on the redTemplar cross, as was the original plan. Instead Icut out the cross from lead foil and glued it on withone corner frayed and hanging as if the stitchinghad split. It was painted using a mix of AC Dark Redand AC Napoleonic Red, with a touch of AC Woodto give a faded and worn appearance. Highlightswere mixed from the base plus the Primary Basecolour from the LC Flesh Set, with lighter highlightsrealised by adding more of the Primary Basefrom the Flesh Set. Shadows were AC Dark Red,followed by the Dark Red mixed with LC Black forthe deepest shadows. Rough frayed edges weresimulated using the highlight colours with moreFlesh added, this was painted on with a series ofdots and dashes all along the edges of the cross.Dust and dirt was then added to the black tunicin the same method as the face, using the samecolours as the face. There are also spots of driedblood in places although these are hard to see inthe photos.The wooden cross was basecoated with ACWood. AV Iraqi Sand was added to the wood andpainted in streaks along the length of both pieces tosimulate the wood grain. AV Burnt Umber and LCBlack were then added to the wood alongside thestreaks of the highlight colour to further enhancethe wood effect. The ends of each piece of woodwere deliberately lightened with washes of AV IraqiSand to give them a worn and cheap look. Washesof LC Black were used for the shadows. The stringholding the cross together was first painted LCBlack, and then painted in with neat AV Iraqi Sand.This extreme of contrast helped it stand apart fromthe wood of the cross.The rope holding the front of the cloak togetherwas basecoated with AV Burnt Umber and LCBlack. Highlights were added by mixing AV IraqiSand into the base colour. Dozens of tiny dasheswere then added along the ropes length using firstlyAV Sand Yellow, then AV Iraqi Sand, which reallyhelped give it a rope like appearance. Shadowswere then added with washes of Burnt Umber andthen Black.The leather lining to the chainmail was paintednext. I wanted this to represent a chamois leathertype material. Onto the base I painted many thinwavy/jagged lines which were lightened towards theouter edge using the base colour (AV Ochre Brown),mixed with AV Iraqi Sand. Next to these wavy linesI painted some more wavy/jagged lines using OchreBrown mixed with AV Beige Brown. Initially thislooked a bit odd, but when shadowed with washesof AV Burnt Umber, and then AV Burnt Umber mixedwith LC Black, the texture really came to life. Somehighlights were added using a wash of the Highlightcolour in the appropriate areas, which finished off asimple but effective looking technique.My attention finally turned to the cloak. Asdescribed before, the base tones were laid downwith an airbrush. The shadows and highlights wereaccentuated with a paintbrush using the samebasic colours – LC Black, AV Burnt Umber and AVIraqi Sand. At this point it looked a bit monotoneand drab. Remembering that this chap is only aSergeant and therefore fairly poor, I decided to tryand weather the coat by making it look worn, dirtyand frayed. To achieve this I began with my initialhighlight colour (Burnt Umber and Iraqi Sand). Ipainted a thin line along all the edges of the cloak,and another just inside the edges. I then addedsome very small fine dashes perpendicular to theselines which made the material look faded and worn.With this same highlight colour I then painted somemore dashes and thin lines across all the highlighted54<strong>Military</strong> <strong>Modelling</strong> Vol.43 No.7 <strong>2013</strong>
14Figuresareas. This process was then repeated a numberof times with more Iraqi Sand added each time.A similar technique was used for the shadows,but with Burnt Umber or Black. The highlights andshadows were then accentuated using washes ofthe original highlight or shadow colour to blend inthe lines/dashes I had just painted. This processwas then followed up with the Pointillism methodof adding dust and dirt as before.Now I was up to the part I had been dreading, themetal areas. Recently I had tried using acrylics forthese jobs, but found the paint was not to my liking.For this bust I returned to using printer’s inks and oils.The brass areas (the rope fastener and the chain forthe cross) were undercoated with AV Burnt Umber.The chainmail was undercoated with LC Black. I thensealed the bust (minus the head) using Humbrol MattVarnish applied through my airbrush.Gold printer’s ink was mixed with Burnt Umberoil paint. This was then painted over the brassareas. Silver printer’s ink was mixed with LampBlack oil paint and dry-bushed over the chainmailto pick out the raised detail. When fully dried (inthe airing cupboard for 24-hours) the brass areaswere first highlighted with gold printer’s ink, andshadowed with Burnt Umber oil paint. These twocolours were then blended into each other using astippling motion. I tend to use an old brush for thisjob. The chainmail was then highlighted using neatprinter’s ink. After another 24-hours in the airingcupboard the highlights on the brass areas weretouched up with the neat highlight (gold printer’sink) and shadow colour (Burnt Umber oil paint). Thechainmail was subjected to a wash of Lamp Blackoil paint, which sunk into the recesses to bringout each link. More drying time then led to furtherpicking out of the highlights on the chainmail.Further washes to accentuate the shadows inthe folds of the chainmail also occurred. After yetanother drying session I remained unsatisfied.The brass areas appeared to be fine. The chainmailI was not happy with. I added some dust, dirt,rust and blood in the same manner as previouslydescribed. Although this looked better, it still did notlook right to me.I took the bust to a show for other people to lookat and hopefully set me on the right tracks.It was Mark Taylor who came to my rescue whenhe suggested giving the chainmail a wash of TamiyaSmoke X-19. He advised that one thin wash wouldsuffice and, should I be tempted, not to add anymore! This is because if I did add another coat thelikelihood is that the paint would pucker and blister.This advice I took, and I am relieved I did as thechainmail now looked completed.With the head glued on and the bust mountedonto a sufficient base from my Dad’s workshop Iwas then able to put him in the cabinet and moveon to my next piece satisfied with the final result(Photos 13 & 14).M‘‘...I was then able”to put him in thecabinet and moveon to my next piecesatisfied with thefinal result.www.militarymodelling.com55
AFV reviewsSmall Scale SceneRobin Buckland’s monthly column for military vehicle modellers.ABOVE LEFT & RIGHT: The chassiselement of the AFV Club SdKfz 263under construction.BELOW: Trumpeter’s 1:72 scaleUparmoured Warrior now built.Well spring has passedus by and the weatherhas on the wholekept us indoors, and with moretime to do some modelling.Hopefully summer is set toarrive with some better weather,and just maybe entice us outof doors. I have to say the kitmanufacturers continue to comeup with plenty to tempt us tostay indoors however!On the benchJust a chance to catch up ona couple of things I have beenbuilding as the Trumpeter modelof the 1:72 scale UparmouredWarrior went together easilyenough, and the end result looksgood, it just now needs painting.At the same time, AFV Club’sSdKfz 263 is underway. Thereare a lot of parts just to thechassis on this one, and here Ifound an issue resulting fromthe sequence in the instructions,fitting the floor pan onto thechassis, when one of thesteering columns and one set ofpedals is fitted early, as per theinstructions. When you try andget the floor pan in place, youcan’t get that column throughthe hole without breaking off thepedals. In the end that is what Idid, and then refitted them oncethe floor was on. It is a relativelycomplex chassis on thisarmoured car, plus some interiorfittings, though interior detailingis not complete (no radios forexample) though the seats etc.,for the two driving positions areincluded.While if that wasn’t enough, Ihave got the chassis mostly doneon my first ever attempt at one ofDragon’s 1:6 scale models, theEuropean pattern SAS Jeep. Anenormous box, a large numberof parts and what will be a hugemodel at the end of it. Assemblyis straightforward so far, though Ihave found a lot of mould seamsthat need to be dealt with on thevarious parts. Not too difficult todeal with, it just adds extra timeto the build process.Trying out the new Army Spraypaints from The Plastic SoldierCompany, I have now managedto get a good few models givena basecoat of colour that willallow a fair number to progressthrough the paint stages, astracks, roadwheels, detailing andcamouflage just need to be added.It will make basecoating the packsof AFVs and troops from PlasticSoldier very straightforward. Igave a good coat to a pack oftheir five small 1:150 scale T-34salong with a pack of three T-34sin 1:72 scale, and still had lots leftto do more. The two AFV coloursI had a go with were a late-warWork has started on the Dragon 1:6 scale SAS European pattern Jeep (Trumpeter’s 1:72 scale Uparmoured Warrior shows just how big it is!).56<strong>Military</strong> <strong>Modelling</strong> Vol.43 No.7 <strong>2013</strong>
AFV reviewsThree new Army Spray colours are part of a new range fromThe Plastic Soldier Company.Dunkelgelb and a Russian Green.If you are painting figures, thenField Grey for German uniformsis another good one to go with. Isprayed outdoors, so no smell inthe house, but they went on welland dried quickly. Once dry it gavea good solid colour and a very evenfinish. For those who can’t affordthe luxury of an airbrush, thesenew Army Sprays work out verywell. The Plastic Soldier Company,Felstead Cottage, Sandy Lane,Henfield, West Sussex BN5 9UXand they have a website at www.theplasticsoldiercompany.co.ukMirror ModelsBut what of some new kits?Let’s start with the latest releasefrom Mirror Models and theirrange of 1:35 scale injectionmouldedplastic kits. The latestis the Russian KomsomoletzArtillery Tractor T-20, with theinclusion of a Russian fuel traileras well in this limited editionversion of their kit. Moulded in agrey plastic, there is an excellentattention to detail in the model,as we have now come to expectfrom Libor Zachoval, the manbehind the masters of the MirrorModels range (as in LZ Models).You start with engine andtransmission details, to fit insidethe hull. Then you have the optionof detail fittings for either a 1937 or1938 Model, both early versions ofthese handy little artillery tractors.The crew cab and then the benchseats for the gun crew are added.The two crewmen have somebasic armour protection, whereasthe crewman seated on thebenches would have been veryexposed to enemy fire. Runninggear is nicely done, and the tracksare made up from individuallinks, so be prepared for somepatience to prepare and assemblethem. One of those things wheremodellers tend to fall into one oftwo camps - you either love themor hate them! The end resultusing the individual links thoughdoes look very good. The smalldetail fittings are quite small insome cases, so do be careful inremoving them from the sprues,so as not to damage them, or havethem ‘ping-off’ to be swallowed bythe ‘carpet monster’.Detailing of both interior andexterior is nicely done, andit will look good if you leaveBox art for Tamiya’s new 1:48 scale Mobelwagen with 37mm FlaK 43.the two hatches open to thedriver’s compartment, allowingthat interior to be seen on thecompleted model. As part of a‘limited edition’ of the kit, thisone includes a Russian Fueltrailer to tow behind it. A quitesimple trailer, just a cylindermounted on an equally simpleframe and axle, you can set itup behind the Komsomoletzor equally have it as a standaloneaccessory by itself. MirrorModels are in the shops now, orsee their website atwww.mirror-models.comTamiyaMore from Tamiya now withtheir 1:48 scale range of armourmodels. This time the PanzerIV based Mobelwagen, armedwith the single barrel 37mm FlaK43 rather than the quad 20mmFlakvierling of their earlier 1:35scale release. The superstructuresides can be fitted in any oneof three positions. The fullupright travelling position, aslightly opened out AA firingposition or laid out flat as theworking platform for the guncrew, as shown in the box art.The chassis is neatly done andassembles well as we expectfrom any Tamiya kit, using linkand length track parts as wellover the running gear. Alsoprovided, as is common in thisseries, is a pair of metal weightsto fit within the hull, to add some‘weight’ to the finished model.The gun has the parts on aseparate sprue and this work outrather nicely in this scale, not toocomplex to assemble either, evenwith the frame for the net used tocatch the empty shell casings. Anecessary accessory on a gun ofthis calibre, as a member of thecrew I wouldn’t have wanted hot,empty brass shell casings as big as37mm flying around in the air nearme! No gun crew, but one figureis included, standing and usingBox art for the new 1:35 scale Russian Komsomletz Artillery Tractor T-20 plus Russian Fuel Trailer from Libor at Mirror Models.www.militarymodelling.com57
AFV reviewsbinoculars, scanning for enemyaircraft. Just one colour schemeis suggested, from an example inFrance in 1944. This is the basicDunkelgelb with a disruptivepattern in green and red-brown.This one happens to have comethrough at about the same timeas the new Panzerwrecks 14 bookand in it are a couple of interestingpictures of Mobelwagensabandoned near Berlin in 1945.Thanks to UK importers TheHobby Company for our sample.DioparkBack to 1:35 scale now, and a kitwhich has followed on quicklyfrom us hearing the news of itsimpending release and what alovely little thing it is too. A WW2British Army Folding Bicycle byDiopark. There are two completebikes included in the box, alongwith the added extra of littlewooden ‘scooters’.The bikes have a choice forthe wheels, as there are plastic‘spokes’ moulded within thewheels, but you have the choiceto remove them, and replacethem with the fine etched-brassalternatives. For this they eveninclude a moulded template so youcan get the right ‘dish’ to them.If you find that a bit fiddly, thenjust make do with the plastic, butthe etched-brass will look reallysuperb. The main bike frame isvery finely moulded, so I wouldsay be very careful in removingthe parts from the sprues, and inhandling them during assembly.For scale thicknesses in plastic forthe likes of a bicycle frame, theyare very fine, as they should beof course. To enable the foldingmechanism, there are two largebutterfly nuts that hold it in placeand even these are separate tinyparts, as are the brake callipers andbrake handles.I was looking forward to theseonce I heard their release wasdue, and I am happy to sayDiopark have managed to evenexceed my expectations onhow good they are. If you addthe details of the brake cableswith some stretched sprue, youwill have a very effective anddelicately detailed accessory totuck into the front bumper of amodel Jeep, or put a number ofthem stowed in the back of atruck. Manufactured by Diopark,PO Box 3-274 Chung Ho City,Taipei, Taiwan and our thanksABOVE: Part of the box art for thenewly released 1:35 scale BritishFolding Bicycle from Diopark.BELOW: The two etched-brass fretsprovided with the Diopark bicycle kit.to them for sending throughour sample. I believe they willbe available here in the UK viaHannants.DragonThis company always managesto keep busy, and a 1 ⁄4-ton 4x4Truck is a title that usually hasa model Jeep lurking behindit! Dragon have now releaseda second armoured version in1:35 scale, this time mountinga pair of Bazookas rather than a.50cal. Having made the previousItaleri’s new 1:35 scale M923 Armoured Gun Truck.armoured version, as well as theirLRDG version, I rather like these.The wheels are the simplerones, with the one-piece tyres andit goes together easily enough.With the engine included, whichyou could add some wiring anddetail to in order to get it so youcan open the bonnet so it could beseen. Etched-brass is again usedfor the sheets of armour platefitted around the crew positions,while the armament in this casefeatures a pair of bazookas, forincreased anti-armour protectionfor the US troops.In simple terms, the first stagesdeal with the construction of theengine and chassis, followedby the bodywork, which is thendetailed and the two fittedtogether. This stage also includesa windscreen, folded down flat,and covered with an anti-reflectivecanvas cover. Then the bazookasmounted on the standard gunpintle and the etched-brass panelswhich you fold and fit to the hullas indicated. I also like it that thetransfers for the instrument paneland the data plates for it are alsoincluded in the kit. Colours? WellBox art for Dragon’s latest armoured Jeep, complete with twin-mounted bazookas.overall Olive Drab is the colourof the day though this is the kindof late-war variant that will suit awinter whitewash scheme withlots of mud, and then just look fora suitably cold weather dressedcrew to go with it. My thanks toDragon Models for our sample.ItaleriIt is some years ago since Italerifirst released their 1:35 scaleUS M923 truck, and now it isout in a slightly updated format,with armoured panels in thetruck-bed and on the cab, tocreate this armoured Gun Truck,reminiscent of the ones firstproduced in Vietnam using theM-35 and M-54. Used for convoyescort in particular, these wereused in Iraq and Afghanistan.The only things I would look toreplace are the tyres, wheresome resin replacements I thinkwould improve the look of them.Detail on the cab, chassisand body is pretty good as theoriginal truck kit was nicely done,even though it was first madea few years ago. The woodenfloor of the truck bed is nicelydone, and the detailing in the cabalso works well. With the extraarmour panels plus armamentto be fitted in the truck bed, youjust need to find some suitablecrew figures to go with it, alongwith appropriate stowage. Thecolours and markings suggestedrepresent a truck in Iraq in 2005,carrying a 3-colour Europeancamouflage scheme, alongwith a plain, rust finish to theunpainted armour plates thathave been mounted to providethe crew with protection. Gettingthe trucks into service was moreimportant than worrying about anew coat of paint. Thanks to TheHobby Company, who are theUK importers for the Italeri rangefor our sample, these are in theshops now.58<strong>Military</strong> <strong>Modelling</strong> Vol.43 No.7 <strong>2013</strong>
AFV reviewsThe new Fiat Topolino in 1:35 scalefrom Bronco Models, including aposter of the box art.Bronco ModelsFirst among a couple of newreleases from Bronco Modelswhich are now in production istheir little 1:35 scale Fiat Topolino.Essentially the same car as theFrench built Simca (which Tamiyahave kitted), Bronco have gone forthe Italian Fiat built version. Smalldifferences in detail between thetwo, such as the Bronco kit havingtwo windscreen wipers ratherthan one on the Simca, but a bit ofdetail identified in photos as wellas some surviving examples.Moulded in a sand colouredplastic, this includes the basiccar, which also has the enginedetail that can be displayedby opening the bonnet or lefthidden away. The doors can bemodelled open or closed andtwo Afrika Korps uniformedfigures are also included in thekit, which has a rack for jerricanson the roof, and it also hasa small German infantry carttowed behind. One of the littlebits of care I was impressed bywas apparent on opening thebox. The main bodyshell comespacked in its own vacformedpackaging within the box, toprotect it while in transit throughthe distribution and hobby shopsystem to get to us.It isn’t an over-complex kit,though there is some fine detailto be fitted in the way of smalletched-brass parts to add thatfiner detailing. With the enginecompartment included, thefirewall and the two seats in themain passenger compartment,there are spare wheels to go onthe back (one or two dependingon your preference) alongwith an equally good choiceof colour and marking options.You have the choice of a PanzerGrey example, with Red Crossmarkings, an Afrika Korps optionor a ‘captured’ one, repainted inOlive Drab and sporting whiteallied stars. The Afrika Korpsoption will be most popular Isuspect, as it goes with thetwo uniformed figures that areincluded in the kit, and featuredon the box art. The other pointto highlight is the inclusion of aposter of the box art (minus thewords), which will look goodmounted in a clip-frame on yourstudy wall. Thanks to BroncoModels for our sample, this is onsale now.AccessoriesA recent 1:76 scale releasefrom Kingfisher Miniaturesis a slightly more unusual, andhence interesting conversion ofthe British Challenger tank. Itfeatures a Driver Training turretfor Challenger, that you just addto the hull of a basic plastic kit.The main parts are neatly cast inresin, and only need some basicclean-up, plus some fine detailsin white metal, including suchthings as the wing mirrors. Youcan glaze the windows in thecab, and the crew seating whichis included will be visible inside.A very good set of assemblyinstructions are provided andaccompanied by some photos ofthe assembled model to showjust how it will look. Availablefrom Kingfisher Miniatures,9 Plaza Court, Eriswell Road,Worthing, West Sussex BN113GZ. My thanks to Alastair forour sample. Their website iswww.kingfisherminiatures.co.uk and you can email them atkingfishermins@btinternet.comThe latest copy of MAFVA’s Tanketteis issue 48/2.PublicationsTankette 48/2 is here, and as eversome interesting features, includingsome useful scale drawings. Oneof these features is from one ofmy old friends, John Rulton, wholooks at the very early days ofthe small scale resin models thatwere available after Eric Clarkestarted his series of polyester resinmodels, featuring subjects thatwere considered then as neverlikely to be covered in plastic. Nextis a feature about the South Walesbranch of MAFVA. This is followedby some background on the ThorBallistic Missile and transporter,which is accompanied by afine scale drawing in 1:76 scalefrom Mick Bell. Next there is aconversion of the Tamiya Centurionto make an ARV Mk.2, which AlanBrown did a very neat job with.Add some reviews, some MAFVAclub business and a few colourphotos from On Track and you haveanother interesting issue. Tankettecomes with being a member ofMAFVA, and details are availablefrom Gary Williams, 45 BalmoralDrive, Holmes Chapel, CheshireCW4 7JQ or emailmafvahq@aol.comBox art and the main resin drivertrainingcompartment for the 1:76scale Challenger conversion byKingfisher Models.www.militarymodelling.com59
AFV reviewsFiguresHobby Fan is the range of resinfigures, kits and conversionsthat is part of the AFV Clubproduction range. A new setof four resin figures has beendesigned to go especially withthe recent AFV Club Büssing-NAG L4500S truck. It features adriver to fit inside the cab, alongwith two troopers riding on thefront mudguards and anotherstanding on one of the runningboards of the cab.All wear greatcoats, andall are very neatly sculptedand cast in resin. The figurescome each bagged individuallywithin the box, so just a simpleclean-up to remove the castingfeeds, assembly and thenprime for painting. I rather likethe poses, adding some extralife to the basic truck kit, andI think resin figures are often,as in this case, sharper indefinition for being resin castrather than plastic and justincluded in the base kit. All arein greatcoats, so set for coldweather. The two chaps ridingthe mudguards carry theirKar 98K rifles, while the NCOhanging onto the door carries aSchmeisser (MP40). It’s a neatset of figures that go togetherto tell quite an instant story atfirst glance, ideal for placinginto a diorama along with thetruck. My thanks to AFV Clubfor our sample.Down in scale a bit, The PlasticSoldier Company has a couplemore recent releases. The rangeof wargamer’s hard plasticfigures, along with their vehiclekits keeps growing at a regularrate. These are sets of late warUS Infantry though in both 1:72scale and also in the smaller15mm scales.The larger scale set containthree copies of the identicalsprue, with 17 figures on each,giving a total of 51 (not 57 asshown on the box). Some aremoulded as complete figures,including their weapons, whileothers have separate arms andweapons, along with a radio inone case. Detail is neatly doneand being hard plastic you havemore opportunity to convertsome of course.In a box the same size, the15mm scale set has sprues thesame size, but holding smallerfigures allows for 29 figures oneach sprue, and there are fiveABOVE: Hobby Fan, part of AFV Club, has released a set of four resin figures togo with their recent Büssing-NAG L4500 truck.copies of the sprue within thebox, so a total of 145 figures inthis one. Simple to remove fromthe sprues are add the arms tothose that need any assembly, andyou are ready for painting. Overallvery nicely done, and I’d suggestoffering excellent value for moneywith the numbers you get in eachbox. Our thanks The Plastic SoldierCompany, Felstead Cottage, SandyLane, Henfield, West Sussex BN5The Plastic Soldier Company have released some late-war US Infantry in both 15mm and 1:72 scales.9UX and they have a website atwww.theplasticsoldiercompany.co.ukGunthwaite Miniatures wascreated to produce 1:72 scalemilitary miniatures for collectors,diorama builders and modellersgenerally. Their fifth batch ofreleases is now available. Thenew sets of figures continue thetheme set by previous releasesand are GM72-022: Fleet AirArm Swordfish Pilot and Crew;GM72-023: Sailors - Flightdeckhandlers with wheel chocks; andGM72-024: Officer & Ratings –duffle coats (2).The set of Fleet Air Arm pilots(item GM72-022) have beeninspired by the Airfix Swordfishand are intended to represent apilot, navigator and gunner. Thenavigator carries his BigsworthBoard. Each figure wears anIrvine Jacket, flying boots andgauntlets (the pilot is carrying hisgauntlets). The set of flightdeckhandlers with wheel chocks (itemGM72-023) comprises two sailorssitting on wheel chocks and athird standing figure carryingtwo chocks. It includes the threefigures plus two chocks for theseated figures to rest on.The third set of figuresreleased (item GM72-024) isanother set of sailors dressedin duffle coats. The two ratingsare keeping warm with a mug ofchar whilst the officer sports a60<strong>Military</strong> <strong>Modelling</strong> Vol.43 No.7 <strong>2013</strong>
AFV reviewsPainted views of the three excellent new 1:72 scale Royal Navy themed figure sets from Gunthwaite Miniatures.beard and is carrying binoculars.The figures are suppliedunpainted in packs of three.The suggested selling price is£6.25 per pack. Gunthwaitedo not sell direct. However,the Gunthwaite Miniatureswebsite (www.gunthwaite.co.uk) provides details ofstockists. These comprise:Halifax Modellers World:www.halifaxmodellersworld.co.uk; White Ensign Models:www.whiteensignmodels.com; Coastal Craft: (at variousmodelling shows and mail order)and Float a Boat (Australia):www.floataboat.com.auAll three sets are beautifullysculpted and cast in white metal,and for anyone interested in theRoyal Navy and Fleet Air Armmodels in 1:72 scale, thesefigure sets really are full ofcharacter and very well producedindeed. Thanks to Al Gunthwaitefor our examples.TransfersThere are some new sets ofwaterslide transfers, whichare printed by Cartograf forArcher Fine Transfers andare produced to a high quality.Their waterslide range is easilyidentified by the green AFTlogo and bright yellow headercard to differentiate them fromtheir dry rub-down range oftransfers. These latest onesare all great for 1:35 scaleWW2 British vehicle modellers.AR77026 UK ArmouredDivision Unit Signs, 1943 –1945: This includes Unit Signsfor Guards Armoured Division,1st Armoured Division, 6thArmoured Division, 7th ArmouredDivision, 11th Armoured Divisionand 79th Armoured Division. Inthree different sizes so suitablefor different types of equipment(Jeeps to AFVs). It covers muchof both Italy and North WestEurope for the period. Quite acolourful set.AR77028 UK Infantry DivisionUnit Signs, 1943 – 1945: Anothervery colourful set of transfers,this time covering 3rd (Ironsides)Infantry Division, 6th AirborneDivision, 15th (Scottish) InfantryDivision, 43rd (Wessex) InfantryDivision, 46th (North Midland)Infantry Division, 49th (WestRiding) Infantry Division, 50th(Northumbrian) Infantry Division,Woody (centre) and the Archer Fine Transfers’team at the AMPS show in Atlanta, April <strong>2013</strong>.51st (Highland) Infantry Division,53rd (Welsh) Infantry Division, 59th(Staffordshire) Infantry Division and78th (Battleaxe) Infantry Division.As with the Armoured Division set,they are all supplied in three sizes.AR77037 UK andCommonwealth AoS Signs,1943 - 1945 (Set 2): Allsupplied in three sizes again,- Signals within ArmouredDivisions: HQ Divisional Signals:Armoured Regiments inArmoured Divisions: ArmouredBrigade HQ, Armoured RegimentNo.1, Armoured Regiment No.2,Armoured Regiment No.3,Motorized Infantry Regiment:Signals within InfantryDivisions: HQ Divisional Signals:Senior Infantry Brigades:Senior Infantry Brigade HQ andLight Aid Detachment REME,Senior Infantry Brigade SupportGroup (Mortars & MGs), SeniorInfantry Brigade, InfantryBattalion No.1, Senior InfantryBrigade, Infantry Battalion No.2,Senior Infantry Brigade, InfantryBattalion No.3.AR77031 UK andCommonwealth AoS Signs,1943 - 1945 (Set 1): InfantryDivisions: HQ, Defence andEmployment Troops, IntelligenceCorps, Cash Office, FieldSecurity Section, InfantryDivisional Support Company(MG), Field Ambulance CompanyNo.1 RAMC, Field AmbulanceCompany No.2 RAMC, FieldAmbulance Company No.3RAMC, Field Hygiene SectionRAMC, Provost Companyattached to Divisional HQ, PostalUnit attached to DivisionalHQ, Field Dressing StationNo.1 RAMC, Field DressingStation No.2 RAMC. ArmouredDivisions: HQ, Defence andEmployment Troops, IntelligenceCorps, Cash Office, ProvostCompany (military police),Divisional Postal Section,Independent Machine GunCompany, Light Field AmbulanceRAMC, Field Ambulance SectionRAMC, Field Hygiene SectionRAMC, Field Dressing StationRAMC. Comes with illustratedapplication instructions.AR77030 UK Royal ArtilleryTactical Markings, 1943 –1945: Tactical Markings forRegimental Headquarters,Towed Field Batteries, Self-Propelled and Medium Batteriesand Anti-Aircraft Units. Comeswith illustrated applicationinstructions.My thanks to Woody at ArcherFine Transfers at PO Box 1277,Youngsville, NC 27596-1277.You can check their website atwww.archertransfers.com MNew AFT Waterslide transfers from Archer Fine Transfers for British AOS signs and Royal Artillery Tactical Markings.www.militarymodelling.com61
BooksOn ParadeBooks, magazines and DVDs reviewedThe Editor welcomes publications for review. Unlessa prior arrangement has been made with the Editorreview samples WILL NOT be returned.All samples intended for review in ‘On Parade’ shouldbe sent direct to the Editor at the address listed under‘Editorial’ on the contents page.Tiger by Thomas Anderson.Osprey Publishing.ISBN 978-1-78096-201-6.Price £25.www.ospreypublishing.comGermany’s Tiger tank is one ofthe world’s legendary weapons.What it lacked in numbers it morethan made up for in the interestshown in it both during its timein action and even more so later.Whether it warrants this popularityor notoriety is not an easy questionto answer but the author of thisnew book on it attempts to do so.It deals with both the original TigerI and the later Tiger II.Coverage is split into logicalsections, beginning withdevelopment of heavy tanks inthe late 1930s to back up thelight and medium series theGermans had by that time. Itsmobility, firepower and armourprotection are examined, as isthe organisation of heavy tankunits first with a mixture ofTigers and medium tanks thenlater with all Tigers as well as theassociated supporting vehicles.The all-important matter ofmaintenance shows that thiswas one area where it was letdown. Without suitable recoveryvehicles stuck or damagedtanks were often abandonedor destroyed instead of beingbrought back into service.Its use in action is the longestchapter in the book. Service isfollowed on the Eastern andTunisia Fronts including thelast days in defence of Berlin.Actions are described usingpersonal accounts and officialreports that show that, whilethese tanks were effective, theydid not always have things theirown way. Action in NW Europeand Italy are not included whichis unfortunate.Any tank is judged by itseffectiveness on the battlefield.What capability Tigers had againsttheir enemy’s tanks and otherweapons is shown using bothGerman charts on the effect of the88mm guns against various tanksand figures for their weaponsagainst Tigers. Here the Russianexperience is covered whilesimilar details for most British andAmerican tanks are absent.All sections are illustrated usingperiod black and white photos.These include sequences of tanksbeing moved by train includingdetails of the narrower transporttracks and their colour codingsystem as well as many of tanksin the field in various locations,being maintained, loaded withammunition and in action. Mostcaptions identify the actual unit andpoint out details of the markingssystem used. Emphasis is on theactual tanks with only very briefdetails of the variants thoughthere are a few useful photos ofthe Befehlstiger based on thecancelled Porsche design andthe Bergepanzer VI variant of theFerdinand/Elefant tank destroyer.Serious Tiger fans will wantto add this to their collection,with its original reports andfirst-hand accounts it makes forinteresting reading.Peter BrownThe Downfall of the ThirdReich by Dr. Duncan Anderson.Published by Amber BooksLimited, 74-77 White LionStreet, London N1 9PF.ISBN 978-1-908696-53-3.Price £14.99.enquiries@amberbooks.co.ukwww.amberbooks.co.ukI found this large-sized 251-page paperback interestingand informative. Its 11chapters take the readerthrough every stage of theconflict in Western Europein 1944 and 1945, from thepreparations for D-Day tothe eventual unconditionalGerman surrender. The textis supplemented throughoutby some 250 excellentcontemporary photos in bothcolour and black and white. Inaddition, the publication containsnumerous clear and informativemaps plus full-colour artworks ofthe weaponry and uniforms ofboth sides.The reader will find theexpected chapters dealing,sequentially, with all the wellknownbattles of that hugecampaign: the D-Day landingsthemselves, the bitter fightingaround Caen, the ill-fated airdrop at Arnhem, the Germanattack in the Ardennes, thecrossing of the Rhine and thefight to reach the Elbe. Whatmay be less anticipated isthe inclusion of two chaptersdealing specifically with theroles played by both theFrench Army and the FrenchResistance in Operation Anvil(the Allied landings on theMediterranean coast of France)and the liberation of Paris.In each chapter the authoris at great pains to describenot merely the military eventsas they unfolded but also theconflicting priorities of thepolitical and military leadersamong all the combatantsand the huge tensions thosedisagreements generated.Long before D-Day was evenfinalised there were widelydivergent views held byChurchill and Eisenhower - setagainst the background ofdeclining British power - asto the best way to attackNazi-occupied Europe. Thosedivisions of opinion weremirrored on the German sideby Hitler, von Rundstedt andRommel with regards to whereand how best to deploy theirown resources. These faultlines were to continue on bothsides right up to the end ofthe war.What comes strongly tothe fore as the campaignunfolds is the political andinter-personal skill displayedby Eisenhower - in sharpcontrast with Montgomery - inmarshalling his forces acrossall services and nationalitiesin order to achieve ultimatesuccess. These qualities wereparticularly in evidence in hisdealings with de Gaulle, setagainst the background ofthe immense complexities ofFrench military and politicalpriorities of the time. Thetaking of Paris - when it wasnot a military imperative - andso allowing the French generala victorious return to the city isthe classic example. However,as the author points out, theultimate test for the generalcame just as the war wasreaching its conclusion. Could- should - the armies under hiscontrol attempt to reach Berlinbefore the Red Army? To thedismay of many Eisenhowerchose the pragmatic option andhalted his forces.In conclusion, those readerswhose priority is to followthe military events of 1944-45 in Western Europe willfind this publication clear andinformative. As befits theHead of Department of WarStudies at Sandhurst, however,the author also provides afascinating wider pictureby taking into account thesometimes hidden but alwayscrucial political and personalfactors behind the noise andfury of battle.Fred Ledden62<strong>Military</strong> <strong>Modelling</strong> Vol.43 No.7 <strong>2013</strong>
BooksConsolidated B-24 Liberator1939 onwards (all marks)Owners’ Workshop Manualby Graeme Douglas. HaynesPublishing, Sparkford, Yeovil,Somerset BA22 7JJ.ISBN 978-0-85733-159-5.Price £21.99.sales@haynes.co.ukwww.haynes.co.ukHaynes are known for theirOwners’ Workshop Manualson cars that for many yearswere very popular for motoristsdoing their own servicing andlight repairs at home. Haynesexpanded their portfoliosometime ago to cover differentand diversified subjects farremoved from DIY manuals forhome servicing when ‘family’cars were much simpler. Withinthis venture the Haynes’ aviationseries is developing apace, andI have those particular Owners’Workshop Manuals on Spitfire,Hurricane and F-86 Sabre …and now the Consolidated B-24Liberator has arrived for review.The Manual is based aroundthe Collings Foundation’saircraft, Witchcraft, an 8thAir Force veteran, that alsoserved with 99 Squadron RAFin the Pacific Theatre. Dividedinto a dozen parts includingthe Introduction, these cover:Development of the B-24; TheB-24 at war; B-24 production;Anatomy of the B-24; Pratt& Whitney R-1830-65 TwinWasp engine; Arming theB-24 (defence and offensiveweapons); Flying the B-24; Theengineer’s view; Appendices;Sources and an Index to locateitems in the book.Illustrated throughout, thebook is packed with illustrations– colour and black and whitephotos and drawings – scaledrawings and illustrationsfrom wartime handbooks. Ifyou are a modeller or aircraftenthusiast you will find thisbook a very handy reference onthe B-24 with lots of ‘hands-on’information.Pages 139 – 141 coverpilot’s pre-flight checks andstart up procedure, which wasinteresting, for me. Starting afour-engined American WW2heavy bomber like the B-24 wasa complicated sequence and Iwas able to compare this withConsolidated’s wartime colourfilm showing the pilot and copilotstarting this multi-enginedbomber. It was engrossing tocompare the Company’s film,which covers preparation ofthe aircraft for flight and startup step-by-step on a verycomplicated sequence carriedout by pilot and co-pilot, andjust to prove I wasn’t asleepregarding either the book orwatching the film a “difference”popped up. After “walking”the blades through six times,prior to starting No.3 engine,operating the switches - “accel”– “prime” – “crank” – then setmixture to “auto lean”, whereasthe book says “auto rich” – butthe film emphasises “autolean” because it lessens thechance of fouling the plugs…I’m not a pilot, but can comparesequences and those particularterms highlighted “auto lean”and “auto rich!” It makes mewonder if the “manufacturer’ssettings” changed later on – ormodified in service?It’s a fascinating book – verythought provoking and highlyrecommended.Ken JonesFlying Scot - An Airman’sStory by Air CommodoreAlastair Mackie CBE DFC.Pen & Sword <strong>Military</strong>,47 Church Street, Barnsley,South Yorkshire S70 2AS.ISBN 978-1-84884-756-9.Price £19.99.enquiries@pen-and-sword.co.ukwww.pen-and-sword.co.ukAutobiographies are as varied asthe people who choose to writethem. They do, however, havecertain things in common. Theyreveal not only what the writer hasdone in life but also - and oftenmore interestingly - the beliefs andpersonal characteristics that liebeneath their public persona.Rarely has this been moreevident than in the case of thispublication. Alastair Mackiehas waited until his 90th yearto inform us of his life as anofficer in the RAF and later asa Whitehall civil servant. Giventhe lengthy perspective he hasallowed himself it is fair to saythat this book contains all theevidence the reader needs toform a rounded opinion of theman and his life.This book is on one level anot unfamiliar recounting ofthe military life of a Scotsmanwho was 17-years-old whenWorld War Two broke out andwho remained in the RAF until1968. Indeed all but two ofits 177-pages are devoted tothe author’s 29-year militarycareer. The reader is toldabout the various air actionsin which he featured up to1945 in North Africa, Europe,the Middle and Far East. Afterthe war he had a deskboundspell on the Cabinet OfficeJoint Intelligence Committee,which he intensely disliked.Further flying experience camehis way in the form of theCanberra and Vulcan bombers,before taking the decisionto leave military life after alargely successful, though notexceptional, career.What stood out aboutthis book is not the careerprogression of a particularRAF officer, but the lightit sheds - intentionally orotherwise – on the personalitybehind the uniform. For amilitary man Alastair Mackiepossesses strong viewsagainst the usefulness ofBritain’s nuclear deterrentand is not afraid to say so.Indeed, he is contemptuousof anyone - such as Tom King,one-time Conservative DefenceMinister who lost an OxfordUniversity debate against himon this subject – who posits anopposite opinion. He is equallydismissive of the qualities ofmany of his superior officerswhen in uniform and of thecapabilities of his civilianbosses in Whitehall. He refersto the one-time head of theJIB (Joint Intelligence Bureau)Major-General Sir KennethStrong in the most derogatorypersonal terms as “ugly andwell past his best.”It is when the author talksabout himself, however, thathe is most revelatory. Havingnurtured hopes in mid-careerof being awarded the Air ForceCross, he is disappointedto receive only “this lousyQueen’s Commendation forValuable Service in the Air”!He describes himself as earlyas page 6 as “one of a verysmall minority of so-callednatural pilots”. One suspectshe regards his ultimate receiptof the DFC and CBE as noless than his due. (He alsomakes sure the reader knowsthat one of his two sons isalso a recipient of the CBE). Aself-confessed ‘lifelong showoff’,the author is also quickto attribute self-praise whenclaiming that an intervention ofhis in the late 1960s saved theRed Arrows from disbandmenton cost grounds. “My advancewarning almost certainly savedthe day” is his recollection ofthe situation.As a record of militaryservice and of Britain’s mid20th century military history,this book has a certain merit.What it reveals of the manhimself, I will leave to readersto decide for themselves.Fred Leddenwww.militarymodelling.com63
BooksThe Desert War Then and Nowby Jean Paul Pallud. Publishedby After the Battle Publications.ISBN 978-1-870067-77-5.Price £44.95.www.afterthebattle.comI think I need to be up front withthis, as I am a huge fan of the Thenand Now series of books that Afterthe Battle have produced over theyears. I admire the dedication andresearch that the authors put intothem. In this case we see anothertitle from the very capable handsof Jean Paul Pallud, who has doneprevious titles in the series, suchas the Tank Battles in Normandy,where he was involved with therediscovery of Michael Wittman’sbattlefield burial site.The other thing that thisnew book did was ‘pull at theheartstrings’ for me personally, asit is now some 18-years since myfather passed away. My dad waspart of the Eighth Army throughoutthe desert war, before he movedto land in Italy at Salerno in 1943.His memories of his war in NorthAfrica I remember well, as hehad an affection for the harshconditions in the desert that arenot easy to understand. However,these feelings were not reflectedabout his time in Italy (1943-1944)nor his time in North West Europebetween 1944 and 1945. Readingthis book just brought back somany memories of places he talkedabout having been, and has helpedbring to life some of those storieshe told.It’s a large format hardback book,filled with some 592-pages offascinating material. Split into sevenmajor parts, each of those thensplit into sub-sections, it follows alogical sequence which makes thewhole thing easy to follow. Thefirst part looks at the backgroundof the battlefield itself, the threecountries it was fought over, withEgypt, Libya and Tunisia. It doesalso include reference to the morerecent conflicts that have beengoing on in the region, conflictswhich have affected just wherethe author was able to visit andphotograph, along with places thatwas not possible to accomplish.Part two deals with the FirstRound in the desert, from June1940 to February 1941. This coversthe opening conflict betweenBritish and Italian forces, with anItalian offensive that ended witha British advance in return, thefirst battle around Tobruk andthe ousting of Italian forces fromCyrenaica. The final part of thissection deals with the creation ofthe Long Range Desert Group,under Major Ralph Bagnold, apre-war desert explorer whosenavigational skills helped sell theidea to Wavell of reconnaissancepatrols that could gain valuableintelligence behind enemy lines,long before satellites could dothe job. This moves on to theestablishment of the moreoffensive operations of the SASas well.The early Italian failure ledthen to the German involvementin North Africa, so part 3 is TheGermans Move In. The arrival ofRommel and the Afrika Korps, asuccessful offensive in Cyrenaicaand his first battle for Tobruk,and then the British OperationBattleaxe, as the seesaw natureof the North African campaigngot under way. It finisheswith a detailed and interestingexamination of the famous ‘Raidon Rommel’, when Commandosattempted to land near Rommel’sheadquarters, to capture or kill him.It was unsuccessful and Rommelwasn’t even there at the time, butJean Pauls’ examination of thestory is well worth reading by itself.Part 4 deals with the WinterBattles of October - December1941, when Rommel choseto make a withdrawal. Part 5though tells the next stage, BritishFortunes reach their lowest ebb,as Rommel goes on the offensiveagain. It includes coverage ofwell-known battles at Gazala, the‘Cauldron’, Bir Hakeim before weget back to Tobruk and the firstskirmishes at El Alamein itself.Part 6 is The Turn of the Tideas the British in at El Alamein,and Operations Lightfoot andSupercharge meet success and theAfrika Korps retreats to El Agheila.Section 7 deals with the closingstage and War on Two Fronts,as US troops land to the Westin Operation Torch, and the warleaves Libya and into Tunisia, fromwhere the final chapter in the storyof the war in North Africa drew to aclose in 1943.What I have bypassed so far isthat throughout all of these storiesnot only do we see large numberof archive photos, but modernday comparisons as well. In a fewplaces they couldn’t be taken dueto the sensitivity of modern militaryinstallations and ports so at timesa satellite photo is used to helpupdate the picture of the area.Amidst the basic history, there areother stories spread among them,such as the long-range operationof Sonderkommando Blaich.This involved a solo mission for aHeinkel He 111 to bomb an alliedbase at the French Fort of FortLamy, a flight of some 5,000 milesto make a raid. The raid droppedthe bomb load over the airstrip anddid destroy thousands of litres offuel but the He 111 itself didn’thave the fuel to get back to its ownbase, landing in the empty desert.Search aircraft discovered it andmanaged to fly out fuel to the crewthe next day, enabling them to topup the tanks and eventually getback to base.As you might expect, manyplaces have seen changes inbuilding developments since thewar and in the desert itself, shiftingsand has obliterated many things.It might surprise many though tosee those buildings, emplacementsand the huge wire fence along theEgyptian border that are still thereto be seen. Millions of mines stillrepresent a hazard that leave nogoareas in the desert itself. Thehundreds of photos assembledwithin these pages include manywell-known ones, and then aregiven a modern comparison frommore resent times. Some of thelandmarks have gone, but manyremain and the book makes for afascinating look at the whole storyof the Desert War between 1940and 1943. I really wish my ownfather was still here to read it, as Iam positive he would have read itfrom cover to cover.This is the kind of referencework that will provide interestingmaterial for both modellers,historians and even familymembers from those involved foryears to come.Robin Buckland95th Rifles 1800 to Corunna:The Peninsular Collection DVD,Battlefield History TV Limited,Pen & Sword <strong>Military</strong>, 47Church Street, Barnsley,South Yorkshire S70 2AS.ISBN 5060247620381.Price £16.99.This DVD is part of a newthree-part series entitled ThePeninsular Collection fromBattlefield History TV andPen & Sword <strong>Military</strong>. Writtenby Andrew Duff and TimSaunders, the DVD featuresmembers of the 1/95th RiflesLiving History Society.After being formed as an‘Experimental Corps of Riflemen’in 1800 and armed with the Bakerrifles, in 1808 two battalions ofthe formation, by this time termedthe 95th Regiment of Foot (Rifles),joined Sir Arthur Wellesley’s forcein Portugal at the onset of what tobecome the Peninsular War. Afterseeing action at Obidos, Rolicaand Vimeiro, the Rifles took partin the retreat through north westSpain which culminated in thebattle of Corunna 16th January1809. Filmed on location wherethe original battles took place, theDVD, which runs for 105-minutes,provides the viewer with someidea of what the British soldiershad to endure in the early years ofthe conflict.Also it provides an importantvisual appreciation of the terrainfor those who are unable toexplore the actual sites forthemselves – a most usefulaspect. Well worth a look.Stuart Asquith64<strong>Military</strong> <strong>Modelling</strong> Vol.43 No.7 <strong>2013</strong>
BooksStuart Asquith’s round up ofsome of the recent releasesfrom Osprey.www.ospreypublishing.comBolt Action: Armies of theSoviet Union (Bolt 4)by Andy Chambers.ISBN 978-1-78096-090-6.Price £14.99.With this nicely producedand colourfully illustratedsupplement for Bolt Action - thefourth in the series - players cannow build a WW2 army for theSoviet Union. The book containsall the background, rules andarmy list information needed tofield a Soviet army in the BoltAction wargame. Details areprovided of the organisation andequipment covering the RedArmy forces from the beginningof what came to be called theGreat Patriotic War (June 1941)to the end of the war in Europe(May 1945). The main armylist includes all the necessarygaming details for all the trooptypes, vehicles and equipmentfielded by the Soviets in WW2,then there are 18 specific‘theatre selectors’ coveringdifferent phases of the conflictin more detail.Note that Bolt Action: WorldWar II Wargames Rules (£25)is needed to use the armiesproduced via these lists.The Naval Battles forGuadalcanal 1942: Clashfor supremacy in the Pacific(Campaign 255) by Mark Stille.ISBN 978-1-78096-154-5.Price £14.99.The battle for Guadalcanal thatlasted from August 1942 toFebruary 1943 was the firstAmerican counter-offensiveagainst the Japanese in thePacific. In the waters offGuadalcanal US and Japanesenaval forces fought a series ofengagements that resulted inheavy losses for both sides,but which eventually forced theJapanese to withdraw from theisland. The six months of battlesincluded seven major encounters,two of which were foughtbetween aircraft carriers, butthe remaining five, all of whichtook place at night, pitted thesurface forces of the two naviesagainst each other in a series ofengagements. This book looks atthe contrasting fortunes of bothnavies during a series of actionsthat turned the tide of the navalwar in the Pacific.The War of Horus and Set(Myths and Legends 3)by David McIntee.ISBN 978-1-78096-902-2.Price £10.99.Long ago, the brother gods Osirisand Set ruled peacefully over thelands of Upper and Lower Egypt,each with his own kingdom. Overtime however, Set came to covethis brother’s crown and lands andtemptation eventually overcamehim. Usurping Osiris’s throne, Setstarted a blood feud that spreadwar, death and chaos throughoutthe heavens and the earth. Godsand men chose sides and took uparms on behalf of Set and Horusthe heirs of Osiris. This book retellsthe mythic struggle betweenHorus and Set, exploring thevariations to the tale and examiningthe earthly realities that inspiredor reflected the actions andallegiances of the gods, such asthe political rivalries between thetwo kingdoms and the invasion ofEgypt by Cambyses II.The Martini-Henry Rifle(Weapon 26) by Angus Konstam.ISBN 978-1-78096-506-2.Price £12.99.Introduced into service in the mid1870s, the Martini-Henry rifle wasthe British army’s first purposedesigned breechloader, thereplacement for the Snider-Enfieldconversion. More accurate and‘flatter shooting’ than the Snider-Enfield, as well as being simpler toreload with its falling block action,the Martini-Henry was arguablythe ultimate evolution of the singleshot British military long arm.The weapon found fame in thehands of British infantryman fromAfghanistan to Zululand.Sino-French Naval War1884-1885 by PiotrOlender (Maritime SeriesNo.3104). Mushroom ModelPublications, 3 GloucesterClose, Petersfield, HampshireGU32 3AX.ISBN 978-83-61421-53-5.Price £19.99.www.roger@mmpbooks.bizThis is a short but fascinating bookabout the late 19th century militarystruggle for supremacy betweenFrance and China for control ofVietnam. This is a conflict that doesnot feature highly in any Anglocentricview of colonial history andis certainly not a subject matterI was hitherto familiar with. It is,nevertheless, of great importancein itself and one I enjoyed learningabout in this publication in whichthe author, not only relates theevents of the conflict itself, but alsosets them clearly in their overallstrategic context.In its 15 chapters the authortakes the reader sequentiallythrough the often-complexsequence of military actionsthat left France in control, notonly of Vietnam, but much ofSouth East Asia by the end ofthe period in question. Chapter1 outlines the origins of theFrench colonial expansioninto Vietnam which began inthe 1850s. As events unfoldsubsequent chapters describehow France becomes master ofthe southern half of the country,but with China retaining hugeinfluence in the northern half ofVietnam which borders its ownterritory. The rivalry betweenthe expansionist Europeanpower and the sick colossus ofthe region finally sparks militaryaction. Some of this takes placeon land, where the Chineseenjoy some success, mainlythanks to their vastly superiornumbers of soldiers. However, itis French naval power, employedto blockade Chinese ports asfar away as Taiwan, whicheventually enables her to prevailas the supreme colonial powerin that part of the world – knownas French Indochina - until afterWorld War Two. In an interestingand informative Aftermath theauthor highlights the almostcomplacent response by theChinese authorities to theirmilitary and political setback atthe hands of France and pointsout that it is only when laterdefeated by their eternal – anddisrespected – rival Japan, thatthe seriousness of the country’soverall decline at that time reallyhits home.Each chapter contains highlyinformative maps, drawings andblack & white photos, which mostusefully supplement the text.The book concludes withtwo Appendices - itemising theFrench and Chinese navy listsand their respective artilleryduring the period in question –followed by 23 excellent fine linedrawings of the vessels involvedin the conflict on both sides.Fred Leddenwww.militarymodelling.com65
Product reviewsAtten-Shun!The Product Review ColumnThe Editor welcomes product samples for review.Unless a prior arrangement has been made with theEditor review samples WILL NOT be returned.All product samples intended for review in ‘Atten-Shun!’should be sent direct to the Editor at the address listedunder ‘Editorial’ on the contents page.ZvezdaSoviet Heavy Tank KV-2in 1:35 scaleZvezda has followed its KV-1Model 1940 kit (item 3624)with the KV-2 heavy tankversion using the productionturret design (item 3608). Thiswas developed during 1939as a ‘bunker buster’ to dealwith Finnish engineer worksalong the Mannerheim Lineduring the ‘Winter War’. After24 KVs Bol’shoy Bashnoy (KV‘Big Turret’) tanks were builtin 1940, a new turret wasintroduced and another 191tanks were built as theKV-2. But they overloaded thealready stressed KV chassis,and most of them failed inaction before they got intocombat. Only one tank stillexists in Moscow (a laterproduction hull with a KV-2turret on it) and apparently asecond vehicle has now beenput on display in Nizhniy Tagilwith a new construction replicaturret on a recovered KV-1 hull.The KV-2 mounted a 152mmM-10 howitzer in its navalliketurret with a 7.62mmDT machine gun in the hulland a second DT coaxial in aball mount on the rear turretplate. At point blank range thegun was devastating to anyfixed structure or tank, but itwas very clumsy and difficultto manoeuvre in a swirlingcombat situation.Zvezda is an improvingcompany and is now startingto produce world-class kits liketheir T-90A kit, but this onewas designed just prior to thatlevel of achievement. This kitis one of their nicer ones andhas some really good touches,such as a partial interior and achoice between vinyl and ‘linkand length’ styrene tracks.The vinyl tracks in Zvezda kits,however, tend to be tauter thanbowstrings so this latter featureis most welcome.The kit is based on theirModel 1940/1941 kits buthas a new set of 78 partson two sprues for the turret.Surprisingly the turret is a ‘flat’moulding in that it consists ofsix main parts (top, bottom,sides, front and back) withdetails added on. The M-10 gunis nicely done but comes withthe odd three-section barrelthat has puzzled many Russianmodellers. The consensusopinion is that the threesections were actually shroudsfor the gun barrel and were notpresent on all tanks, so somevehicles appear to have it andothers do not. The gun doescome with the basic elevationand cradle mechanisms, butother than the mount for thecoaxial gun there is nothinginside the turret.Those modellers who readRussian or have been fortunateenough to either get a copy ofthe book Tyazhelyy Tank KV-2:‘Neuayazvimyy’ Koloss Stalina(KV-2 Heavy Tank: Stalin’s‘Invulnerable’ Colossus) byMaksim Kolomiyets (Yauza/EhKSMO Publishing, Moscow2001, (ISBN 978-5-699-50462-6) will note it comeswith interior photos of thepreserved tank in Moscow aswell as a copy of the factoryblueprints from November1940 that cover the interior.This makes adding an interiorto the tank a much easier task.The interior of the hullprovides an engine blocktop and air cleaner, but theradiator grilles (C9) are solidand installed from the inside ofthe hull. The good news is thatZvezda did provide the curvedframe on the outside, so if youhave a set of etched grillesthe openings are cleaned outand ready to install. Note thatyou will have to come up withthe armoured radiator guardcovers if you use etched grilles,however. The same goes withthe radiator air exhaust grille atthe rear of the hull (A14) whichis a separate part so it too canbe replaced.Assembly is typical of anEastern European kit – flat hullsides that attach to a belly plate,bow and stern plates, and theupper hull. It does come withseparate roadwheel arms, andall wheels use vinyl ‘keepers’so they are easily removed forpainting. The kit also providesthree early-style ‘ZIP’ bins fortools and equipment.The model, however, is notwithout quirks and one majorissue – according to checks withdimensions and plans publishedby some of the better Russianauthors (Kolomiyets being thebest ‘single source’) the modelis about 3mm too short. Width,height and all major componentsscale out right, but then thereare some “please don’t look tooclose” items.As before this model comeswith the reinforced cast internallybuffered road wheels, whichwere only used after mid 1941.But in the case of this tank as agood number were built in thattime frame it is not wrong as itwas with the Model 1940 kit.Finishing is simple – 4BO greenoverall with one decal option:Za Rodinu! (For the Motherland!)Overall, if you can live with theslightly short hull this is a nice kitand a good place to start due tothe turret construction to build aKV-2 with a full turret interior. Butfor a better hull for the purist youmay wish to ‘cross kit’ with aKV-2 hull from Trumpeter.Cookie SewellPrice £21.50UK distributors, The HobbyCompany, Milton KeynesMK5 8PG.66<strong>Military</strong> <strong>Modelling</strong> Vol.43 No.7 <strong>2013</strong>
Product reviewsMengMerkava Mk.3 BAZ w/NochriDalet Mine Roller System in1:35 scaleMeng has been noted forlistening to the modellingcommunity and thelatest release in their TS(Tyrannosaurus) rangerepresents the Israeli DefenceForce Merkava Mk.3 Bazwith Nochri Dalet Mine RollerSystem (item TS-005). Onceagain Desert Eagle Publishinghave been credited withinput for this impressive andwelcome release. This versionof the Merkava is derivedfrom the Mk.3 and has beenupgraded with a new FireControl System called BAZ(Barak Zoher – Hebrew forglaring light) and upgradedsights for the gunner andthe commander. The enginedeck and turret roof has alsoreceived an appliqué armourupgrade. The kit also featuresthe Nochri Dalet mine rollerthe main change for the IDFhas been the introduction of anadaptor to fit it to any tank, asopposed to the older methodof welding it to the vehicle.Mine rollers are simple devicesthat simply detonate pressurecontact mines by using directpressure. The roller is hingedallowing it to lift with the forceof the detonation and thendrop back into position. Themain drawback to this kind ofmine clearance is that it canbe defeated by double impulseand electronic fused devices.The kit arrives in a deepbox containing 17 mediumgrey sprues, turret (upperand lower), hull (upper andlower), two lengths of vinyltracks, decals and a small bagcontaining a length of nylontwine, a short length of brasswire, copper coloured chainand a sheet of soft metal foil.Be aware that once openedand examined the box willneed careful repacking toensure that it all fits back inthe box! The upper hull is animpressive moulding with aseparate engine deck althoughno interior is supplied. Thehull lacks any form of anti-slipcoating some modellers wefeel that this is an error the factis that moulded anti-slip alwayslooks over done and unrealistic.The instructions are in Meng’susual small format booklet witha total of 50 stages, each ofthem appearing to be quite clear.The suspension comes with achoice of steel or rubber shodwheels, the modeller can eitherfit all one or create a mixture ofthe two. The wheels are held inplace using poly caps and theidlers are moulded using slidemoulds and will require a minoramount of clean up owing totheir production method. Theconstruction continues witha the suspension and thenmoves to the hull fittings, aninteresting choice is that Menghave included a choice of fullor empty stowage baskets forthe rear of the hull. The buildthen continues with the upperhull and the modeller can makethe choice if fitting the driver’speriscopes open or closed theheadlights raised or lowered.The kit is supplied with the achoice of side skirts, one piecewith integral skirt hangers or amulti piece versions completedin pairs with spate hangers.The moulding on these is verydelicate and displays the castnumbers seen on the full sizeexamples, aiding the crew whenrefitting them.With the hull completeconstruction moves to theturret moulded in a way thatit captures the complex shapeseen on the Merkava. The120mm smoothbore barrel isa combination of slide mouldsand traditional two halveswith resulting clean up. Afteradding the armour to the turretthe modeller is then given thechoice with using a coveredor empty rear turret rack. Themoulded ball and chain armour isadded and care should be takenremoving these items from thesprues to ensure that they arenot damaged. My only concernwould be that these couldbe damaged as constructioncontinues with the turret andreceives a lot of handlingadding the extra fittings. Thesmoke grenade launchers canbe built open or closed butmy references indicate thatthey are doors that open andnot items that are removed,possibly an easy conversionbut time will tell. The turretfinally receives the additionalweapon and panoramic sights,turret mounted .50 calibre andthe loader’s and commander’sFN MAG. Once the turret isattached the in instructionscall for the two towropes tobe attached and the tacticalmarking boards to be attachedto the turret baskets.With the Merkava nowcomplete the build continueswith the mine roller, the hullbracket is constructed firstwith the subsequent stagesdealing with the rollers andtheir supporting arms includinghow many links should be ineach length of chain. Thesestages must be followedcarefully as there a number ofstages where components aretrapped or measurements arecritical for the construction.The final stage attaches themine roller to the brackets andwith that the build is complete.Markings are provided fortwo versions:Mark 3 BAZ, CommandTank, 2nd Platoon, 3rd GimelCompany, 1st Sufa Battalion,188 Barak Brigade.Mark 3 BAZ, Tank 1,1st Platoon, 1st Company,3rd Izuz Battalion, 460 Brigade,Operation Cast Lead, Gaza,Jan 2009.Certainly not for a beginnerbut not as complex as somemanufacturers the model hassome exceptionally finelydetailed parts the ball and chainarmour is well reproduced andthe lack of anti-slip coatingis the only downside. Highlyrecommended for all fansof modern armour and forthose seeking something a bitdifferent.Brian O’DonoghueUK price around £51.99www.meng-model.comAvailable in the UK fromHannantswww.hannants.co.ukwww.militarymodelling.com67
Product reviewsDragon Models LtdM48A3 Mod.B in 1:35 scaleWhen the M60 and M60A1tanks entered service, the USArmy still had a large numberof M48 tanks in service anddecided to upgrade them tomatch most of the capabilities ofthe newer vehicles. A test-beddubbed the M48A1E1 was builtwith the Continental AVDS-1790diesel engine as well as addingthe coincidence rangefinderfrom the M60 series in place ofthe older stereoscopic one. Thenew tank, other than its lack ofthe newer 105mm gun, wasconsidered its near equal in mostcategories. The biggest one wasnearly doubling the tank’s rangeto 300-miles on the highway(500-kilometres) from the olderM48/A1/A2 gasoline engine.When the tanks got toVietnam they were found tohave some serious problems.One of the worst was thepoor visibility from thecommander’s cupolaand lack of room dueto the use of the bigM2HB machine gun in a tightspace. The trackguards andheadlights also proved nomatch for jungle growth andwere easily damaged. As aresult, Bowen-McLaughlin-Yorkmodified 578 M48A3 tanksto ‘Model B’ standards withnew reinforced trackguardsand stronger headlightmounts and guards, a bulgedcommander’s hatch, and ariser block with eight largeprisms in it for improved roomand visibility. While it did notsolve one endemic problem ofthe M48 series cupolas – 50rounds for the M2 and linkejection jams – it did providea much better environmentfor the commander. But manycommanders preferred to havethe .50 calibre gun mountedoutside the cupola on a pintlemount.In <strong>2013</strong> two new M48 kitswere announced, one fromAFV Club and one from Dragon;the latter is first to the market.Dragon’s kit (item 3544) showsa great deal of planning for othervariants, and as it sits now it canbe produced as an early M48A3,an M48A2 or M48A2C, or anM48A5 with little changesneeded other than a new sprueor two. Based on the rear enginedeck hull side fittings, it alsoappears that an M48 and M48A1will also follow.The kit appears to have takena lot of comments by modellersinto account, and looks to haveused some pretty good research.Recent comments about theheight of the turret seem to findthe Tamiya turret a bit suspect,and this one measures 25.3mmfrom lower edge to flat roof.The shapes compare favourablywith those in the Hunnicuttbook Patton: A History of theAmerican Main Battle Tank,and all details for the basicModel B tank are present.The riser block is a singleclear moulding but willneed some tinting to moreaccurately represent thoseon the actual tank. However, forreasons best known to Dragonthey have left off the VVS-2searchlight assembly (but didmould the power feed to theroof of the turret). The basicmounts are in place but aremissing the ball fittings.Also an oddity is why,considering their great useof DS plastic parts with otherkits, Dragon did not providethe mantlet with its canvascover and gun tube boot asfound on nearly all of theVietnam-era tanks. Of all majormanufacturers, Dragon couldhave done this and pleasedall of the modellers eagerlyawaiting this kit. As it is,either they will have to awaita later version of the kit or goto the after-market boys for areplacement.The turret comes with theearly model T-shaped muzzlebrake. This is not wrong, butlater tanks adopted a slightlyY-shaped one due to problemswith ‘Beehive’ flechette roundstending to cause the muzzlebrake to shatter.The bustle rack is the basicmodel and comes in five parts,all of which are suitably thin andscale. Ditto for the handrails onthe sides of the turret.The hull comes in two halveswith all other componentshaving to be attached to themsuch as the engine deck, sternplate, and trackguards. Thetrackguards have part of theedge of the turret race mouldedto them; the M48A5 will needholes in them so it will beinteresting to see what Dragondoes when it gets to that tank.Due to the breakdown of partsan A2 will be easy for them toaccomplish as the replacementside louvres without air cleanerfeed should be a drop-fit from68<strong>Military</strong> <strong>Modelling</strong> Vol.43 No.7 <strong>2013</strong>
Product reviewsa new sprue. The kit comeswith the correct ‘side load’ aircleaners for this variant.The suspension is by far themost involved part of the kit.The roadwheels each consistof a tyre/rim and a centresection, so they get a muchbetter ‘lip’ at the outer edgeof the wheel. Surprisingly thedrivers are solid and do notcome with the cleanout holesfound in nearly all of the tanksbuilt. The suspension unitsconsist of a hull mount, jouncestop, two-piece shock absorberand roadwheel arm. The armsappear a bit fragile.The tracks are neatly done inDS plastic and happily includethree links of overlap forconnection, which makes it easierto shorten them for attachment iftoo long or too loose.Oddly again, four finishingoptions are given but noneare given any colour! The onlycolour cited is FS34102 greenwhich is wrong for Vietnam-eratanks, as most of them were inFS24087 semi-gloss or FS14087gloss Olive Drab. Markings areprovided for: Unidentified Unit,1965 (tiger mouth, USA 9B8215,‘Wild One 4’); UnidentifiedUnit, 1965 (USA 09A38468);Unidentified Unit, 1965 (USA9A 9997, weight marking, whitestars); B Company, 3rd TankBattalion, USMC, Vietnam 1965(B33, but a number jungle isprovided for A, B or C Companytanks). A sheet of Cartografdecals provides the markings.Considering the fact this wasthe most common US tank inVietnam (other than the earlyM48A2 deployment with theMarines) this is something of adisappointing selection.Overall, however, there is farmore to cheer about this kit thanto carp upon, and the fact that aseries are apparently in planningbodes well for modern armourfans.Cookie SewellPrice £49.99Dragon Models Ltd., Kong NamIndustrial Building, 10/F, B1,603-609 Castle Peak Road,Tsuen Wan, New Territories,Hong Kong. Tel: 2493 0215.Fax: 2411 0587.info@dragon-models.comwww.dragon-models.comUK distributors, The HobbyCompany, Milton KeynesMK5 8PG.ZvezdaNew figure sets for ‘Art ofTactic WW2’ in 1:72 scaleThe Russian company Zvezdahave added several boxed setsof figures to their increasingrange designed to be playingpieces for their expandablegame system ‘Art of TacticWW2’. Cast in hard plastic andpresented on a sprue, these arenicely detailed self-assemblyfigures snap fit together wellwithout the need for glue.The new releases received forreview were:• German Medical Personnel1941-1943 (item 6143)• German 75mm Infantry Gunwith Crew (item 6156)• Soviet Medical Personnel1941-1942 (item 6152)• British 3 Inch Mortar withCrew 1939-1945 (item 6168)• German Regular Infantry1939-1943 (item 6178)• Soviet Regular Infantry 1941-1942 (item 6179)Each boxed set contains amultiple base - although thelater production sets e.g. SovietRegular Infantry 1941-1942 alsoprovide individual bases for thefigures - to which the three tofour assembled figures are fixedto produce a playing piece. TheGerman figure sets are mouldedin light green/grey plastic, theRussians in dark green andthe British in a sand colouredplastic. A hard plastic flag ormarker finishes off the item.Assembly instructions and agame card for the finished pieceare included in each box.More details regarding ‘Artof Tactic WW2’ can be foundat www.art-of-tactic.com orwww.zvezda.org.ruStuart AsquithPrice £2.99 eachUK distributors, The HobbyCompany, Milton KeynesMK5 8PG.www.militarymodelling.com69
Product reviewsTrumpeterHMS Eskimo Destroyer 1941in 1:350 scaleKeen students of 20th centurynaval history will recognise HMSEskimo as one of the 16 large‘Tribal Class’ destroyers builtfor the Royal Navy in the 1930sand which saw significant activeservice during World War Two.Kit builders familiar withTrumpeter’s products of willfind all the familiar contentsinside the box. In this casethe kit contains 214 parts onseven sprues, a one-piecehull (no waterline option), onephoto-etched fret with 41parts plus one decal sheet. Toassist in the delicate task ofassembly there is a 12-pageinstruction booklet, the firstpage of which lists all theusual equipment necessary forthe assembly but not includedin the kit, most notably cutters,glue, paint and brushes. Italso carries the warning thatthe kit is not suitable forinexperienced modellers andnot in any case for anyoneunder 14-years of age. Pages2 and 3 display in diagramform all the parts awaitingassembly. The remaining ninepages contain the 17 highlydetailed sections that mustbe followed meticulously andchronologically in order toachieve the desired result. Inaddition Trumpeter, as usual,provides the assembler with amost useful three-part diagramof the finished and paintedmodel, as it should appear inprofile from port and starboardand from directly overhead.This diagram also contains thepaint reference chart needed topurchase the correct colours.This model will provide theusual test of concentration,dexterity and eyesight butshould result in a good replica ofthis particular warship and at anacceptable purchase price.Trumpeter also provide on theoutside of the box a synopsis ofHMS Eskimo’s long and eventful11-years of active service, fromher commissioning in 1938 toher scrapping in 1949. She sawaction in the second battle ofNarvik in April 1940and supportedthe Allied landingsin North Africa inNovember 1942.She was activein the English Channel duringand after D-Day and helpedsink U-971 north of Brest on 24June 1944. She ended her warservice in the Far East harryingwhat was then left of the fleetof the Imperial Japanese Navy.As one of only four ‘Tribal Class’destroyers who survived thewar, her ultimate fate was tobe broken up for scrap in 1949.She and her class of warshipdeserve to be remembered andassembling this model is anexcellent way of doing so.Fred LeddenPrice £24.99UK distributors Pocketbond,PO Box 60, Welwyn, AL6 0ND.AFV ClubU.S. M2HB .50 Cal MachineGun Set in 1:35 scaleOf all nominally small arms in theworld today, probably none is aswell-known or widely proliferatedthan the Browning Model 1921.50 calibre machine gun family,better known as the M2 machinegun. It has been offered in threebasic barrel types over the years– water-cooled, air-cooled, andheavy barrel ground mount, andtwo basic firing rates: 550rpmas the M2 and 1100-1300 as theM3 aircraft version. Its 12.7 x107mm round still packs a majorwallop today.Over the years modellers havegrown more and more fussyabout their machine guns, andas nearly all US made vehiclespacked an M2 as their turretexternal/anti-aircraft mount,the old single-piece mouldingsfrom the 1960s have fallen intodisrepute and any good modernkit needs a much more detailed.50 for the turret. To that end,a number of resin kits havebeen offered over the yearsand now injection-moulded kitshave caught and in some areassurpassed them.This kit (item AF35246)makes the fourth after-purchaseoffering of a more detailed M2for modellers to use. The oldestis a Tamiya set from manyyears ago which offered anice M2 with tripod. The mostuseful general kit is one fromAcademy that offers a varietyof both .30 and .50 calibreweapons and accessories.Tasca offers a separate .50calibre kit that builds a singlemachine gun. Now this kitfrom AFV Club is offered whichprovides for two machine gunsand a number of differentmounts and accessories.The kit offers two differentM2 variants: one is an M2HBwith a choice of either thecommon barrel with muzzlereinforcement or the modernone with flash hider bolted inplace; the other, for reasons bestknown to AFV Club, is the aircooledbarrel that is rarely seenanymore and was not commonin ground usage. The HB oneconsists of eight parts includingan etched-brass forward sight;the air-cooled one only has fiveparts. Both come with slidemouldedopen bores.An M3 tripod is offeredin either open or foldedconfiguration, and comes withseparate feet (‘spades’) andpintle. Cradles add anotherfive parts to each gun, and achoice of ammunition boxesand ammunition box holderscompletes the weapons.The kit includes the M63 AAmount and a set of ‘speed-ring’type sights from etched-brassfor each type of gun. The mountcomes in 17 parts and alsoincludes the double-handled twopositiontrigger frame assemblyfor the gun in this use.The machine guns are verynice, but all things consideredthe choice of the air-cooledbarrel is a bit odd as mostground mounts never used one.A few are in service with theUSAF for protection on helicaircooledsome may be in servicewith the Navy/Marine Corps butmost are now gone. Two breechmechanisms with a choice ofthree barrels would have been abetter option. Overall though, thekit is nicely done.Cookie SewellPrice £12.99UK distributors Pocketbond,PO Box 60, Welwyn, AL6 0ND.70
MODEL KITSFROM AROUNDTHE WORLDPOCKETBONDDISTRIBUTIONAVAILABLEIN ALL GOODMODEL SHOPSI:35I:35I:35TIGER I EARLY VERSION (INTERIOR DETAIL) AYI3239I:35HETZER "PRAGUE I945" AYI3277NEWI:35PZKPFW 35(T) AYI3280NEWI:35NEWNEWI:35VW SCHWIMMWAGEN TYPE I28 AF35228NEWNEWCHURCHILL MK III W/ QF 75MM MK V GUN AF35S54GERMAN WWII FUEL &WATER CANS SET AF35257BRITISH WWII FUELTANK SET AF35258I:72I:72I:35SDKFZ 23I URO-702NEWOPEL BLITZBUS LUDEWIG “AERO” (WWII SERVICE) URO-728KRAZ-255B URO-805NEWI:35I:35BMP-3F IFV TM0I529NEWBTR-80 APC TM0I594NEWI:35NEWD-20 I52MM SOVIET HOWITZER TM02333I:350I:350USS FORT WORTH LCS-3 TM04553NEWLength: 562.8mmTotal Parts: 520+Contains:2 Mk.1 AircraftDisplay standEngraved name plateHMS BELFAST I942 TM05334COMINGSOON!USS IWO JIMA LHD-7 GM64002NEWLength 738mmI:350Kit Includes:-CH-46E, CH-53E, AH-1W,SH-60B, V-22 HelicoptersAV-8B HarriersLCAC, LCU +Assault VehiclesExclusive UK Distributors POCKETBOND LTD (Dept MM/I307)The Pocketbond<strong>2013</strong>/14 144 pagecolour catalogue ispacked with picturesof more than 2,500plastic kits fromaround the world!For your free copysend a £1.40 stampedaddressed A4 envelopeto the address below.UK residents only.Allow 28 days for delivery.P.O.BOX 80, WELWYN, HERTS, AL6 0ND. Trade enquiries only on tel 01707 391509, fax 01707 327466, info@pocketbond.co.uk
Product reviewsAcademyUSS Indianapolis (CA-35)in 1:350 scaleThe history of this Portland classheavy cruiser, which saw servicewith the US Navy from 1932 to1945, is much better known in thatcountry than it is on this side of theNorth Atlantic. The USS Indianapolisis remembered in American mindsfor two major reasons. Firstly, forher transporting of the indispensibleenriched uranium to Tinian Islandin <strong>July</strong> 1945 for the first Atomicbomb which was to be flown fromthere and dropped over Hiroshimaand, secondly, for her sinking by theJapanese submarine I-58 on the30th of that month. This resulted inthe heaviest single vessel loss oflife in American military history (880sailors) and the eventual suicide ofher commanding officer.I mention all this because Ithink it adds a great deal to thesatisfaction of the model makerto know the story of the vesselin the box that has just beenpurchased. Unfortunately, this kitfrom Academy - unlike some othermanufacturers - supplies no suchinformation. Equally, although apaint chart is provided, it refers tothe colours only by name and codenumber. In addition, the picturesof the completed vessel - both onthe outside of the box and on theinstructions inside - are in shades ofgrey and not in the actual colours tobe used. This makes it more difficultto visualise the final effects that themodeller will be aiming to achieve.These caveats apart, this kitpresents a worthy challenge for theexperienced model maker. On theoutside of the box it states clearlythat the skill level required, on ascale of 1 to 5, is a high-ranking 4.It also informs the purchaser thatthe kit is unsuitable, in any case, foranyone younger than 14-years ofage. Immediately noticeable uponopening the box is the ship’s hull.It is in two parts, split horizontally(with the lower half in red), so as toprovide the welcome opportunityto display the vessel in both full andwaterline configuration. In addition,there are three main sprues in lightgrey, two minor sprues in dark grey,a display stand and decals. Thereare no photo-etched parts. All thelater-addition weaponry used by thevessel in 1945 is included, notablythe 24 x 40mm Bofors anti-aircraftguns. There is a one-page PartsLocation Diagram which is essentialfor the correct identification ofthe parts awaiting assembly.(Interestingly, this chart lists nofewer than 45 parts that will not beneeded for this particular kit, leadingto the thought that this model mayat some stage become available inits pre-World War Two guise). Theassembly instructions themselvesare contained in an 8-page, 12-stageformat that leads the assemblerclearly and carefully through thecomplex process of creatingthis vessel out of its several 100constituent parts.I have no doubt that, oncepainted and assembled, this wellpricedkit will provide a worthwhilereplica of a ship that has an iconicstatus in the naval history of herhome country.Fred LeddenPrice £34.99UK distributors Pocketbond,PO Box 60, Welwyn, AL6 0ND.Dragon Models LtdFlakpanzer V “Coelian”in 1:72 scaleYears ago Dragon released a1:35 scale kit of the Coelianprototype twin 3.7cm AA tankbased on a Panther Ausf Gchassis. While the actual vehiclenever went into production fora number of reasons (mostlydelays and a bigger need forgun tanks) it has always beenpopular with Panther fans as afairly attractive vehicle. Dragonhas now returned with a 1:72scale version of this vehiclebased on their Ausf G kits with atotally new turret as item 7236.The hull consists of threeparts - upper, lower and sternplate. The roadwheel arms arepre-moulded into the lower hull,but in the case of this kit usestotally separate wheels for eachaxle. The idler wheel consistsof two parts and even the smallintermediate roller is included.The tracks now come as withall recent Dragon 1:72 scale kitswith an indicator that the tracksare to be 182mm in overalllength. These measured out at183mm, but once formed to theright ‘sag’ should appear righton the money. All side detailsare separate but the pioneertools and OVM come ‘bundled’into assemblies for simplerinstallation.All hatches are moulded inplace on both the hull and turretwith the exception of the enginedeck, which comes with thefalse engine to cover the screwassembly mount in the oldermould hull bottom. (The otherone goes under the machinegun blister on the glacis, butno screws are provided forassembly.) Anyone wantingto use figures in the hatcheshas some work on his handsto make changes. As thereare no etched-brass parts anymodellers wanting them willhave to either borrow from anearlier Dragon kit or seek aftermarketparts.The turret makes good useof slide moulding to capturedetails with the drum trappedfor elevation. The barrels havehollow flash hiders, which is anice touch in this scale.Two finishing options areprovided: ‘Unidentified Unit’Germany 1945 (3-colour withblack crosses); Unidentified Unit,1945 (sand with a primer redturret, black crosses).A tiny sheet of six crosses fromCartograf is provided.Overall Panther fans will behappy to see this vehicle inthis scale to join the previousPanther releases.Cookie SewellPrice £19.99Dragon Models Ltd., Kong NamIndustrial Building, 10/F, B1,603-609 Castle Peak Road, TsuenWan, New Territories, Hong Kong.Tel: 2493 0215. Fax: 2411 0587.info@dragon-models.comwww.dragon-models.comUK distributors, The HobbyCompany, Milton KeynesMK5 8PG.72<strong>Military</strong> <strong>Modelling</strong> Vol.43 No.7 <strong>2013</strong>
Product reviewsMengPickup w/ZU-23-2 in 1:35 scaleMeng certainly caused a stirwith their first Pick-up basedupon a later model well-knownpickup, it was well detailed butmany criticised the release as ascaled down 1:24 scale car kit.This latest release (item VS-004)has gone a long way to correctthese and they now present anolder model Pickup. This releasesuspiciously looks like a Toyota70 series Land Cruiser it avoidsany licensing issues by nothaving a definitive grille and bynaming the kit ‘Pickup’.The name ‘Technical’ hasbeen applied to many expedientmilitary vehicles seen all overthe world in the many conflictsthat we have seen in moderntimes. During the recent people’srevolution in Libya many of thesevehicles where seen on thenews broadcasts and some ofthese image’s began appearingon websites. This release fromMeng provides us with just sucha vehicle it is a regular pickupwith a ‘field modification’ of aplatform mounted ZU 23-2 antiaircraftcannon (23mm calibreand two barrels). The kit ispresented in medium size boxthat comprises of two models,the pickup and the ZU23-2,moulded in tan, black, green andclear styrene with vinyl tyres,a small sheet of etched-metal,decals and set of poly caps.Construction begins with thechassis before moving on to thecab interior, including sun visorsand rear view mirror, and thenthe cab exterior. The cab hasbeen moulded in an unusual wayas the cab roof is a separate partallowing the modeller to producea vehicle similar to those seenduring recent conflicts. Thecargo bed has separate topedges that allowed Meng tomould the tie-down hooksalthough fragile they certainlywill look quite realistic. The cabdoors are separate with nicelyrendered interior panels withindividual side windows. Oncethe main components are addedincluding the wheels the vehicleis complete.Construction moves on tothe ZU23-2, the main guns haveslide moulded flash hiders andit is at an early stage that themodeller should choose whatelevation the guns are to be setat. With some careful work andwith a little fabrication the gunscould be made moveable. Theinstructions include assemblyinstructions for the ammunitionboxes but do not include theammunition belts. The weaponsights are quite delicate as arethe seats for the operators. Thelatter part of the constructiondeals with the turntable andthe expedient field modifiedplatform. The final stages dealwith fitting the wheels and tyresfor versions either on a groundmount or being towed by aprime mover.With individual colours beingcalled out during the build theinstructions give the modellera mere two schemes. With thevariation seen in many of thesevehicles the modeller has quitesome leeway with painting.Highly recommended for allmodern, and not so modern,era fans. The separate roof,doors and separate windscreenall make this a very welcomerelease. The ZU23-2 can eitherbe included or used separatelyor replaced with one of themany other ad-hoc weaponsseen on this kind of vehicle, itcould even be used as a plaincivilian vehicle. The lack ofseparate bonnet and may beseen as a disadvantage butgiven time the after-marketproducers may offer something.As noted above with work theZU23-2 can be made ‘workable’although not critical may proveadvantageous when adding it toa diorama. Bottom line two kitsin one box – many modellersare likely to pick up more thanone for the excellent ZU23-2 andwe are likely to see cross-kittingwith the earlier release.Brian O’Donoghuewww.meng-model.comAvailable in the UK fromHannantswww.hannants.co.ukRevellHMS Kelly (HMS Kipling) in1:700 scalePurchasers of this kit (item05120) have the choice ofmaking this model of a SecondWorld War ‘K’ class destroyerto the precise specification ofeither HMS Kelly – at one timethe command of Lord LouisMountbatten – or of her lesswell-known sister ship, HMSKipling. The vessels differ onlyslightly, in superstructure and inweaponry.In 1:700 scale this destroyerkit is inevitably very small,indeed its overall length is only15.5mm, or 6”. This means thatthe assembler must be capableof working with a continuoussupply of small, sometimesminute, parts. That said, Revellsupply a clear and concise set ofinstructions to follow.I would suggest that thismodel would serve well for anenthusiastic but inexperiencedmodeller – of whatever age - asan introduction to the complextasks that lie in wait in the muchlarger and more expensive kitscurrently on the market. At£6.50 this product representsgood value for money and, for allyoungsters who deserve everyencouragement, lies well withinpocket money range.Whichever model is made,the histories these vessels aresadly similar. They were bothlaunched in the run up to theSecond World War and wereboth sunk by Luftwaffe aircraftin the Mediterranean Sea. HMSKelly succumbed in May 1941off the coast of Crete with heavyloss of life, whilst HMS Kiplingserved for another year till sunkoff the coast of North Africa inMay 1942.Fred LeddenPrice £6.50Revell model kits are availablefrom all good toy and modelretailers.For further information visitwww.revell.euwww.militarymodelling.com73
Product reviewsDragon Models LtdSd.Kfz. 3 Maultier Ambulancein 1:35 scaleAs well as the open body cargovariants of the Opel Blitz 3-tontruck, the Germans also builta large number of closed or‘Box Body’ variants for variouspurposes. The most common ofthese were long-range radio vansand ambulances. Dragon hasnow released a kit (item 6766)that combines an all-new boxbody for the ambulance variantwith their Maultier half-trackconversion of the 3-tonner.Back in 1999 Italeri releaseda kit of the cargo truck as a boxbody with the Einheitskoffer bodyvariant. Now Dragon has updatedthat with this body, which shouldbe a drop fit onto the cargo truckchassis (and comes with wheelwells to prove it) and will probablybe released soon for that versionas well. But this variant is forthe ambulance, and Dragonhas provided a full interior forthat version complete with ninestretchers, racks, and fittings.The interior is complete but asnoted rather crowded as oncethe nine stretchers are in placethere is no room for an attendantor medic to move around. Theracks are quite involved, and as apoint of fact this kit adds a totalof 196 new parts to the existingmoulds to replicate the variant.As with its predecessor Blitzcargo versions this is a typicalDragon kit of recent vintagewith lots of slide mouldedparts – and far fewer of themthan the armoured vehicle kits.The kit includes a nicely doneradiator shell with open bars andetched-brass Opel Blitz badging.It comes with a complete engineand nicely done hood framefor opening the hood to viewthe engine. Also the driver’scompartment is complete withall pedals, levers and ‘stick-on’instruments for the panel (A16).Doors have inside and outsidehandles and separateclear windows.This kit receives atotally new chassis andsuspension, with themulti-piece tyresfor the front and afairly intricate rearsuspension. The modeller getsboth early (six bolt) and late (eightbolt) wheels to choose from aswell. A new engine block andcrankcase are provided for themodified driveline.Where modellers will probablystart to hate this kit is whenthey go to install the tracks.The links are Panzer I links andvery tiny – about the size of thatof a medium tank in HO scale(1:87) and very, very petite. Eachlink is only 6 x 3mm and thereis not much surface for gluingprovided. I would recommend acombination of Tamiya Orangeand Green or even Testors’Liquid Cement on them, and youwill need to make a jig of somesort for the best results. Dragonreally should think of making DSPlastic tracks for these kits.Two different finishing optionsare provided for the model:Unidentified Unit, 1943 (sandwith green/brown overspray,red crosses, registration plateWH-1618714); Unidentified Unit,1943 (sand overall, no markings,no registration plate given). Asmall sheet of Cartograf decalsis provided.Overall, this kit expands onDragon’s Blitz family and bodeswell for other versions to follow.But as before the tracks willfrustrate some modellers.Cookie SewellPrice £49.99Dragon Models Ltd., Kong NamIndustrial Building, 10/F, B1, 603-609 Castle Peak Road, Tsuen Wan,New Territories, Hong Kong.Tel: 2493 0215. Fax: 2411 0587.info@dragon-models.comwww.dragon-models.comUK distributors, The HobbyCompany, Milton KeynesMK5 8PG.74<strong>Military</strong> <strong>Modelling</strong> Vol.43 No.7 <strong>2013</strong>
Product reviewsF. M. BeneitoZulu War 65mmcavalry figure kitsThe Durban Mounted Riflesand the Frontier Light Horse,at the time of the Zulu War1879 form the subjects for ‘twofigures in one box’ (item BE03)from Spanish manufacturer F.M. Beneito, who manufactureswhite metal figure kits to anuncommon nominal figureheight of 60-65mm, (1:30 scaleapprox) in addition to other moreconventional ‘sizes’ in theirextensive range. Beneito havebeen in the miniature figure kitbusiness since 1983.Both figures wear ‘frogged’patrol jackets, (popular withmost arms in late Victorianarmies) cartridge bandoleersand pistol holsters, with MartiniHenry carbines – these havecustom ‘sporter’ stocks (to usemodern terminology) rather thanthe fully-stocked, issue MartiniHenry rifles and carbines. Thetrooper of the Durban MountedRifles carries his carbine withthe butt on his hip, whereas theFrontier Light Horseman holdshis, with the butt on the ground.Paired together these presenta good contrast in colours – theDurban Mounted Rifleman in darkblue with red ‘frogging’ and whitehelmet, against the Frontier LightHorseman’s buff coloured jacketwith black ‘frogging’ and a greyslouch hat with red pugree anddark brown riding breeches.The white metal casting of kitparts is fair, it could be crisper,but don’t expect the fidelity ofresin cast figures. Detail is soft inparts and there is a little flash andsome ‘pin prick’ sized surfaceblowholes that need treatingbefore the figures are assembledand primed. Anatomy isn’t toobad, but features like the handsare a bit ‘lumpy’, but nothingthat can’t be improved upon orreplaced. Watch the rifle barrels,however, they are fine and soft,and will bend, and eventuallybreak after too much bending.Apparently the figures areavailable only as a pair, and itsays on the box that there areinstructions and a catalogueinside, but our review samplebox contained neither. We didhave an extra cast scenic base inthe box though!Available, plus p&p, fromHistorex Agents, WellingtonHouse, 157 Snargate Street,Dover, Kent CT17 9BZ.sales@historex-agents.co.ukwww.historexagents.comKen JonesPrice £32.45Miniaturas F. M. Beneito,Marcenado, 31, 28002 – Madrid,Spain.www.beneito.combeneito@beneito.comMouse ArmourConversion set for Light TankMk.VIA and Australian LightTank decals in 1:35 scaleThe Light Tank Mk.VI series wasproduced in four versions withdetail changes between the types.Mk.VIA was the second type with110 vehicles built in the 1930s.Compared to the later VIB it hadthe same suspension systembut used a different system ofcooling louvres for the engineand an octagonal commander’scupola. This makes ‘back dating’Vulcan’s Mk.VIB kit item 56008(see MM Vol.41 No.15 for a reviewand Vol.43 No.3 for a build article)relatively easy as long as you havesuitable references.Australian company MouseArmour have produced asimple resin update set (itemMA150) which saves you timeresearching and making thenew parts. It consists of nineitems cleanly moulded in palegreen resin. Two of thesereplace the engine cover withthe correct pattern and thesecond louvre cover while fiveare for the cupola with basicbody, separate hatch flaps andbump stops. The other partsprovide the strengthening rib onthe turret roof and the small flapon the lower hull front.Using them is straightforward,parts are cut from the pour blocksand mostly replace the equivalentkit plastic parts following theinstructions which include usefulphotos of the cupola and enginedeck of one of the surviving tanksat the Royal Australian ArmouredCorps Museum at Puckapunyal.The Mk.VIAs were used inNorth Africa during the earlydesert battles as well as beingused by the Australian Armyat home. Ten vehicles werebought, these arrived in 1937and were used pre-war andlater for training. Although theyretained their original Britishcensus numbers they did getnew registration numbers andeach was given the name ofan indigenous animal or bird.Australian units in the MiddleEast used Mk.VIA and VIB tanksfrom British stocks with theDivisional Cavalry Regiments oftheir infantry divisions.<strong>Modelling</strong> one of theseAustralian owned or mannedtanks has been made easierthanks to decal set MAD618. Ithas complete markings for fourMk.VIA of two different unitsincluding civilian-style registrationplates, the multicoloured markingwith census and unit details andindividual names. Middle East tanksare covered by Division markingsfor each of the 6th, 7th and 9thDivisions and arm of servicemarkings for Divisional CavalryRegiments. Enough markings areprovided for at least four vehicles.Decals are clearly printed witha glossy finish, each item willneed to be cut out as they are ona single piece of backing sheetand given a matt coating when inplace. Instructions show whichMk.VIA markings go with whichwith a photo showing typicallayout for Middle East tanks.<strong>Modelling</strong> a Light Tank Mk.VIAin use by anyone is madeeasier by the update set whilemarking up an Australian tankis straightforward thanks to thedecals. Both are available directfrom Mouse House via theirwebsite www.mheaust.com.auBoth update set MA150 and decalset MAD618 are priced at AUS$12 each plus post and packingcharges. Payment can be madeusing PayPal and my sets weredelivered to me in the UK only afew days after placing my order.Peter Brownwww.militarymodelling.com75
Product reviewsLife MiniaturesWaffen SS infantryman bustin 1:10 scaleLife Miniatures of Seoul, Koreahas added a new bust titled,“Waffen-SS Infantryman,Ardennes 1944” (item LM-B004)to their range. The sculptorof the work is Sang-Eon Leewho also painted the pictureof the completed model inthe colour photo on the boxtop, which is the sole paintingguide supplied. However, avisit to Life Miniatures’ websitehttp://lifeminiatures.kr willreveal how to paint the face ina well-presented step-by-stepfeature. More photos on thesite show the other busts in LifeMiniatures’ range.There are five parts to the kit,upper torso, right hand holding apiece of bread, head and helmetplus a cast resin rod to mountthe bust to a base. Cast in lightgrey polyurethane resin, the partshave much fine surface detail.There are blocks attached to theparts that need careful removalduring clean up before assembly.The soldier is depicted ashaving just taken a bite fromthe piece of bread in his righthand and his partly open mouthreveals the just bitten off pieceprotruding between his teeth,and an impression of the saidpiece swelling the right cheek.Sang-Eon Lee has captured thisaction very well. He has made anexcellent job of painting it too, asphotos of his work reproducedhere show.Life Miniatures’ kits areavailable from Historex Agents,Wellington House, 157 SnargateStreet, Dover, Kent CT17 9BZ.sales@historex-agents.co.ukwww.historexagents.comKen JonesPrice £44.30 plus p&pLife Miniatures, #103, KAIST2,155-8, Anambong 2ga,Sungbukgu, Seoul, Korea.http://lifeminiatures.krMiniArtSoviet Limber 52-R-353M Mod.1942 in 1:35 scaleSoviet artillery was very oldfashionedat the beginning of theSecond World War in that each gunusually had a horse-drawn limberfor each weapon that served bothas a towing vehicle and ammunitioncarrier. But as motorization crept inthe Soviets adapted their limbers tovehicle towing.This very common limberwas one of the most widelyused of the entire ‘GreatPatriotic War’ and served justabout all light guns. Therewere either cases for lightammunition (e.g. 45mm antitankshells) or trays for thelarger ones (57mm, 76mm of alltypes). The design was prettyspartan with a simple woodenslat seat on the top of theammunition chest and storagefor only a few other items suchas a hatchet and shovel. Photosshow some units were ableto get two or more for eachgun and thus create quite anartillery ‘train’ with one vehicletowing two limbers and thegun they supported.Years ago Maquette releaseda kit of this same limber, butit consisted of only 32 parts,was designed only for vehicletowing, and really wasn’t verydetailed. MiniArt has releasedthis limber as part of other kits(such as their horsedrawn SovietDivisional Artillery - item 35045)and other guns. They nowoffer it as a separate kit (item35115) which offers the optionof adding it to a tractor kit fromanother model firm or using it toadd a second limber to one ofMiniArt’s kits.The kit is excellent in mostareas and does come with thecomplete set of 52-Ch-0331and 52-Ch-0332 horsedrawnharnesses for use with any sparehorses the modeller may have.The directions cover the differentmeans of assembly for eithertowing or horsedrawn fittings.The wheels on this kit arebased on those from the newGAZ-AA/AAA kits from MiniArtand are very nicely done.The ammunition bin isunfortunately a sealed item andcontains no trays, which is a bitof a shame considering the detailon the rest of the kit is first-rate.It does mean the modeller canuse it with any light gun andtractor and also that there willnot be a problem with variouskits tailored for specific guns.No decals are included andfinishing instructions (4BO green!)are on the back of the box.Overall this is a handy, ifexpensive kit, and one thatwill probably find use behinditems like the new STZ-5,Komsomolets and other tractorswhich are now on sale.Cookie Sewell76<strong>Military</strong> <strong>Modelling</strong> Vol.43 No.7 <strong>2013</strong>
Product reviewscyber-hobby.comSd.Kfz. 141/3 Pz.Kpfw. III (F1)in 1:35 scaleDragon’s boutique affiliate cyberhobby.comhas now releasedthe flamethrower conversion ofthe Panzer III Ausf M as theirlatest kit (cyber-hobby.com item79, Dragon item 6616). It addsa single sprue of eight partswith the flamethrower barrel toreplace the parts found in theAusf M with wading muffler kit(item 6658).One hundred Panzer III AusfM models were converted foruse as flamethrowers for combatin Stalingrad, but by the time thetanks were ready Stalingrad hadalready fallen. As a result, thetanks only began to be fieldedin mid-1943 for the attack onKursk with both the 11th PanzerDivision and Grossdeutschlandnoted as having these vehicles.The tank mounted a 14mmflamethrower and carried 1,000litres of fuel for the weapon; asit retained all around traverseof the turret it was more usefulthan the fixed flamethrowermounted on the StuG III chassis.A reduced crew of three wascarried in this version.As with its parent kit, it is acase of ‘mix and match’ usingthe later Dragon Ausf J/L andAusf N kit sprues with somenew bits or replacement of someof the older ones. It comes withthe split hatch early PzKpfw IVstyle cupola and other earlierproduction parts.The hull pan is a later oneminus the side hatches andother detail changes suchas the three return rollerassemblies. It retains the fulltorsion bar suspension fromthe other kit and the detailedsuspension components andmuffler assembly. As with theStuG all hatches are separatewith some interior detailsand can be positioned as themodeller chooses. All enginedeck ventilators are spaced andmounted on separate frames toget the correct appearance and‘lift’ needed to give an accuraterepresentation of the original.The kit provides options forblackout or clear headlight lensesand the kugel mount for the bowmachine gun. All viewports andviewers may be positioned openor closed as well.Once again this kit includesthe rudiments of an interior,which accurate as far as theygo. This should please the ‘aftermarketboys’ as there is morethan enough room for a niceresin interior here and enoughports and hatches to see it.This kit offers the 40cmDS Plastic tracks which manymodellers prefer if only for thereason that it cuts four to 12-hoursof their build time. Dragon doesnot indicate the length of thetracks needed as they do withtheir 1:72 scale kits so I cannotdetermine if they will have a looseor tight fit. Note that the tracksare dubbed ‘L’ and ‘R’ in theparts sheet but ‘Y’ and ‘Z’ in theinstructions – just note that fromhead-on the ‘bar’ part of the tracklink faces down and there is a bolthead on the outside of the track.Even with two identifieduser units, the kit providesonly one finishing option:Unidentified Unit, EasternFront 1943 (sand, nomarkings). (Note that thephoto on Page 69 of theChamberlain/Ellis/Jentzencyclopedia shows a sandpainted FL with crosses on thehull sides and rear, some sortof divisional insignia, and theturret number 107 in what maybe red with a white outline.)Cartograf provides a smallsheet with red and white turretnumbers, crosses, and a goodselection of divisional insignia.Overall this is at least avehicle which WAS built andsaw service and fills in a nichein Panzer III variants.Cookie SewellDragon Models Ltd., Kong NamIndustrial Building, 10/F, B1,603-609 Castle Peak Road,Tsuen Wan, New Territories,Hong Kong. Tel: 2493 0215.Fax: 2411 0587.www.cyber-hobby.cominfo@dragon-models.comwww.dragon-models.comwww.militarymodelling.com77
28 Years of Premier <strong>Military</strong> <strong>Modelling</strong>21st-22nd September <strong>2013</strong>The Leas Cliff Hall, FolkestoneCOMMANDRESPECTBe recognised for yourtalent in model making!Enter one of the 32Competition classes opento modellers this year.The international judgingpanel will award the topmodellers by recognisingprecision and representationalaspects of eachmodel in their class.DON’T MISSDemonstrations by leading expertsthroughout the showOver 60 traders and exhibitors to includeHistorex Agents, Pegaso Models andBadger Air-Brush CompanyThe fi nest models and dioramas in the militarymodelling world on display•Internationaltraders andcompetitors•The fi nest modelsand dioramas in themilitary modellingworld on displayEuro Militaire <strong>2013</strong>>>>Early Bird Tickets
Precision MetalsBringing Precision Metalsto Scale <strong>Modelling</strong>Slide Fit Micro Tubes & More...New product informationavailable on websiteModel by Andy ArgentTM“for the precise model miniaturist”Flex-i-file & AlbionAlloys Glue Applicatorsand Finishing ProductsVisit our updated website for information,video links anddownloadable instruction sheets. All Product available from good model shopswww.albionalloys.co.uk
BriefingErrant Knight bust turnsTemplar SergeantNext issueVolume 43 No.8 will be on sale 2nd August <strong>2013</strong>www.militarymodelling.coml Fort BenningUnited States Army vehicles in close-upl Astrov’s ChildrenReworking Start’s T-40Amphibious Tank kitl A 1:35 scale kit rich in detail!Universal Carrier Mk.I from Riich Modelsl Confederate CavalrymanPainting El Greco Miniatures’ 1:10 scale bustSee more about what’s in <strong>Military</strong> <strong>Modelling</strong> magazine month-to-month in forthcoming issues and see some of the articles you may have missedfrom past issues and subscription offers on our website: www.militarymodelling.comAs a <strong>Military</strong> <strong>Modelling</strong> subscriber you will also be able to unlock modelling articles, have access to the current issue and back numbers you mayhave missed, and other features that do not appear in the magazine or openly on the website’s pages…Don’t forget! Issue No.8 will be published on 2nd August <strong>2013</strong> price £4.40 – don’t miss it! Order your copy now! Or better still why not makeit your first copy in a year’s subscription to <strong>Military</strong> <strong>Modelling</strong> magazine? See our subscriptions offer on page 4 in this issue...MILITAR YAn aerial baiter!Hetzer 2cm FlaK 38 conversionin 1:35 scaleIf you can’t always find a copyof this magazine, help is athand! Complete this form andhand in at your local store,they’ll arrange for a copy ofMODELLINGBEF 18pdr & LimberResicast’s artillery piece“It’s a cracker of a kit!”RussianColossus!Colour modulationtechnique for KV-2Dark Eden Studioeach issue to bereserved for you.Some stores mayeven be able toarrange for it to bedelivered to yourhome. Just ask!Please reserve/deliver my copy of <strong>Military</strong> <strong>Modelling</strong>on a regular basis, starting with issue..........................................Title............... First name.................................................................Surname...........................................................................................Address.....................................................................................................................................................................................................................................................................................................................Postcode...........................................................................................Telephone number..........................................................................Visit our website at www.militarymodelling.com it’s only a few clicks away!MM Vo43 No7cover.indd 1 20/06/<strong>2013</strong> 09:14£4.405th <strong>July</strong> <strong>2013</strong>If you don’t want to miss an issueContents may be subject to change.80<strong>Military</strong> <strong>Modelling</strong> Vol.43 No.7 <strong>2013</strong>
ClassifiedsCLASSIFIEDSBOOKS // KITS // MODELS// SHOP GUIDES //Euro Militaire <strong>2013</strong>21st-22nd SeptemberThe LeasCliff Hall,FolkestoneBook yourSTANDNOW!Book now (01993) 709545ordavid.holden@myhobbystore.comBIRMINGHAMMASSACHUSETTESGLASGOWMID GLAMORGANAdvertisers’ IndexAAlbion Alloys 79Amerang 9BBarwell Body Works 8 & 79MM Binders 79Bookworld Wholesale 10 &11CCenturion Toy Soldiers 15Classified & Shop Guides 81 & 82Crown <strong>Military</strong> Miniatures 2EEuro Militaire Show 78Everything Airbrush 8FFirst Corps 15HHistorex 6 & 7LLSA Models 5OOptum Sylmasta 8PPocketbond 71SSubscriptions 4VVectis Auctions 83WWelsh Dragon Models 84Widespread Graphic Air 79www.militarymodelling.com 97 81
ClassifiedsPRECISION ICE AND SNOWfor the realistic depiction of snow and ice effects in all scalemodelling.‘The finest snow effects on earth’Www.precisioniceandsnow.comOrders@precisioniceandsnow.comTEL 01299 251497www.modelskills.co.ukA comprehensive range of tools, decals and fittings forthe bi-plane and general aviation modeller.Turnbuckles, rigging accessories, strut making tools,Uschi van der Rosten decals & paints and thinnersGeneral Enquiries : 01202 51123282<strong>Military</strong> <strong>Modelling</strong> Vol.43 No.7 <strong>2013</strong>