
Create successful ePaper yourself
Turn your PDF publications into a flip-book with our unique Google optimized e-Paper software.
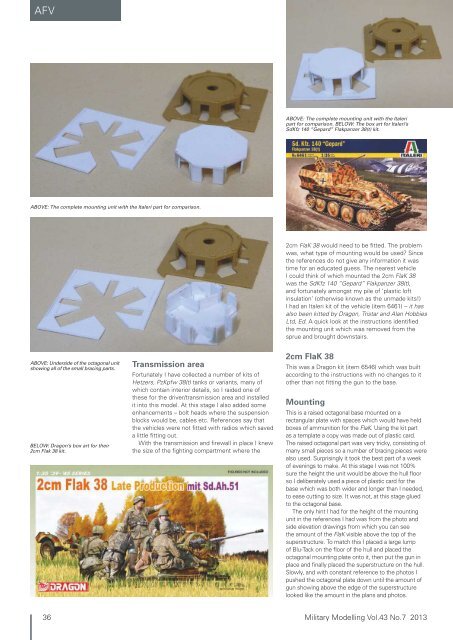
AFVABOVE: The complete mounting unit with the Italeripart for comparison. BELOW: The box art for Italeri’sSdKfz 140 “Gepard” Flakpanzer 38(t) kit.ABOVE: The complete mounting unit with the Italeri part for comparison.2cm FlaK 38 would need to be fitted. The problemwas, what type of mounting would be used? Sincethe references do not give any information it wastime for an educated guess. The nearest vehicleI could think of which mounted the 2cm FlaK 38was the SdKfz 140 “Gepard” Flakpanzer 38(t),and fortunately amongst my pile of ‘plastic loftinsulation’ (otherwise known as the unmade kits!)I had an Italeri kit of the vehicle (item 6461) – it hasalso been kitted by Dragon, Tristar and Alan HobbiesLtd, Ed. A quick look at the instructions identifiedthe mounting unit which was removed from thesprue and brought downstairs.ABOVE: Underside of the octagonal unitshowing all of the small bracing parts.BELOW: Dragon’s box art for their2cm Flak 38 kit.Transmission areaFortunately I have collected a number of kits ofHetzers, PzKpfw 38(t) tanks or variants, many ofwhich contain interior details, so I raided one ofthese for the driver/transmission area and installedit into this model. At this stage I also added someenhancements – bolt heads where the suspensionblocks would be, cables etc. References say thatthe vehicles were not fitted with radios which saveda little fitting out.With the transmission and firewall in place I knewthe size of the fighting compartment where the2cm FlaK 38This was a Dragon kit (item 6546) which was builtaccording to the instructions with no changes to itother than not fitting the gun to the base.MountingThis is a raised octagonal base mounted on arectangular plate with spaces which would have heldboxes of ammunition for the FlaK. Using the kit partas a template a copy was made out of plastic card.The raised octagonal part was very tricky, consisting ofmany small pieces so a number of bracing pieces werealso used. Surprisingly it took the best part of a weekof evenings to make. At this stage I was not 100%sure the height the unit would be above the hull floorso I deliberately used a piece of plastic card for thebase which was both wider and longer than I needed,to ease cutting to size. It was not, at this stage gluedto the octagonal base.The only hint I had for the height of the mountingunit in the references I had was from the photo andside elevation drawings from which you can seethe amount of the FlaK visible above the top of thesuperstructure. To match this I placed a large lumpof Blu-Tack on the floor of the hull and placed theoctagonal mounting plate onto it, then put the gun inplace and finally placed the superstructure on the hull.Slowly, and with constant reference to the photos Ipushed the octagonal plate down until the amount ofgun showing above the edge of the superstructurelooked like the amount in the plans and photos.36<strong>Military</strong> <strong>Modelling</strong> Vol.43 No.7 <strong>2013</strong>