
You also want an ePaper? Increase the reach of your titles
YUMPU automatically turns print PDFs into web optimized ePapers that Google loves.
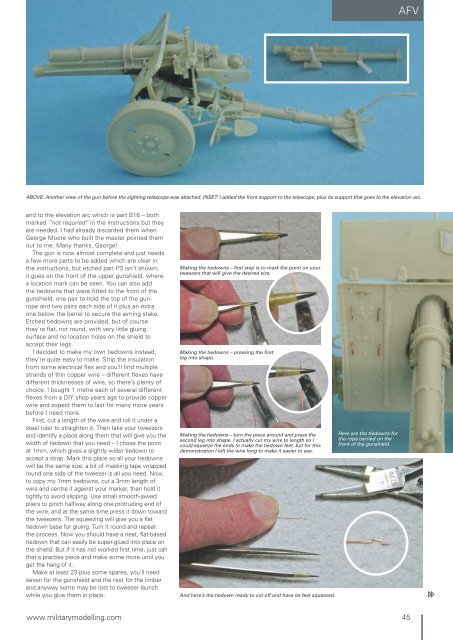
AFVABOVE: Another view of the gun before the sighting telescope was attached. INSET: I added the front support to the telescope, plus its support that goes to the elevation arc.and to the elevation arc which is part B16 – bothmarked “not required” in the instructions but theyare needed. I had already discarded them whenGeorge Moore who built the master pointed themout to me. Many thanks, George!The gun is now almost complete and just needsa few more parts to be added which are clear inthe instructions, but etched part P3 isn’t shown;it goes on the front of the upper gunshield, wherea location mark can be seen. You can also addthe tiedowns that were fitted to the front of thegunshield, one pair to hold the top of the gunropeand two pairs each side of it plus an extraone below the barrel to secure the aiming stake.Etched tiedowns are provided, but of coursethey’re flat, not round, with very little gluingsurface and no location holes on the shield toaccept their legs.I decided to make my own tiedowns instead;they’re quite easy to make. Strip the insulationfrom some electrical flex and you’ll find multiplestrands of thin copper wire – different flexes havedifferent thicknesses of wire, so there’s plenty ofchoice. I bought 1 metre each of several differentflexes from a DIY shop years ago to provide copperwire and expect them to last for many more yearsbefore I need more.First, cut a length of the wire and roll it under asteel ruler to straighten it. Then take your tweezersand identify a place along them that will give you thewidth of tiedown that you need – I chose the pointat 1mm, which gives a slightly wider tiedown toaccept a strap. Mark this place so all your tiedownswill be the same size; a bit of masking tape wrappedround one side of the tweezer is all you need. Now,to copy my 1mm tiedowns, cut a 3mm length ofwire and centre it against your marker, then hold ittightly to avoid slipping. Use small smooth-jawedpliers to pinch halfway along one protruding end ofthe wire, and at the same time press it down towardthe tweezers. The squeezing will give you a flattiedown base for gluing. Turn it round and repeatthe process. Now you should have a neat, flat-basedtiedown that can easily be super-glued into place onthe shield. But if it has not worked first time, just callthat a practise piece and make some more until youget the hang of it.Make at least 23 plus some spares, you’ll needseven for the gunshield and the rest for the limberand anyway some may be lost to tweezer launchwhile you glue them in place.Making the tiedowns – first step is to mark the point on yourtweezers that will give the desired size.Making the tiedowns – pressing the firstleg into shape.Making the tiedowns – turn the piece around and press thesecond leg into shape. I actually cut my wire to length so Icould squeeze the ends to make the tiedown feet, but for thisdemonstration I left the wire long to make it easier to see.And here’s the tiedown ready to cut off and have its feet squeezed.Here are the tiedowns forthe rope carried on thefront of the gunshield.www.militarymodelling.com45