
Create successful ePaper yourself
Turn your PDF publications into a flip-book with our unique Google optimized e-Paper software.
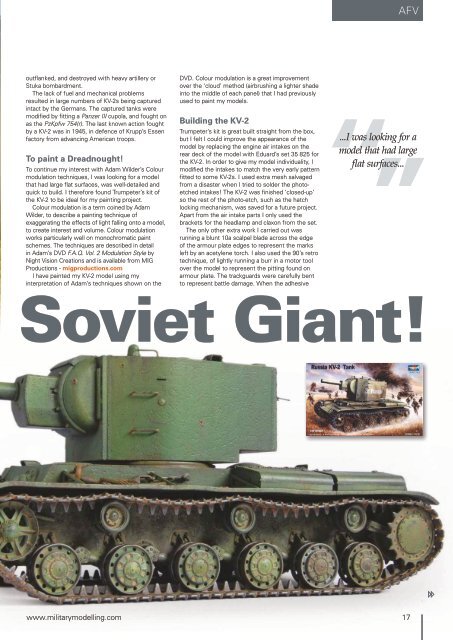
AFVoutflanked, and destroyed with heavy artillery orStuka bombardment.The lack of fuel and mechanical problemsresulted in large numbers of KV-2s being capturedintact by the Germans. The captured tanks weremodified by fitting a Panzer III cupola, and fought onas the PzKpfw 754(r). The last known action foughtby a KV-2 was in 1945, in defence of Krupp’s Essenfactory from advancing American troops.To paint a Dreadnought!To continue my interest with Adam Wilder’s Colourmodulation techniques, I was looking for a modelthat had large flat surfaces, was well-detailed andquick to build. I therefore found Trumpeter’s kit ofthe KV-2 to be ideal for my painting project.Colour modulation is a term coined by AdamWilder, to describe a painting technique ofexaggerating the effects of light falling onto a model,to create interest and volume. Colour modulationworks particularly well on monochromatic paintschemes. The techniques are described in detailin Adam’s DVD F.A.Q. Vol. 2 Modulation Style byNight Vision Creations and is available from MIGProductions - migproductions.comI have painted my KV-2 model using myinterpretation of Adam’s techniques shown on theDVD. Colour modulation is a great improvementover the ‘cloud’ method (airbrushing a lighter shadeinto the middle of each panel) that I had previouslyused to paint my models.Building the KV-2Trumpeter’s kit is great built straight from the box,but I felt I could improve the appearance of themodel by replacing the engine air intakes on therear deck of the model with Eduard’s set 35 825 forthe KV-2. In order to give my model individuality, Imodified the intakes to match the very early patternfitted to some KV-2s. I used extra mesh salvagedfrom a disaster when I tried to solder the photoetchedintakes! The KV-2 was finished ‘closed-up’so the rest of the photo-etch, such as the hatchlocking mechanism, was saved for a future project.Apart from the air intake parts I only used thebrackets for the headlamp and claxon from the set.The only other extra work I carried out wasrunning a blunt 10a scalpel blade across the edgeof the armour plate edges to represent the marksleft by an acetylene torch. I also used the 90’s retrotechnique, of lightly running a burr in a motor toolover the model to represent the pitting found onarmour plate. The trackguards were carefully bentto represent battle damage. When the adhesive‘‘...I was”looking for amodel that had largeflat surfaces...Soviet Giant!www.militarymodelling.com17