
Create successful ePaper yourself
Turn your PDF publications into a flip-book with our unique Google optimized e-Paper software.
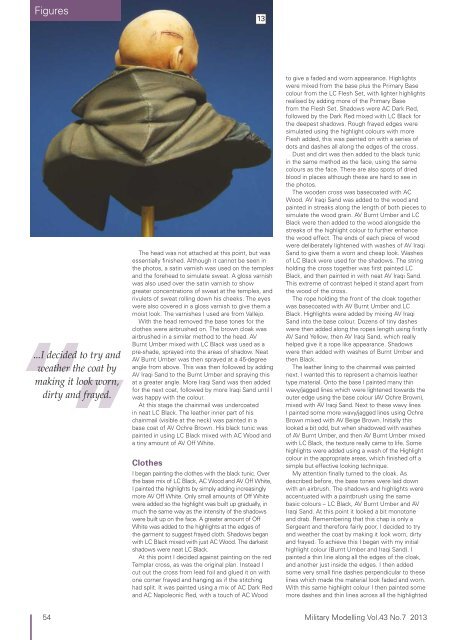
Figures13‘‘...I decided”to try andweather the coat bymaking it look worn,dirty and frayed.ClothesThe head was not attached at this point, but wasessentially finished. Although it cannot be seen inthe photos, a satin varnish was used on the templesand the forehead to simulate sweat. A gloss varnishwas also used over the satin varnish to showgreater concentrations of sweat at the temples, andrivulets of sweat rolling down his cheeks. The eyeswere also covered in a gloss varnish to give them amoist look. The varnishes I used are from Vallejo.With the head removed the base tones for theclothes were airbrushed on. The brown cloak wasairbrushed in a similar method to the head. AVBurnt Umber mixed with LC Black was used as apre-shade, sprayed into the areas of shadow. NeatAV Burnt Umber was then sprayed at a 45-degreeangle from above. This was then followed by addingAV Iraqi Sand to the Burnt Umber and spraying thisat a greater angle. More Iraqi Sand was then addedfor the next coat, followed by more Iraqi Sand until Iwas happy with the colour.At this stage the chainmail was undercoatedin neat LC Black. The leather inner part of hischainmail (visible at the neck) was painted in abase coat of AV Ochre Brown. His black tunic waspainted in using LC Black mixed with AC Wood anda tiny amount of AV Off White.I began painting the clothes with the black tunic. Overthe base mix of LC Black, AC Wood and AV Off White,I painted the highlights by simply adding increasinglymore AV Off White. Only small amounts of Off Whitewere added so the highlight was built up gradually, inmuch the same way as the intensity of the shadowswere built up on the face. A greater amount of OffWhite was added to the highlights at the edges ofthe garment to suggest frayed cloth. Shadows beganwith LC Black mixed with just AC Wood. The darkestshadows were neat LC Black.At this point I decided against painting on the redTemplar cross, as was the original plan. Instead Icut out the cross from lead foil and glued it on withone corner frayed and hanging as if the stitchinghad split. It was painted using a mix of AC Dark Redand AC Napoleonic Red, with a touch of AC Woodto give a faded and worn appearance. Highlightswere mixed from the base plus the Primary Basecolour from the LC Flesh Set, with lighter highlightsrealised by adding more of the Primary Basefrom the Flesh Set. Shadows were AC Dark Red,followed by the Dark Red mixed with LC Black forthe deepest shadows. Rough frayed edges weresimulated using the highlight colours with moreFlesh added, this was painted on with a series ofdots and dashes all along the edges of the cross.Dust and dirt was then added to the black tunicin the same method as the face, using the samecolours as the face. There are also spots of driedblood in places although these are hard to see inthe photos.The wooden cross was basecoated with ACWood. AV Iraqi Sand was added to the wood andpainted in streaks along the length of both pieces tosimulate the wood grain. AV Burnt Umber and LCBlack were then added to the wood alongside thestreaks of the highlight colour to further enhancethe wood effect. The ends of each piece of woodwere deliberately lightened with washes of AV IraqiSand to give them a worn and cheap look. Washesof LC Black were used for the shadows. The stringholding the cross together was first painted LCBlack, and then painted in with neat AV Iraqi Sand.This extreme of contrast helped it stand apart fromthe wood of the cross.The rope holding the front of the cloak togetherwas basecoated with AV Burnt Umber and LCBlack. Highlights were added by mixing AV IraqiSand into the base colour. Dozens of tiny dasheswere then added along the ropes length using firstlyAV Sand Yellow, then AV Iraqi Sand, which reallyhelped give it a rope like appearance. Shadowswere then added with washes of Burnt Umber andthen Black.The leather lining to the chainmail was paintednext. I wanted this to represent a chamois leathertype material. Onto the base I painted many thinwavy/jagged lines which were lightened towards theouter edge using the base colour (AV Ochre Brown),mixed with AV Iraqi Sand. Next to these wavy linesI painted some more wavy/jagged lines using OchreBrown mixed with AV Beige Brown. Initially thislooked a bit odd, but when shadowed with washesof AV Burnt Umber, and then AV Burnt Umber mixedwith LC Black, the texture really came to life. Somehighlights were added using a wash of the Highlightcolour in the appropriate areas, which finished off asimple but effective looking technique.My attention finally turned to the cloak. Asdescribed before, the base tones were laid downwith an airbrush. The shadows and highlights wereaccentuated with a paintbrush using the samebasic colours – LC Black, AV Burnt Umber and AVIraqi Sand. At this point it looked a bit monotoneand drab. Remembering that this chap is only aSergeant and therefore fairly poor, I decided to tryand weather the coat by making it look worn, dirtyand frayed. To achieve this I began with my initialhighlight colour (Burnt Umber and Iraqi Sand). Ipainted a thin line along all the edges of the cloak,and another just inside the edges. I then addedsome very small fine dashes perpendicular to theselines which made the material look faded and worn.With this same highlight colour I then painted somemore dashes and thin lines across all the highlighted54<strong>Military</strong> <strong>Modelling</strong> Vol.43 No.7 <strong>2013</strong>