

Domestic-user-manual - Heat pump water Heater
Domestic-user-manual - Heat pump water Heater
Domestic-user-manual - Heat pump water Heater

Create successful ePaper yourself
Turn your PDF publications into a flip-book with our unique Google optimized e-Paper software.
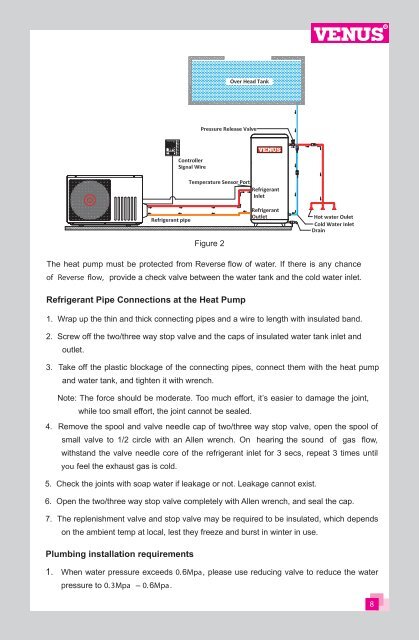
RFigure 2The heat <strong>pump</strong> must be protected from Reverse flow of <strong>water</strong>. If there is any chanceprovide a check valve between the <strong>water</strong> tank and the cold <strong>water</strong> inlet.Refrigerant Pipe Connections at the <strong>Heat</strong> Pump1. Wrap up the thin and thick connecting pipes and a wire to length with insulated band.2. Screw off the two/three way stop valve and the caps of insulated <strong>water</strong> tank inlet andoutlet.3. Take off the plastic blockage of the connecting pipes, connect them with the heat <strong>pump</strong>and <strong>water</strong> tank, and tighten it with wrench.Note: The force should be moderate. Too much effort, it’s easier to damage the joint,while too small effort, the joint cannot be sealed.4. Remove the spool and valve needle cap of two/three way stop valve, open the spool ofsmall valve to 1/2 circle with an Allen wrench. On hearing the sound of gas flow,withstand the valve needle core of the refrigerant inlet for 3 secs, repeat 3 times untilyou feel the exhaust gas is cold.5. Check the joints with soap <strong>water</strong> if leakage or not. Leakage cannot exist.6. Open the two/three way stop valve completely with Allen wrench, and seal the cap.7. The replenishment valve and stop valve may be required to be insulated, which dependson the ambient temp at local, lest they freeze and burst in winter in use.Plumbing installation requirements1. When <strong>water</strong> pressure exceeds 0.6Mpa, please use reducing valve to reduce the <strong>water</strong>pressure to 0. 3Mpa – 0. 6Mpa.8