Encore®
Encore®
Encore®

You also want an ePaper? Increase the reach of your titles
YUMPU automatically turns print PDFs into web optimized ePapers that Google loves.
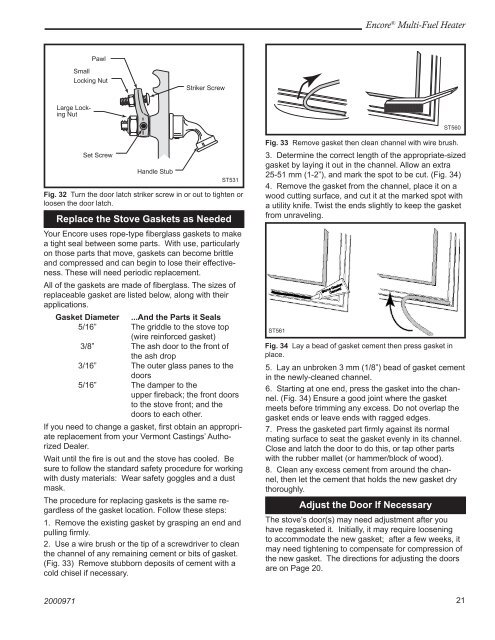
Encore ® Multi-Fuel HeaterPawlSmallLocking NutStriker ScrewLarge LockingNutST560Set ScrewHandle StubST531Fig. 32 Turn the door latch striker screw in or out to tighten orloosen the door latch. ST531Door PawlReplace the Stove Gaskets as Needed11/00Your Encore uses rope-type fiberglass gaskets to makea tight seal between some parts. With use, particularlyon those parts that move, gaskets can become brittleand compressed and can begin to lose their effectiveness.These will need periodic replacement.All of the gaskets are made of fiberglass. The sizes ofreplaceable gasket are listed below, along with theirapplications.Gasket Diameter ...And the Parts it Seals5/16” The griddle to the stove top(wire reinforced gasket)3/8” The ash door to the front ofthe ash drop3/16” The outer glass panes to thedoors5/16” The damper to theupper fireback; the front doorsto the stove front; and thedoors to each other.If you need to change a gasket, first obtain an appropriatereplacement from your Vermont Castings’ AuthorizedDealer.Wait until the fire is out and the stove has cooled. Besure to follow the standard safety procedure for workingwith dusty materials: Wear safety goggles and a dustmask.The procedure for replacing gaskets is the same regardlessof the gasket location. Follow these steps:1. Remove the existing gasket by grasping an end andpulling firmly.2. Use a wire brush or the tip of a screwdriver to cleanthe channel of any remaining cement or bits of gasket.(Fig. 33) Remove stubborn deposits of cement with acold chisel if necessary.Fig. 33 Remove gasket then ST560 clean channel with wire brush.Removegasketgasket by laying it out in the channel. Allow an extra11/30/00 djt3. Determine the correct length of the appropriate-sized25-51 mm (1-2”), and mark the spot to be cut. (Fig. 34)4. Remove the gasket from the channel, place it on awood cutting surface, and cut it at the marked spot witha utility knife. Twist the ends slightly to keep the gasketfrom unraveling.ST561Fig. 34 Lay a bead of gasket cement then press gasket inplace.5. Lay an unbroken 3 mm (1/8”) bead of gasket cementin the newly-cleaned channel.6. Starting at one end, press the gasket into the channel.(Fig. 34) Ensure a good joint where the gasketmeets before trimming any excess. Do not overlap thegasket ends or leave ends with ragged edges.7. Press the gasketed part firmly against its normalmating surface to seat the gasket evenly in its channel.Close and latch the door to do this, or tap other partswith the rubber mallet (or hammer/block of wood).8. Clean any excess cement from around the channel,then let the cement that holds the new gasket drythoroughly.Adjust the Door If NecessaryThe stove’s door(s) may need adjustment after youhave regasketed it. Initially, it may require looseningto accommodate the new gasket; after a few weeks, itmay need tightening to compensate for compression ofthe new gasket. The directions for adjusting the doorsare on Page 20.200097121