Installation Instructions – RVR Solar Water Heating Kits - RVR.ie
Installation Instructions – RVR Solar Water Heating Kits - RVR.ie
Installation Instructions – RVR Solar Water Heating Kits - RVR.ie

Create successful ePaper yourself
Turn your PDF publications into a flip-book with our unique Google optimized e-Paper software.
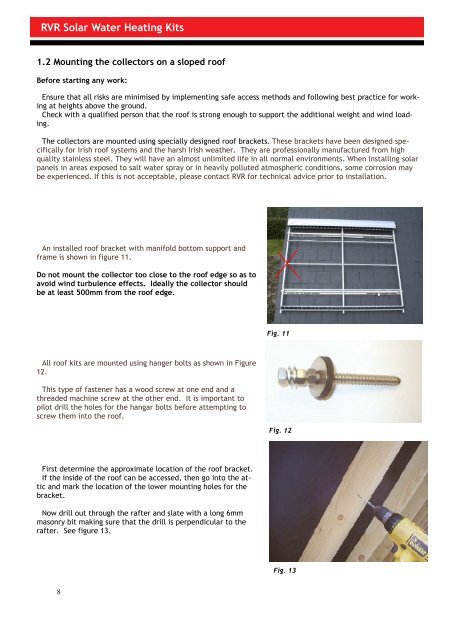
<strong>RVR</strong> <strong>Solar</strong> <strong>Water</strong> <strong>Heating</strong> <strong>Kits</strong>1.2 Mounting the collectors on a sloped roofBefore starting any work:Ensure that all risks are minimised by implementing safe access methods and following best practice for workingat heights above the ground.Check with a qualif<strong>ie</strong>d person that the roof is strong enough to support the additional weight and wind loading.The collectors are mounted using specially designed roof brackets. These brackets have been designed specificallyfor Irish roof systems and the harsh Irish weather. They are professionally manufactured from highquality stainless steel. They will have an almost unlimited life in all normal environments. When installing solarpanels in areas exposed to salt water spray or in heavily polluted atmospheric conditions, some corrosion maybe exper<strong>ie</strong>nced. If this is not acceptable, please contact <strong>RVR</strong> for technical advice prior to installation.An installed roof bracket with manifold bottom support andframe is shown in figure 11.Do not mount the collector too close to the roof edge so as toavoid wind turbulence effects. Ideally the collector shouldbe at least 500mm from the roof edge.Fig. 11All roof kits are mounted using hanger bolts as shown in Figure12.This type of fastener has a wood screw at one end and athreaded machine screw at the other end. It is important topilot drill the holes for the hangar bolts before attempting toscrew them into the roof.Fig. 12First determine the approximate location of the roof bracket.If the inside of the roof can be accessed, then go into the atticand mark the location of the lower mounting holes for thebracket.Now drill out through the rafter and slate with a long 6mmmasonry bit making sure that the drill is perpendicular to therafter. See figure 13.Fig. 138