ML8000 Manual - Meiji Techno
ML8000 Manual - Meiji Techno
ML8000 Manual - Meiji Techno

You also want an ePaper? Increase the reach of your titles
YUMPU automatically turns print PDFs into web optimized ePapers that Google loves.
JAPAN
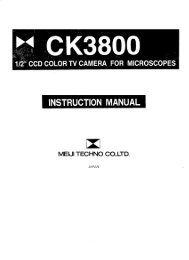
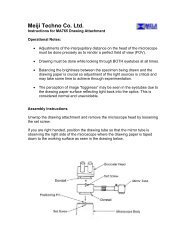
Eyepieces KHW10XDiopter Adjustment RingBinocular Body Inclined 30Binocular Clamp ScrewAnalyzer control LeverReflected Light IlluminatorBall-Bearing ObjectiveNosepieceObjectivesLarge Scan 4 x 4Mechanical Stage withclear glass plateSubstage condenser with irisdiaphragm and 30mm filter trayLamp Centering ControlClamp ScrewMicroscope LimbFocus Tension Control KnobCoarse Focus ControlFine Focus ControlSubstage focusing controlTransmitted Light On/Off andIntensity ControlStage controlsMicroscope Base withTransformer and 6V 30WHalogen lamp for transmittedlight illuminatorField IrisTransformer box forReflected light illuminator withON/OFF and Intensity ControlML82001
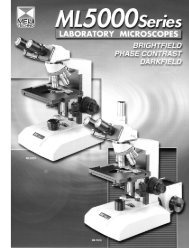
UNPACKING, ASSEMBLY, PREPARATION FOR USEUNPACKINGAll MEIJI TECHNO Microscopes are usually supplied in an expanded polystyrene, 2-part case and thisshould be used for storge, possible transport in the future, etc. If your order includes a wooden storagecabinet, release the fixing screws holding the limb and base from the cabinet and withdraw.Unpack the microscope and its parts carefully. Do not throw away any boxes or packing materials untilcontents of the shipping container have been checked against your (a)order and the packing list sent.ASSEMBLYTo mount the vertical illuminator (packed separately), loosen the clamp screw and insert the cone fittingof the illuminator into the recess on the top of the limb and push the cone fitting toward and against thespring stopper gently until the illuminator slips into the position and fasten it with the clamp screw .Now, the binocular or trinocular body can be mounted on the vertical illuminator.To mount the body, loosen the clamp screw and insert the conefitting of the body into the recess on the top of the illuminator andfasten it with the clamp screw.(b)Aperture iris(a)Field irisSpring stopperPlace the microscope and parts on a sturdy table or desk which gives firm and stable support. Thisshould be located in the atmosphere as clean as possible, avoiding the places where there is excessivedust, moisture, heat or fumes.When in place insert eyepieces in the eyetubes of the binocular body and mount the objectives on theobjective nosepiece, starting with the lowest magnification, then positioning the others to the right of thenext lowest magnification objective.IMPORTANT!Clamp screwBefore plugging the illuminator into any electric outlet, make sure that transformers and illuminationbases supplied to you are suitable to the current available. (See voltage indication given at the backbottom of the Limb.)2
A correct optical set-up and adjustment is, of course, crucial to obtaining a good TV monitor image, butkeep in mind that the monitor controls for brightness and contrast adjustment are also important andshould also be experimented with in order to obtain the best monitor image.MAINTENANCE AND CAREBULB REPLACEMENT ON REFLECTED LIGHT ILLUMINATORWhen changing light bulbs in the illuminators, always disconnect the plug from the electrical source.Never work on the electrical system without first disconnecting.The bulb is held in a socket block inserted in the light source housing at the back of the incidentilluminator.[1] To remove the socket block from the light source housing, loosen the Clamp Screw and turn theBacking Plate clockwise to the slot. Then pull out the Backing Plate from the light source housing.Clamp screwBacking plateCentering Control[2] After making certain the old bulbis cool to the touch, remove it by pulling straight out of its socket. Do not twist as the lamp pins maybreak off and become lodged in the socket.[3] Handle the new bulb only with tissue paper or the plastic in which it is wrapped and insert the twopins into the two holes in the socket.BULB REPLACEMENT ON TRANSMITTED LIGHT ILLUMINATOR(1) Remove the socket block from the microscope base by unscrewing the two screws and pulling thebacking plate clear of the instrument.(2) After making certain the old bulb is cool to the touch, remove it by pulling straight out of its socket.Do not twist as the lamp pins may break off and become lodged in the socket.7
(3) handle the new bulb only with tissue paper or the plastic in which it is wrapped and insert the twopins into the two holes in the socket.Socket BlockScrewsDO NOT HANDLE WITH BARE FINGERS - BULB MAY EXPLODE WHEN HEATED IF NOTHANDLED CORRECTLY.CAREAlways cover the instrument with plastic dust cover provided when the microscope is not in use.Keep eyepieces in the microscope body at all times in order to prevent dust from falling on the internaloptics.Store the microscope in a safe, clean place when not in use for an extended period of time.CLEANINGClean exposed lens surfaces carefully with a pressurized air source, soft brush or clean soft cloth. Toomuch finger pressure may damage lens coatings.To remove oil, fingerprints and grease smudges, use the cleaning cloth moistened with a very smallamount of alcohol or xylene.Immersion oil should always be promptly cleaned from high power oil immersion objectives after everyuse.Painted or plastic surfaces should be cleaned only with a cloth moistened with water and a smallamount of detergent.DO NOT ATTEMPT TO MAKE ADJUSTMENTS TO THE INTERNAL OPTICS OR MECHANICS!!If the microscope does not seem to be functioning properly or you have questions about its operation,call your supplier (or/and authorized repair service) for advice.8
6, Oi-670, Oi-machi, Iruma-gunSaitama 356, JapanPhone : 492-67-0911Fax : 492-69-0691, 492-69-06922186 Bering DriveSan Jose, CA., 95131, USAPhone : 408-428-9654 Fax : 408-428-0472Toll free : 800-832-0060 97.07.1,000 Printed in Japan