HCI DVD Player OPERATIONS MANUAL
HCI DVD Player OPERATIONS MANUAL
HCI DVD Player OPERATIONS MANUAL

Create successful ePaper yourself
Turn your PDF publications into a flip-book with our unique Google optimized e-Paper software.
<strong>HCI</strong> <strong>DVD</strong> <strong>Player</strong><br />
TM<br />
<strong>OPERATIONS</strong> <strong>MANUAL</strong><br />
Model # <strong>HCI</strong>- <strong>DVD</strong>2<br />
REVISION 1.1
----------------------------------------------------------------------------------------<strong>DVD</strong>2 <strong>OPERATIONS</strong> <strong>MANUAL</strong><br />
CONTENTS<br />
PACKAGE CONTENTS 2<br />
SAFETY PRECAUTIONS 3-5<br />
MOUNTING INSTRUCTION 6, 7<br />
SUPPORTED FORMATS 7<br />
PRODUCT INTRODUCTION 8-12<br />
FRONT AND REAR PANEL VIEW 8<br />
IR REMOTES 9, 10<br />
PILLOW SPEAKER CONTROL 11<br />
TV SETUP FOR PILLOW SPEAKER CONTROL 11<br />
OPERATION 12<br />
ADVANCED SETUP<br />
ACCESSING SETUP MENUS 13<br />
SOFTWARE VERSION 13<br />
MENUS<br />
GENERAL MENU 13, 14<br />
TV DISPLAY 13<br />
ANGLE MARK 13<br />
OSD LANGUAGE 13<br />
CAPTIONS 13<br />
SCREEN SAVER 13<br />
HDCD 13<br />
LAST MEMORY 13<br />
MP3 LYRICS 13<br />
AUDIO MENU 14, 15<br />
SPEAKER SETUP 14, 15<br />
DOWNMIX 14<br />
POST DRC 15<br />
SPDIF SETUP 15<br />
SPDIF OUTPUT 15<br />
LPCM OUT 15<br />
DOLBY MENU 15<br />
DUAL MONO 15<br />
DYNAMIC RANGE 15<br />
VIDEO MENU 16<br />
COMPONENT 16<br />
RESOLUTION 16<br />
QUALITY 16<br />
SHARPNESS 16<br />
BRIGHTNESS 16<br />
CONTRAST 16<br />
GAMMA 16<br />
HUE 16<br />
SATURATION 16<br />
LUMA DELAY 16<br />
HDMI SETUP 16<br />
HDMI 16<br />
AUDIO SOURCE 16<br />
PREFERENCE MENU 17, 18<br />
IR BAND 17<br />
PCB 17<br />
AUDIO 17<br />
SUBTITLE 17<br />
DISC MENU 17<br />
PARENTAL CONTROL 18<br />
PASSWORD 18<br />
DEFAULT 18<br />
CLEANING 18<br />
SPECIFICATIONS 18<br />
WARRANTY 19<br />
HealthCare Information, LLC 1
----------------------------------------------------------------------------------------<strong>DVD</strong>2 <strong>OPERATIONS</strong> <strong>MANUAL</strong><br />
PACKAGE CONTENTS<br />
After opening, carefully check the package contents:<br />
<strong>DVD</strong> player 1<br />
Operation Manual 1<br />
HDMI Cable 1<br />
POWER Cord 1<br />
3`RCA Cable Set 1<br />
Foot Pads 4<br />
Mounting Screws M4*8 Philips Pan Head 4<br />
Black Washer 4<br />
RJ11Data Cable 1<br />
IR Remote 1<br />
HealthCare Information, LLC 2
----------------------------------------------------------------------------------------<strong>DVD</strong>2 <strong>OPERATIONS</strong> <strong>MANUAL</strong><br />
SAFETY PRECAUTIONS<br />
WARNING<br />
To reduce the risk of fire or electric shock, do not expose this apparatus to rain or moisture and this apparatus shall not be exposed to dripping<br />
or splashing and no objects filled with liquids, such as vases, shall be placed on the apparatus.<br />
Do not use this apparatus near water. For example: avoid placing it near a bathtub, washbowl, kitchen sink, or laundry tub, in a wet basement,<br />
or near a swimming pool, etc.<br />
This apparatus shall be connected to a mains socket outlet with a protective earthing connection.<br />
The mains plug of this apparatus must remain readily operable.<br />
Advertisement:<br />
Pour réduire le risque du feu ou de décharge électrique, n’exposez pas cet appareil à la pluie ou à l’humidité. L’appareil ne sera pas exposé à<br />
l’égoutture ou l’éclaboussement et aucun objet remplis de liquides, tels que des vases, ne seront placés sur l’appareil.<br />
NOTE TO CABLE TV INSTALLER<br />
This reminder is provided to call the cable TV installer’s attention to Article 820-40 of the National Electric Code (U.S.A.). This code provides<br />
guidelines for proper grounding and, in particular, specifies that the cable ground shall be connected to the grounding system of the building as<br />
close to the point of the cable entry as practical.<br />
REGULATORY INFORMATION<br />
This equipment generates uses and can radiate radio frequency energy, and if not installed in accordance with this instruction manual, may<br />
cause harmful interference to radio communications. However, there is no guarantee that interference will not occur in a particular installation.<br />
If this equipment does cause harmful interference to radio or television reception, which can be determined by turning the equipment off and<br />
on, the user is encouraged to try to correct the interference by one or more of the follow measures:<br />
1. Increase the separation between the equipment and receiver.<br />
2. Consult the dealer or an experienced radio/TV technician for help.<br />
CAUTION<br />
Do not attempt to modify this product in any way without written authorization from HealthCare Information, LLC. Unauthorized<br />
modification will void the warranty of the product.<br />
This unit employs a laser system. To ensure the proper use of the unit, read this manual carefully and keep it for future reference.<br />
This <strong>DVD</strong> video player is a class 1 laser product. Adjustments or performance procedures other than those specified herein may result in<br />
hazardous radiation exposure. The laser beam used in this <strong>DVD</strong> video player is harmful to the eyes; refer servicing to qualified personnel only.<br />
COMPLIANCE<br />
The party responsible for this product’s compliance is:<br />
HealthCare Information, LLC, 113 Commerce Blvd., Loveland, OH 45140, USA. Phone 513-271-8100<br />
HealthCare Information, LLC 3
----------------------------------------------------------------------------------------<strong>DVD</strong>2 <strong>OPERATIONS</strong> <strong>MANUAL</strong><br />
IMPORTANT SAFETY INSTRUCTIONS<br />
1. Read these instructions.<br />
2. Keep these instructions.<br />
3. Heed all warnings.<br />
4. Follow all instructions.<br />
5. Do not use this apparatus near water.<br />
6. Clean only with soft dry cloth. For heavy contamination a soft cloth dampened with a mild soap solution may be used.<br />
7. Do not block any ventilation openings. Install in accordance with the manufacturer’s instructions.<br />
8. Do not install near any heat source such as radiators, heat registers, stoves, or other apparatus (including amplifiers) that<br />
produce heat.<br />
9. Do not defeat the safety purpose of the polarized or grounding type plug. A polarized plug has two blades with one<br />
wider than the other. A grounding type plug has two blades and a third grounding prong. The wide blade or third prong<br />
is provided for your safety. If the provided plug does not fit into your outlet, consult an electrician for replacement of<br />
the obsolete outlet.<br />
10. Protect the power cord from being walked on or pinched particularly at plugs, convenience receptacles, and the point<br />
where they exit from the apparatus.<br />
11. Only use attachments/accessories specified by the manufacturer.<br />
12. Use only with the cart, stand, tripod, bracket, or table specified by the manufacturer, or sold with the apparatus. When a<br />
cart is used, use caution when moving the cart/apparatus combination to avoid injury from tip-over.<br />
13. The mains plug is used as the disconnect device, the disconnect device shall remain readily operable. Always remember<br />
to remove the plug from the mains socket before disconnecting the power lead from the unit.<br />
14. Unplug this apparatus during lightning storms or when unused for long periods of time.<br />
15. Refer all servicing to qualified service personnel. Servicing is required when the apparatus has been damaged in any<br />
way, such as power-supply cord or plug is damaged, liquid has been spilled or objects have fallen into the apparatus, the<br />
apparatus has been exposed to rain or moisture, does not operate normally, or has been dropped.<br />
------------------------------------------------------------------------------------------------------------<br />
IMPORTANT SAFEGUARDS FOR YOU AND YOUR NEW PRODUCT<br />
YOUR NEW PRODUCT HAS BEEN MANUFACTURED AND TESTED WITH YOUR SAFETY IN MIND. HOWEVER,<br />
IMPROPER USE CAN RESULT IN POTENTIAL ELECTRICAL SHOCK OR FIRE HAZARDS. TO AVOID DEFEATING<br />
THE SAFEGUARDS THAT HAVE BEEN BUILT INTO YOUR NEW PRODUCT, PLEASE READ AND OBSERVE THE<br />
FOLLOWING SAFETY POINTS WHEN INSTALLING AND USING YOUR NEW PRODUCT, AND SAVE THEM FOR<br />
FUTURE REFERENCE. OBSERVING THE SIMPLE PRECAUTIONS DISCUSSED IN THE <strong>MANUAL</strong> CAN HELP YOU<br />
GET MANY YEARS OF ENJOYMENT AND SAFE OPERATION THAT ARE BUILT INTO YOUR NEW PRODUCT.<br />
HealthCare Information, LLC 4
----------------------------------------------------------------------------------------<strong>DVD</strong>2 <strong>OPERATIONS</strong> <strong>MANUAL</strong><br />
IMPORTANT SAFETY INSTRUCTIONS<br />
Do not use a<br />
defective power<br />
cable.<br />
Switch off the player,<br />
If the cable plug wires<br />
are not completely in<br />
power socket.<br />
If it is very cold, please<br />
turn on the power for<br />
1min. then turn off the<br />
power for 1min. then<br />
you can turn on and<br />
use the unit.<br />
Place <strong>DVD</strong> player on<br />
a stable surface.<br />
Do not touch<br />
the power cable<br />
with wet hands.<br />
Unplug the apparatus<br />
if the device is wet.<br />
Do not expose the<br />
unit to the direct<br />
sunlight or extreme<br />
heat.<br />
Do not place the unit<br />
under any heavy<br />
object or in<br />
unventilated place.<br />
Insert the plug<br />
in to the socket<br />
firmly.<br />
Disconnect player<br />
from power outlet if<br />
unit is damage.<br />
Do not place this unit<br />
near moisture.<br />
Do not use discs with<br />
scratches and<br />
deformations.<br />
HealthCare Information, LLC 5
----------------------------------------------------------------------------------------<strong>DVD</strong>2 <strong>OPERATIONS</strong> <strong>MANUAL</strong><br />
MOUNTING INSTRUCTIONS (OPTIONAL)<br />
Installing <strong>HCI</strong> <strong>DVD</strong> player flat against the wall or on a flat surface.<br />
1. Place <strong>DVD</strong> mounting bracket bottom of <strong>HCI</strong> <strong>DVD</strong> player as picture shown above.<br />
2. Use the 4 M4x8mm screws and 4 black washers (included with <strong>DVD</strong> player) to fasten the mount to <strong>DVD</strong> player.<br />
3. Place <strong>DVD</strong> player fixed with mounting bracket flat against the wall.<br />
4. Using 4pcs 1/4`` lag bolts fasten the <strong>DVD</strong> player onto wall or flat surface.<br />
Mounts are available to mount the <strong>DVD</strong> player directly to an <strong>HCI</strong> RoomMate series TV. Mounts are available for left, right and<br />
bottom mounting. Contact your dealer for more information and part numbers. For these mounts, follow the directions that are<br />
included with the mount to mount the <strong>DVD</strong> player to the TV.<br />
5. Connect the RJ-11 cable to the RJ-11 jack on the rear panel of the TV to the RJ-11 jack on the rear panel of the<br />
<strong>DVD</strong> player. (Optional for pillow speaker control only)<br />
6. For <strong>HCI</strong> RoomMate TV’s connect the HDMI output of the <strong>DVD</strong> player to the HDMI input of the TV.<br />
7. Plug the power cord in to the power cord jack on the rear panel of the <strong>DVD</strong> player and the other end in to a<br />
standard wall outlet.<br />
HealthCare Information, LLC 6
----------------------------------------------------------------------------------------<strong>DVD</strong>2 <strong>OPERATIONS</strong> <strong>MANUAL</strong><br />
8. To connect to non-<strong>HCI</strong> sets.<br />
A. Locate the <strong>DVD</strong> player close to the set. The connecting cables must be able to reach the input jacks of the<br />
set.<br />
B. Connect the <strong>DVD</strong> player to the TV using one of the following outputs on the back of the <strong>DVD</strong> player.<br />
The TV must have a corresponding input.<br />
SUPPORTED FORMATS<br />
CD PLAYER<br />
A. HDMI Best picture and sound quality<br />
B. COMPONENT Excellent picture and sound quality<br />
C. S-VIDEO Good picture and sound quality<br />
D. COMPOSITE (A/V) Common picture and sound quality<br />
E. COAX (RF-CH4) Common picture and sound quality<br />
If using the coax connector, connect the incoming coax to the RF IN coax connector and the RF OUT coax<br />
connector to the TVs RF IN connector. (tuner) To watch a <strong>DVD</strong>, tune the TV to channel four. NOTE:<br />
When the <strong>DVD</strong> player is on, the TV will not receive normal TV channels. To return to normal TV<br />
viewing, turn the <strong>DVD</strong> player off.<br />
VCD, SVCD, <strong>DVD</strong>, MP3, MP4, JPEG, HDCD, CDDA, WMA, CD-G, CD-RW, <strong>DVD</strong>-R, <strong>DVD</strong>+R, <strong>DVD</strong>-RW, <strong>DVD</strong> +RW,<br />
H<strong>DVD</strong> and Kodak Picture CD.<br />
USB FLASH DRIVE AND SD/MS/MMC MEMORY CARD<br />
WMA, AVI, MP3, DIVX, MPEG 4, DIVX3.11, DIVX4.X and DIVX5.X.<br />
HealthCare Information, LLC 7
----------------------------------------------------------------------------------------<strong>DVD</strong>2 <strong>OPERATIONS</strong> <strong>MANUAL</strong><br />
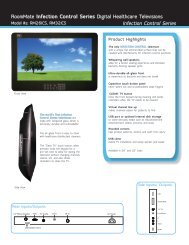
PRODUCT INTRODUCTION<br />
FRONT PANEL<br />
REAR PANEL<br />
HealthCare Information, LLC 8
----------------------------------------------------------------------------------------<strong>DVD</strong>2 <strong>OPERATIONS</strong> <strong>MANUAL</strong><br />
IR REMOTE (<strong>DVD</strong> ONLY)<br />
1. POWER<br />
2. MENU DIRECTION<br />
3. <strong>DVD</strong>/USB<br />
4. SLOW<br />
5. REVERSE<br />
6. PLAY/ PAUSE<br />
7. PREVIOUS<br />
8. ZOOM<br />
9. SUBTITLE<br />
10. REPEAT<br />
11. ROOT MENU<br />
12. FORWARD<br />
13. NEXT<br />
14. STOP<br />
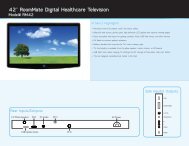
IR REMOTE (<strong>HCI</strong> TV AND <strong>DVD</strong>)<br />
1. POWER POWER ON/OFF<br />
2. MUTE TURNS SOUND ON AND OFF<br />
3. VOLUME UP INCREASES SOUND LEVEL<br />
4. SOURCE SELECTS INPUT SOURCE (<strong>DVD</strong>/ USB/ CARD)<br />
5. CC CHANGE THE <strong>DVD</strong> SUBTITLE LANGUAGE<br />
6. VOLUME DOWN DECREASES SOUND LEVEL<br />
7. IPTV NO FUNCTION (TV)<br />
8. LAST NO FUNCTION (TV)<br />
9. CHANNEL UP PREVIOUS TRACK<br />
10. FM NO FUNCTION (TV)<br />
11. FAVORITES NO FUNCTION (TV)<br />
12. CHANNEL DOWN NEXT TRACK<br />
13. NUMBER BUTTONS DIRECT ACCESS TO TRACKS<br />
14. PREVIEW NO FUNCTION (TV)<br />
15. SLEEP NO FUNCTION (TV)<br />
16. ALARM NO FUNCTION (TV)<br />
17. TIME NO FUNCTION (TV)<br />
18. STATUS NO FUNCTION (TV)<br />
19. SCREEN SIZE SETS SCREEN SIZE (ZOOM)<br />
20. NAVIGATION USED TO NAVIGATE TV SETUP MENUS<br />
AND <strong>DVD</strong> SETUP MENUS<br />
21. B REPEAT FUNCTION<br />
22. SETUP USED TO ENTER SETUP MENU<br />
23. FUNCTION NO FUNCTION (TV)<br />
24. BACK RETURN TO ROOT MENU OF <strong>DVD</strong> DISC<br />
25. HOME RETURN TO ROOT MENU OF <strong>DVD</strong> DISC<br />
26. MEDIA CONTROL CONTROLS <strong>DVD</strong> PLAYBACK<br />
27. ESC PUSH DISC IN OR OUT<br />
28. MEDIA TITLE RETURN TO SUBTITLE MENU OF <strong>DVD</strong> DISC<br />
HealthCare Information, LLC 9
----------------------------------------------------------------------------------------<strong>DVD</strong>2 <strong>OPERATIONS</strong> <strong>MANUAL</strong><br />
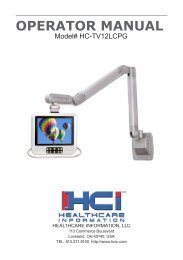
UNIVERSAL IR (IR4)<br />
Universal remotes should be set for a Broksonic <strong>DVD</strong> player.<br />
4<br />
8<br />
9<br />
2<br />
6<br />
7<br />
10 11<br />
12<br />
14<br />
1<br />
3<br />
5<br />
13<br />
15<br />
1. POWER<br />
POWER ON/OFF<br />
2. NUMBER BUTTONS DIRECT ACCESS TO TRACKS<br />
3. ENTER CONFIRM THE OPTION<br />
4. MENU RETURN TO ROOT MENU<br />
5. CHANNEL UP PREVIOUS TRACK<br />
6. DIRECTION BUTTONS USED TO NAVIGATE <strong>DVD</strong><br />
SETUP MENUS<br />
7. CHANNEL DOWN NEXT TRACK<br />
8. VOLUME UP INCREASES SOUND LEVEL<br />
9. VOLUME DOWN DECREASES SOUND LEVEL<br />
10. SUBTITLE Button CHANGE THE <strong>DVD</strong> SUBTITLE<br />
LANGUAGE<br />
11. PLAY Button PLAY<br />
12. REV Button REWIND<br />
13. FWD Button FAST FORWARD<br />
14. STOP Button STOP<br />
15. PAUSE Button PAUSE<br />
NOTE: Unspecified button have no function.<br />
HealthCare Information, LLC 10
----------------------------------------------------------------------------------------<strong>DVD</strong>2 <strong>OPERATIONS</strong> <strong>MANUAL</strong><br />
PILLOW SPEAKER CONTROL<br />
Any digital pillow speaker with number buttons can be used through an <strong>HCI</strong> RoomMate television to control the <strong>DVD</strong> player.<br />
Pillow speakers with custom <strong>HCI</strong> overlays with <strong>DVD</strong> functions printed on the button pad are available from both Curbell and<br />
Anacom Medtek.<br />
When the HDMI, Component or Composite input is selected on the RoomMate TV (usually the HDMI input) the number buttons<br />
on the pillow speaker are used for <strong>DVD</strong> control. When the TV is in TV or DTV mode, the number buttons function normally.<br />
For the pillow speaker to be able to control the <strong>DVD</strong> player, a six conductor RJ-11 cable must be connected from the TV serial<br />
control port (labeled SER) to the <strong>DVD</strong> serial control port. Serial control in the TV “ADVANCE” menu must be set to “<strong>DVD</strong>”<br />
BUTTON FUNCTIONS<br />
1 EJECT<br />
2 FAST FORWARD, MENU CHOICE UP<br />
3 STOP<br />
4 PLAY PREVIOUS TITLE, CHAPTER OR TRACK, MENU CHOICE LEFT<br />
5 PLAY/PAUSE, MENU ENTER<br />
6 PLAY NEXT TITLE, CHAPTER OR TRACK, MENU CHOICE RIGHT<br />
7 <strong>DVD</strong> DISC MENU<br />
8 FAST FORWARD, MENU CHOICE DOWN<br />
9 <strong>DVD</strong> TITLE MENU<br />
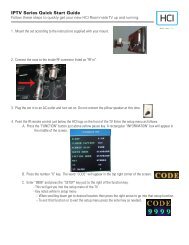
GENII IPTV SETUP FOR PILLOW SPEAKER CONTROL<br />
1. Enter the setup menu. (Function 0, 9999)<br />
2. Go to the SYSTEM menu<br />
3. Select SERIAL CONTROL<br />
4. Set SERIAL CONTROL to <strong>DVD</strong><br />
5. Exit Setup menu.<br />
Curbell pillow speaker<br />
with custom <strong>HCI</strong> overlay<br />
HealthCare Information, LLC 11
----------------------------------------------------------------------------------------<strong>DVD</strong>2 <strong>OPERATIONS</strong> <strong>MANUAL</strong><br />
OPERATION<br />
RoomMate TV<br />
1. Turn the TV and <strong>DVD</strong> player on.<br />
2. Use the “SOURCE” or “INPUT” buttons to select the <strong>DVD</strong> input source. Normally this will be the HDMI<br />
input of a RoomMate set. The input source may be renamed <strong>DVD</strong>. See the RoomMate Operations Manual to<br />
rename the source. The component, S-Video or audio/video inputs may also be used but the picture quality<br />
will not be as good as using the HDMI port.<br />
3. Insert a <strong>DVD</strong> into the slot. Printed side faces the top of the <strong>DVD</strong> player. Push the <strong>DVD</strong> gently and slowly in<br />
to the slot until the <strong>DVD</strong> player takes it.<br />
4. If the <strong>DVD</strong> has no menu content the <strong>DVD</strong> will start to play automatically. If the <strong>DVD</strong> contains menu content,<br />
use the menu navigation buttons to select the main title and press the “ENTER” or “PLAY” button.<br />
5. When the <strong>DVD</strong> is finished, press the “EJECT” button and retrieve the <strong>DVD</strong>. Do not pull the <strong>DVD</strong> out of the<br />
player until it is finished ejecting.<br />
**NOTE: When you play the <strong>DVD</strong> disc, if you want to skip the warning and the advertising, you can press the STOP button<br />
twice followed by PLAY button to directly access to <strong>DVD</strong> content.<br />
Other TV<br />
1. Turn the TV and <strong>DVD</strong> <strong>Player</strong> on.<br />
2. Set the TV to the input source the <strong>DVD</strong> player is connected to.<br />
3. Insert a <strong>DVD</strong> into the slot. Printed side faces the top of the <strong>DVD</strong> player. Push the <strong>DVD</strong> gently and slowly in<br />
to the slot until the <strong>DVD</strong> player takes it.<br />
4. If the <strong>DVD</strong> has no menu content the <strong>DVD</strong> will start to play automatically. If the <strong>DVD</strong> contains menu content,<br />
use the menu navigation buttons to select the main title and press the “ENTER” or “PLAY” button.<br />
5. When the <strong>DVD</strong> is finished, press the “EJECT” button and retrieve the <strong>DVD</strong>. Do not pull the <strong>DVD</strong> out of the<br />
player until it is finished ejecting.<br />
HealthCare Information, LLC 12
----------------------------------------------------------------------------------------<strong>DVD</strong>2 <strong>OPERATIONS</strong> <strong>MANUAL</strong><br />
ADVANCED SETUP<br />
Use one of the following methods to access the setup menu.<br />
1. Press the rewind (left) and fast forward (right) buttons on the front panel at the same time.<br />
2. Using a RoomMate IR remote press and release the “SETUP” button followed by the “1” button and then the<br />
“2” button.<br />
3. Press the menu button on the <strong>DVD</strong> IR remote. NOTE: The <strong>DVD</strong> player default IR remote is set for a<br />
RoomMate IR remote. See page 17 to change the IR remote setting.<br />
4. Use the “UP”, “DOWN”, “LEFT” and “RIGHT” arrow buttons to navigate the menus. Press the “ENTER”<br />
button to make selections.<br />
5. To return to the MENU selection bar press the “LEFT” arrow button.<br />
6. Press the “SETUP” button on a RoomMate IR remote or the “MENU” button on the <strong>DVD</strong> remote to exit setup<br />
mode. Setup mode will also time out if no buttons are pressed.<br />
SOFTWARE VERSION<br />
To check the software version number of the <strong>DVD</strong> player, enter the setup menu per above instructions then using and IR remote,<br />
press and release number buttons “1, 3, 8, 9” one at a time. Software version information will be displayed. Press the<br />
“ENTER” button to exit version display. Setup menu will then be displayed.<br />
MENUS<br />
1. General Menu<br />
HealthCare Information, LLC 13
----------------------------------------------------------------------------------------<strong>DVD</strong>2 <strong>OPERATIONS</strong> <strong>MANUAL</strong><br />
TV Display Sets the aspect ratio (width to height ratio) of the picture. Selections are:<br />
2. Audio Menu<br />
4:3/PS - 4:3/LB – 16:19<br />
PS Pan and Scan<br />
LB Letter Box<br />
Angle Mark Allows viewing of scenes from different angles. <strong>DVD</strong> must be recorded with<br />
different angles for this function to operate. Turns Angle Mark on or off.<br />
Selections are:<br />
On – Off<br />
OSD Lang Selects the language used for the On-Screen-Displays. Selections are:<br />
English – French – Spanish<br />
Captions Turns closed captions on or off. Selections are:<br />
On – Off<br />
Screen Saver Turns screen saver on and off. Settings are:<br />
On – Off<br />
HDCD High Definition Compatible Digital. Sets HDCD mode. Settings are:<br />
Off – 1X – 2X<br />
Last Memory Turns memory function on or off. When on and player is turned off while playing,<br />
play will resume at the power off point when power is turned back on. Settings are:<br />
On – Off<br />
Mp3 Lyric Displays Mp3 lyrics if available. MP3 file and LRC song lyric document must have<br />
the same filename. Selections are:<br />
On - Off<br />
Speaker Setup Selects sound mode.<br />
Downmix Selects donwmix mode. Selections are:<br />
LT/RT – Stereo<br />
LT/RT Dolby Surround mix suitable for Dolby Surround Pro Logic<br />
decoding. Also known as Pro Logic or Left total/Right total.<br />
Stereo Dolby Surround mix suitable for use with headphones or standard<br />
stereo system.<br />
HealthCare Information, LLC 14
----------------------------------------------------------------------------------------<strong>DVD</strong>2 <strong>OPERATIONS</strong> <strong>MANUAL</strong><br />
Post DRC Dynamic Range Compression. Lower the dynamic range (volume difference<br />
between high and low levels) for better playback quality on low quality stereo<br />
systems. Selects post DRC mode. Selections are:<br />
On – Off – AUTO<br />
Spdif Setup Digital audio output setup.<br />
Spdif Output Sets the SPDIF mode. Selections are:<br />
Spdif Off – RAW – Spdif/Pcm<br />
Lpcm Out Sets the sampling frequency of the digital audio output. Selections are:<br />
48K – 96K – 192K<br />
NOTE: Karaoke Setup, CH EQ Setup and 3D process are not available.<br />
3. Dolby Menu<br />
Dual Mono Sets stereo audio output mode. Selections are:<br />
Stereo – L-Mono – R-Mono – Mix-Mono<br />
Stereo Standard left and right audio output.<br />
L-Mono Left channel is output on both audio output jacks.<br />
R-Mono Right channel is output on both audio output jacks.<br />
Mix-Mono Left and right channels are mixed together and the mix is output<br />
to both audio output jacks.<br />
Dynamic Sets the amount of stereo enhancement. Selections are:<br />
FULL – 7/8 – ¾ - 5/8 – ½ - 3/8 – ¼ - 1/8 – OFF<br />
HealthCare Information, LLC 15
----------------------------------------------------------------------------------------<strong>DVD</strong>2 <strong>OPERATIONS</strong> <strong>MANUAL</strong><br />
4. Video Menu<br />
Component Selects component YPBr output or S-video output. Both outputs can not be active<br />
at the same time. Selections are:<br />
S-Video – YUV<br />
YUV – Component<br />
Resolution Sets output resolution. Selections are:<br />
Quality Video setup<br />
480I – 480P – 720P60 – 1080I60 – 1080p(60Hz) – 576I - 576P – 720P50 – 1080I50<br />
1080p(50Hz)<br />
Sharpness Adjusts picture sharpness. Selections are:<br />
High – Medium – Low<br />
Brightness Adjusts picture brightness. Press “ENTER” to exit. Selections are:<br />
-20 to +20<br />
Contrast Adjusts picture contrast. Press “ENTER” to exit. Selections are:<br />
-16 to +16<br />
Gamma Sets Gamma correction. Selections are:<br />
None – Low – Medium – High<br />
Hue Adjust color tone. Also know as tint. Press “ENTER” to exit. Selections are:<br />
-9 to +9<br />
Saturation Adjusts color level. Press “ENTER” to exit. Selections are:<br />
-9 to +9<br />
Luma Delay Adjusts the delay between the Luminance and chroma signals. Selections are:<br />
0 T – 1 T<br />
HDMI Setup Setup for the HDMI output.<br />
HDMI Turns HDMI output on or off. Selections are:<br />
On – Off<br />
Audio Source Selects HDMI audio source track to playback from on a <strong>DVD</strong>. Selections are:<br />
AUTO - PCM<br />
HealthCare Information, LLC 16
----------------------------------------------------------------------------------------<strong>DVD</strong>2 <strong>OPERATIONS</strong> <strong>MANUAL</strong><br />
5. Preference Menu<br />
NOTE: To access the Preference Menu page the <strong>DVD</strong> player must be in the stop mode.<br />
IR Selects IR band. Selections are:<br />
IR1 – IR2 – IR3 – IR4<br />
IR 1 <strong>HCI</strong> RoomMate IR Remote Band 1<br />
IR 2 <strong>HCI</strong> RoomMate IR Remote Band 2<br />
IR 3 <strong>DVD</strong> Mini Remote<br />
IR4 Universal IR remote Broksonic codes.<br />
NOTE: The <strong>DVD</strong> player will always respond to an RoomMate IR remote is the player is<br />
connected to an <strong>HCI</strong> RoomMate television via the serial port. Serial control in the TV<br />
“ADVANCE” menu must be set to “<strong>DVD</strong>”<br />
NOTE: Press and hold the “POWER” button for 10 seconds on a RoomMate IR remote to<br />
change the IR band.<br />
PBC Playback Control. Allows interactive playback control for Video CD 2.0 and Super Video<br />
CD 1.0 discs. Selections are:<br />
On – Off<br />
Audio Selects the audio playback language. Disc must have the selected language recorded.<br />
Selections are:<br />
English – French – Spanish – Others<br />
For others you must enter the language code then select OK and press the “ENTER” button.<br />
Subtitle Selects the subtitle language. Disc must have the selected language recorded. Selections are:<br />
English –French – Spanish – Off – Others<br />
For others you must enter the language code then select OK and press the “ENTER” button.<br />
Disc Menu Selects the disc menu language for disc equipped with interactive menus. Selections are:<br />
English –French – Spanish – Others<br />
For others you must enter the language code then select OK and press the “ENTER” button.<br />
HealthCare Information, LLC 17
----------------------------------------------------------------------------------------<strong>DVD</strong>2 <strong>OPERATIONS</strong> <strong>MANUAL</strong><br />
Parental Sets the parental control rating. Any content rated above the set rating can not be viewed.<br />
Selections are:<br />
CLEANING<br />
KID SAF – G – PG – PG 13 – PGR – R – NC17 – ADULT<br />
Password Sets password mode and password.<br />
Password Mode Turns password mode on or off. Selections are:<br />
On – Off<br />
Password Changes password.<br />
Default Resets all settings to factory defaults.<br />
CAUTION: Make sure that the power cable is removed from the AC outlet before cleaning the product.<br />
Do not use a volatile solvent (such as toluene, rosin and alcohol) to clean the housing and remote control. Such chemicals may<br />
damage the housing, housing and remote control cause the paint to peel.<br />
Use only a soft dry cloth for cleaning the housing and remote control.<br />
If the housing or remote control is heavily contaminated, use a soft cloth moistened with a mild soap and water solution. Wring<br />
solution out of cloth before cleaning to prevent solution from entering the housing or remote control.<br />
SPECIFICATIONS<br />
GENERAL<br />
POWER 120VAC 60Hz<br />
POWER CONSUMPTION 15W<br />
DIMENSIONS 315MM X 160MM X 61MM (L X W X H)<br />
12.5” X 6.5” X 2.5” (L X W X H)<br />
WEIGHT 3.6LBS<br />
SHIPPING WEIGHT 4.8LBS<br />
VIDEO SYSTEM NTSC<br />
AUDIO FREQUENCY RANGE 20Hz TO 20KHz +/- 1dB<br />
AUDIO SIGNAL TO NOISE RATIO >90Db<br />
AUDIO DYNAMIC RANGE >80Db<br />
INPUT/OUTPUT<br />
FRONT INPUTS USB, SD/MS/MMC<br />
REAR INPUTS RF, SERIAL CONTROL PORT (RJ-11)<br />
REAR OUTPUTS HDMI, COMPONENT, COMPOSITE, AUDIO L, AUDIO R<br />
S-VIDEO, DIGITAL AUDIO, RF<br />
DIGITAL MEDIA SUPPORT<br />
VCD, SVCD, <strong>DVD</strong>, MP3, MP4, JPEG, HDCD, CDDA, WMA, CD-G, CD-RW, <strong>DVD</strong>-R, <strong>DVD</strong>+R, <strong>DVD</strong>-RW,<br />
<strong>DVD</strong> +RW, H<strong>DVD</strong> Kodak Picture CD, USB Flash Drive (MP3, MP4, JPEG) and SD/MS/MMC memory<br />
cards.<br />
HealthCare Information, LLC 18
----------------------------------------------------------------------------------------<strong>DVD</strong>2 <strong>OPERATIONS</strong> <strong>MANUAL</strong><br />
PRODUCT LIMITED WARRANTY<br />
<strong>HCI</strong> warrants, to the original purchaser only that all new <strong>HCI</strong> <strong>DVD</strong> players (excluding any equipment manufactured by others<br />
and included in <strong>HCI</strong> shipment) are free from defects in material for a period of 90 days from the date of shipment.<br />
The dealer your product was purchased through must receive notice of a defect or malfunction occurring during the warranty<br />
period. <strong>HCI</strong> will repair or replace goods returned to its Loveland, Ohio office, at its discretion, free of charge to the original<br />
purchaser, the whole or any component part of any product manufactured by <strong>HCI</strong> found to be defective.<br />
As a condition to obtaining warranty service, notification must be given to the dealer the product was purchased through within<br />
at least 10 days after defect is first observed. Repair of product requires it to be shipped to <strong>HCI</strong> in Loveland, Ohio. All shipping<br />
and freight charges to <strong>HCI</strong> shall be paid for by the customer and will not be accepted without a Return Merchandise<br />
Authorization Number (RMA#). The dealer can provide you information on how to obtain the RMA#.<br />
This warranty does not apply to any <strong>HCI</strong> products subjected to improper use, negligence or accident; nor to tampering,<br />
alterations, or repairs by others, without <strong>HCI</strong>’s written prior notice. For more information pertaining to this warranty, please<br />
contact the dealer you purchased your product from.<br />
<strong>HCI</strong>’s liability under this warranty is limited to repair or replacement of defective products and parts as provided above. <strong>HCI</strong><br />
shall not be liable for incidental or consequential damages.<br />
HealthCare Information, LLC 19
----------------------------------------------------------------------------------------<strong>DVD</strong>2 <strong>OPERATIONS</strong> <strong>MANUAL</strong><br />
HealthCare Information, LLC 20
<strong>HCI</strong> ALSO OFFERS 22”, 26”, 32” & 42” SIZES<br />
©Copyright 2011, HealthCare information, LLC