5th Grade Band Music Curriculum
5th Grade Band Music Curriculum
5th Grade Band Music Curriculum

You also want an ePaper? Increase the reach of your titles
YUMPU automatically turns print PDFs into web optimized ePapers that Google loves.
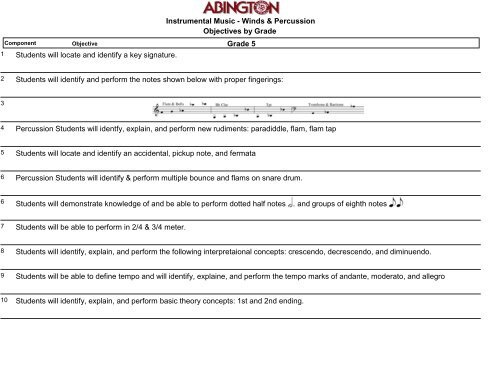
Instrumental <strong>Music</strong> - Winds & PercussionObjectives by <strong>Grade</strong>Component Objective <strong>Grade</strong> 51Students will locate and identify a key signature.2Students will identify and perform the notes shown below with proper fingerings:34Percussion Students will identfy, explain, and perform new rudiments: paradiddle, flam, flam tap5Students will locate and identify an accidental, pickup note, and fermata6Percussion Students will identify & perform multiple bounce and flams on snare drum.6Students will demonstrate knowledge of and be able to perform dotted half notesand groups of eighth notes7Students will be able to perform in 2/4 & 3/4 meter.8Students will identify, explain, and perform the following interpretaional concepts: crescendo, decrescendo, and diminuendo.9Students will be able to define tempo and will identify, explaine, and perform the tempo marks of andante, moderato, and allegro10Students will identify, explain, and perform basic theory concepts: 1st and 2nd ending.
Forte (f) . . . . . . . .Forte-piano (fp) . . . .Fortissimo (ff) . . . . .Forzando (fz >) . . . .Forza . . . . . . . . .Glocoso . . . . . . . .Giusto . . . . . . . . .Grandioso . . . . . . .Grave . . . . . . . . .Grazioso . . . . . . .Key note . . . . . . .Largamente . . . . .Larghetto . . . . . .Largo . . . . . . . .Ledger-line. . . . . .Legato . . . . . . . .Leggiero . . . . . . .Lento . . . . . . . . .L’istesso tempo . . .Loco . . . . . . . . .PRINCIPAL TERMS USED IN MUSIC 2LoudAccent strongly, diminishing instantly to pianoVery loudIndicates that a note or chord is to be strongly accentedForce of toneJoyously; playfullyExact; in strict timeGrand; pompous; majesticVery slow and solemnGracefullyThe first degree of the scale, the tonicVery broad in styleSlow, but not so slow as Largo; nearly like AndantinoBroad and slow; the slowest tempo-markA small added line above or below the staffSmoothly; the reverse of staccatoLightlySlow, between Andante and LargoIn the same time (or tempo)In place; play as written, no longer an octave higher or lowerMa . . . . . . . . . . ButMa non troppo . . . . But not too much soMaestoso . . . . . . Majestically; dignifiedMaggiore . . . . . . Major keyMarcato . . . . . . . MarkedMeno . . . . . . . . LessMeno mosso . . . . . Less quicklyMezzo . . . . . . . . Half; moderatelyMezzo-piano (mp) . . Moderately softMinore . . . . .. . . Minor keyModerato . . . . . . Moderately - Allegro moderato, moderately fastMolto . . . . . . . Much; veryMorendo . . . . . . Dying awayMosso . . . . . . . Equivalent to rapid; piu mosso, quickerNon . . . . . . . . NotNotation . . . . . . The art of representing musical sounds by means of written charactersObbligato. . . . . . .Opus (Op.) . . . . . .Ossia . . . . . . . . .Ottava (8va) . . . . .Pause ( ) . . . . . . .Perdendosi . . . . . .Piacere, a . . . . . . .Pianissimo (pp) . . .Piano (p) . . . . . . .Piu . . . . . . . . . .Piu Allegro. . . . . .Poco or un poco . . .Poco a poco . . . . .An indispensable partA workOr; or else - generally indicating an easier methodTo be played an octave higherThe sign indicating a pause or restDying away graduallyAt pleasureVery softlySoftlyMoreMore quicklyA littleGradually; by degrees; little by little
Poco piu mosso. . . .Poco meno . . . . . .Poco piu . . . . . . .Pomposo . . . . . . .Prestissimo . . . . . .Presto . . . . . . . .Primo (1 mo) . . . .Quasi . . . . . . . .Rallentando (rall.) . .Replica . . . . . .. .Rinforzando (rfz.) . .Ritardando (rit.) . . .Risoluto . . . . . .Ritenuto . . . . . .PRINCIPAL TERMS USED IN MUSIC 3A little fasterA little slowerA little fasterPompous; grandAs quickly as possibleVery quick; faster than AllegroThe firstAs if; in the style ofGradually slowerRepetition; Senza replica, without repeatsWith special emphasisGradually slower and slowerResolutely; bold; energeticIn slower time - not gradually slowerScherzando . . . . . Playfully; sportivelySegue . . . . . . . . Follow on; in similar styleSemplice . . . . . . Simply; unaffectedlySenza . . . . . . . Without. Senza sordino, without muteSforzando (sf.) . . . Forcibly; with sudden emphasisSimile . . . . . . . . In like mannerSmorzando (smorz.) . Diminishing in sound. Equivalent to MorendoSolo . . . . . . . . For one performer only. Soli, for allSostenuto . . . . . . Sustained; prolongedSotto . . . . . . . . . Below; under. Sotto voce, in a subdued toneSpirito . . . . . . . . Spirit. Con Spirito, with spiritStaccato . . . . . . . Detached; separateStentando . . . . . . Dragging or retarding the tempoStretto or stretta . . . An increase of speed. Piu stretto, fasterStringendo . . . . . Gradually fasterTacet . . . . . . . . “Is silent.” Signifies that an instrument or vocal part, so marked, is omitted during themovement or number in question.Tempo . . . . . . . . Movement; rate of speedTempo primo . . . . . Return to the original tempoTenuto (ten.) . . . . . Held for the full valueTonic . . . . . . . . . The key-note of any scaleTraquillo . . . . . . . QuietlyTremolando, Tremolo . A tremulous fluctuation of toneTrio . . . . . . . . . A piece of music for three performersTriplet . . . . . . . . A group of three notes to be performed in the time of two of equal value in the regular rhythmTroppo . . . . . . . . Too; too much. Allegro, ma non troppo, not too quicklyTutti . . . . . . . . . All; all the instrumentsUn . . . . . . . . . .Variatione . . . . . .Veloce . . . . . . . . .Vivace . . . . . . . . .Vivo . . . . . . . . . .Volti Subito (V.S.) . . .A; one; anThe transformation of a melody by means of harmonic, rhythmic and melodic changes andembellishmentsQuick; rapid; swiftWith vivacity; bright; spiritedLively; spiritedTurn over quickly
All Instruments:Feet flat on floor.Back off chair, sitting forward on front edge of seat.Fingers slightly curved and relaxed.Bring instrument to you for playing.Wrists aligned with forearm.Head erect.FLUTEPosture of Body and Instrument1. Head should be erect with flute slightly cocked to the right.2. Arms out in front of right shoulder. Right elbow does not rest on back of chair.3. Three contact points – pivot points:a. Chinb. Left forefinger – the flute rests between the knuckle and first joint. The finger provides a small shelf forthe flute.c. Right Thumb – pad contacts tube and opposite mid-point between 1 st & 2 nd finger.4. Other fingers – pad of fingers centered on keys.The chair may be turned 20° to 30° to the player’s right (clockwise).AFlute - Care and maintenance1. Use a cloth to dry inside of flute after use. Cloth (about the size of a man’s handkerchief) should be large enoughso that once threaded through eye of cleaning rod, it should be able to wrap around the entire rod including thetip. The cleaning rod is now ready to be inserted into the body. Hold cloth and rod at the bottom so cloth will notget stuck inside the flute during the swabbing process. Note: (Head joint collects the most moisture). Do boththe head and foot joints in the same way. When swabbing the head joint, cleaning rod is inserted gently until itstops. Never force the cleaning rod beyond the stopping point.2. Wipe instrument down with soft cloth or flute polishing cloth; never use anything abrasive.3. Remove moisture from pads with clean paper when needed.4. A drop of key oil at each pivot screw of each rod (once a year).5. Brush out case to remove lint and dust as needed.BFlute - Assembly1. The main purpose of assembling the flute correctly is to avoid touching the keys. Keys can bend very easily.Once a key is bent, even slightly, the key will not cover or seal the hole completely causing an air leak.Consequently, the flute will play poorly or not at all.2. Open the case on the floor.3. Hold the body of the flute where the writing or brand logo is engraved.4. Slide the head joint onto the body of the instrument (line up embouchure hole with the keys so that they are inline).5. Leave head joint out at least a quarter of an inch.6. Hold the foot joint not touching any keys (hold body as above).7. Slide the pieces together (line up post of the foot joint with the center of the closest key on the body of the flute).CFlute - Disassembly1. Disassemble the flute the same way you assembled it but in reverse order.1
All Instruments:Feet flat on floor.Back off chair, sitting forward on front edge of seat.Fingers slightly curved and relaxed.Bring instrument to you for playing.Wrists aligned with forearm.Head erect.CLARINETPosture of Body and Instrument1. Right thumb – thumb contacts thumb rest facing upward on the side just at the base of the thumbnail.2. Left thumb – pad centered on tone hole, tip touches register key and angled up 20° to 30°.3. Pads of fingers centered on tone holes.4. Left forefinger – slightly touches A key between first and second joints.5. Instrument angled at about 40° from body. Does not rest on leg or chair.AClarinet - Care and Maintenance1. Remove the mouthpiece & reed2. Dry mouthpiece and reed; store mouthpiece with mouthpiece cap in case and reed in reed holder.3. After playing your instrument swab out the inside using a cloth style swab.4. Clean old or excessive accumulations of cork grease from joints with a paper towel when needed.5. Remove moisture from pads with clean paper when needed.6. Wipe instrument down with a soft cloth when needed.7. Use a cotton swab to clean tone holes and other hard to reach places when needed.8. Place a drop of key oil at each pivot screw of each rod (once a year).9. Brush out case to remove lint and dust as needed.10. Do not store books, toys, broken reeds, etc. in the case.BClarinet - Assembly1. Open the case on the floor:a. Put reed in mouth to moisten. Do not bite down upon or chew reed.b. Remove ligature from mouthpiece.c. Align moistened reed on the table of the mouthpiece with tip of the reed to tip of the mouthpiece.d. Carefully slide ligature over the reed to avoid slicing the tip of the reed (screws over reed); then tighten thescrews.2. Grease the corks on the joints that are hard to put together (always grease new corks).3. Avoid touching any keys when removing parts from the case; keys are very delicate and can bend easily.4. Lower joint:a. Place palm of right hand on the wood beneath the large keys.b. Cover the large keys with your fingers closing them.5. Bell joint: Grasp and twist onto the lower joint.6. Upper joint:a. Place palm of left hand on the wood beneath the keys.b. Wrap left fingers around closing the larger ring key.c. (This ring key must be closed to raise the bridge key)d. Align upper and lower bridge keys pushing and twisting parts together.7. Barrel joint:a. Hold upper joint using left hand (as above).b. Twist the barrel onto the upper joint.8. Mouthpiece:i. Grasp the upper joint and barrel at the same time {Twist the mouthpiece on}.ii. Align the flat table of the mouthpiece with the register key.9. Reed:a. Place the “wet” reed on the table of the mouthpiece.b. Align tip of the reed to the tip of the mouthpiece; hold it there with your thumb.10. Ligature:a. Slip on the ligature over the unshaven part of the reed.b. Tighten the screws.2
CClarinet – Disassembly1. Remove mouthpiece. Swab clarinet (weighted swab) bottom to top – weight goes through bell end first.2. Disassemble the clarinet in reverse order.3. Remove the ligature.4. Remove the reed & place in reed holder; now mouthpiece may be swabbed.5. Barrel-upper joint-lower joint-bell (Each piece should be laid in case).6. Close case and secure latches.3
All Instruments:Feet flat on floor.Back off chair, sitting forward on front edge of seat.Fingers slightly curved and relaxed.Bring instrument to you for playing.Wrists aligned with forearm.Head erect.SAXOPHONEPosture of Body and Instrument1. Head erect – adjust neck strap to bring mouthpiece to mouth.2. Mouthpiece adjusted for front or side playing.3. Neck strap supports instrument – not chair or leg4. Right thumb pushes forward to maintain proper angle.5. Pads of fingers centered on keys.ASaxophone – Care and Maintenance1. Remove the mouthpiece & reed2. Dry mouthpiece and reed; store mouthpiece with mouthpiece cap in case and reed in reed holder.3. After playing your instrument swab out the inside using a cloth style swab.4. Clean old or excessive accumulations of cork grease from joints with a paper towel when needed.5. Remove moisture from pads with clean paper when needed.6. Wipe instrument down with a soft cloth when needed.7. Use a cotton swab to clean tone holes and other hard to reach places when needed.8. Place a drop of key oil at each pivot screw of each rod (once a year).9. Brush out case to remove lint and dust as needed.10. Do not store books, toys, broken reeds, etc. in the case.11. Always store the saxophone with the end plug in to prevent damage.BSaxophone – Assembly1. Open the case on the floor.2. Grease the cork on the neck.3. Mouthpiece:a. Grasp the neck and the mouthpiece and twist the mouthpiece on to the neck.b. Align the flat table of the mouthpiece with the bottom side of the neck.4. Reed:a. Place the “wet” reed on the table of the mouthpiece.b. Align the tip of the reed to the tip of the mouthpiece hold in place with your thumb.5. Ligature:a. Slip on the ligature over the unshaven part of the reed.b. Tighten the screws.6. Place the neck strap around your neck.7. Pick up the instrument by the bell with the right hand.8. Hook the neck strap to the body with the left hand.9. Remove the end plug and place it back in the case.10. Loosen neck screw at the top of the stack.11. Grasp the neck with the left hand.12. Twist the two parts together aligning the neck opposite the bell.13. Tighten the neck screw at the top of the stack.CSaxophone – Disassembly1. Disassemble in reverse order.2. Swab neck with weighted clarinet swab or saxophone neck saver.3. Swab body (weighted swab) from bottom to top.4. Remove the reed and place in reed holder; now mouthpiece may be swabbed.5. Close case and secure all latches.4
All Instruments:Feet flat on floor.Back off chair, sitting forward on front edge of seat.Fingers slightly curved and relaxed.Bring instrument to you for playing.Wrists aligned with forearm.Head erect.TRUMPETPosture of Body and Instrument1. Left Hand – supports instrument. Wrap around valve casing, thumb to back. Ring finger through 3 rd valve slidering.2. Right Hand – works pistons:a. Thumb – tip anchored between 1 st & 2 nd valvesb. Little finger- roams free3. Instrument – angled down slightly no more than 30 degrees and into standATrumpet - Care and Maintenance1. Oil your valves as needed:a. Unscrew the top cap one valve at a time (do not remove valve from it’s casing).b. Pull piston out far enough to see the valve (holding the trumpet at a downward angle).c. Fully cover the surface with valve oil.d. Slide the valve back into the casing “clicking” into the valve guide. Replace the top cap. Simply turn until itstops; avoid tightening.2. Greasing the slides, Use valve oil on the 3 rd slide. Use tuning slide grease on the other slides.a. Remove the slide and wipe off with a clean cloth.b. Apply a bit of grease to the end part of the slide.c. Insert one side at a time to evenly distribute the grease to that side.d. Repeat the above with the other half of the slide.e. Insert the slide as normal and wipe away excess grease.3. Bottom valve caps should be removed, cleaned, and greased once a month.4. Do not use household tools to free slide or mouthpieces; see a repairperson.5. Wipe the outside of the instrument after playing using a non-treated soft cloth.6. Brush out the inside of the case as needed; do not store music or other non-essential items in the case.7. Store the mouthpiece in the case properly.8. Washing instructions:a. Each valve may be removed. Rinse (lukewarm water) bottom half of valve. Holes may be brushed out. Dryand then re-oil before placing it back in the casing.b. Valve casings may be cleaned using a clean lint free cloth. Wrap cloth around a narrow dowel (could beunsharpened pencil) and wipe inside of casing.c. Slides may be removed, rinsed (warm water) and brushed inside using a snake-like brush. Dry outside withlint free soft cloth. Re-oil or re-grease appropriate slide before replacing.d. With tuning slide removed, lead pipe may be brushed inside with snake-like brush.e. A small mouthpiece brush may be used to clean the bore of the mouthpiece.BCTrumpet - Assembly1. Open the case on the floor.2. Remove the mouthpiece from holder.3. Remove the trumpet and gently slide mouthpiece into the lead pipe.Trumpet - Disassembly1. Empty water keys.2. Remove mouthpiece and place into the case.3. Place the instrument into the case.4. Close case and secure all latches.5
All Instruments:Feet flat on floor.Back off chair, sitting forward on front edge of seat.Fingers slightly curved and relaxed.Bring instrument to you for playing.Wrists aligned with forearm.Head erect.TROMBONEPosture of Body and Instrument1. Left Hand – supports instrument.a. Thumb – behind bell brace.b. Forefinger – above side brace on shank.c. Middle finger – above inner slide and outer slide braces.d. Other fingers – between inner & outer slide braces.e. Little finger used as insurance for slide lock.2. Right Hand – works outer slide.a. Hold outer slide brace with pad of thumb and first two or three fingers.3. Instrument – angled down slightly no more than 30 degrees into stand.ATrombone - Care and Maintenance1. Lubricating the Hand Slide:a. Place trombone bumper on the ground.b. Pull inner slide all the way out.c. Wipe slide with soft lint-free cloth before applying additional oil or slide cream.d. Use slide oil at least once a week. (OR)i. Use slide cream (Slide cream should be placed on the bottom part of the hand slide).ii. Jr. High: Water in a squirt bottle is acceptable to activate slide cream.iii. Sr. High use water-cream mix in squirt bottle.2. Lubricating the tuning slide (use tuning slide grease):a. Remove the slide and wipe off with a clean soft cloth.b. Apply a bit of grease to each end of the slide (larger diameter).c. Insert one end at a time to evenly distribute the grease inside the slide. Remove slide.d. Repeat the above with the other half of the tuning slide.e. Now insert the tuning slide as normal and wipe away excess grease.3. Washing instructions:a. Remove outer slide. Carefully place inner slide in an area where it will not be damaged or dented.b. Outer slide may be rinsed with lukewarm water. Brush inside with snake-like trombone brush. Rinse, wipeoutside with clean soft lint free cloth.c. Wipe inner slide with clean soft lint free cloth. Re-oil or re-cream and carefully insert into outer slide withwater key on the bottom.d. Remove tuning slide and rinse in lukewarm water. Use trombone brush on the inside. Dry outside with softlint-free cloth, re-grease, and insert.e. A small mouthpiece brush may be used to clean the bore of the mouthpiece.BTrombone - Assembly1. Open the case on the floor.2. Lock slide when not playing; check the lock before removing the slide from the case.3. Grasp slide mechanism with left hand:a. Thumb around tapered end.b. Forefinger above inner slide brace.c. Middle and ring finger between two braces.d. Little finger below outer slide brace.e. Stand slide on bumper in front of you: tapered end toward you, mouthpiece end away.f. Grasp bell just above lock nut with right hand.g. Thumb pointing toward tuning slide (tuning slide up) bell down.h. Cross right hand over left and slide lock nut on the bell over tapered end on slide.i. Form proper angle and tighten lock nut.4. Gently insert the mouthpiece into the instrument.6
CTrombone - Disassembly1. Empty water keys.2. Remove mouthpiece (place in case).3. Remove bell from slide (place in case).4. Place slide in case and secure.5. Close case and secure all latches.7
All Instruments:Feet flat on floor.Back off chair, sitting forward on front edge of seat.Fingers slightly curved and relaxed.Bring instrument to you for playing.Wrists aligned with forearm.Head erect.BARITONE/TUBA – UPRIGHT BELLPosture of Body and Instrument1. Left Hand – supports instrument. Instrument tilts to right. Wrap Left arm around body of instrument and holdtubing on the opposite side of bell tubing.2. Right Hand – works pistons:a. Thumb – in thumb ring or tip anchored between 1 st & 2 nd valvesb. Fingers – slight curvature (softball or sandwich grip); pad of fingers centered on valve caps; little fingerroams free.3. Instrument is not resting on chest. Baritone is not resting in lap.BARITONE/TUBA – FORWARD BELLPosture of Body and Instrument1. Left Hand – supports instrument. Instrument tilts to left. Hold the tubing on the opposite side of the bell tubing.2. Right Hand – works pistons:a. Thumb – in thumb ring or tip anchored between 1 st & 2 nd valves.b. Fingers – slight curvature (softball or sandwich grip), pad of fingers centered on valve caps, little fingerroams free.3. Instrument is not resting on chest. Baritone is not resting in lap.ABaritone Horn - Care and Maintenance1. Oil your valves as neededa. Unscrew the top cap one valve at a time (do not remove valve from it’s casing).b. Pull piston out far enough to see the valve (holding the trumpet at a downward angle).c. Fully cover the surface with valve oil.d. Slide the valve back into the casing “clicking” into the valve guide. Replace the top cap. Simply turn until itstops; avoid tightening.2. Greasing the slides, Use valve oil on the 3 rd slide. Use tuning slide grease on the other slides.a. Remove the slide and wipe off with a clean cloth.b. Apply a bit of grease to the end part of the slide.c. Insert one side at a time to evenly distribute the grease to that side.d. Repeat the above with the other half of the slide.e. Insert the slide as normal and wipe away excess grease.3. Bottom valve caps should be removed, cleaned, and greased once a month.4. Do not use household tools to free slide or mouthpieces; see a repair person.5. Wipe the outside of the instrument after playing using a non-treated soft cloth.6. Brush out the inside of the case as needed; do not store music or other non-essential items in the case.7. Store the mouthpiece in the case properly.8. Washing instructions:a. Each valve may be removed. Rinse (lukewarm water) bottom half of valve. Holes may be brushed out. Dryand then re-oil before placing it back in the casing.b. Valve casings may be cleaned using a clean lint free cloth. Wrap cloth around a narrow dowel (could beunsharpened pencil) and wipe inside of casing.c. Slides may be removed, rinsed (warm water) and brushed inside using a snake-like brush. Dry outside withlint free soft cloth. Re-oil or re-grease appropriate slide before replacing.d. With tuning slide removed, lead pipe may be brushed inside with snake-like brush.e. A small mouthpiece brush may be used to clean the bore.BBaritone Horn - Assembly1. Open the case on the floor.8
2. Remove the mouthpiece from holder.3. Remove the trumpet and gently slide mouthpiece into the lead pipe.CBaritone Horn - Disassembly1. Empty water keys.2. Remove mouthpiece and place into the case.3. Place the instrument into the case.4. Close case and secure all latches.9
SNARE DRUMPosture of Body and Instrument1. Position of Druma. Drum should be securely attached to stand.b. Top of drum should be about waist height.2. Right Hand:a. Stick lays diagonally across palm from lower left through knuckle of forefinger - about 1” of stick buttshould be exposed.b. Thumb and Forefinger hold stick – thumb pointing toward bead of stick.c. Palm should face straight down.d. A straight line should be formed from outside elbow through stick butt, to bead.3. Left Hand – MATCH GRIP:a. Same as right hand.4. Left Hand – TRADITIONAL:a. Palm perpendicular to floor.b. Stick rests in cradle between thumb and forefinger – about 3” of stick butt should be exposed.c. Thumb and forefinger grip stick.d. Other fingers curve (not bend) for control, middle finger above stick, ring-finger & pinky below.5. Stick Position on Drum:a. Stick beads should form 90° angle about 1” apart.b. Playing spot is in center of drum unless otherwise dictated by dynamics.c. Stick motion should be straight up and down, not sliced to the side.d. When at rest, beads should be 1” above playing surface.6. Four Methods of Stroking a Drum:a. Low to Low.b. Low to High.c. High to Low.d. High to High.ASnare Drum - Regular Maintenance1. Never place heavy or pointed objects on drum.2. Play only with approved sticks. Use sticks only on percussion equipment.3. Clean drum shell with ammonia based window cleaner. Do not clean coated drum too often.4. Changing heads:a. Remove old head.b. Clean hardware.c. Lightly sand rough areas of shell edge and remove dust.d. Lubricate shell edge with paraffin or soap.e. Dip all tension rods in grease and lube all washers.f. Position and seat head (press center of head with palm).g. Position and seat rim.h. Finger tighten all tension rods.i. Press down evenly on rim, seat head again, and again finger tighten tension rods.j. Tighten all tension rods with drum key using a crisscross pattern. *TIPS: Do not crank too much or too fast.k. Proceed clockwise around the head to check pitch at each tension rod by playing 2” in from rim.l. Tone control – bring it only to minimal contact with head.5. Release head tension when storing drum for a long period of time.10