MaintenanceGeneral maintenanceIMPORTANT!MAINTENANCE, REPLACEMENT OR REPAIR OF EMISSION CONTROL DEVICES AND SYSTEMS MAY BE PERFORMEDBY ANY REPAIR ESTABLISHMENT OR INDIVIDUAL; HOWEVER, WARRANTY REPAIRS MUST BE PERFORMED BY ADEALER OR SERVICE CENTER AUTHORIZED BY ECHO,INC. THE USE OF PARTS THAT ARE NOT EQUIVALENT IN PER-FORMANCE AND DURABILITY TO AUTHORIZED PARTS MAY IMPAIR THE EFFECTIVENESS OF THE EMISSION CON-TROL SYSTEM AND MAY HAVE A BEARING ON THE OUTCOME OF A WARRANTY CLAIM.NOTE:Using non-standard replacement parts could invalidate your <strong>Shindaiwa</strong> warranty.WARNING!Before performing any maintenance,repair, or cleaning work onthe unit, make sure the engine andcutting attachment are completelystopped. Disconnect the spark plugwire before performing service ormaintenance.WARNING!Non-standard accessories, cuttingattachment, or replacement partsmay not operate properly with your unitand may cause damage and lead topersonal injury.MufflerThis unit must never be operated with a faulty or missingspark arrester or muffler. Make sure the muffler is wellsecured and in good condition. A worn or damaged muffleris a fire hazard and may also cause hearing loss.Spark PlugKeep the spark plug and wire connections tight and clean.FastenersMake sure nuts, bolts, and screws (except carburetoradjusting screws) are tight.Air FilterThe H4 engine that powers your <strong>Shindaiwa</strong> model is a hybrid4-stroke engine. As a hybrid, the engine is lubricated by oilmixed with the gasoline and air from the carburetor that movesthrough and around the internal parts of the engine in a similarway that a 2-stroke engine is lubricated. Without the heavy duty2-stage air filter equipped on all H4 engines, dust and dirt couldalso move through the engine, decreasing engine life, increasingvalve wear and the need for more frequent valve adjustments.To keep your H4 engine strong and reliable, <strong>Shindaiwa</strong>recommends that you check and service the air filter asinstructed in the 10-Hour Maintenance section that follows.Daily maintenancePrior to each work day, perform thefollowing:■■Remove all dirt and debris from theengine, check the cooling fins andair cleaner for clogging, and cleanas necessary.■■Carefully remove any accumulationsof dirt or debris from the mufflerand fuel tank. Check cooling airintake area at base of crankcase.Remove all debris. Dirt build-upin these areas can lead to engineoverheating, fire, or prematurewear.CoolingfinsCoolingfinsRemove all dirt and debris from the engine and check the cooling finsAirintakeWARNING!Always wear gloves whenworking around the cutter assembly.14■■Clean any debris or dirt from the cuttingattachment.■■Check for loose or missing screwsor components. Make sure the cutterattachment is securely fastened.■■Check the entire unit for leakingfuel or grease.■■Make sure nuts, bolts, and screws(except carburetor idle speedadjusting screws) are tight.
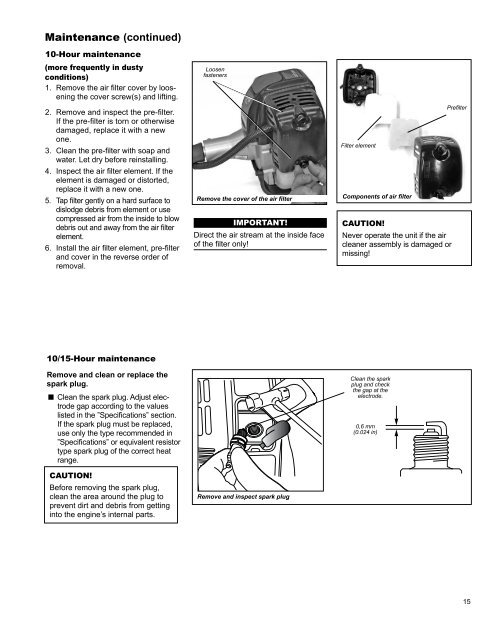
Maintenance (continued)10-Hour maintenance(more frequently in dustyconditions)1. Remove the air filter cover by looseningthe cover screw(s) and lifting.2. Remove and inspect the pre-filter.If the pre-filter is torn or otherwisedamaged, replace it with a newone.3. Clean the pre-filter with soap andwater. Let dry before reinstalling.4. Inspect the air filter element. If theelement is damaged or distorted,replace it with a new one.5. Tap filter gently on a hard surface todislodge debris from element or usecompressed air from the inside to blowdebris out and away from the air filterelement.6. Install the air filter element, pre-filterand cover in the reverse order ofremoval.LoosenfastenersRemove the cover of the air filterIMPORTANT!Direct the air stream at the inside faceof the filter only!Filter elementComponents of air filterCAUTION!Never operate the unit if the aircleaner assembly is damaged ormissing!Prefilter10/15-Hour maintenanceRemove and clean or replace thespark plug.■■Clean the spark plug. Adjust electrodegap according to the valueslisted in the ”Specifications” section.If the spark plug must be replaced,use only the type recommended in”Specifications” or equivalent resistortype spark plug of the correct heatrange.CAUTION!Before removing the spark plug,clean the area around the plug toprevent dirt and debris from gettinginto the engine’s internal parts.Remove and inspect spark plugClean the sparkplug and checkthe gap at theelectrode.0,6 mm(0.024 in)spark plug ga15