

STUDIO
Studio-Sound-1989-06
Studio-Sound-1989-06
- No tags were found...

Create successful ePaper yourself
Turn your PDF publications into a flip-book with our unique Google optimized e-Paper software.
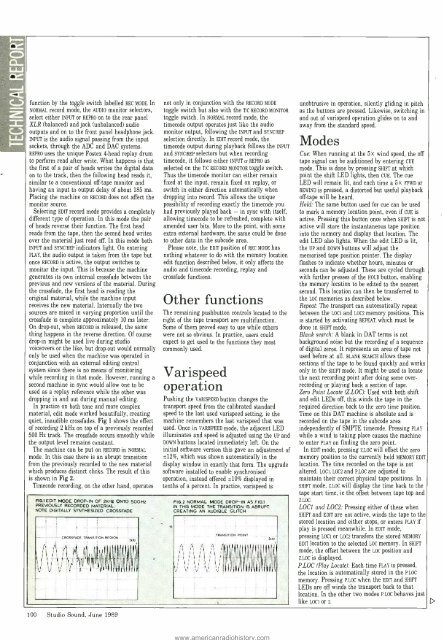
function by the toggle switch labelled REC MODE. InNORMAL record mode, the AUDIO monitor selectors,select either INPUT or REPRO on to the rear panelXLR (balanced) and jack (unbalanced) audiooutputs and on to the front panel headphone jack.INPUT is the audio signal passing from the inputsockets, through the ADC and DAC systems.REPRO uses the unique Fostex 4 -head replay drumto perform read after write. What happens is thatthe first of a pair of heads writes the digital dataon to the track, then the following head reads it,similar to a conventional off tape monitor andhaving an input to output delay of about 185 ms.Placing the machine on RECORD does not affect themonitor source.Selecting EDIT record mode provides a completelydifferent type of operation. In this mode the pairof heads reverse their function. The first headreads from the tape, then the second head writesover the material just read off. In this mode bothINPUT and SYNC/REP indicators light. On enteringPLAY, the audio output is taken from the tape butonce RECORD is active, the output switches tomonitor the input. This is because the machinegenerates its own internal crossfade between theprevious and new versions of the material. Duringthe crossfade, the first head is reading theoriginal material, while the machine inputreceives the new material. Internally the twosources are mixed in varying proportion until thecrossfade is complete approximately 10 ms later.On drop -out, when RECORD is released, the samething happens in the reverse direction. Of coursedrop -in might be used live during studiovoiceovers or the like, but drop -out would normallyonly be used when the machine was operated inconjunction with an external editing controlsystem since there is no means of monitoringwhile recording in that mode. However, running asecond machine in sync would allow one to beused as a replay reference while the other wasdropping in and out during manual editing.In practice on both tone and more complexmaterial, edit mode worked beautifully, creatingquiet, inaudible crossfades. Fig 1 shows the effectof recording 2 kHz on top of a previously recorded500 Hz track. The crossfade occurs smoothly whilethe output level remains constant.The machine can be put on RECORD in NORMALmode. In this case there is an abrupt transitionfrom the previously recorded to the new materialwhich produces distinct clicks. The result of thisis shown in Fig 2.Timecode recording, on the other hand, operatesFIG.1 EDIT MODE DROP -IN OF 2kHZ ONTO 500HíPREVIOUSLY RECORDED MATERIAL.NOTE DIGITALLY SYNTHESIZED CROSSFADE- CROSSFADE TRANSITION REGION100 Studio Sound, June 1989not only in conjunction with the RECORD MODEtoggle switch but also with the T/C RECORD MONITORtoggle switch. In NORMAL record mode, thetimecode output operates just like the audiomonitor output, following the INPUT and SYNC/REPselection directly. In EDIT record mode, thetimecode output during playback follows the INPUTand SYNC/REP selectors but when recordingtimecode, it follows either INPUT or REPRO asselected on the T/C RECORD MONITOR toggle switch.Thus the timecode monitor can either remainfixed at the input, remain fixed on replay, orswitch in either direction automatically whendropping into record. This allows the uniquepossibility of recording exactly the timecode youhad previously played back - in sync with itself,allowing timecode to be refreshed, complete withamended user bits. More to the point, with someextra external hardware, the same could be doneto other data in the subcode area.Please note, the EDIT position of REC MODE hasnothing whatever to do with the memory locationedit function described below, it only affects theaudio and timecode recording, replay andcrossfade functions.Other functionsThe remaining pushbutton controls located to theright of the tape transport are multifunction.Some of them proved easy to use while otherswere not so obvious. In practice, users couldexpect to get used to the functions they mostcommonly used.VarispeedoperationPushing the VARISPEED button changes thetransport speed from the calibrated standardspeed to the last used varispeed setting, ie themachine remembers the last varispeed that wasused. Once in VARISPEED mode, the adjacent LEDilluminates and speed is adjusted using the UP andDOWN buttons located immediately left. On theinitial software version this gave an adjustment of±12 %, which was shown automatically in thedisplay window in exactly that form. The upgradesoftware installed to enable synchronisedoperation, instead offered ±10% displayed intenths of a percent. In practice, varispeed isFIG.2 NORMAL MODE DROP -IN AS FIG.1N THIS MODE THE TRANSITION IS ABRUPT,CREATING AN AUDIBLE GLITCH:TRANSITION POINTItfti111111 rt111ff2kHiIIII1unobtrusive in operation, silently gliding in pitchas the buttons are pressed. Likewise, switching inand out of varispeed operation glides on to andaway from the standard speed.ModesCue: When running at the 5x wind speed, the offtape signal can be auditioned by entering CUEmode. This is done by pressing SHIFT at whichpoint the shift LED lights, then CUE. The cueLED will remain lit, and each time a 5x FFWD orREWIND is pressed, a distorted but useful playbackoff -tape will be heard.Hold: The same button used for cue can be usedto mark a memory location point, even if CUE isactive. Pressing this button once when SHIFT is notactive will store the instantaneous tape positioninto the memory and display that location. Theedit LED also lights. When the edit LED is lit,the UP and DOWN buttons will adjust thememorised tape position pointer. The displayflashes to indicate whether hours, minutes orseconds can be adjusted. These are cycled throughwith further presses of the HOLD button, enablingthe memory location to be edited to the nearestsecond. This location can then be transferred tothe LOC memories as described below.Repeat: The transport can automatically repeatbetween the LOCI and LOC2 memory positions. Thisis started by activating REPEAT, which must bedone in SHIFT mode.Blank search: A blank in DAT terms is notbackground noise but the recording of a sequenceof digital zeros. It represents an area of tape notused before at all. BLANK SEARCH allows thesesections of the tape to be found quickly and worksonly in the SHIFT mode. It might be used to locatethe next recording point after doing some over -recording or playing back a section of tape.Zero Point Locate (Z.LOC): Used with both shiftand edit LEDs off, this winds the tape hi therequired direction back to the zero time position.Time on this DAT machine is absolute and isrecorded on the tape in the subcode areaindependently of SMPTE timecode. Pressing PLAYwhile a wind is taking place causes the machineto enter PLAY on finding the zero point.In EDIT mode, pressing Z.LOC will offset the zeromemory position to the currently held MEMORY EDITlocation. The time recorded on the tape is notaltered. LOCI, LOC2 and P.LOC are adjusted tomaintain their correct physical tape positions. InSHIFT mode, Z.LOC will display the time back to thetape start time, ie the offset between tape top andZ.LOC.LOCI and LOC2: Pressing either of these whenSHIFT and EDIT are not active, winds the tape to thestored location and either stops, or enters PLAY ifplay is pressed meanwhile. In EDIT mode,pressing LOCI or LOC2 transfers the stored MEMORYEDIT location to the selected LOC memory. In SHIFTmode, the offset between the LOC position andz.LOC is displayed.P.LOC (Play Locate): Each time PLAY is pressed,the location is automatically stored in the P.LOCmemory. Pressing PLOC when the EDIT and SHIFTLEDs are off winds the transport back to thatlocation. In the other two modes P.LOC behaves justlike LOCI or 2.