Washroom Dispenser Service and Parts Manual Tork Foam Soap ...
Washroom Dispenser Service and Parts Manual Tork Foam Soap ...
Washroom Dispenser Service and Parts Manual Tork Foam Soap ...
- No tags were found...

You also want an ePaper? Increase the reach of your titles
YUMPU automatically turns print PDFs into web optimized ePapers that Google loves.
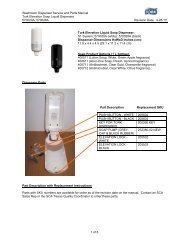
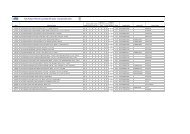
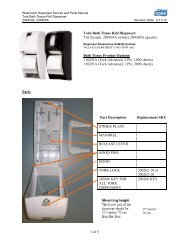
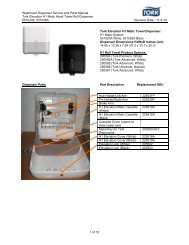
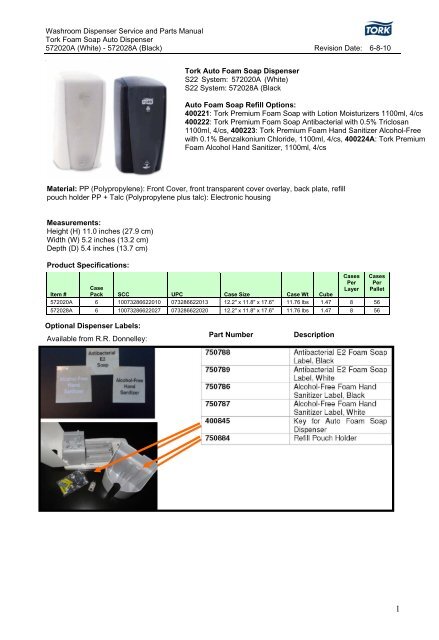
<strong>Washroom</strong> <strong>Dispenser</strong> <strong>Service</strong> <strong>and</strong> <strong>Parts</strong> <strong>Manual</strong><strong>Tork</strong> <strong>Foam</strong> <strong>Soap</strong> Auto <strong>Dispenser</strong>572020A (White) - 572028A (Black) Revision Date: 6-8-10<strong>Tork</strong> Auto <strong>Foam</strong> <strong>Soap</strong> <strong>Dispenser</strong>S22 System: 572020A (White)S22 System: 572028A (BlackAuto <strong>Foam</strong> <strong>Soap</strong> Refill Options:400221: <strong>Tork</strong> Premium <strong>Foam</strong> <strong>Soap</strong> with Lotion Moisturizers 1100ml, 4/cs400222: <strong>Tork</strong> Premium <strong>Foam</strong> <strong>Soap</strong> Antibacterial with 0.5% Triclosan1100ml, 4/cs, 400223: <strong>Tork</strong> Premium <strong>Foam</strong> H<strong>and</strong> Sanitizer Alcohol-Freewith 0.1% Benzalkonium Chloride, 1100ml, 4/cs, 400224A: <strong>Tork</strong> Premium<strong>Foam</strong> Alcohol H<strong>and</strong> Sanitizer, 1100ml, 4/csMaterial: PP (Polypropylene): Front Cover, front transparent cover overlay, back plate, refillpouch holder PP + Talc (Polypropylene plus talc): Electronic housingMeasurements:Height (H) 11.0 inches (27.9 cm)Width (W) 5.2 inches (13.2 cm)Depth (D) 5.4 inches (13.7 cm)Product Specifications:Cases CasesPer PerCaseLayer PalletItem # Pack SCC UPC Case Size Case Wt Cube572020A 6 10073286622010 073286622013 12.2" x 11.8" x 17.6" 11.76 lbs 1.47 8 56572028A 6 10073286622027 073286622020 12.2" x 11.8" x 17.6" 11.76 lbs 1.47 8 56Optional <strong>Dispenser</strong> Labels:Available from R.R. Donnelley:Part NumberDescription1
<strong>Washroom</strong> <strong>Dispenser</strong> <strong>Service</strong> <strong>and</strong> <strong>Parts</strong> <strong>Manual</strong><strong>Tork</strong> <strong>Foam</strong> <strong>Soap</strong> Auto <strong>Dispenser</strong>572020A (White) - 572028A (Black) Revision Date: 6-8-10Mounting Template <strong>and</strong> Loading Instructions:A refill loading diagram is located on the back panel of the inner carton.Mounting Options:Surface Mounted Tape2
<strong>Washroom</strong> <strong>Dispenser</strong> <strong>Service</strong> <strong>and</strong> <strong>Parts</strong> <strong>Manual</strong><strong>Tork</strong> <strong>Foam</strong> <strong>Soap</strong> Auto <strong>Dispenser</strong>572020A (White) - 572028A (Black) Revision Date: 6-8-10Direct-to-Wall3
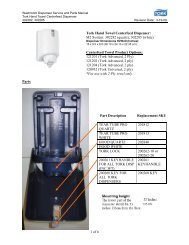
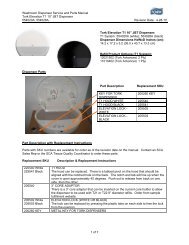
<strong>Washroom</strong> <strong>Dispenser</strong> <strong>Service</strong> <strong>and</strong> <strong>Parts</strong> <strong>Manual</strong><strong>Tork</strong> <strong>Foam</strong> <strong>Soap</strong> Auto <strong>Dispenser</strong>572020A (White) - 572028A (Black) Revision Date: 6-8-10Battery Installation1. Use the dispenser cabinet key to open the frontcover. Insert the key into the holes located at the topof the dispenser, twisting the key, <strong>and</strong> pulling thecover towards you. The cover is hinged at the bottomof the dispenser.2. Remove the soap refill pouch holder by pulling it straight up.3. Insert four C-cell alkaline batteries (not included) makingsure to place batteries in the compartment in the properorientation as shown by the diagram in the batterycompartment.4. Replace the soap refill pouch holder.5. The dispenser will turn “on” automatically once batteries are installed.*You will hear a long beep signifying the unit is activated.* If the dispenser appears non-functional, remove batteries, wait 4 minutes <strong>and</strong> reinsert.4
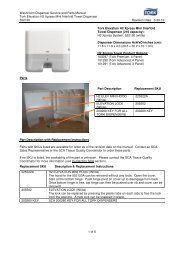
<strong>Washroom</strong> <strong>Dispenser</strong> <strong>Service</strong> <strong>and</strong> <strong>Parts</strong> <strong>Manual</strong><strong>Tork</strong> <strong>Foam</strong> <strong>Soap</strong> Auto <strong>Dispenser</strong>572020A (White) - 572028A (Black) Revision Date: 6-8-10LED/Tone Indicators:Tone switch:When switch is set to ON position there will be one beep.When switch is set to OFF position there will be two beeps.LED Indicators <strong>and</strong> Tone (IR sensor error indications):RefillAfter 2,600 doses a red LED flashes twice every 2 seconds along with two beeps every 8 secondsindicating the refill needs to be replaced. Be careful to not remove or dislodge the refill while modifying anysettings, as the dosing program will reset.BatteriesWhen the batteries are low a yellow LED flashes once every 2 seconds, along with one beep every 16seconds. 4 C-cell batteries will last 120,000 h<strong>and</strong> washes or 3 years, whichever comes first.Object in Sensor Range (within 4 inches of sensing window)Refill in dispenser -If an object is in the sensor range more then 10 seconds then the green LED will flashonce every second, one beep every 1/2 second. Remove object <strong>and</strong> unit will operate normally. No refill indispenser – If an object is in the sensor range then the green LED blinks once every second <strong>and</strong> beepsevery ½ second continuously as long as object remains in sensing range.<strong>Dispenser</strong> Activation:1. To activate dispenser, place h<strong>and</strong> under bottom of dispenser. If a second dose is needed, removeh<strong>and</strong>, <strong>and</strong> then replace h<strong>and</strong> under dispenser (When an object comes within 4 inches of the sensingwindow the dispenser will activate).2. The dispenser cover must be closed to activate.Loading Instructions:1. Open dispenser cover with a dispenser cabinet key.2. Remove the refill pouch from the packaging box. Place the refill pouch with the nozzle pointing downinto the pouch holder.3. Remove <strong>and</strong> discard the nozzle cap.4. Snap the pouch fitment into the U-shaped bracket insuring the nozzle fits into actuator lever. The pouchfitment will snap into place once both brackets have snapped over the fitment. At the same time, makesure the nozzle fits into the slotted actuator lever.5. The dispenser <strong>and</strong> dose program resets automatically each time a refill is installed. You will hear a longbeep once the refill is properly installed.6. Close dispenser cover.5
<strong>Washroom</strong> <strong>Dispenser</strong> <strong>Service</strong> <strong>and</strong> <strong>Parts</strong> <strong>Manual</strong><strong>Tork</strong> <strong>Foam</strong> <strong>Soap</strong> Auto <strong>Dispenser</strong>572020A (White) - 572028A (Black) Revision Date: 6-8-10Removing Empty Refill:1. Press grey tabs on pouch fitment sideways to release valve.2. Valve should pop up out of collar.3. Remove empty bag from dispenser.Contacting SCABefore contacting SCA, please locate <strong>and</strong> make note of the date code circle molded into the back of thedispenser.Product Code Date Location: Open dispenser, look on back wall of dispenser a circle (like shown above)molded into unit. The circle shows an arrow pointing to the month, with the year in the center of circle.To contact the SCA Tissue Quality Coordinator, dial 1-866-SCA-TORK (866-722-8675) <strong>and</strong> select # 6.6