Hands-On RTAC Session Web Server Introduction Exercise
Web Server Introduction Exercise - CacheFly
Web Server Introduction Exercise - CacheFly
- No tags were found...

Create successful ePaper yourself
Turn your PDF publications into a flip-book with our unique Google optimized e-Paper software.
<strong>Hands</strong>-<strong>On</strong> <strong>RTAC</strong> <strong>Session</strong><br />
<strong>Web</strong> <strong>Server</strong> <strong>Introduction</strong> <strong>Exercise</strong><br />
SEL-3530 <strong>RTAC</strong><br />
Front<br />
USB<br />
USB<br />
Cable<br />
Laptop<br />
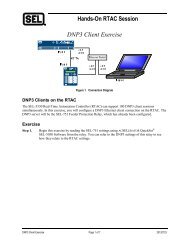
Figure 1<br />
Connection Diagram<br />
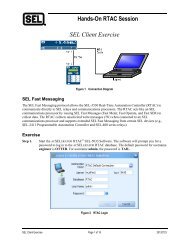
SEL <strong>RTAC</strong> <strong>Web</strong> <strong>Server</strong><br />
The SEL-3530 Real-Time Automation Controller (<strong>RTAC</strong>) web server provides a means to set up <strong>RTAC</strong><br />
network configurations and user accounts, view human-machine interface (HMI) pages, download<br />
collected events, and view the Sequential Events Recorder (SER) and alarm logs. This exercise provides a<br />
brief introduction to the <strong>RTAC</strong> web server using the front USB port.<br />
<strong>Exercise</strong><br />
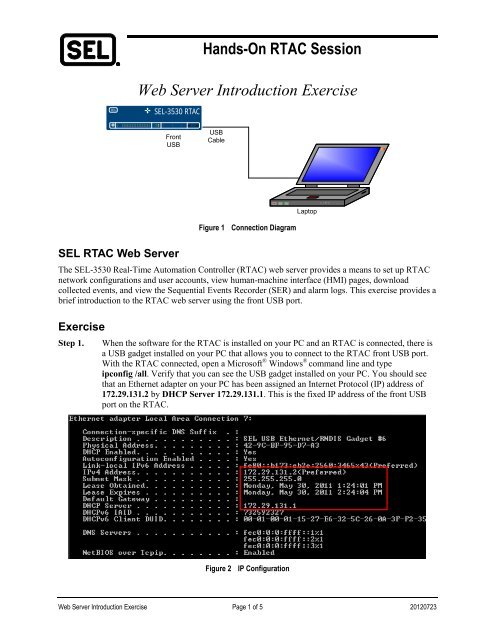
Step 1.<br />
When the software for the <strong>RTAC</strong> is installed on your PC and an <strong>RTAC</strong> is connected, there is<br />
a USB gadget installed on your PC that allows you to connect to the <strong>RTAC</strong> front USB port.<br />
With the <strong>RTAC</strong> connected, open a Microsoft ® Windows ® command line and type<br />
ipconfig /all. Verify that you can see the USB gadget installed on your PC. You should see<br />
that an Ethernet adapter on your PC has been assigned an Internet Protocol (IP) address of<br />
172.29.131.2 by DHCP <strong>Server</strong> 172.29.131.1. This is the fixed IP address of the front USB<br />
port on the <strong>RTAC</strong>.<br />
Figure 2<br />
IP Configuration<br />
<strong>Web</strong> <strong>Server</strong> <strong>Introduction</strong> <strong>Exercise</strong> Page 1 of 5 20120723
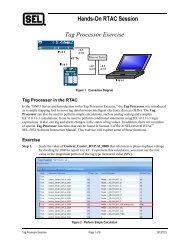
Step 2.<br />
Open your web browser (Internet Explorer ® or Firefox ® ), and type in the address<br />
https://172.29.131.1/. If this is the first time you are connecting to the <strong>RTAC</strong>, you will see a<br />
security warning because the <strong>RTAC</strong> is using a default X.509 certificate that has not been<br />
signed by a trusted certificate authority. Accept the certificate from the <strong>RTAC</strong>, and continue<br />
to the <strong>RTAC</strong> user login page.<br />
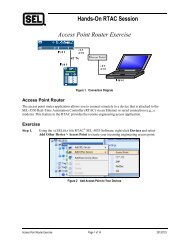
Step 3.<br />
Figure 3<br />
Security Certificate Warning<br />
The <strong>RTAC</strong> does not come with any accounts configured. If an account is configured, you will<br />
see the login screen in Figure 4; otherwise, you will see a screen asking you to configure an<br />
account name and password. By default, complex passwords must be used. Your instructor<br />
will provide you with the details of which account is configured, or should be configured, on<br />
your <strong>RTAC</strong>.<br />
Figure 4<br />
Login Screen<br />
<strong>Web</strong> <strong>Server</strong> <strong>Introduction</strong> <strong>Exercise</strong> Page 2 of 5 20120723
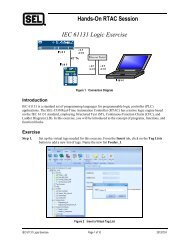
Step 4.<br />
<strong>On</strong>ce you are logged in, the <strong>RTAC</strong> dashboard screen appears. Enter the information as shown<br />
in Figure 5 and click Submit to commit changes.<br />
Figure 5<br />
<strong>RTAC</strong> Dashboard<br />
<strong>Web</strong> <strong>Server</strong> <strong>Introduction</strong> <strong>Exercise</strong> Page 3 of 5 20120723
Step 5.<br />
Under Accounts, create a new user for yourself under the Add New User tab. You can<br />
uncheck the complex password requirement to use a simple password for the exercises today.<br />
Step 6.<br />
Figure 6<br />
New User Accounts<br />
Under Network > Ethernet, enter the Ethernet port settings as provided by the instructor for<br />
your workstation. For the exercise today, enable ping on the <strong>RTAC</strong> network interface card<br />
that you are using.<br />
Figure 7<br />
Ethernet Settings<br />
<strong>Web</strong> <strong>Server</strong> <strong>Introduction</strong> <strong>Exercise</strong> Page 4 of 5 20120723
Step 7.<br />
Set the system time to the current local time, and explore the rest of the <strong>RTAC</strong> web server.<br />
Figure 8<br />
Set System Date and Time<br />
<strong>Web</strong> <strong>Server</strong> <strong>Introduction</strong> <strong>Exercise</strong> Page 5 of 5 20120723