INSTRUCTIONS FOR USE AND MAINTENANCE - mbm-Service ...
INSTRUCTIONS FOR USE AND MAINTENANCE - mbm-Service ...
INSTRUCTIONS FOR USE AND MAINTENANCE - mbm-Service ...

You also want an ePaper? Increase the reach of your titles
YUMPU automatically turns print PDFs into web optimized ePapers that Google loves.
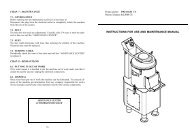
INTRODUCTION<br />
• This manual is meant to provide customers with information on the slicer and<br />
its specifications and the necessary operating and maintenance instructions in<br />
order to guarantee the best possible use of the machine and preserve its<br />
efficiency in the long term.<br />
• This manual is to be used by qualified and skilled people well informed about<br />
the use of the slicer and its periodical maintenance.<br />
CONTENTS<br />
CHAP. 1 - IN<strong>FOR</strong>MATION ON THE SLICER page 5<br />
1.1 - GENERAL PRECAUTIONS<br />
1.2 - SAFETY DEVICES INSTALLED ON THE SLICER<br />
1.2.1 - mechanical safety devices<br />
1.2.2 - electrical safety devices<br />
1.3 - SPECIFICATIONS OF THE SLICER<br />
1.3.1 - general description<br />
1.3.2 - construction characteristics<br />
1.3.3 - slicer components<br />
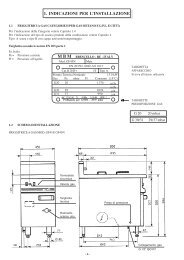
CHAP. 2 - TECHNICAL DATA page 8<br />
2.1 - OVERALL DIMENSIONS, WEIGHT, CHARACTERISTICS ...<br />
CHAP. 3 - THE ARRIVAL OF THE SLICER page 10<br />
3.1 - DESPATCH OF THE SLICER<br />
3.2 - PACKAGE CHECK UPON RECEIPT<br />
3.3 - PACKAGE DISPOSAL<br />
CHAP. 4 - INSTALLATION page.11<br />
4.1 - SETTING UP OF THE SLICER<br />
4.2 - ELECTRICAL CONNECTIONS<br />
4.2.1 - slicer with single-phase motor<br />
4.2.2 - slicer with 3-phase motor<br />
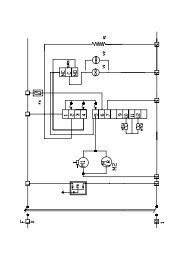
4.3 - ELECTRIC CIRCUIT DIAGRAMS<br />
4.3.1 - electric circuit diagram of normal automatic single-phase slicer<br />
4.3.2 - electric circuit diagram of normal automatic 3-phase slicer<br />
4.3.3 - electric circuit diagram ofsuper automatic three-phase, single-phase<br />
slicer<br />
2<br />
5. take the axis of the two holes (c) on the blade match with the two pivots (d) on<br />
the tool, simply making the blade turn until the desired position is reached;<br />
6. screw the two knobs (e) without though tightening too hard;<br />
6.2.3 - cleaning the sharpener<br />
Rub the sharpening stones with a small brush , still in safety position, i.e. with the<br />
sharpening stones towards the opposite side of the blade.<br />
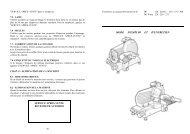
6.2.4 - cleaning the deflector<br />
To remove the deflector (see FIG. n°19) simply unscrew<br />
the two screws (a) that keep it blocked.<br />
At this point, clean the deflector with water and neutral<br />
detergents.<br />
CHAP. 7 - <strong>MAINTENANCE</strong><br />
FIG. n° 19 - View of the deflector<br />
7.1 - GENERAL FEATURES<br />
Before starting maintenance:<br />
a) always disconnect the power plug from the mains to completely isolate the<br />
slicer from the rest of the machine.<br />
b) turn the dial knob to adjust the thickness gauge plate to “0”.<br />
7.2 - BELT<br />
The belt does not need any adjusting. Generally, after 3/4 years it should be<br />
replaced; in this case, please contact the “SERVICE CENTRE”.<br />
7.3 - LEVELING FEET<br />
The leveling feet may deteriorate with time and loose their elasticity, thus reduces<br />
the stability of the slicer and they should be therefore regularly replaced.<br />
7.4 - POWER CORD<br />
Periodically check whether the power supply cord is worn out and, if so, please<br />
call the “SERVICE CENTRE” to have it replaced.<br />
7.5 - BLADES<br />
Check that the diamater of the blade, after many sharpenings, is not reduced by<br />
23<br />
a