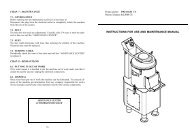
INSTRUCTIONS FOR USE AND MAINTENANCE - mbm-Service ...
INSTRUCTIONS FOR USE AND MAINTENANCE - mbm-Service ...
INSTRUCTIONS FOR USE AND MAINTENANCE - mbm-Service ...

You also want an ePaper? Increase the reach of your titles
YUMPU automatically turns print PDFs into web optimized ePapers that Google loves.
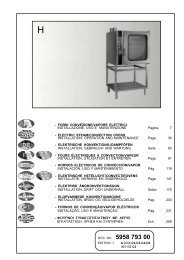
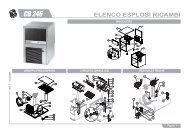
LEGEND:<br />
1 - Hand guard 12 - Tie screw for blade guard<br />
2 - Meat press arm 13 - Leveling feet<br />
3 - Blade guard 14 - Push-button panel<br />
4 - Sliding food hopper 15 - Dial knob<br />
5 - Edge 16 - Thickness gauge plate<br />
6 - Stem 17 - Deflector<br />
7 - Carriage locking knob 18 - Rating plate - serial number<br />
8 - Mechanism lever 19 - Blade<br />
9 - Thickness gauge plate 20 - Ring<br />
10 - Sharpener cover 21 - Fixed meat hopper<br />
11 - Sharpener locking knob 22 - Shell<br />
23 - Base<br />
24 - Stem lever<br />
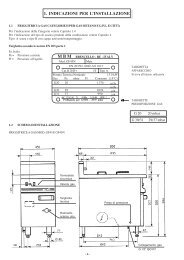
CHAP. 2 - TECHNICAL DATA<br />
2.1 - OVERALL DIMENSIONS, WEIGHT, CHARACTERISTICS...<br />
FIG. n°2 - Overall dimensions<br />
D<br />
A<br />
8<br />
E<br />
B<br />
C<br />
Manual operation<br />
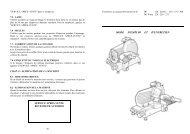
Unlock the carriage by turning the knob to position A (see FIG.n°12):<br />
7. press the switch-on button “I” and the switch-off button “0” of the blade;<br />
8. check the manual sliding of the carriage.<br />
A<br />
B<br />
Carriage lock/unlock lever<br />
A - Carriage unlocked<br />
B - Carriage locked<br />
FIG. n° 12 - Carriage lock/unlock lever<br />
5.2.2 - SUPER AUTOMATIC slicer<br />
1. turn the selector on AUTO (FIG. n° 11 - ref. 2);<br />
2. check the functioning and the adjustment of the thickness gauge plate by using<br />
the dial knob (FIG. n°1 - ref. 15);<br />
3. Check the functioning of the sharpener (see para. 5.4, FIG. 15 a-b-c);<br />
4. check that the carriage can be removed only with the knob in position “0” and<br />
that, after removal, the knob remains in the same position;<br />
5. set a random number of slices on the selector (FIG. n°11 - ref. 7);<br />
6. press the blade switch-on button (FIG. n°11 - ref. 4) and then the carriage<br />
switch-on button (FIG. n°11 - ref. 5), making sure that they both work<br />
correctly;<br />
7. check whether display indicates the number of slices cut;<br />
8. make sure that the slicer shuts down automatically when the preset number of<br />
slices has been reached.<br />
Semi-manual operation mode<br />
9. turn the selector on MAN;<br />
10. press the switch-on button “I” (FIG. n°11 - ref. 4);<br />
11. check that the display indicates the number of slices cut;<br />
12. once the preset number of slices has been reached, turn off the slicer.<br />
Manual operation mode<br />
13. turn the selector on MAN (FIG. n°11 - ref. 2);<br />
14. unlock the carriage by turning the knob in position A (FIG. n° 12);<br />
15. press the blade switch-on button “I” and then the switch-off button “0”;<br />
16. check the manual sliding of the carriage and of the meat press;<br />
17