INSTRUCTIONS FOR USE AND MAINTENANCE - mbm-Service ...
INSTRUCTIONS FOR USE AND MAINTENANCE - mbm-Service ...
INSTRUCTIONS FOR USE AND MAINTENANCE - mbm-Service ...

Create successful ePaper yourself
Turn your PDF publications into a flip-book with our unique Google optimized e-Paper software.
INDEX OF FIGURES<br />
FIG. n°1 - General view of the slicer page 7<br />
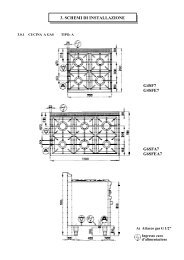
FIG. n°2 - Overall dimensions page 8<br />
FIG. n°3 - Package description page 10<br />
FIG. n°4 - Rating plate - serial number page 11<br />
FIG. n°5 - Blade rotation page 12<br />
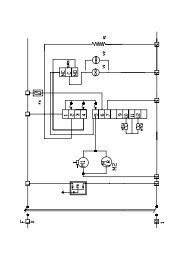
FIG. n°6 - Single-phase electric circuit diagram page 12<br />
FIG. n°7 - Three-phase electric circuit diagram page 13<br />
FIG. n°8 - Single and three-phase electric circuit diagram page 14<br />
FIG. n°9 - Table of adjustament values page 15<br />
FIG. n°10 - Location of controls on the normal automatic page 16<br />
slicer<br />
FIG. n°11 - Location of controls on the super automatic page 16<br />
slicer<br />
FIG. n°12 - Carriage lock/unlock lever page 17<br />
FIG. n°13 a-b - Correct cutting position page 18<br />
FIG. n°14 - Meat cut page 18<br />
FIG. n°15 a-b-c - Use of the sharpener page 20<br />
FIG. n°16 - Release of the carriage page 22<br />
FIG. n°17 - Release of the blade guard page 22<br />
FIG. n°18 - Positioning the blade removal tool page 22<br />
FIG. n°19 - View of the deflector page 23<br />
4<br />
6. after sharpening, the sharpening stones should be<br />
cleaned (see 6.2.3);<br />
7. once sharpening has been completed, put the<br />
sharpening device back in its initial position<br />
following the inverse procedure.<br />
N.B.: Deburring should not last longer than 3/4<br />
seconds in order not to deform the blade edge.<br />
CHAP. 6 - ORDINARY CLEANING<br />
6.1 - GENERAL FEATURES<br />
• The slicer should be cleaned at least once a day or more frequently, if<br />
necessary.<br />
• Cleaning should be extremely accurate on all the parts of the slicer that come<br />
into direct contact with the food.<br />
• Never clean the slicer by means of compressed water or water jets. Do not use<br />
other detergents. Also brushes and similar tools that may damage the<br />
appliance should not be used.<br />
Before cleaning:<br />
1) always disconnect the power plug from the mains to isolate completely the<br />
slicer from the rest of the machine;<br />
2) turn the dial knob to position "0";<br />
Pay attention to RESIDUAL RISKS due to cutting and/or sharp edges<br />
6.2 - SLICER CLEANING PROCEDURE<br />
6.2.1 - cleaning of the meat hopper (see FIG.n°16)<br />
The carriage (hopper+meat press+stem) can be easily removed:<br />
- with the dial knob on "0" (1);<br />
- with the carriage (2) at stroke-end (a) on the controls side;<br />
21<br />
3<br />
FIG. n°15b<br />
3<br />
FIG. n°15c<br />
4