INSTRUCTIONS FOR USE AND MAINTENANCE - mbm-Service ...
INSTRUCTIONS FOR USE AND MAINTENANCE - mbm-Service ...
INSTRUCTIONS FOR USE AND MAINTENANCE - mbm-Service ...

Create successful ePaper yourself
Turn your PDF publications into a flip-book with our unique Google optimized e-Paper software.
- carriage only removable when the thickness gauge plate is set in the “0”<br />
position, at the end of its run and towards the operating side.<br />
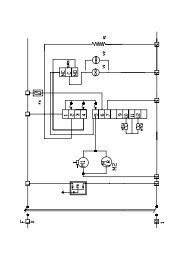
1.2.2 - ELECTRICAL SAFETY SYSTEM<br />
The safety system installed to protect users against electrical risks is in<br />
compliance with EC directives 72/23, 89/336, mod. 91/368, 92/31, 93/68 and<br />
regulations EN 60335-1, EN 60335-2-64, EN 55014.<br />
The slicer is equipped with:<br />
- a micro-switch which stops the slicer in case the tie screw for blade guard is<br />
removed (see Fig. n° 1); the micro-switch prevents from restarting the slicer if<br />
the guard has not been set in the switch-off position.<br />
- a relay in the control box which requires the restarting of the slicer when a<br />
power cut occurs.<br />
Even though CE professional slicers are provided with electrical and mechanical<br />
protections (when the slicer is working and for maintenance and cleaning<br />
operations), there are still RESIDUAL RISKS (EC 89/392 point 1.7.2) that<br />
cannot be eliminated completely; these risks are mentionned in this manual under<br />
WARNING.The blade and other parts of the machine can cause cuts and injuries.<br />
1.3 - SPECIFICATIONS OF THE SLICER<br />
1.3.1 - general description<br />
Our firm has designed and manufactured the CE line of professional slicers to cut<br />
foodstuffs (as salami and meat) in order to guarantee:<br />
- the highest degree of safety in functioning, cleaning and maintenance;<br />
- the highest hygienic standards due to an accurate choice of materials and a<br />
smooth design of the slicer components which come into contact with products<br />
so as to obtain easy and total cleaning and easy disassembly;<br />
- the greatest accuracy in cutting foodstuffs thanks to a cam mechanism;<br />
- solidity and stability of components;<br />
- the highest degree of noiselessness due to belt drive;<br />
- great handiness.<br />
1.3.2 - construction features<br />
The professional slicers CE are made of an aluminium alloy (Peraluman Mg 5)<br />
treated by anodic oxidation. This procedure guarantees high hygienic standards of<br />
the parts interested by the cut and resistance to acids, salts and oxidation<br />
processes. The blade is made of chromium plated steel 100Cr6; it is grinded and<br />
hardened to guarantee an accurate and sharp cut of products also after it has been<br />
resharpened. The other components of the slicer are made of ABS, LEXAN,<br />
PLEXIGLAS and steel AISI 430 or 304.<br />
The edge is made of stainless steel and the inside frame is made of galvanized<br />
6<br />
1. load the product on the slicer and lock it with the meat press equipped with<br />
sharp edges;<br />
2. set the slicing thickness by means of the dial knob;<br />
3. press the switch-on button “I” of the blade (FIG. n° 10 - ref. 1);<br />
4. in the VV model it is possible to adjust the speed using a small knob;<br />
5. push the carriage (meat hopper + meat press + stem) and slightly advance it<br />
towards the blade, without pressing the product against the thickness gauge<br />
plate (by gravity). The product will easily penetrate through the blade, and the<br />
slice, guided by the deflector, will fall onto the collecting tray (see FIG. n°14);<br />
6. do not let the slicer work when unloaded;<br />
7. at the end of the slicing, turn the dial knob to “0”,and press the switch-off<br />
button “0” of the blade to stop the slicer (FIG. n° 10 - ref. 2);<br />
8. resharpen the blade as soon as the slices have a frayed or rough surface and<br />
slicing becomes difficult (see 5.4).<br />
5.3.3 - Super automatic slicer in automatic mode<br />
The procedure below is to be followed:<br />
1. load the product on the slicer and lock it with the meat press equipped with<br />
sharp edges;<br />
2. adjust the desired slicing thickness by means of the dial knob;<br />
3. turn the selector to AUTO (FIG. n°11 - ref. 2);<br />
4. set the number of slices desired by means of the selector (FIG. n°11 - ref. 7);<br />
5. press the switch-on button “I” of the blade;<br />
6. press the switch-on button “I” of the carriage;<br />
7. set the carriage speed by using the appropriate knob (FIG. n°11 - ref. 1); the<br />
display will progressively show the number of slices cut;<br />
8. resharpen the blade as soon as the slices have a frayed or rough surface and<br />
slicing becomes difficult (see 5.4).<br />
5.3.4 - Super automatic slicer in semi-automatic mode<br />
The procedure below is to be followed:<br />
1. load the product on the slicer and lock it with the meat pusher equipped with<br />
sharp edges;<br />
2. adjust the desired slicing thickness by means of the dial knob;<br />
3. turn the selector to MAN (FIG. n° 11 - ref. 2);<br />
4. press the switch-on button “I” of the blade;<br />
5. press the switch-on button “I” of the carriage;<br />
6. set the carriage speed by using the appropriate knob (FIG. n°11 - ref. 1); the<br />
display will progressively show the number of slices cut;<br />
19