

American Iron Magazine December 2017

You also want an ePaper? Increase the reach of your titles
YUMPU automatically turns print PDFs into web optimized ePapers that Google loves.
to mount the new ones.<br />
The JRi shocks are beautifully<br />
made, and when comparing them to<br />
<br />
<br />
news is the ride is noticeably better<br />
than expected, no bottoming out and<br />
very smooth and predictable through<br />
the turns. The bad news is the rear<br />
shocks are so very good, the front<br />
suspension now really stands out as<br />
lacking. However, I hear JRi is now<br />
also making high-end fork cartridges<br />
for Harleys. Unfortunately, not yet for<br />
my year Dyna.<br />
JRI SHOCKS come pre-adjusted,<br />
but to achieve the maximum benefit<br />
TIPS &<br />
TRICKS<br />
from your new shocks<br />
you should set the sag.<br />
First, mark a location on<br />
the rear subframe directly above the<br />
axle centerline. You can use a small<br />
piece of masking tape. Raise the<br />
rear of the bike until the wheel just<br />
comes off the ground, and measure<br />
the distance from the axle to the<br />
subframe, this is measurement A.<br />
Then have the rider (with gear) sit<br />
on the bike and measure again, this<br />
is measurement B. Subtract B from<br />
A and this is your total sag. It should<br />
be between 25mm-30mm. If greater<br />
than 30mm, add preload to the<br />
spring. If less than 25mm, remove<br />
preload.<br />
2<br />
Jack up the rear of the bike to get the weight of the<br />
vehicle off the shocks.<br />
5<br />
Install the new JRi shock using the stock hardware. Install<br />
the lower bolt first, but do not tighten completely,<br />
as the shock may need to be pivoteded to align with<br />
the upper mounting hole.<br />
7<br />
Once both sides are done, lower the bike back to terra<br />
firma.<br />
3<br />
Remove the lower shock bolt (one side at a time) with<br />
a T50 torx socket wrench.<br />
4<br />
Loosen and remove the top shock bolt with a 3/4"<br />
wrench and remove the shock absorber.<br />
6<br />
Then install the original upper shock bolt and tighten<br />
with a 3/4" wrench. Then tighten the lower shock bolts<br />
with the Torx T50 socket wrench. Torque the upper<br />
bolts to 75-85 ft-lb. Torque the lower Torx bolts to<br />
30-40 ft-lb.<br />
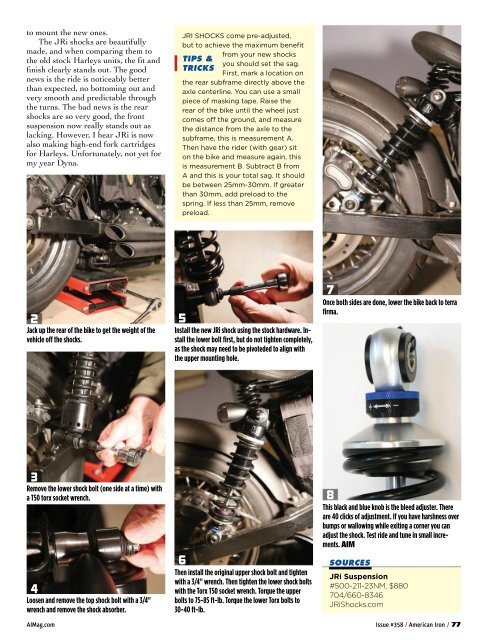
8<br />
This black and blue knob is the bleed adjuster. There<br />
are 40 clicks of adjustment. If you have harshness over<br />
bumps or wallowing while exiting a corner you can<br />
adjust the shock. Test ride and tune in small increments.<br />
<br />
SOURCES<br />
JRi Suspension<br />
#500-211-23NM, $880<br />
704/660-8346<br />
JRiShocks.com<br />
AIMag.com Issue #358 / <strong>American</strong> <strong>Iron</strong> / 77