

American Iron Magazine December 2017

You also want an ePaper? Increase the reach of your titles
YUMPU automatically turns print PDFs into web optimized ePapers that Google loves.
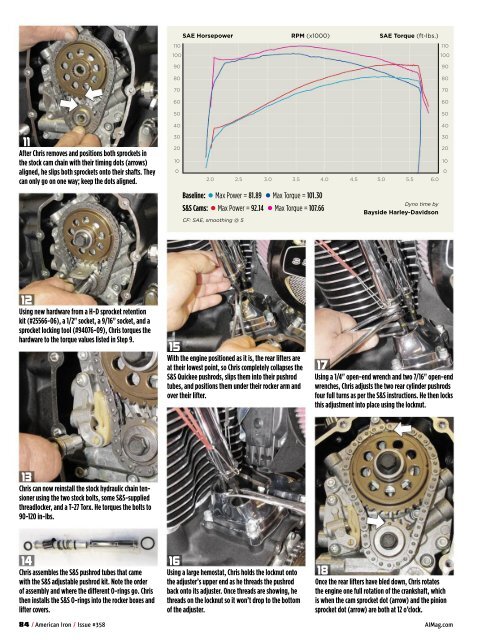
SAE Horsepower RPM (x1000) SAE Torque (ft-lbs.)<br />
110<br />
110<br />
100<br />
100<br />
90<br />
80<br />
70<br />
60<br />
50<br />
90<br />
80<br />
70<br />
60<br />
50<br />
11<br />
After Chris removes and positions both sprockets in<br />
the stock cam chain with their timing dots (arrows)<br />
aligned, he slips both sprockets onto their shafts. They<br />
can only go on one way; keep the dots aligned.<br />
40<br />
30<br />
20<br />
10<br />
0<br />
2.0 2.5 3.0 3.5 4.0 4.5 5.0 5.5 6.0<br />
Baseline: Max Power = 81.89 Max Torque = 101.30<br />
S&S Cams: Max Power = 92.14 Max Torque = 107.66<br />
CF: SAE, smoothing @ 5<br />
Dyno time by<br />
Bayside Harley-Davidson<br />
40<br />
30<br />
20<br />
10<br />
0<br />
12<br />
Using new hardware from a H-D sprocket retention<br />
kit (#25566-06), a 1/2" socket, a 9/16" socket, and a<br />
sprocket locking tool (#94076-09), Chris torques the<br />
hardware to the torque values listed in Step 9.<br />
15<br />
With the engine positioned as it is, the rear lifters are<br />
at their lowest point, so Chris completely collapses the<br />
S&S Quickee pushrods, slips them into their pushrod<br />
tubes, and positions them under their rocker arm and<br />
over their lifter.<br />
17<br />
Using a 1/4" open-end wrench and two 7/16" open-end<br />
wrenches, Chris adjusts the two rear cylinder pushrods<br />
four full turns as per the S&S instructions. He then locks<br />
this adjustment into place using the locknut.<br />
13<br />
Chris can now reinstall the stock hydraulic chain tensioner<br />
using the two stock bolts, some S&S-supplied<br />
threadlocker, and a T-27 Torx. He torques the bolts to<br />
90-120 in-lbs.<br />
14<br />
Chris assembles the S&S pushrod tubes that came<br />
with the S&S adjustable pushrod kit. Note the order<br />
of assembly and where the different O-rings go. Chris<br />
then installs the S&S O-rings into the rocker boxes and<br />
lifter covers.<br />
16<br />
Using a large hemostat, Chris holds the locknut onto<br />
the adjuster’s upper end as he threads the pushrod<br />
back onto its adjuster. Once threads are showing, he<br />
threads on the locknut so it won’t drop to the bottom<br />
of the adjuster.<br />
18<br />
Once the rear lifters have bled down, Chris rotates<br />
the engine one full rotation of the crankshaft, which<br />
is when the cam sprocket dot (arrow) and the pinion<br />
sprocket dot (arrow) are both at 12 o’clock.<br />
84 / <strong>American</strong> <strong>Iron</strong> / Issue #358 AIMag.com