American Iron Magazine December 2017
You also want an ePaper? Increase the reach of your titles
YUMPU automatically turns print PDFs into web optimized ePapers that Google loves.
the bike’s ECM. This screen doesn’t<br />
stay on the bike. It’s provided to give<br />
you access to the ECM, so you can alter<br />
the ECM’s fuel maps, etc. without a<br />
computer. We’ve used a Power Vision<br />
tuner on many <strong>American</strong> <strong>Iron</strong> <strong>Magazine</strong><br />
projects and have always gotten excellent<br />
results.<br />
As always, the accompanying dyno<br />
chart shows two sets of horsepower and<br />
torque readings. The baseline set show<br />
what we had after we installed a S&S<br />
Stealth air cleaner (as shown in our last<br />
issue) and a S&S header package and<br />
<br />
that we’ll show you how to install in the<br />
January/February 2018 issue of <strong>American</strong><br />
<strong>Iron</strong> Garage. The second set of power<br />
readings show the power increases we<br />
got after installing the new 465C cam<br />
and resetting the fuel mixtures using a<br />
Power Vision tuner.<br />
As he did for our Stealth air cleaner<br />
install and test, Chris Cowden at Bayside<br />
Harley-Davidson in Portsmouth,<br />
Virginia, will be bolting on the parts,<br />
tuning the engine, and running the<br />
dyno for this article. Longtime readers<br />
know we’ve done several projects with<br />
Chris and the crew at Bayside over the<br />
years. Bayside H-D is an excellent shop<br />
with service techs that know their way<br />
around Harley-Davidsons.<br />
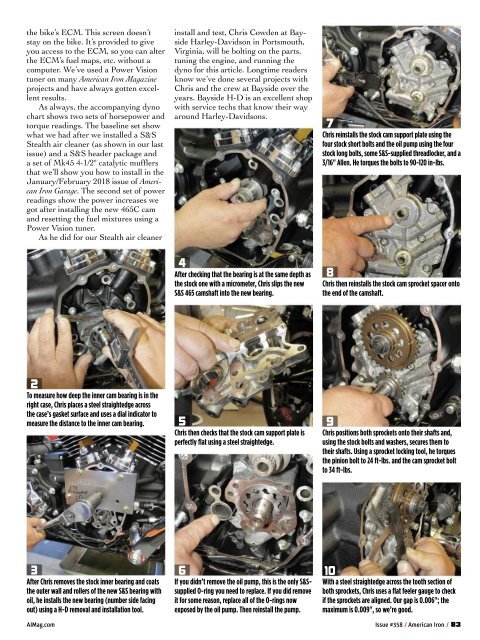
7<br />
Chris reinstalls the stock cam support plate using the<br />
four stock short bolts and the oil pump using the four<br />
stock long bolts, some S&S-supplied threadlocker, and a<br />
3/16" Allen. He torques the bolts to 90-120 in-lbs.<br />
4<br />
After checking that the bearing is at the same depth as<br />
the stock one with a micrometer, Chris slips the new<br />
S&S 465 camshaft into the new bearing.<br />
8<br />
Chris then reinstalls the stock cam sprocket spacer onto<br />
the end of the camshaft.<br />
2<br />
To measure how deep the inner cam bearing is in the<br />
right case, Chris places a steel straightedge across<br />
the case’s gasket surface and uses a dial indicator to<br />
measure the distance to the inner cam bearing.<br />
5<br />
Chris then checks that the stock cam support plate is<br />
perfectly flat using a steel straightedge.<br />
9<br />
Chris positions both sprockets onto their shafts and,<br />
using the stock bolts and washers, secures them to<br />
their shafts. Using a sprocket locking tool, he torques<br />
the pinion bolt to 24 ft-lbs. and the cam sprocket bolt<br />
to 34 ft-lbs.<br />
3<br />
After Chris removes the stock inner bearing and coats<br />
the outer wall and rollers of the new S&S bearing with<br />
oil, he installs the new bearing (number side facing<br />
out) using a H-D removal and installation tool.<br />
6<br />
If you didn’t remove the oil pump, this is the only S&Ssupplied<br />
O-ring you need to replace. If you did remove<br />
it for some reason, replace all of the O-rings now<br />
exposed by the oil pump. Then reinstall the pump.<br />
10<br />
With a steel straightedge across the tooth section of<br />
both sprockets, Chris uses a flat feeler gauge to check<br />
if the sprockets are aligned. Our gap is 0.006"; the<br />
maximum is 0.009", so we’re good.<br />
AIMag.com Issue #358 / <strong>American</strong> <strong>Iron</strong> / 83


