

American Iron Magazine December 2017

You also want an ePaper? Increase the reach of your titles
YUMPU automatically turns print PDFs into web optimized ePapers that Google loves.
Aligning A Headlight<br />
Aligning your headlight is easy. Start by making sure the tires are properly inflated.<br />
Then, with the bike upright in a normal riding position and with someone<br />
the same weight as you on the bike, measure the distance from the center of the<br />
headlight bulb to the pavement. For this example, we’ll say that distance is 40",<br />
so multiplying 40" x 0.9 gives you 36", which is the height we’ll need to place<br />
the beam marker in our example. Now find a relatively smooth exterior wall<br />
where the pavement is level and you can position your bike 25' perpendicular<br />
to the wall with nothing between your bike and the wall. Once it’s dark out, put<br />
a 12"-long strip of any color tape that’s not the same color as the wall onto the<br />
wall. Position the tape strip 36" (our example height) from the ground. Position<br />
your bike 25' directly perpendicular to the wall opposite the tape strip. You<br />
want your bike positioned so that if you were to drive straight forward your front<br />
wheel would touch the wall directly below the tape strip. Then, with the bike upright<br />
and you sitting on it, see where your headlight’s low beam’s main intensity<br />
hits the wall in relation to the tape strip. The top edge of the beam’s well defined<br />
main intensity cut-off should be just touching the bottom of the tape strip. If it’s<br />
not, adjust the headlight.<br />
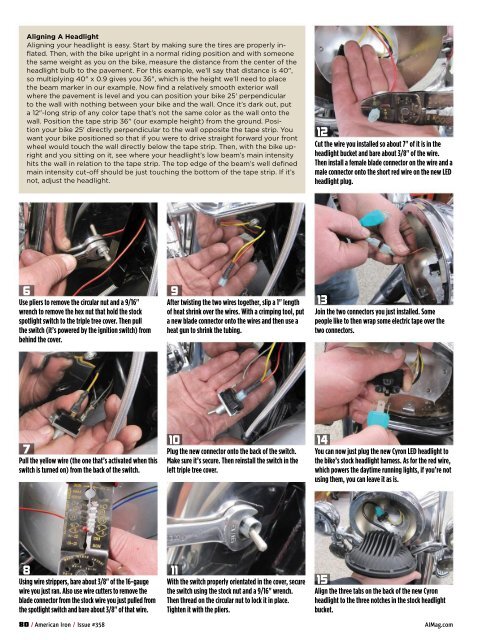
12<br />
Cut the wire you installed so about 7" of it is in the<br />
headlight bucket and bare about 3/8" of the wire.<br />
Then install a female blade connector on the wire and a<br />
male connector onto the short red wire on the new LED<br />
headlight plug.<br />
6 9<br />
Use pliers to remove the circular nut and a 9/16"<br />
wrench to remove the hex nut that hold the stock<br />
spotlight switch to the triple tree cover. Then pull<br />
the switch (it’s powered by the ignition switch) from<br />
behind the cover.<br />
After twisting the two wires together, slip a 1" length<br />
of heat shrink over the wires. With a crimping tool, put<br />
a new blade connector onto the wires and then use a<br />
heat gun to shrink the tubing.<br />
13<br />
Join the two connectors you just installed. Some<br />
people like to then wrap some electric tape over the<br />
two connectors.<br />
7<br />
Pull the yellow wire (the one that’s activated when this<br />
switch is turned on) from the back of the switch.<br />
10<br />
Plug the new connector onto the back of the switch.<br />
Make sure it’s secure. Then reinstall the switch in the<br />
left triple tree cover.<br />
14<br />
You can now just plug the new Cyron LED headlight to<br />
the bike’s stock headlight harness. As for the red wire,<br />
which powers the daytime running lights, if you’re not<br />
using them, you can leave it as is.<br />
8 11<br />
Using wire strippers, bare about 3/8" of the 16-gauge<br />
wire you just ran. Also use wire cutters to remove the<br />
blade connector from the stock wire you just pulled from<br />
the spotlight switch and bare about 3/8" of that wire.<br />
With the switch properly orientated in the cover, secure<br />
the switch using the stock nut and a 9/16" wrench.<br />
Then thread on the circular nut to lock it in place.<br />
Tighten it with the pliers.<br />
15<br />
Align the three tabs on the back of the new Cyron<br />
headlight to the three notches in the stock headlight<br />
bucket.<br />
80 / <strong>American</strong> <strong>Iron</strong> / Issue #358 AIMag.com