

QUILTsocial | Issue 10
Welcome to a new issue of QUILTsocial! I'm so excited to share with you tips, tutorials and product reviews in this issue and I'm even more excited you'll be able to download it for future reference! Among the several projects 5 of them are created by playing with rulers: a square, a triangle and a circular cutter. My favorite is the triangle ruler, as it simplifies and shortens the time it takes to make half square triangles, substantially. Another must-read feature is about using the lowly placemat as a creative platform and learning tool to discover different quilting techniques and embroidery possibilities. Also you don't want to miss the 9 essential tools for successful quilting on your domestic machine, guidelines that will change your quilting possibilities. Let me highlight one more, you know those quilt panels you love so much and hate to cut up into a quilt? We offer tips about how to cut these so the images are highlighted instead of lost. Enjoy exploring everything else there is in this amazing issue.
Welcome to a new issue of QUILTsocial! I'm so excited to share with you tips, tutorials and product reviews in this issue and I'm even more excited you'll be able to download it for future reference! Among the several projects 5 of them are created by playing with rulers: a square, a triangle and a circular cutter. My favorite is the triangle ruler, as it simplifies and shortens the time it takes to make half square triangles, substantially. Another must-read feature is about using the lowly placemat as a creative platform and learning tool to discover different quilting techniques and embroidery possibilities. Also you don't want to miss the 9 essential tools for successful quilting on your domestic machine, guidelines that will change your quilting possibilities. Let me highlight one more, you know those quilt panels you love so much and hate to cut up into a quilt? We offer tips about how to cut these so the images are highlighted instead of lost. Enjoy exploring everything else there is in this amazing issue.

You also want an ePaper? Increase the reach of your titles
YUMPU automatically turns print PDFs into web optimized ePapers that Google loves.
Machine Embroidery with<br />
THE Dream Machine 2<br />
Jean Boyd<br />
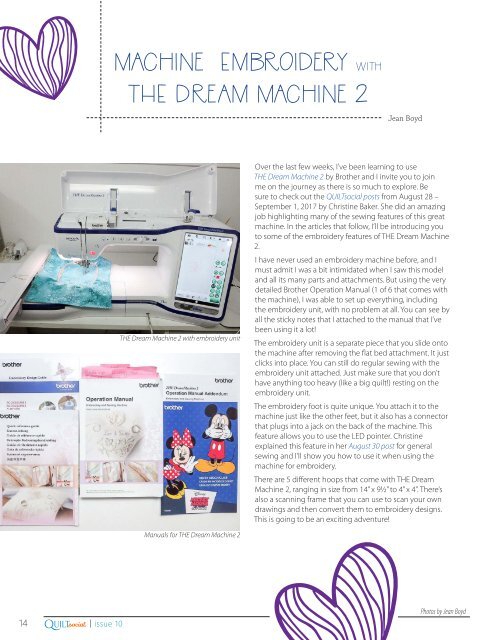
THE Dream Machine 2 with embroidery unit<br />
Over the last few weeks, I’ve been learning to use<br />
THE Dream Machine 2 by Brother and I invite you to join<br />
me on the journey as there is so much to explore. Be<br />
sure to check out the <strong>QUILTsocial</strong> posts from August 28 –<br />
September 1, 2017 by Christine Baker. She did an amazing<br />
job highlighting many of the sewing features of this great<br />
machine. In the articles that follow, I’ll be introducing you<br />
to some of the embroidery features of THE Dream Machine<br />
2.<br />
I have never used an embroidery machine before, and I<br />
must admit I was a bit intimidated when I saw this model<br />
and all its many parts and attachments. But using the very<br />
detailed Brother Operation Manual (1 of 6 that comes with<br />
the machine), I was able to set up everything, including<br />
the embroidery unit, with no problem at all. You can see by<br />
all the sticky notes that I attached to the manual that I’ve<br />
been using it a lot!<br />
The embroidery unit is a separate piece that you slide onto<br />
the machine after removing the flat bed attachment. It just<br />
clicks into place. You can still do regular sewing with the<br />
embroidery unit attached. Just make sure that you don’t<br />
have anything too heavy (like a big quilt!) resting on the<br />
embroidery unit.<br />
The embroidery foot is quite unique. You attach it to the<br />
machine just like the other feet, but it also has a connector<br />
that plugs into a jack on the back of the machine. This<br />
feature allows you to use the LED pointer. Christine<br />
explained this feature in her August 30 post for general<br />
sewing and I’ll show you how to use it when using the<br />
machine for embroidery.<br />
There are 5 different hoops that come with THE Dream<br />
Machine 2, ranging in size from 14” x 9½” to 4” x 4”. There’s<br />
also a scanning frame that you can use to scan your own<br />
drawings and then convert them to embroidery designs.<br />
This is going to be an exciting adventure!<br />
Manuals for THE Dream Machine 2<br />
Q<br />
14 .com| issue <strong>10</strong><br />
UILTsocial<br />
Photos by Jean Boyd


