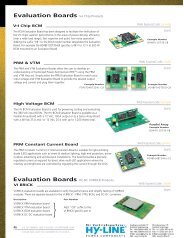
OsTech electro-optical-instruments Laser- und ... - Hy-Line
OsTech electro-optical-instruments Laser- und ... - Hy-Line
OsTech electro-optical-instruments Laser- und ... - Hy-Line

Create successful ePaper yourself
Turn your PDF publications into a flip-book with our unique Google optimized e-Paper software.
�����<br />
������<br />
�������������������������������<br />
���<br />
�������������������������������������<br />
�������������������������������������������������������������������<br />
�����������������<br />
� The External Pulse-Mode will run by entering the 'LMDX'-command. If this tag is<br />
activated and the laser-current and compliance voltage is entered as in CW-Mode<br />
you can run the laser by the 'LR'-command. The laser then is activated with an TTL<br />
high-level at the DMOD input and vv. . With the 'LMDXN[R|S]'-commands you may<br />
negate these logic, that means: the laser will be activated by TTL low-level.<br />
������������������������������������<br />
� The Analog Modulation-Mode will run by entering the 'LMAX'-command. If this tag is<br />
set and the laser is activated by the 'LR'-command, the compliance Voltage must be<br />
set before, the laser current can be controlled by the voltage at the AMOD input<br />
with 0.5V/A.<br />
�����������������������<br />
(in cw-mode!)<br />
The Power Control Loop consits of two independent parts:<br />
1. The photo current control loop, which works independent and<br />
2. The <strong>Laser</strong> Power top, which in fact does nothing than a translation from<br />
a power value into a value for the photo current<br />
To initiate the Power Control you must first prepare the laser for proper operation<br />
in cw-mode. Don't forget to adjust the <strong>Laser</strong> Current Limit.<br />
When the laser runs you must connect the photosensor between the PDC-(Cathode) and<br />
the GND(Anode) pins at the laser connector. After this you should test whether the<br />
sensor works well. For this run the laser and check with the 'LPCA'-command (<strong>Laser</strong><br />
Photo Current Actual) it's operation. The maximum photo current is (default) 700µA,<br />
but can be increased on request.<br />
When all this is working start the 'LPCCC'-command (<strong>Laser</strong>Photo Current Calibration),<br />
the driver searches about 1 minute for the threshold current, the slope and internal<br />
offsets. After this the control loop is working already with photo current values.<br />
Give in your target photocurrent with 'LPCT'-command. Initialise the photocurrent<br />
control mode by 'LPCCR'-command (<strong>Laser</strong> Photo Current Controll Run). Now you have<br />
merely to run and stop the laser by 'LR' and 'LS'.<br />
In the moment you start the laser the current is setup with a target photo current<br />
calculated by the fo<strong>und</strong> coefficients, so that (power) is initiated at once. After<br />
this the driver begins continuosly to track and guide the photo current.<br />
The second step is to adjust the power coefficients, so that you can use power<br />
values in Watt. For this:<br />
1. Adjust a 'LPT'-value (<strong>Laser</strong> Power Target), it should have a typical or a maximum<br />
..value<br />
2. Now run the laser in normal cw-mode and set up the current until the laser<br />
emitts exact the target laser power. An external power-meter is necessary for<br />
this. Now execute the 'LPF'-command to fix the actual photocurrent value to<br />
this laser power.<br />
Now you can get the laser power by 'LPA'-command, set the power target by<br />
'LPT'-command, run the power control mode by 'LPCCR'-command. Start and stop the<br />
laser by<br />
'LR' and 'LS'.<br />
������������ ���� ���������������������