

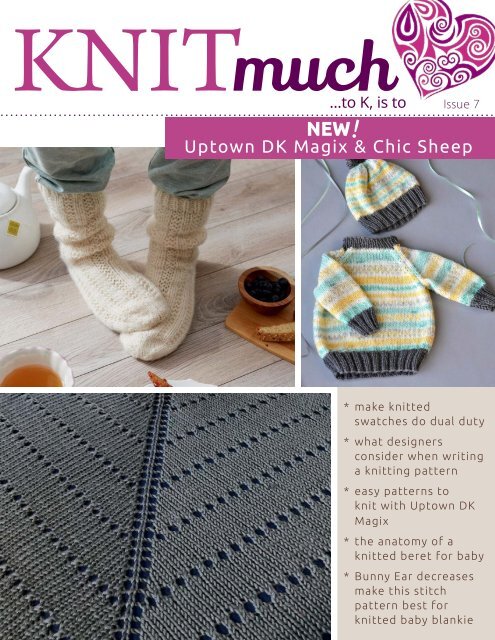
KNITmuch | Issue 07
Welcome to a new issue of KNITmuch magazine! We review four yarns, two yarns created with natural fibers and two with acrylics. Check them out! See how they are constructed, the fiber content, how they knit up, and suggestions for knitting projects. I'm talking about Uptown Worsted Magix, a new addition to the Uptown Worsted collection that has anti-pilling properties you'll be excited about. Dreamy yarn, an acrylic yarn perfect for those soft socks, blankets and anything you want to feel cozy in. Another new yarn this year, Chic Sheep by Marly Bird is 100% merino wool by Red Heart. For natural fiber lovers check out the properties that make this an excellent choice for winter knitting. And for those who knit their summer clothes during the winter, included is our review of Papyrus yarn, a soft linen and cotton blend that offers cool and soft knits for the whole family. Don't miss our tutorials on steam blocking, how to write patterns for beginner knitters, the anatomy of a knitted beret and bunny ears decreases make an excellent motif for a baby blanket, and you know there's so much more.
Welcome to a new issue of KNITmuch magazine! We review four yarns, two yarns created with natural fibers and two with acrylics. Check them out! See how they are constructed, the fiber content, how they knit up, and suggestions for knitting projects.
I'm talking about Uptown Worsted Magix, a new addition to the Uptown Worsted collection that has anti-pilling properties you'll be excited about. Dreamy yarn, an acrylic yarn perfect for those soft socks, blankets and anything you want to feel cozy in.
Another new yarn this year, Chic Sheep by Marly Bird is 100% merino wool by Red Heart. For natural fiber lovers check out the properties that make this an excellent choice for winter knitting. And for those who knit their summer clothes during the winter, included is our review of Papyrus yarn, a soft linen and cotton blend that offers cool and soft knits for the whole family.
Don't miss our tutorials on steam blocking, how to write patterns for beginner knitters, the anatomy of a knitted beret and bunny ears decreases make an excellent motif for a baby blanket, and you know there's so much more.

Create successful ePaper yourself
Turn your PDF publications into a flip-book with our unique Google optimized e-Paper software.
KNIT much.com<br />
much KNIT<br />
...to K, is to<br />
<strong>Issue</strong> 7<br />
NEW<br />
Uptown DK Magix & Chic Sheep<br />
!<br />
* make knitted<br />
swatches do dual duty<br />
* what designers<br />
consider when writing<br />
a knitting pattern<br />
* easy patterns to<br />
knit with Uptown DK<br />
Magix<br />
* the anatomy of a<br />
knitted beret for baby<br />
* Bunny Ear decreases<br />
make this stitch<br />
pattern best for<br />
knitted baby blankie
KNIT much<br />
...to K, is to<br />
◦{<br />
daily blog<br />
◦{<br />
weekly giveaways<br />
◦{<br />
monthly newsletter<br />
◦{<br />
quarterly magazine<br />
◦{<br />
Facebook page<br />
◦{<br />
Pinterest page<br />
◦{<br />
ALL of the above!<br />
2 <strong>KNITmuch</strong> | issue 7<br />
.com<br />
ALL<br />
FREE!<br />
www.<strong>KNITmuch</strong>.com<br />
Visit and download our free ebook:<br />
Cynthia MacDougall's<br />
Knitting Essentials!<br />
EDITOR-IN-CHIEF, ART DIRECTOR<br />
Carla A. Canonico<br />
Carla@<strong>KNITmuch</strong>.com<br />
ADVERTISING SALES<br />
John De Fusco<br />
John@<strong>KNITmuch</strong>.com<br />
PUBLISHER<br />
A Needle Pulling Thread<br />
PHOTOGRAPHERS<br />
John De Fusco, Carla A. Canonico<br />
BLOGGERS/CONTRIBUTORS<br />
Cynthia MacDougall<br />
cgknitters.blogspot.com<br />
Michelle Nguyen<br />
www.stitchesbeslippin.com<br />
Charles Voth<br />
www.charlesvothdesigns.ca<br />
GRAPHIC DESIGN<br />
Carla A. Canonico<br />
Carla@<strong>KNITmuch</strong>.com<br />
Sondra Armas<br />
Sondra@<strong>KNITmuch</strong>.com<br />
SOCIAL MEDIA and WEB<br />
Sondra Armas<br />
Alejandro Araujo<br />
WEBSITE / BLOG : <strong>KNITmuch</strong>.com<br />
Like us on Facebook : <strong>KNITmuch</strong><br />
Follow us on Twitter : @<strong>KNITmuch</strong>mag<br />
WHERE TO GET YOUR COPY<br />
<strong>KNITmuch</strong> is a quarterly eMagazine published by A<br />
Needle Pulling Thread. It is available free for personal use<br />
online at <strong>KNITmuch</strong>.com.<br />
A limited number of printed copies of <strong>KNITmuch</strong> are<br />
available for purchase at select yarn shops and specialty<br />
stores. Ask for it at your local shop. <strong>KNITmuch</strong> is not<br />
available by subscription.<br />
YARN SHOPS<br />
If you are interested in carrying <strong>KNITmuch</strong> in your store,<br />
please email John@<strong>KNITmuch</strong>.com.<br />
EDITORIAL<br />
Bloggers, designers and other contributors who would<br />
like to be considered for future issues please email<br />
Carla@<strong>KNITmuch</strong>.com with a brief description of your<br />
work and your proposed project.<br />
©2018 <strong>KNITmuch</strong>. All rights reserved. <strong>Issue</strong> 7. ISSN 2368-5913.<br />
No part of this publication may be reproduced without<br />
written permission from the publisher.<br />
All designs, patterns, and information in this magazine are<br />
for private, non-commercial use only, and are copyrighted<br />
material owned by their respective creators or owners.<br />
www.TheNeedleworkPages.com<br />
the<br />
find a<br />
local shop!<br />
9 listings<br />
9 reviews<br />
9 events<br />
9 new products<br />
9 free patterns<br />
9 blogs<br />
& more!<br />
pages
<strong>KNITmuch</strong><br />
6<br />
7<br />
9<br />
10<br />
12<br />
16<br />
17<br />
18<br />
19<br />
20<br />
22<br />
23<br />
25<br />
26<br />
31<br />
36<br />
37<br />
38<br />
39<br />
40<br />
Knitting with Uptown DK Magix yarn<br />
This antipilling acrylic yarn gets an ‘A’<br />
Easy patterns to knit with Uptown DK Magix<br />
The anatomy of a knitted beret for baby<br />
Bunny Ear decreases make this stitch pattern best for knitted baby blankie<br />
NEW! Red Heart Chic Sheep yarn by Marly Bird<br />
A simple lace triangle shawl is luxurious knitted with Chic Sheep yarn<br />
Steam blocking a shawl knitted with Chic Sheep goes from good to great!<br />
Knitting the Road to Success Chic Hat<br />
The anatomy of a pompom<br />
Papyrus – cottony soft knitting!<br />
Make knitted swatches do dual duty<br />
Patterns for Papyrus, a summery yarn<br />
What designers consider when writing a knitting pattern<br />
How to write patterns for beginner knitters<br />
Red Heart Dreamy yarn<br />
Dreamy Relaxation Socks<br />
How Dreamy yarn is perfect for knitting throws<br />
Knitting a lace shawl using a brushed acrylic yarn makes it Dreamy<br />
How does a scalene triangle relate to knitting?<br />
contents<br />
<strong>KNITmuch</strong> | issue 7<br />
3
Download the NEW<br />
<strong>KNITmuch</strong> App!<br />
Includes the Premier issue and the latest<br />
issue FREE for a limited time only!<br />
4 <strong>KNITmuch</strong> | issue 7
editor's letter<br />
I consider carefully what I<br />
choose to knit. I ask myself,<br />
will I wear the style? Do I like<br />
the yarn? What about the<br />
color? These are important<br />
elements that make my<br />
knitting worthwhile!<br />
I also take these elements<br />
into consideration when<br />
knitting for others. But let me<br />
tell you a little story about a<br />
recent cardi I knit for myself<br />
during a KAL. I was so excited<br />
to participate because I rarely<br />
get a chance to do so.<br />
I knew I wasn't crazy about<br />
the style and I wasn't crazy<br />
about the suggested yarn<br />
either. But good news, one<br />
can change the yarn which I<br />
did.<br />
After four weeks, my cardi was<br />
done, and although the style<br />
didn't quite flatter my body<br />
type it was still quite a lovely<br />
cardi. I wore it only once.<br />
A year later, I heartlessly<br />
frogged the cardi once I<br />
found a top pattern that<br />
flattered me. I was happy to<br />
find as I knitted the new top<br />
that the yarn wasn't pilling<br />
as I worked it. Great relief,<br />
as one of my pet peeves is<br />
garments that pill.<br />
More good news, the new<br />
version of Uptown DK yarn,<br />
Magix, is phenomenal when<br />
it comes to its anti-pilling<br />
properties, especially when<br />
knitting for children. The<br />
people at Universal Yarn<br />
created bright a playful<br />
colors for Magix, so as color<br />
and anti-pilling yarn are a<br />
perfect pair when knitting for<br />
children.<br />
Another new yarn, Chic Sheep,<br />
is the newest 100% wool<br />
by Red Heart. Its softness<br />
and colors satisfy natural<br />
fiber lovers without the<br />
fuss required to wash it.<br />
Because it's mercerized<br />
wool, it can be washed by<br />
machine in cold water and<br />
layed out flat to dry.<br />
Let's not stop here, in this<br />
issue, get to know the<br />
very lovely Papyrus yarn,<br />
synonym to baby-soft<br />
cotton and silk yarn. It's<br />
never too early to knit for<br />
next summer or perhaps<br />
you're a 'snowbird' heading<br />
towards the warm south for<br />
the winter!<br />
Lastly, have you come<br />
home from a very busy<br />
day wishing there was<br />
something special yet<br />
unpretentious to snuggle<br />
up to? You might want<br />
to consider Dreamy yarn.<br />
It's an acrylic yarn with a<br />
dream-like halo.<br />
There's so much yarn to<br />
explore. Enjoy!<br />
Share the love of knitting. Own the obsession.<br />
Cheerfully,<br />
follow me<br />
<strong>KNITmuch</strong> | issue 7<br />
5
Self-striping Uptown Magix DK is a super-soft machine washable yarn.<br />
Ok! We’re looking at a new<br />
version of Uptown DK yarn,<br />
Uptown DK Magix. This yarn is<br />
produced by Universal Yarns<br />
in Turkey. There are six fun<br />
colorways that we’ll explore in<br />
more detail further on, but what<br />
I want to write about now is the<br />
yarn texture and structure.<br />
As you know if you’ve read<br />
some of my past posts, I’m not<br />
a fiber snob. I like natural fibers<br />
and synthetics, but I believe<br />
each type of yarn has its pros<br />
and cons or at least its suitability<br />
for certain projects.<br />
I’d honestly say that Uptown DK<br />
Magix, and its sister solid yarn,<br />
Uptown DK (which is available in<br />
51 colors) is suitable for any knit<br />
project. I mean, it wouldn’t work<br />
for a trivet, because it would<br />
melt, but for garments, hats,<br />
accessories, slipper-socks…it is a<br />
great yarn. Let me tell you why.<br />
6 <strong>KNITmuch</strong> | issue 7<br />
These teal and red blends are some of my favorite<br />
colorways ever.<br />
The above swatch is in the Swing<br />
Set colorway. And while it’s<br />
hard to capture in a photo, the<br />
drape of the knit fabric is lovely<br />
– there’s no stiffness when I knit<br />
with it at the recommended<br />
needle size. The yarn has about<br />
10 to 12 twists per inch, which<br />
gives it a really sound structure<br />
and also provides the stitches<br />
with great definition.<br />
After knitting and frogging 3<br />
times and then washing it, there<br />
is a slight, very slight fuzzy halo,<br />
but true to the label, it’s resistant<br />
to pilling.<br />
Very soft fibers, in four single plies, spun together<br />
at 10 twists per inch, create a squishy, stable and<br />
well-defined yarn.<br />
I did find as I knit a small fuzzball<br />
occasionally formed around the<br />
yarn at the point where I tension<br />
it in my hand, but it was easily<br />
removed, and it wasn’t constant.<br />
The hand of the yarn and of the<br />
fabric is very interesting. It’s very<br />
soft and has no scratchiness to it.<br />
There isn’t the squeakiness that<br />
many synthetics have, either.
Even though it isn’t made out of rayon, Uptown DK<br />
Magix has a rayon-like feel to it (I call it scrunchy,<br />
but that’s not the right word). People who want to<br />
knit garments that will look good for a long time,<br />
and those who want to knit easy-care items like<br />
baby blankets or kids’ clothing will find Uptown DK<br />
Magix to be a great go-to yarn.<br />
One of the pluses to Uptown DK Magix, and why<br />
I think it fights pilling so well is the length of the<br />
staple. I untwisted the yarn to its original 4 plies,<br />
and then I took 1 of them and, with tweezers, I<br />
teased out several individual filaments. Each one<br />
was between 2½″ and 3¼″ long.<br />
This staple length helps ensure that a lot of short<br />
fuzzy ends don’t come to the surface and twist<br />
into pill bumps. It also contributes to the sturdiness<br />
of the twist. The yarn has a slight sheen – nothing<br />
like silk or viscose or rayon – but a nice glint that<br />
catches the light. This helps to create good, crisp<br />
stitch definition when it’s knit up.<br />
A slice of pie? No, just a few garter stitch short rows, making up a quarter of<br />
a circle.<br />
One of the best features of Uptown DK Magix is<br />
that it’s an antipilling acrylic. As we explore this<br />
yarn over the next few days we’ll look at patterns<br />
and colors, and yesterday we looked at its<br />
structure. We’ll look at what happens to this yarn<br />
with some wear and tear!<br />
One of the reasons I give Uptown DK Magix top<br />
marks is because it truly lives up to its antipilling<br />
label. There are certain pima cotton yarns and<br />
merino wools, both lovely, and often quite pricey,<br />
that pill as I’m knitting across the needles, and that<br />
is SO disappointing.<br />
I’ve knit a comfort blankie, 2 swatches, and a hat<br />
with 1 skein of Uptown DK Magix and there has<br />
been NO pilling while on the needles. I also sat<br />
and watched a 1-hour TV show and rubbed<br />
these two swatches together, and wrung them,<br />
and spun them and fidgeted with them the<br />
whole time…not one pill.<br />
I put these 2 swatches through one more<br />
experience! A load of laundry in hot water (they<br />
swam around with kitchen cloths and bath towels)<br />
and a trip through the dryer saw these two<br />
swatches come out unscathed.<br />
Here are two un-washed swatches of Uptown DK Magix.<br />
Two swatches that have been through the laundry.<br />
<strong>KNITmuch</strong> | issue 7<br />
7
After a stint in the wash, this swatch has a slight halo of fuzz, but no pills.<br />
As you can see in the photo above, the washing<br />
and drying experience didn’t result in pills on these<br />
acrylic yarn swatches. The slight halo of fuzz that is<br />
visible doesn’t even seem to matt and form those<br />
pre-pilling wads which often happens to acrylics<br />
when they go through the laundry.<br />
I tried to find out as much as I could about how<br />
antipilling yarn is manufactured, but the information<br />
must be buried outside of Google’s “eyes”. I even<br />
looked at fiber engineering resources and really<br />
came up with little, so I’m guessing it’s a tightly<br />
guarded trade secret.<br />
What I could gather from my research is that the<br />
polymers used to produce a longer, stronger more<br />
resilient staple (individual strand of fiber), that<br />
handles being spun by large spinning machines<br />
really well. I tried to see if there is a chemical<br />
bath, like the ones superwash wool or mercerized<br />
cotton get dumped in, that would change the<br />
properties of the acrylic yarn, but I couldn’t find<br />
anything to indicate that’s a thing. There’s a<br />
lot more experimentation with microfibers and<br />
blending nylon and different types of viscose and<br />
polyesters with acrylic as well, but the label would<br />
reflect that, I think.<br />
Suffice it to say, I may never be able to find out what<br />
the secret sauce is, but I don’t need to. I’m happy<br />
knitting with this yarn, and it will be one of my go to<br />
yarns for gifts that need easy care.<br />
Another reason I give Uptown DK Magix a high<br />
score is the six colorways it comes in. They are<br />
bright and they don’t fade in the wash. I really like<br />
pairing green with purple, and this use of a seafoam<br />
green in Purple Party would be perfect for<br />
mermaid fans. If you’ve read any of my earlier blog<br />
posts, you’ll know that teal is my absolute favorite<br />
color, and when it’s paired with red, like in Swing<br />
Set, I just love it. The blues in Blue Shades will be the<br />
choice of many knitters, I’m sure.<br />
3 bright colorways of Uptown DK Magix in warm colors<br />
Yellow Slumber reminds me of some marshmallow<br />
Easter candies we would have in the house every<br />
spring. All of the items I knit this week are knit in<br />
Summer Flies, a fitting name with the sky blue and<br />
meadow greens used in this colorway. Pink Tango,<br />
is a saucy, fun name for a colorway, and captures<br />
this blend of pinks perfectly.<br />
Just a last note: the washing instructions on the ball<br />
band say wash in cold water and tumble on low. I<br />
hadn’t paid attention to that before I washed it in<br />
hot water and dried it in full-blast heat on a towel<br />
load. I’m guessing if you follow the ball band, you’re<br />
knit items will look lovely even longer, but if you<br />
must disinfect anything, it’ll all turn out fine.<br />
3 bright colorways of Uptown DK Magix in cool tones<br />
Summer Flies colorway of Uptown DK Magix is a cheery combination of<br />
summer skies and green meadows.<br />
8 <strong>KNITmuch</strong> | issue 7
Now that I’ve described the<br />
anatomy of Uptown DK Magix<br />
and looked at its resilience in the<br />
laundry, and studied its colors,<br />
I’m sure you’d like to see what<br />
you could knit with this yarn.<br />
One good way to use Uptown<br />
DK Magix is to pair it with a<br />
solid-colored yarn from the<br />
Uptown DK line. In this sweater<br />
called ‘Hey Baby‘ we can see the<br />
colorway Yellow Slumber knit<br />
together with a complimentary<br />
granite gray. The solid-colored<br />
ribbing and pompom in the<br />
contrasting color makes the<br />
subtle colors of Yellow Slumber<br />
really pop.<br />
Uptown DK and Magix yarns don’t<br />
have to be used for kids’ knits<br />
only. Here’s a seamless cowl with a<br />
unique texture stitch pattern knit<br />
with the Purple Party colorway<br />
of Magix and combined with the<br />
solid color, silver. This warm cowl<br />
can be worn right next to the<br />
neck with no fear of prickliness.<br />
The designer who came up with<br />
the next free pattern combines<br />
squares knitted in the Roman<br />
Stripe quilting design connected<br />
with solids that complement<br />
Uptown DK Magix. Some of them<br />
are paired with several Magix<br />
colorways in this blanket pattern.<br />
Combine a solid Uptown DK yarn with one of the<br />
Uptown DK Magix colorways for a vibrant look!<br />
This seamless cowl uses 1 skein each of Uptown<br />
DK Magix and a solid color of Uptown DK.<br />
Roman stripe squares knitted on the diagonal are<br />
joined log-cabin style in a join-as-you-go fashion<br />
to perfectly combine solid shades of Uptown DK<br />
and self-striping Uptown DK Magix.<br />
This stunning blanket makes the most of these<br />
self-striping yarns and highlights them by<br />
framing them in intensely saturated solid colors.<br />
Photos this page courtesy of Universal Yarn<br />
<strong>KNITmuch</strong> | issue 7<br />
9
Uptown DK Magix, makes a colorful, warm and soft, and fun-to-wear hat<br />
with a beret-style shape.<br />
The strategically placed purl stitch makes a nice turning edge and a nice, flat<br />
crown for our beret.<br />
I’d like to share a recipe to knit<br />
a beret or a beret-like beanie<br />
(it depends on the width of the<br />
band) for a baby, or for that<br />
matter, for any wearer. We’ll use<br />
short rows to make a flat circular<br />
top, and then jump right in.<br />
For beginning knitters, short rows<br />
worked in garter stitch knitting<br />
are the easiest to learn, as you<br />
don’t need to worry about<br />
gaping holes or wrapped stitches<br />
because the ridges of the garter<br />
stitch tends to keep everything<br />
neat and tidy.<br />
Short rows are worked by knitting<br />
partially across the stitches on<br />
the needle at which point you<br />
stop, turn the work around<br />
and knit back in the opposite<br />
direction. This can cause a<br />
gap which can be avoided by<br />
wrapping a stitch at the point<br />
where the work is turned. Please<br />
watch the following video for two<br />
easy ways to do this.<br />
10 <strong>KNITmuch</strong> | issue 7<br />
I’ll be honest with you. I didn’t<br />
swatch for this pattern. I just cast<br />
on stitches, stretched them as far<br />
apart as I could on the needle<br />
and measured across to get what<br />
I thought would be the radius of<br />
the top circle of the hat. I wanted<br />
an infant-size hat, and, according<br />
to this chart, I needed a 19″<br />
[43cm] circumference, which<br />
meant I needed about 3″ [7.5cm]<br />
worth of stitches because 3 x π,<br />
aka 3.14 comes very close to a<br />
radius of 10, which gets me very<br />
close to a diameter of 19. Then I<br />
added 3 more stitches to create<br />
a turning ridge at the outer edge<br />
of the circle.<br />
Well, as I’ve preached for many<br />
years, I should have swatched,<br />
because my gauge in garter<br />
stitch turned out to be 20 sts<br />
per 4″ [10cm] using size 5 US<br />
[3.75mm] needles and 22 stitches.<br />
What came off my needles was<br />
a “pie” with a 3¼″ radius and a<br />
hat that is 20¼″ around –perfect<br />
for a toddler. Now, if you can find<br />
a toddler who cooperates with<br />
wearing hats, you may be in luck.<br />
I remember playing hat-pickup<br />
with my two sons for a few<br />
winters – it’s not a fond memory.<br />
In my experience, it’s a lot easier<br />
to keep hats on infants.<br />
As I mentioned above, you need<br />
3 additional stitches for the<br />
turning ridge, then do what I<br />
should have done: knit a garter<br />
stitch gauge swatch, figure out<br />
how many stitches you’ll need for<br />
the desired radius for the size/<br />
circumference you want (which<br />
is the measurement around the<br />
head just above the ears), and<br />
add 3 more stitches to determine<br />
the total number of stitches to<br />
cast on.<br />
I used the Old Norwegian cast<br />
on because its bottom edge<br />
looks similar to garter stitch,<br />
which leaves a nearly invisible<br />
seam when you graft together<br />
the two short ends of the “pie”<br />
you’re about to knit. My editor,<br />
who has an annoying penchant<br />
for doing Kitchener stitch, has<br />
said she would use a waste-yarn<br />
provisional cast on and graft all<br />
the live stitches at the end.
Next…how to calculate the short<br />
rows.<br />
Can you find the seam that joins the two ends? It<br />
is barely perceptible because of the ways I cast on<br />
and bound off.<br />
Take the number of stitches<br />
you have and find the nearest<br />
multiple of 4 that’s lower than<br />
the total. For me, with 22 sts,<br />
20 is the nearest multiple of 4.<br />
Divide that number by 4 to get<br />
the interval for short rows. 20<br />
divided by 4 is 5 for my hat, so<br />
my interval is 5.<br />
Proceed as follows:<br />
Row 1 (WS): Slip first st purlwise<br />
with yarn in back, knit to<br />
last 3 sts, p1, k2.<br />
Row 2: With yarn in front, sl 1<br />
purlwise, return yarn to back<br />
of work (selvedge stitch<br />
made – begin all even rows<br />
like this), knit across.<br />
Row 3 and all following odd<br />
rows: Repeat Row 1.<br />
Row 4: Selvedge st, knit to last 2<br />
sts, wrap and turn.<br />
Row 6: Selvedge st, knit to last 7<br />
sts, wrap and turn.<br />
Row 8: Selvedge st, knit to last 12<br />
sts, wrap and turn.<br />
Row 10: Selvedge st, knit to last<br />
17 sts, wrap and turn.<br />
Row 12: Selvedge st, knit across<br />
including all wrapped sts to<br />
the last 3 sts, wrap and turn.<br />
Row 14: Selvedge st, knit across<br />
to last 8 sts, wrap and turn.<br />
Row 16: Selvedge st, knit across<br />
to last 13 sts, wrap and<br />
turn.<br />
Row 18: Selvedge st, knit across<br />
to ast 18 sts, wrap and turn.<br />
Row 20: Selvedge st, knit across<br />
including all wrapped sts.<br />
This makes 1 wedge.<br />
Repeat Rows 1-20 until the two<br />
short ends of the “pie” shape<br />
touch without any puckering<br />
or buckling in the circle. Bind<br />
off purlwise and sew the ends<br />
together to form a circle. Run<br />
a tail of yarn in out of the ends<br />
of rows in the center of the “pie<br />
slices” and cinch the hole closed.<br />
If you look closely, you can see<br />
the 5-stitch intervals of my short<br />
rows. Use your interval number<br />
that you calculated above to<br />
prescribe where to turn your<br />
short rows.<br />
The selvedge edge around the<br />
outside of the crown is perfect<br />
for picking up stitches for the<br />
hat band. Rejoin the yarn and<br />
pick up and knit one stitch<br />
under both strands of “chain”<br />
along the selvedge. Join to<br />
work in the round.<br />
Purl the first round.<br />
Count the stitches, then, refer to<br />
your gauge swatch to determine<br />
the number of stitches you<br />
need to go around the desired<br />
circumference. If you want a<br />
comfortable fit, add 2 extra<br />
stitches to the result. If you want<br />
the hat to fit snugly, decrease<br />
2 stitches. I have 80 sts exactly,<br />
which is 20″ [51cm]. That’s ¼”<br />
[5mm] tighter than the actual<br />
measurement for a toddler.<br />
Hopefully, it will stay on without<br />
being too tight.<br />
Once you know how many<br />
stitches you need, increase or<br />
decrease the necessary number<br />
of stitches on the next (knit) round.<br />
From this point on, alternate<br />
purl and knit rounds until you<br />
the brim of the hat is the desired<br />
depth. Bind off loosely – I<br />
recommend using a needle one<br />
or two sizes larger.<br />
The turning st and the selvedge stitches make for<br />
a neat join between the crown and the band.<br />
I hope you try this recipe<br />
to make several berets with<br />
Uptown DK Magix yarn, or<br />
even with other yarns in your<br />
stash. I topped this one off<br />
with a pompom, but a simple<br />
crocheted chain would make a<br />
traditional “stem.” The top could<br />
even be left plain!<br />
If you don’t have tiny heads to<br />
wear your work, you can donate<br />
them to mitten drives, centers<br />
for grieving children, or even<br />
to nearby schools to hand out<br />
to children who have forgotten<br />
theirs, or who don’t have a hat<br />
they can call their own.<br />
Keep reading! we’ll look at<br />
another pattern that really takes<br />
advantage of the stripes created<br />
by Uptown DK Magix.<br />
<strong>KNITmuch</strong> | issue 7<br />
11
This soft, cuddly blanket is the perfect comfort for<br />
your little one.<br />
This swatch shows the progression I took from flat<br />
stripes to rippling ones.<br />
12 <strong>KNITmuch</strong> | issue 7<br />
Let's take advantage of one of<br />
the best features of this yarn, and<br />
that is its softness.<br />
I’m always exploring new stitches,<br />
new techniques, and ways to<br />
blend them into new patterns. I<br />
knew the moment that I received<br />
this yarn I wanted to work up a<br />
ripple or chevron stitch blankie.<br />
But I didn’t want it to be the<br />
traditional scalloped or zigzag<br />
chevron stitch. So I set out to try<br />
something else.<br />
Over the last few weeks, in<br />
my explorations of new-tome<br />
stitches, I had come across<br />
horizontal braids, and bunny<br />
ear decreases, and so I thought<br />
I’d try these out. As you can see,<br />
starting on the left of the photo,<br />
my stripes stayed fairly even keel<br />
despite my attempts to disrupt<br />
them with mid-row bind offs and<br />
bunny ear decreases.<br />
As I moved further along, I<br />
figured out how to get a W-like<br />
ripple in the stripes, so I worked<br />
enough repeats that I fine-tuned<br />
the issues with the large eyelets<br />
and the placement of the other<br />
little lace motifs which remind me<br />
of evergreen trees. I abandoned<br />
the braids early on. I’ll save them<br />
for a future project, but I kept the<br />
bunny ear decreases.<br />
Bunny Ear decreases are so<br />
called because of the shape<br />
the 2 stitches have as they stem<br />
forth from the 3 stitches that are<br />
used to work the decrease. To<br />
work this decrease, you insert<br />
the right-hand needle into the<br />
next 2 stitches as if to knit them<br />
together through the front legs<br />
and you wrap the yarn and bring<br />
it up between the 2 front legs<br />
and then slide everything of<br />
the left-hand needle. Then you<br />
knit the next st, then take the<br />
dropped leg, which now looks<br />
like an obvious diagonal strand<br />
and you pass it over the first 2<br />
stitches on the right-hand needle.<br />
This creates a nice symmetrical<br />
decrease, with the “bunny ears”<br />
protruding upwards. Here’s a<br />
video to help see how it works.<br />
The other stitch pattern that I<br />
swatched for a while to get it right<br />
are these large eyelets that have<br />
6 stitches germinating from them.<br />
It’s actually 5 stitches at first, but<br />
the 6th is added shortly after. In<br />
this next video, I demonstrate how<br />
to work these eyelets.<br />
I’ve combined these two<br />
techniques into the pattern that<br />
I’m sharing below. But I just<br />
wanted to revisit blocking though,<br />
because it really made these<br />
stitches stand out well in this yarn.<br />
While Uptown DK Magix is 100%<br />
acrylic, it responded well to<br />
blocking. I did a wet soak in warm<br />
water and pinned it out to dry.
un-dec-w-yo (Bunny Ears Decrease<br />
with YO): Insert RH needle to<br />
knit next 2 sts together through the<br />
front legs, wrap yarn to knit, bring<br />
RH needle up between the two legs<br />
and slide all off LH needle, yarn fwd,<br />
knit next st, pass 3rd strand on RH<br />
needle over first 2 sts.<br />
k: knit<br />
k2tog: knit 2 stitches together<br />
through the front legs<br />
lki (lifted knit increase): lift the stitch<br />
2 rows below the first stitch on the<br />
RH needle onto the LH needle and<br />
knit this stitch.<br />
p: purl.<br />
ssk: slip 2 stitches knitwise, then knit<br />
slipped stitches together through the<br />
back legs<br />
S1 (slip 1): with the working yarn in<br />
back, insert the RH needle into the<br />
next stitch as if to purl and transfer the<br />
stitch from the left needle to the right.<br />
S1 wyif: With the working yarn in front,<br />
insert the RH needle into the next<br />
stitch as if to purl and transfer the stitch<br />
from the left needle to the right.<br />
s2tog-k1-p2sso: Slip 2 stitches<br />
together knitwise, knit 1, then pass<br />
slipped stitches over.<br />
yo: wrap the working yarn over the<br />
right needle, from front to back<br />
(counter-clockwise).<br />
(k, yo, k, yo, k) in next st: knit, leaving<br />
the stitch on the needle, then yarn<br />
over, knit, yarn over, and then knit (5<br />
stitches total) into the same stitch.<br />
1/1 LC (left crossed sts): Insert RH<br />
needle between next 2 sts on the LH<br />
needle from the back, and then into<br />
the front leg of the 2nd st, knit 2nd<br />
st, then knit first st on LH needle and<br />
slide both off. Or, slip 1 stitch to cable<br />
needle and hold in front; k1; k1 from<br />
cable needle.<br />
1/1 RC (right crossed sts): Insert<br />
RH needle from right to left under<br />
the front leg of the 2nd st on the LH<br />
needle an loosen leg loop, knit this<br />
loop, then knit the first st on the LH<br />
needle separately, slide both off. Or,<br />
slip 1 stitch to cable needle and hold<br />
in back; k1; k1 from cable needle.<br />
needles and yarn<br />
1 ball Uptown DK Magix in<br />
Summer Flies<br />
US 5 [3.75mm] needles<br />
gauge<br />
22 sts and 32 rows = 4″ [10cm] in<br />
stockinette stitch<br />
When you work this stitch<br />
pattern, the number of stitches<br />
for each repeat will increase and<br />
then gradually decrease. This is<br />
in part what forms the ripples.<br />
Stitch counts are provided on all<br />
rows where there’s a change in<br />
the total number.<br />
Cast on 93 sts.<br />
Work in Garter Stitch (knit every<br />
row) for 4 rows.<br />
Work in Stockinette Stitch (knit 1<br />
row, purl 1 row) for 2 rows.<br />
Then you can begin the W-ripple<br />
motifs in the following stitch<br />
pattern rows:<br />
W-ripple Stitch<br />
Row 1: S1 wyif, k2, p1, k1, 1/1 LC,<br />
p1, [k5, bun-dec-w-yo, k2,<br />
s2tog-k1-p2sso, k3, k2tog,<br />
yo, ssk, k3, s2tog-k1-<br />
p2sso, k2, bun-dec-w-yo,<br />
k5, p1, k1, 1/1 LC, p1] twice,<br />
k3 (83 sts).<br />
Row 2: S1 wyif, k2, {[k1, p3] twice,<br />
p2, [p1, yo] twice, p17, [yo,<br />
p1] twice, p5} twice, k1, p3,<br />
k4 (91 sts).<br />
Row 3: S1 wyif, k2, p1, 1/1 RC, k1,<br />
p1, {k7, [yo, k1] twice, k2,<br />
s2tog-k1-p2sso, k3, (k, yo,<br />
k, yo, k) in 1, k3, s2tog-k1-<br />
p2sso, k2, [k1, yo] twice, k7,<br />
p1, 1/1 RC, k1, p1} twice, k3<br />
(99 sts).<br />
Row 4: S1 wyif, k3, p3, k1, {p7,<br />
[p1, yo] twice, p21, [yo, p1]<br />
twice, p3, [p3, k1] twice}<br />
twice, k3 (105 sts).<br />
Row 5: S1 wyif, k2, p1, k1, 1/1 LC,<br />
p1, {k9, s1, k4, s2tog-k1-<br />
p2sso, k5, lki, k4, s2tog-k1-<br />
p2sso, k4, s1, k9, p1, k1, 1/1<br />
LC, p1} twice, k3 (101 sts).<br />
Row 6: S1 wyif, k3, p3, k1, {p37, [p3,<br />
k1] twice} twice, k3 (101 sts).<br />
Row 7: S1 wyif, k2, p1, 1/1 RC, k1,<br />
p1, {k5, [k8, s2tog-k1-p2sso]<br />
twice, k13, p1, 1/1 RC, k1, p1}<br />
twice, k3 (93 sts).<br />
Row 8: S1 wyif, k3, p3, k1, {p33, [p3,<br />
k1] twice} twice, k3 (93 sts).<br />
Row 9: S1 wyif, k2, p1, k1, 1/1 LC,<br />
p1, {k36, p1, k1, 1/1 LC, p1}<br />
twice, k3 (93 sts).<br />
Row 10: S1 wyif, k3, p3, k1, {p33,<br />
[p3, k1] twice} twice, k3<br />
(93 sts).<br />
Row 11: S1 wyif, k2, p1, 1/1 RC,<br />
k1, p1, {k5, bun-dec-w-yo,<br />
k2, s2tog-k1-p2sso, k3,<br />
k2tog, yo, ssk, k3, s2togk1-p2sso,<br />
k2, bun-dec-wyo,<br />
k5, p1, 1/1 RC, k1, p1}<br />
twice, k3 (83 sts).<br />
Row 12: S1 wyif, k2, {[k1, p3]<br />
twice, p2, [p1, yo] twice,<br />
p17, [yo, p1] twice, p5]<br />
twice, k1, p3, k4 (91 sts).<br />
Row 13: S1 wyif, k2, p1, k1, 1/1<br />
LC, p1, {k7, [yo, k1] twice,<br />
k2, s2tog-k1-p2sso, k3, (k,<br />
yo, k, yo, k) in next st, k3,<br />
s2tog-k1-p2sso, k2, [k1, yo]<br />
twice, k7, p1, k1, 1/1 LC, p1}<br />
twice, k3 (99 sts).<br />
Row 14: S1 wyif, k3, p3, k1, {p7,<br />
[p1, yo] twice, p21, [yo, p1]<br />
twice, p3, [p3, k1] twice}<br />
twice, k3 (105 sts).<br />
Row 15: S1 wyif, k2, p1, 1/1 RC,<br />
k1, p1, {k9, s1, k4, s2tog-k1-<br />
p2sso, k5, lki, k4, s2tog-k1-<br />
p2sso, k4, s1, k9, p1, 1/1 RC,<br />
k1, p1} twice, k3 (101 sts).<br />
Row 16: S1 wyif, k3, p3, k1, {p37,<br />
[p3, k1] twice} twice, k3 (101<br />
sts).<br />
<strong>KNITmuch</strong> | issue 7<br />
13
The unblocked lovey blankie is really rippling all over the place, but this acrylic yarn can indeed be blocked.<br />
Charles Voth<br />
twitter.com/stitchstud<br />
charlesvothdesigns.ca<br />
Row 17: S1 wyif, k2, p1, k1, 1/1<br />
LC, p1, {k5, [k8, s2tog-k1-<br />
p2sso] twice, k13, p1, k1, 1/1<br />
LC, p1} twice, k3 (93 sts).<br />
Row 18: S1 wyif, k3, p3, k1, {p33,<br />
[p3, k1] twice} twice, k3 (93<br />
sts).<br />
Row 19: S1 wyif, k2, p1, 1/1 RC, k1,<br />
p1, {k36, p1, 1/1 RC, k1, p1}<br />
twice, k3 (93 sts).<br />
Row 20: S1 wyif, k3, p3, k1, {p33,<br />
[p3, k1] twice} twice, k3<br />
(93 sts).<br />
Repeat rows 1-20 the desired<br />
number of times, ending with a<br />
row 18.<br />
Work 2 rows Stockinette and 4<br />
rows Garter Stitch.<br />
Then you can bind off.<br />
The dimensions of my lovey<br />
blankie are 10″ x 16″.<br />
To make this blanket wider, you<br />
simply need to add multiples of<br />
41 to the current 93 sts.<br />
If I didn’t have tens of other<br />
things to knit, and design, and<br />
dream up, I’d start a larger<br />
W-stitch blanket, but for now, the<br />
next friends who have a baby will<br />
have some sort of gift wrapped<br />
up in this lovey blanket made out<br />
of Uptown Dk Magix.<br />
After blocking, the edges settle down to their true W-ripple and the motifs are crisp and neat.<br />
The W-stitch lovey blanket getting blocked so its<br />
motifs can really stand out!<br />
14 <strong>KNITmuch</strong> | issue 7
10 Night Aran Islands, Donegal & Causeway Coast (Ireland)<br />
Tour Dates:<br />
• 11 May 2019<br />
• 06 Jul 2019<br />
• <strong>07</strong> Sep 2019<br />
This amazing 10 night tour includes Studio Donegal, the stunning Slieve League Cliffs, &<br />
Glencolmcille Folk Village. Tour Northern Ireland’s Causeway Coast and visit the Giant’s<br />
Causeway, Dunluce Castle, Belfast City and Titanic Belfast. A highlight will be two nights<br />
on Inis Mór, one of the famous Aran Islands!<br />
Workshops with Edel McBride, Lisa Sisk from This is Knit and<br />
Una McDonagh on Inis Mór!<br />
Also Included:<br />
Hotels, Sightseeing<br />
Tours, Entrance<br />
Fees, Meals, Craft<br />
Demonstrations and<br />
Knitting Workshops!<br />
www.KnittingTours.com<br />
Toll Free: 1800 913 1135<br />
Info@knittingtours.com<br />
P.S Check out our website for more tours!<br />
KnittingTours.com is part of the Irish Tourism Group,<br />
Trusted tour operator, members of ACTA, ASTA & ETOA<br />
15
NEW! Red Heart<br />
Chic Sheep yarn<br />
by Marly Bird<br />
Michelle Nguyen<br />
Chic Sheep in the color Sterling<br />
The newest addition to the Red Heart family is Chic<br />
Sheep yarn by Marly Bird. This is really exciting for a<br />
number of reasons, but mainly because this yarn is<br />
100% merino wool. Yes, you heard me, it’s all wool.<br />
This makes Chic Sheep stand out from the rest of<br />
Red Heart yarns, which are typically a wool blend.<br />
With this yarn being 100% merino wool you’d<br />
think the washing instructions would get really<br />
complicated. Something along the lines of, hand<br />
wash by the light of a full moon in cold water<br />
made of pure unicorn tears. This is so not the case!<br />
Machine wash in cold water and lay flat to dry. If<br />
you have a newer washing machine, there is a wool<br />
cycle you can use.<br />
I have frequently washed my hand knit garments<br />
on the wool cycle with a bit of wool wash and have<br />
never had a problem with felting or damage. I’ll<br />
admit to being slightly apprehensive about it the<br />
first time, but I have never had any issues with a<br />
superwash or mercerized yarn.<br />
Another amazing thing about Chic Sheep, is the<br />
sheer volume of colors it comes in! There are a total<br />
of 24 colors, which means you’ll be able to find the<br />
color you’re looking for no matter the project. I’m<br />
always pleasantly surprised when a new yarn comes<br />
out in a whole lot of colors. I’m a huge color person,<br />
so when I’m able to pick bright hues and pair them<br />
with neutrals to get an amazing garment, I’m all for<br />
it. Mind you, Red Heart is rarely short on colors.<br />
Chic Sheep is a medium weight yarn with a<br />
recommended needle size of US 8 [5mm]. This is<br />
an excellent standard size yarn, you can make just<br />
about anything with it; hats, socks, slippers, cowls,<br />
sweaters, mittens, skirts, blankets, shawls, etc.<br />
When I took the skeins out of the bag, I just wanted<br />
to keep squishing them. This is a four-ply yarn with<br />
lots of air space worked in. It has a lovely hand that<br />
makes me want to constantly keep touching it.<br />
Photo courtesy of Red Heart<br />
Recommended hook and needle size along with<br />
washing instructions.<br />
16 <strong>KNITmuch</strong> | issue 7<br />
You can easily tell how many plies your yarn<br />
is if you un-twist one end. They’ll come apart<br />
separately, then you can twist them back up<br />
when you’re done.<br />
All the colors are so vivid, I’m having trouble choosing<br />
between them!<br />
Photos by Michelle Nguyen
A simple lace triangle shawl is luxurious<br />
knitted with Chic Sheep yarn<br />
From my previous articles lately,<br />
you may be able to tell I’m on a<br />
shawl kick, so it makes sense that<br />
the first thing I’d knit with Chic<br />
Sheep is a shawl. The pattern<br />
is named Simple Lace Triangle<br />
Shawl, it’s available for free on<br />
the Red Heart website.<br />
The shawl is originally written for<br />
Red Heart Super Saver Ombre<br />
yarn, but I chose it for this solid<br />
color because I think it will<br />
show off the stitches nicely. The<br />
eyelets and delicate lace of the<br />
pattern look amazing with the<br />
soft sheen of the natural wool. I<br />
was completely right, this pattern<br />
does an amazing job of showing<br />
how the yarn does with stitches<br />
and shows off the beautiful<br />
natural look of this fiber. Chic<br />
Sheep was a dream to knit with. It<br />
moved along the needles easily<br />
and never split. Not once did I<br />
have the issue of splitting yarn;<br />
even when I was knitting in a car<br />
in the dark.<br />
It helps that the pattern is very<br />
easy to memorize and alter. I<br />
did alter the top. There was a<br />
small triangle of garter stitch<br />
in the beginning, but I just<br />
made it stockinette because I<br />
have an unreasonable, undying<br />
love of stockinette. What? It’s<br />
a completely normal kind of<br />
psychosis!!!<br />
Photo courtesy of Red Heart<br />
The lovely product photo of the Simple Lace<br />
Triangle Shawl.<br />
The knitted and blocked garment. Look at how<br />
beautiful those eyelets turned out.<br />
Chic Sheep in the yellow color of Mimosa and the<br />
blue color Royal.<br />
You could also weave in some<br />
other colors, for example, making<br />
each stripe between the eyelets<br />
a different color. I very seriously<br />
considered doing this, but really<br />
wanted to show off the yarn and<br />
pattern. I ended up nixing the<br />
idea because I thought it would<br />
have created too much interest,<br />
but it’s still in the back of my<br />
mind. Perhaps a future article will<br />
feature the Simple Lace Triangle<br />
Shawl pattern with more colors.<br />
I normally block all my knitting,<br />
no matter the fiber content. With<br />
100% wool this step becomes<br />
non-negotiable. Tomorrow I’ll<br />
cover the reasons you should be<br />
blocking and a couple of different<br />
blocking methods you can use.<br />
It really makes a huge difference<br />
in the way your finished object<br />
looks. I’d highly suggest sticking<br />
around to read tomorrow’s post!<br />
The Simple Lace Triangle Shawl<br />
pattern was an excellent pattern<br />
to really show off Chic Sheep. I’m<br />
so pleased with the way it turned<br />
out. After blocking, it looks<br />
absolutely perfect. The yarn<br />
was so easy to knit with and felt<br />
amazing while I was knitting it up.<br />
Chic Sheep is definitely a staple<br />
for any knitters stash.<br />
My shawl blocking on my craft room floor.<br />
<strong>KNITmuch</strong> | issue 7<br />
17
Steam blocking a shawl knitted with<br />
Chic Sheep goes from good to great!<br />
When I blocked the Simple Lace Triangle Shawl,<br />
it went from this curly crumpled triangularish<br />
shaped garment to a beautiful shawl. One<br />
comment I receive from a lot of people is how<br />
perfect my stitches look on knitted garments.<br />
Blocking goes a long way to making those stitches<br />
look absolutely perfect. They lay flat and fall in line<br />
with their brothers and sisters. It even makes errors<br />
less noticeable.<br />
This is what the eyelets looked like before blocking. You might want to scroll<br />
back to this photo after you see the end result.<br />
Here’s my ‘before’ picture. This shawl was fresh off the needles, cast off and<br />
onto the blocking board.<br />
First thing is first when blocking, you need to decide<br />
how you’re going to do it. There’s wet blocking and<br />
steam blocking. Wet blocking takes a bit longer and<br />
I’d definitely suggest starting out with wet blocking if<br />
you’re not entirely familiar with the process. It’s a bit<br />
more forgiving. It’s easy enough to do, you saturate<br />
your entire garment with water, then gently press<br />
the excess water from it. You then lay it out on a<br />
surface where you can pin it out and leave it to dry.<br />
I know I’m going through this at rapid-fire speed<br />
but it's very easy to find highly detailed instructions<br />
on how to block your knitted garments. I just want<br />
to give you a brief overview and a couple tips and<br />
tricks that will make it easier.<br />
Steam blocking is my favorite way to block and,<br />
I’ve discovered lately, much less common. I steam<br />
blocked the Simple Lace Triangle Shawl made with<br />
Chic Sheep. When I block my garments. I usually<br />
don’t have 12-24 hours to leave something to dry. I<br />
have cats who get into everything and while I might<br />
be able to close off one whole room in my house to<br />
let something settle into its final shape, it’s just not<br />
practical for me to do all the time.<br />
This is the corner of the shawl after unpinning. No curling, no rolling, a perfect<br />
pointed corner. Look at those eyelets! They’re much bigger and more noticeable.<br />
18 <strong>KNITmuch</strong> | issue 7
With the Simple Lace Triangle Shawl, I pinned out<br />
the top first. Usually, you can get length or width<br />
from a garment, but not both. With shawls, I prefer<br />
width so I make that line first. Then I make sure all<br />
the eyelets are open and you can see that yarn<br />
detail. If you’re blocking a sweater and you think<br />
it might be a bit too short, you can block it a bit<br />
longer, or if your armhole is a bit too small, you can<br />
block that bigger.<br />
The beautiful thing about wool is its memory.<br />
Natural wool remembers the shape it wants to be<br />
in and when you use water or steam to set it in a<br />
shape, it will naturally want to bounce back.<br />
With synthetic fibers, they usually relax when<br />
blocked, but wool reacts differently. If you’re<br />
knitting with a new yarn, whether it’s Chic Sheep or<br />
something else, I would highly suggest knitting two<br />
swatches and blocking them. You need to know<br />
how the yarn will react to steam and/or water. This<br />
is very relevant to garments you intend to wash. If<br />
the wool is going to bloom, the garment will have<br />
a very different look. You can never have too much<br />
information when it comes to your knitting. Swatch!<br />
Knitting the Road to<br />
Success Chic Hat<br />
Here’s my ‘after’ picture! First of all, look at the size difference. That’s the same<br />
iron and board. The blocking has increased the size, but mostly because I<br />
aggressively blocked it to open all the lacework.<br />
Talking of blocking made<br />
me think of things that are<br />
more difficult to block, hats,<br />
for example, need to have a<br />
specific shape and not have a<br />
line down the length of them. I<br />
like to combine steam and wet<br />
blocking for things like the Road<br />
to Success Chic Hat. This pattern<br />
is available for free on the Red<br />
Heart website.<br />
What really drew me to this<br />
pattern were the cables on<br />
the front and clean lines they<br />
create within the hat. It was<br />
also designed by Marly Bird,<br />
the inspiration for this yarn and<br />
National Spokesperson for Red<br />
Heart yarns. I would check out<br />
her website if you get a chance<br />
or even her podcast Yarn Thing.<br />
I personally really like Marly Bird<br />
and love her podcast. She is a<br />
lively lady with a love of yarn.<br />
Photo courtesy of Red Heart<br />
The Road to Success Chic Hat is the perfect spring fashion item!<br />
Considering the sheer volume of patterns she has written for Ravelry,<br />
I was really excited to see her writing style and how Ravelry measured<br />
it. Marly Bird didn’t disappoint, the pattern is well written and charted.<br />
I love when designers give you the option to go with a chart or written<br />
instructions. Not everyone works the same and visual learners, like<br />
myself, may have a hard time with purely written instructions.<br />
<strong>KNITmuch</strong> | issue 7<br />
19
My finished product, post-blocking of course, in the color royal.<br />
The color Polo really shows off the cables nicely. The shimmer of the yarn<br />
adds depth to the hills and valleys of the cables.<br />
Photo courtesy of Red Heart<br />
Guys, I'm so happy I got the opportunity to knit<br />
this pattern with this yarn! They went together<br />
beautifully, like peanut butter and jelly.<br />
The color Polo really shows off the cables nicely.<br />
The shimmer of the yarn adds depth to the hills<br />
and valleys of the cables.<br />
We all know I<br />
have a slight<br />
apprehension<br />
about cables,<br />
but this 6 row<br />
repeat is easy<br />
peasy. It’s not<br />
too bad to<br />
memorize and<br />
it’s very easy<br />
to see if you’ve<br />
crossed a cable<br />
the wrong way<br />
or went astray<br />
in another way.<br />
The pattern<br />
almost knits<br />
itself. The little<br />
bit of interest<br />
the cables add, keep you knitting through the<br />
stockinette sections and looking forward to the next<br />
cable piece.<br />
When a pattern is written specifically for a particular<br />
yarn you know the two are will go well together.<br />
Especially in this case when one person has designed<br />
the yarn and the pattern for each other. The yarn<br />
captures Marly Bird’s light-hearted spirit and the hat<br />
shows off her clean design aesthetic.<br />
The anatomy of a pompom<br />
The Road to Success Chic Hat happens to have a<br />
pompom on the top. There are several different<br />
ways to make a pompom and a couple different<br />
trains of thought about them. As a cat-mom, I<br />
usually forgo pompoms on my knitting, because<br />
they’re just too tempting for little feline instincts to<br />
pass over, but occasionally I make a whole bunch<br />
for my kitties to play with.<br />
He doesn’t look like he is jonesing for a pompom does he?<br />
20 <strong>KNITmuch</strong> | issue 7
The first and easiest way to make<br />
pompoms is with a pompom<br />
maker. You can buy these from<br />
your local big box craft store,<br />
they usually come in a pack with<br />
a couple different sizes. There<br />
are a few different styles, but I<br />
like the ones pictured below. You<br />
can open them up to thoroughly<br />
wrap the yarn around for a really<br />
fluffy pompom.<br />
This innocuous looking device is a pompom maker.<br />
There are some that look like two<br />
circles you wrap the yarn around,<br />
then cut between them, and<br />
pull the circles off. The best part<br />
about this method is, if you’re in<br />
need of a pompom and the craft<br />
store is closed, you can always<br />
make two circles from cardboard<br />
and DIY.<br />
TIP For using this kind of<br />
pompom maker. I cut a long<br />
length of yarn and fold it in half,<br />
thread the middle through the<br />
hole and push the ends though<br />
on the other side. This makes a<br />
knot around the little pompom<br />
doughnut so your yarn doesn’t<br />
slide off. It gives you a good<br />
anchor to work from. I also use<br />
a crochet hook to pull the yarn<br />
through the hole. This way you’re<br />
easily pulling the yarn through<br />
the hole with a crochet hook and<br />
it will go quickly because you’re<br />
working with two strands.<br />
One side all wrapped and ready to go, the other<br />
side is next, then a cut down the middle.<br />
One of the most important parts<br />
of your pompom is to tie the yarn<br />
around the middle very securely. If<br />
it’s too loose then your pompom<br />
will fall apart in a million small<br />
threads. It’s not the best when<br />
you’re making it for tiny ferocious<br />
felines who are going to be<br />
pulling at it with their little teeth.<br />
I’ll usually use a smaller yarn size<br />
than the type my pompom is<br />
made from. This will ensure you<br />
get a very solid knot. I’ll also leave<br />
these ends long if you’re looking<br />
to secure it to something, like the<br />
top of a hat.<br />
Snip, snip, snip. To avoid pulling your yarn in strange<br />
ways, only use the tips of your scissors to make small<br />
precise cuts to the pompom in progress.<br />
Pompoms are tons of fun to<br />
make and can add a little bit of<br />
whimsey to a garment. The Road<br />
to Success Chic Hat knit with Chic<br />
Sheep is already a sharp looking<br />
hat, but the pompom gives it a<br />
little something extra. It could<br />
also double to cover the seam<br />
at the top of the hat if it wasn’t<br />
finished neatly.<br />
Michelle Nguyen<br />
stitchesbeslippin.com<br />
I roll the pompom around in my hands and give<br />
it a little haircut if there are any very long strands<br />
that need to be trimmed.<br />
<strong>KNITmuch</strong> | issue 7<br />
21
Papyrus –<br />
cottony soft<br />
knitting!<br />
Cynthia MacDougall<br />
A decorative box in cream and gold is the perfect work box for<br />
Papyrus’ luxurious softness!<br />
On the left is the full double knitting strand of Papyrus. On the right, the two<br />
“S” twists have been separated out to show the thin, silk plies and how they<br />
trap the lofty, soft cotton fibers.<br />
How should I even start this article about Papyrus?<br />
Papyrus is SOFT – baby’s bottom soft. And, it’s<br />
strong! Here’s how they did it:<br />
Papyrus is not a blend of cotton and silk – it’s<br />
made of strands of cotton and silk. The cotton is<br />
very softly spun in a “Z” direction. The silk is spun<br />
quite firmly in the same direction, but it’s much<br />
thinner than the cotton strand. Silk gives Papyrus<br />
its strength. Without it, the softly spun cotton fibers<br />
(each of which is about the length of a memory<br />
card for a camera) would drift apart.<br />
One strand each of the cotton and silk are then<br />
twisted together in the “S” direction. The tightly<br />
twisted silk serves as a binding thread to trap the<br />
softly spun cotton fibers into place, keeping loft in<br />
the super soft cotton. But, that’s only half the story!<br />
A second of these cotton and silk twists are twisted<br />
together to make the full, double-knitting weight<br />
yarn. Interestingly, these two strands are also twisted<br />
in the “S” direction.<br />
22 <strong>KNITmuch</strong> | issue 7<br />
Photos by Cynthia MacDougall
Here’s why that’s interesting:<br />
Ordinarily, a yarn needs to be spun in the opposite<br />
direction each time. Most knitting yarns, if you<br />
look at them have a dominant “S” twist. The fibers<br />
in each ply have been spun “Z,” then they all get<br />
twisted in the opposite (“S”) direction to balance the<br />
yarn. At spinning demonstrations, I compare it to<br />
spinning around on a swing. When we spin, we put<br />
energy into the ropes of the swing, and, when we<br />
let go, the energy tries to balance itself back out, so<br />
we “unspin” in the opposite direction.<br />
With Papyrus, the process begins with one twist of<br />
“Z” spun singles, that are twisted “S” as per usual,<br />
but then, two of these “S” twists are twisted together<br />
also in the “S” direction. Ordinarily, this gives what<br />
is called an “energized yarn” which would be very<br />
springy and could even coil into little twists on the<br />
surface of the knitted fabric, but because neither<br />
cotton nor silk have a lot of memory, it works,<br />
making a beautiful, soft yarn with a fabulous drape.<br />
When a yarn is out of balance, it will often “skew” in<br />
the knitting, which is to say that a stockinette stitch<br />
piece will lean like a parallelogram. Sometimes it’s<br />
severe and sometimes it’s minor. Sometimes it can<br />
be blocked out.<br />
Make knitted swatches do dual duty<br />
I’m swatching and talking about the qualities of the<br />
yarn in the knitted fabric.<br />
I’ve been reviewing yarns and knitting swatches<br />
from them for 16 years now. After a while, it’s hard<br />
to watch boxes filling up with 4″ bits of knitting. For<br />
the past couple years, I’ve been looking for ways<br />
to give these swatches a dual purpose.<br />
For lacy pieces, especially ones made from cotton<br />
or linen yarns, I’ve been making my swatches bigger<br />
and using them for dish and face cloths. Last year, I<br />
took my tension sample of Flax Lace and turned it<br />
into a beautiful bride’s handkerchief.<br />
I always recommend to my knitting students that<br />
they make their gauge swatches bigger than the 4″<br />
[10cm] “bare minimum.” Why? First, because a larger<br />
swatch will give you the ability to do an “average<br />
tension” by measuring off 4″ in several places,<br />
and averaging the results. When you knit a wider<br />
piece, you more closely mimic the area of an actual<br />
sweater – even if it’s only the sleeve. When you<br />
knit short, little 4″ [10cm] rows, you can get a false<br />
indication of your gauge. For this reason, a wider<br />
swatch will be less likely to lie to you.<br />
The humble gauge swatch, elevated. This piece, made in Flax Lace, another<br />
Fibra Natura yarn, is a perfect handkerchief to put in with a bride’s bouquet<br />
for her “something blue.”<br />
<strong>KNITmuch</strong> | issue 7<br />
23
A wider swatch will also tell you a<br />
bit more about the yarn – whether<br />
it will develop a nice halo, for<br />
example, if it’s a mohair yarn, or<br />
whether it will shed or pill.<br />
As well, when you knit a larger<br />
gauge swatch, if your tension IS<br />
out, it will be more noticeable:<br />
an 8″ square will be noticeably<br />
larger or smaller than a 4″<br />
counterpart, even if your gauge<br />
is only out by a stitch or two.<br />
Am I now suggesting that I fill a<br />
box with 8″ or 10” squares? Not<br />
at all.<br />
Once our swatches have lived<br />
out their useful purpose, they<br />
can go on to do honorable<br />
service.<br />
In 2006, my Mom wrote an<br />
article about a knitting basket<br />
she found at Sunnybrook hospital<br />
when she was there waiting<br />
for my Dad at a specialist’s<br />
appointment. Fast forward 12<br />
years and now it’s me waiting for<br />
Dad at our local cancer center. In<br />
the appointment waiting room,<br />
there’s a basket with a pair of<br />
scissors tied to it. It’s brimming<br />
with balls of yarn and a few pairs<br />
of knitting needles. Beside it is a<br />
sign that says, “Knit an 8″ square<br />
while you wait. We’ll turn them<br />
into blankets for our chemo<br />
patients!” Isn’t that a great idea?<br />
For chemo blankets, the yarn<br />
has to be really washable.<br />
Papyrus squeaks in, as the<br />
care recommendation for it is<br />
machine wash in cold water.<br />
Eight inches [20cm] seems to be<br />
the standard for charity project<br />
squares, which is convenient for<br />
us knitters: all we have to do is<br />
double the number of stitches<br />
given for 4″ on the ball band.<br />
Papyrus’ ideal tension is 21 sts to<br />
4″ [10cm], so I cast on 42 stitches.<br />
Now, normally I get pretty<br />
close to tension. Wouldn’t you<br />
know that today’s not normal<br />
for me. But this is why, it is SO<br />
IMPORTANT to DO a gauge<br />
swatch, no matter how long<br />
you’ve been knitting!<br />
Instead of getting 21 sts to 4″<br />
[10cm] – I’m getting 23 sts. The<br />
result of this seemingly tiny<br />
discrepancy means that my 8″<br />
swatch now measures a modest<br />
7¼” [18.5 cm]. Worse, it means<br />
that if I had blindly cast on for<br />
a sweater for myself, it would<br />
come up at least 5″ [11.5 cm] shy<br />
of the desired finished size. To<br />
make it come up to the proper<br />
finished size I’d need another 23<br />
stitches if I continue to use US<br />
6/4mm needles.<br />
This tension swatch is a bit too<br />
tiny for any 8″ square charity<br />
project, but hey, my heart was in<br />
the right place, and your tension<br />
swatch might be perfect!<br />
Don’t give away your swatch<br />
away too quickly, though. They’re<br />
handy to keep around in case<br />
you need those few yards of<br />
yarn to finish your neckband or<br />
lengthen the cuffs of a young<br />
person’s sleeves. Some knitters<br />
even keep their swatches and<br />
wash them every time they wash<br />
the sweater. That way, if the piece<br />
ever requires mending, the yarn<br />
from the tension swatch will<br />
match it very very closely. The<br />
charity of your choice will never<br />
know what year your swatch was<br />
made when you donate it!<br />
The plan is to find some<br />
summery patterns for Papyrus<br />
and create a little sundress for a<br />
little girl. The plan WAS to make<br />
a little tunic for moi, but the time<br />
got away on me! It appears as<br />
though this is not my week!<br />
This photo is so close, you can check my gauge<br />
for me! The only thing is that the curve of the<br />
photo lens on the iPad makes it appear as<br />
though the ruler extends a little beyond the first<br />
and last stitch of the 0 and 4'' markings.<br />
The knitting tension for Papyrus is 21 stitches to 4''<br />
[10cm], so 42 stitches should make an 8'' [20cm]<br />
wide piece. It should.<br />
24 <strong>KNITmuch</strong> | issue 7
patterns for Papyrus,, a summery yarn<br />
Papyrus comes in 22 colors.<br />
Raven and Bison are the darkest<br />
shades, and Camellia is the<br />
brightest. The rest of the shades<br />
are very soft, perfect for summer<br />
wear. The names of the colors<br />
evoke mental pictures of the<br />
shade: cloud, moonstruck, doe,<br />
and water lily need very little<br />
more in the way of description.<br />
Naturally, with this knowledge<br />
in hand, and knowing that<br />
Papyrus is made of cotton and<br />
silk, and therefore offers a lovely<br />
drape, we can conjure up some<br />
fabulous summer knit ideas!<br />
My “first thought” use for Papyrus<br />
is the “office cardigan” – with 78%<br />
cotton, it’s cool enough to wear<br />
in the summer, and with 22% silk,<br />
it has enough warmth to ward off<br />
air conditioner drafts.<br />
The Babbling Brook cardigan fills<br />
that bill nicely. It uses cables to<br />
mimic the appearance of water<br />
rushing over rocks in a brook<br />
bed. The link on the title of the<br />
pattern, above, takes you to<br />
a free pattern for this project,<br />
which is sized for Small right<br />
through 2X.<br />
Another office knock-out is the<br />
Graphite Tank, which is more of<br />
a tunic-length shell top. (A “shell”<br />
is a sleeveless top – the shoulder<br />
seams some right out to the<br />
armhole edge instead of having<br />
straps like a tank top.) This very<br />
classy knit is another perfect knit<br />
for the office, and it could still be<br />
worn with jeans to a corn roast<br />
(but maybe not in white…)<br />
The Graphite Tank is sized to fit a<br />
bust as small as 32″ [81cm] and<br />
as large as 56″ [143cm].<br />
I like the Graphite Tank so much,<br />
I’ve printed the pattern off to<br />
make for myself!<br />
For more casual wear, the Blissful<br />
Tee will fit the bill. This is a “true”<br />
T-shirt in that the sleeves are<br />
formed by adding stitches to the<br />
front and back at the underarms<br />
to make a “T” shape. No sleeves<br />
to sew in!<br />
The Babbling Brook cardigan is perfect for<br />
warding off air conditioning drafts, or for hiding<br />
spaghetti straps in an office setting.<br />
How pretty is this? There are enough colors of<br />
Papyrus to do this in blues, or even in the colors in<br />
the child’s tunic.<br />
This little T-shirt would top off a summer skirt or a<br />
pair of jeans quite nicely!<br />
<strong>KNITmuch</strong> | issue 7<br />
25
This little t-shirt would brighten any child’s day!<br />
Our last project with Papyrus is the Seahorse Tee –<br />
even someone at the company commented on how<br />
precious this is!<br />
Like the Blissful Tee, this top has the sleeves added<br />
in as the front and back are knitted. The pattern<br />
gives instructions for sizes 2 through 10.<br />
All of these patterns are for double-knitting weight<br />
cotton yarns, and some of them have different<br />
gauges. For that reason, I recommend doing<br />
tension swatches, you may find my last post<br />
helpful in that regard.<br />
I’ve designed a child’s tank-tunic for sizes 12-18<br />
months through size 4 in playful colors. I also<br />
go right through the pattern and explain various<br />
elements of patterns and why they might be written<br />
the way they are. Read on!<br />
What designers consider when writing a knitting pattern<br />
Have you ever worked on a<br />
pattern and wondered what the<br />
designer was thinking when they<br />
created the design?<br />
We’re playing with Papyrus, a<br />
lovely, soft, summery yarn. With<br />
a fiber content of 78% cotton<br />
and 22% silk, Papyrus is perfect<br />
for stylish summer knits.<br />
Come along on my designing<br />
journey! I want to show you why<br />
patterns should be considered a<br />
guideline, and why I wrote this<br />
pattern the way I did.<br />
Papyrus comes in what I refer to as “European style balls.” Years ago, I was advised to work these from the<br />
outside of the ball, rather than pulling from the inside, as this style of ball tends to collapse faster than the<br />
more oblong shaped ones. For this reason, a yarn bowl is a very convenient accessory.<br />
26 <strong>KNITmuch</strong> | issue 7
Child’s Tunic in Papyrus<br />
skill level: beginner<br />
sizing<br />
• Small -12-18 months (20″<br />
[51cm] finished chest)<br />
• Medium – size 2 (22″ [56cm]<br />
finished chest)<br />
• Large – size 4 (24″ [61 cm]<br />
finished chest)<br />
materials<br />
yarn<br />
• Papyrus, 1.75oz [50g] ball,<br />
131yd [120m] per ball<br />
• 3 (3, 4) balls Col A (elderberry)<br />
• 1 ball each Col B (Camellia),<br />
Col C (Daffodil), and Col D<br />
(Gardenia)<br />
needles<br />
• circular knitting needle size 6<br />
[4mm], 16″ [40cm] long or size<br />
needed to obtain gauge<br />
• straight knitting needles size 5<br />
[3.75mm]<br />
other<br />
• stitch markers<br />
• tapestry needle<br />
gauge 21 sts and 29 rows to 4″<br />
[10cm]<br />
Notes: This piece is made in the<br />
round from the bottom hem to<br />
the bodice. The skirt is tapered<br />
by decreases at the sides – stitch<br />
markers are recommended at<br />
these points. Slip markers as<br />
necessary. The bodice is worked<br />
back-and-forth.<br />
Instructions are given for size<br />
Small. Instructions for Medium<br />
and Large are given in brackets:<br />
S (M, L). If working from a printed<br />
pattern, highlight the instructions<br />
for the size you want to make<br />
ahead of time.<br />
Skirt<br />
This tunic will fit a size 2 toddler. The pattern has been written for 12-18<br />
months, size 2, and size 4.<br />
With Col B, cast on 166 (174, 190)<br />
stitches. Join in the round, being<br />
careful not to twist the sts.<br />
TIP Double check your stitch<br />
count!<br />
Round 1: Pm, (k1, p1) for 82 (86,<br />
94) sts, k1, pm, (p1, k1) to<br />
last st, p1.<br />
Round 2: (p1, k1) around.<br />
Round 3: (k1, p1) around.<br />
Rounds 4-5: Repeat Rounds 2<br />
and 3.<br />
Round 6 (dec round): K2tog, (p1,<br />
k1) to 2 sts before marker,<br />
ssk, slm, p2tog, (k1, p1) to<br />
last 2 sts of round, ssp.<br />
Rounds 7-11: Repeat Rounds 2<br />
and 3 twice, then repeat<br />
round 2.<br />
Round 12 (dec round): P2tog,<br />
(k1, p1) to 2 sts before<br />
marker, ssp, slm, k2tog, (p1,<br />
k1) to last 2 sts of round,<br />
ssk. Break yarn. Join Col C.<br />
**Round 1: K around.<br />
Repeat Round 2 to 12 above.<br />
Break yarn. ** Join Col D.<br />
Repeat from ** to **. Join Col A.<br />
Knit in stockinette stitch (K every<br />
round), working a decrease<br />
round on 6th and every<br />
following 6th (6th, 7th)<br />
round:<br />
Dec. Round: *Slm, k2tog, k to 2<br />
sts before marker, ssk; rep<br />
from *.<br />
When there are 106 (114, 126) sts<br />
on the round, continue knitting<br />
without further decreases<br />
until work from cast on edge<br />
measures 13 (14, 15)” [32.5 (35,<br />
38)]cm.<br />
<strong>KNITmuch</strong> | issue 7<br />
27
Abbreviations<br />
K – knit<br />
P – purl<br />
k2tog – knit two stitches together<br />
ssk – slip, slip, knit – slip one stitch<br />
knitwise, then slip the next stitch, also<br />
knitwise. Place these two stitches back<br />
onto the left needle with the left needle<br />
tip in front of the right needle tip,<br />
then knit the two stitches together<br />
p2tog – purl two stitches together<br />
ssp – slip slip purl. slip one stitch<br />
knitwise, then slip the next stitch, also<br />
knitwise. Place these two stitches<br />
back onto the left needle together<br />
and remove the right needle. Purl<br />
these two stitches together by inserting<br />
the right needle tip into the two<br />
stitches from the back of the work,<br />
then wrap the yarn, draw the loop<br />
through and slip the two stitches off<br />
the left needle.<br />
pm – place marker between the last<br />
stitch knit and the next stitch<br />
slm – slip marker<br />
rm – remove marker<br />
The run-down<br />
The title of a pattern should be<br />
pretty self-explanatory. Ideally, it<br />
should give the type of garment,<br />
the category of person it will fit,<br />
and sometimes the name or type<br />
of yarn (I could have said “in DK<br />
or double knitting yarn”, if I didn’t<br />
want to cite the proper name of<br />
my yarn in the title.)<br />
Skill level is something that can<br />
get a bit murky. Ideally, it should<br />
be clear to the reader exactly<br />
who could properly execute the<br />
pattern, but different designers<br />
have different ideas of what<br />
a beginner knitter is vs. what<br />
an advanced knitter is. Some<br />
designers use “cutesy” descriptors<br />
for their skill level, but I’m<br />
challenged to know if “lumberjack”<br />
or “axe master” accurately<br />
describe beginner or intermediate.<br />
As for sizing, not all patterns<br />
give the measurements clearly<br />
– most give measurements,<br />
but don’t always say if that<br />
measurement is for the finished<br />
chest of the garment, or if it’s the<br />
size of chest the garment will fit.<br />
There can be a difference! Ease<br />
is an important part of garment<br />
construction, so it’s helpful to<br />
know which is which in a pattern!<br />
Materials – this is where the<br />
rubber starts to hit the road.<br />
Again, not all patterns include<br />
information such as fiber<br />
content, yardage, and weight<br />
but this opinionated knitter/<br />
designer believes they should<br />
and here’s why:<br />
Not all yarns stay with us forever.<br />
So, 15 years from now, when<br />
someone comes across this<br />
little pattern for a child’s tunic, it<br />
will be very helpful for them to<br />
know that it took 3 balls of yarn<br />
at 131 yards per ball to make the<br />
project. That way, if Papyrus is no<br />
longer available (and I hope it is,<br />
as it’s a beautiful yarn), our future<br />
knitter can go shopping and<br />
know how many yards he or she<br />
will need to complete the project.<br />
Almost all patterns include the<br />
size and type of needles, but<br />
they don’t all say what length the<br />
circular needle needs to be. I’ve<br />
prescribed 16″ [40cm], because<br />
a 16″ needle should comfortably<br />
hold enough stitches for the hem<br />
of the largest size and for the<br />
least number of stitches on the<br />
smallest size.<br />
Not all patterns include such<br />
notions as stitch markers and<br />
tapestry needles. For more<br />
advanced level patterns, a designer<br />
can assume that such things are<br />
already in a knitter’s tool kit and<br />
that they’ll know to grab them,<br />
but for absolute beginners, this<br />
information is helpful.<br />
A beginner knitting pattern should include all the<br />
items necessary to complete the project – even<br />
the stitch markers! When I took this photo, I had<br />
already knit the tunic. There’s enough yarn here to<br />
make at least one more!<br />
Gauge – now the rubber is<br />
really hitting the road! Gauge, or<br />
tension, is, in most cases, nonnegotiable.<br />
It’s imperative that<br />
the knitter get this tension if the<br />
garment is to fit the person for<br />
whom it’s intended! “But what<br />
if I’m not getting that?” you<br />
ask. Then, we refer back to the<br />
materials section above where it<br />
says “or size required to obtain<br />
gauge.” And we do another<br />
sample until we get our gauge.<br />
Having said that, there is some<br />
wiggle room: This pattern is a<br />
child’s tunic, and, knowing that<br />
children grow quickly, we can<br />
knit the larger size if our gauge<br />
is too tight, or a smaller size, if<br />
our gauge is looser than that<br />
prescribed. If I were making this<br />
top for me, though I would do a<br />
solid math calculation to make<br />
sure that working the pattern<br />
in a different size is going to<br />
28 <strong>KNITmuch</strong> | issue 7
fit. It bears saying, too, that working a pattern in a<br />
different size may mean I’ll use more yarn than the<br />
directions for my size prescribe. (Word to the wise!)<br />
Not all patterns include notes, but over the years,<br />
I’ve come to enjoy seeing them. Often, notes give<br />
you little insights about what the designer’s thought<br />
process was, and in the case of beginner patterns,<br />
the more explanation the better, right?<br />
The photos below show what twisted and nontwisted<br />
cast ons look like. The reason a twisted cast<br />
on is very bad is that the knitting will progress in a<br />
“twisted tube” and you don’t want that! By keeping<br />
the edge of that cast on inside the loop of the<br />
needle, with the stitches toward the outside, the<br />
knitting can progress as it should.<br />
The photo on the left shows a cast on that has a twist in it (big blue arrow).<br />
In the photo on the right, the twist has been removed, and the stitches all lay<br />
pointing outward, in anticipation of the knitting to come.<br />
Here’s our skirt as far as the pattern takes us today. The following text talks<br />
about how I constructed it, and the decreases I used to shape the sides.<br />
Now we tackle the actual pattern:<br />
Normally, a pattern with several colors of yarn<br />
would begin with the main color, Col A. However,<br />
this pattern begins with 3 contrasting stripes, so we<br />
begin with Col B.<br />
The cast on method is rarely prescribed in any<br />
pattern. Designers usually leave this up to the<br />
knitter. As a knitter progresses through their skillbuilding,<br />
they’ll learn new cast ons and adapt them<br />
to their use. If yours is an enquiring mind, I’ll fill you<br />
in: I used a long tail cast on because I like the edge<br />
it gives the bottom of a garment.<br />
I’ve included two important things in the following<br />
instruction – double check your stitch count, and be<br />
careful not to twist the cast on. Very rarely would<br />
a pattern recommend double checking the stitch<br />
count, but because I want an absolute beginner to<br />
succeed with this project, I’ve included it.<br />
And so, we are ready to knit. In the first round,<br />
you’ll see that I’ve prompted where to place stitch<br />
markers – this is useful information to the beginner<br />
or intermediate knitter.<br />
After the first few rounds, the directions say to<br />
repeat rounds 2 and 3 – this type of notation is<br />
often used in publications, especially printed ones,<br />
because it saves precious column space. It also<br />
saves the designer some typing, which reduces the<br />
chance for error. It’s quite easy for the knitter to<br />
refer back up to the previous two lines!<br />
In this pattern, I've added “(decrease round)” to<br />
Rounds 6 and 12. Not all patterns would note this,<br />
and an absence of this instruction might make<br />
a pattern more directed at the intermediate or<br />
advanced knitter who might understand this just<br />
by reading the instruction for these rows. Because<br />
I’ve written this for a beginning knitter, however, I’ve<br />
flagged this in an effort to be helpful.<br />
<strong>KNITmuch</strong> | issue 7<br />
29
Let’s talk about the decreases. I’ve put 4 in the<br />
pattern: k2tog, p2tog, ssk, and ssp. Most beginner<br />
knitters will be familiar with the k2tog and p2tog,<br />
and likely ssk, but ssp? “What’s that,” you say?<br />
With both ssk and ssp, you slip stitches knitwise, one at<br />
a time, from the left needle to the right one.<br />
With ssk, you slip the stitches back onto the tip of<br />
the left needle so the right needle crosses behind<br />
the left one, then you wrap the yarn and draw<br />
the loop through, essentially knitting the stitches<br />
through the back of the loop.<br />
For ssp, when you slip the stitches back onto the tip<br />
of the left needle, you take the right needle tip out,<br />
then re-insert it into those two slipped stitches from<br />
behind, almost pointing the right needle tip directly<br />
at yourself. Then, you wrap the yarn around the<br />
needle tip at the front of the work and draw the loop<br />
through to the back. Ssk is illustrated in the photo on<br />
the left, and ssp in the photo on the right.<br />
This is a very fine point of detail, especially for a<br />
toddler’s jumper. This is a good time to note that<br />
patterns really are guidelines, and that there are<br />
no “knitting police”. When your toddler is moving<br />
around at the speed toddlers do, nobody is going<br />
to say “Oh, she should have done those as ssp<br />
instead of p2tog!” But, if I was sizing this pattern up<br />
for an adult size, I would want this amount of detail<br />
in my garment.<br />
OK, home stretch – just 3 more things to cover:<br />
First, asterisks – inevitably, when working up a<br />
pattern for knitting, the reader is going to come<br />
across the humble asterisk (*). It may be the most<br />
helpful symbol used in knitting. Its primary use is to<br />
indicate that a series of instructions that follow will<br />
be repeated at least once in the row. Sometimes,<br />
asterisks also denote that a number of rows will be<br />
repeated. Often in such cases, two or more asterisks<br />
are used.<br />
On our decrease round, when you follow this<br />
direction “*Slm, k2tog, k to 2 sts before marker, ssk;<br />
rep from *” you will reach the end of the round<br />
when you reach the semi colon the second time. The<br />
semi colon is also an important signal to the pattern<br />
reader – it usually signals the end of the repeat.<br />
An example of a series of repeating rows appears<br />
after the first color stripe. After joining in Col C, two<br />
asterisks (**) indicate the beginning of the next color<br />
stripe. The two asterisks before “Join Col D” signify<br />
the end of that repeat – think of them as “starry<br />
little brackets.”<br />
But, what’s with that vague instruction “Knit in<br />
stockinette stitch (K every round) working a<br />
decrease round on 6th and every following 6th (6th,<br />
7th) round:”? This is just an efficient way of writing<br />
the pattern. I could have written it like this:<br />
Rounds 1-5: K around.<br />
Round 6 (Dec round):<br />
but that would have given me a problem with the<br />
larger size, where decreases occur on the 7th round<br />
instead of the 6th, as with the other 2 sizes. The<br />
instruction as I have written it in the pattern, above,<br />
is the way most other designers will write it, and it<br />
brings me to this important point: read all the way<br />
through a pattern before you begin. If you stopped<br />
reading at “Knit in stockinette stitch every round,”<br />
and knitted merrily on, your tunic would have no<br />
shape at all above the stripes, and you would have<br />
more than 20 too many stitches when you got to<br />
the bodice!<br />
Two photographs showing the difference of execution between an ssk and ssp.<br />
On the top, I’m about to knit the ssk, and below, the ssp. Ssp is a bit of a tricky<br />
maneuver, and if it’s causing you problems, substitute it out for p2tog. Nobody’s<br />
going to notice the difference when that toddler goes speeding by! Note that<br />
my yarn should have been at the front of the work in the lower picture.<br />
30 <strong>KNITmuch</strong> | issue 7
The last point to touch on is “continue knitting without further decreases.” Sometimes, this instruction will<br />
include a nod to maintaining a certain stitch pattern, but in this case, it literally means “knitting.” Because<br />
we’re making stockinette stitch in the round, every row will be knitted without any shaping, once the<br />
prescribed number of stitches are on the needle.<br />
Keep reading we’ll talk a bit more about this, when I give you the pattern for the bodice, including the<br />
armhole, neck, and shoulder shaping.<br />
How to write<br />
patterns for<br />
beginner<br />
knitters<br />
I got really wordy with my “run<br />
down”, but it was all in an effort<br />
to make beginner knitters<br />
successful at reading patterns<br />
– not just my patterns, but any<br />
patterns! So, let’s get started<br />
on the rest of our toddler tunic,<br />
picking up where I left off.<br />
This portion of a garment is called the “bodice.”<br />
Bodice front<br />
Change to straight needles, size<br />
5 [3.75mm]. Work will proceed<br />
back-and-forth. Remove round<br />
markers as they appear.<br />
Row 1: (k1, p1) to last st before<br />
marker, k1. 53 (57, 63) sts<br />
on needle. Leave rem sts<br />
on circular needle. Turn<br />
work.<br />
Repeat Row 1 for a total of 8<br />
rows (1” [2.5cm]).<br />
Shape armhole<br />
All sizes:<br />
Row 1: Cast off 2 sts, (p1, k1) to<br />
end. 51 (55, 61) sts.<br />
Rows 2-4: Repeat Row 1. 45 (49,<br />
55) sts.<br />
Row 5: P2tog (k1, p1) to last 3 sts,<br />
p2tog. 43 (47, 53) sts.<br />
Row 6: (P1, k1) to last st, p1.<br />
Row 7: Ssk, (p1, k1) to last 3 sts,<br />
p1, k2tog. 41 (45, 51) sts.<br />
Row 8: (k1, p1) to last st, k1.<br />
Largest size only: Repeat Rows 5 –<br />
8. (47 sts) ***Continue in pattern<br />
until work from start of bodice<br />
measures 2½” [6.3cm], ending<br />
with RS facing for next row.<br />
Shape neck and shoulder strap:<br />
Row 1: (k1, p1) 6 times, cast off 17<br />
(21, 23)sts, (k1, p1) to last st,<br />
k1. (12 sts on each side of<br />
neck)<br />
Row 2: (k1, p1) 6 times.<br />
Row 3: Ssk, (p1, k1) 5 times. (11<br />
sts)<br />
Row 4: (k1, p1) to last st, k1.<br />
Row 5: P2tog, (k1, p1) to last st,<br />
k1. (10 sts.)<br />
Row 6: (K1, p1) to end.<br />
Row 7: (P1, k1) to end.<br />
Repeat rows 6 and 7 until knitting<br />
measures 5½ (6, 6½)” [14 (15, 16.5)<br />
cm] from the beginning of the<br />
bodice. Cast off all sts. Break yarn.<br />
With WS facing and Col A, join<br />
yarn at neck edge.<br />
Row 1: (P1, K1) 6 times. (12 sts)<br />
Row 2: (K1, p1) 5 times, k2tog. (11<br />
sts)<br />
Row 3: (K1, p1) 5 times, k1.<br />
Row 4: (K1, p1) 4 times, k1, p2tog.<br />
(10 sts)<br />
Row 5: (P1, k1) to end.<br />
Row 6: (K1, p1) to end.<br />
Repeat Rows 5 and 6 until<br />
knitting measures 5½ (6, 6½)” [14<br />
(15, 16.5) cm] from the beginning<br />
of the bodice. Cast off all sts.<br />
Break yarn.<br />
<strong>KNITmuch</strong> | issue 7<br />
31
Bodice Back<br />
With RS facing, join Col A.<br />
Row 1: (k1, p1) to last st, k1. 53<br />
(57, 63) sts on needle. Turn<br />
work.<br />
Repeat Row 1 for a total of<br />
8 rows (1” [2.5cm]). Work as<br />
given for Shape Armhole to ***.<br />
Continue in pattern until work<br />
from start of bodice measures<br />
3½” [9cm], ending with RS facing<br />
for next row.<br />
Shape neck and shoulder straps<br />
as given for Bodice front, above.<br />
Finishing<br />
Sew the shoulder seams together.<br />
Sew bodice seams under arms<br />
using mattress stitch. Weave in<br />
all ends.<br />
The run-down<br />
The first two questions a beginner<br />
is likely to ask are: “Why did she<br />
change needle size?” and “Why<br />
are we going back-and-forth<br />
now?” I can explain:<br />
The bodice of a garment is an<br />
area where structure is desired.<br />
I tell my students that the<br />
shoulder seams of a garment<br />
act as the “coat hanger”: you<br />
want structure so that the rest of<br />
the garment will hang properly.<br />
By going to a slightly smaller<br />
needle size, and switching to<br />
seed stitch, we can add structure<br />
and not lose anything in the<br />
way of chest size, because seed<br />
stitch tends to expand slightly<br />
horizontally.<br />
Knitting back and forth with<br />
two little seams at the side of<br />
the garment adds stability to the<br />
underarm, an area that can take<br />
a lot of wear and tear. (It also<br />
gives me a chance to talk about<br />
mattress stitch – you’re learning<br />
all the skills this week!)<br />
Once we’ve knitted up the<br />
stitches for the front of the<br />
bodice, the circular needle<br />
serves as the stitch holder. This<br />
saves transferring the remaining<br />
stitches onto a stitch holder<br />
and putting them back onto a<br />
needle when we go to do the<br />
back of the bodice. I’d have<br />
written this section “work in seed<br />
stitch for 8 rows,” but if I had, the<br />
pattern would be elevated to an<br />
intermediate level, in my opinion.<br />
Under “Shaping the armhole,” I<br />
wrote the instruction so that<br />
the next stitch after the cast<br />
off stitch will be the one that<br />
presents to the knitter, NOT the<br />
one that was worked to facilitate<br />
the second cast off stitch. Most<br />
patterns assume that the knitter<br />
knows that the stitch on the<br />
right needle is part of the next<br />
stitch to be worked, but when I<br />
began knitting it caused much<br />
consternation. If I was writing<br />
this pattern for an intermediate<br />
or advanced level, I’d hold to<br />
the practice of “most patterns,”<br />
however, I’m writing it for an<br />
absolute beginner, so I’ve written<br />
it the way my “beginner knitter<br />
mind” worked. Intermediate<br />
and advanced knitters you’ll<br />
recognize that we’re working<br />
seed stitch here, so the next<br />
stitch will need to be worked as<br />
a purl, but I want an absolute<br />
beginner to be able to follow my<br />
direction to the letter.<br />
In this section, three asterisks<br />
(***) have been inserted. They’ll<br />
come into play when we’re<br />
working the bodice back.<br />
Note that I’ve given a lot of<br />
stitch counts in this section.<br />
Again, the purpose for this is<br />
to provide ample opportunities<br />
for a beginner knitter to be able<br />
to double-check their work.<br />
Intermediate knitters are apt<br />
to find them handy, too, while<br />
advanced knitters may want to<br />
skip over most of them.<br />
After row 5 on the first strap,<br />
and row 4 of the second strap, I<br />
could have instructed “continue<br />
working in pattern until work<br />
measures….” Again, I’ve written<br />
it the “spelled out” way for the<br />
benefit of beginning knitters.<br />
Once a beginner has worked<br />
several patterns of this nature,<br />
they’ll be able to go with the<br />
more vague instruction given<br />
quotes, above.<br />
The bodice back has many<br />
similarities to the bodice front.<br />
Rather than repeat all that text<br />
for the back of the garment,<br />
most patterns will refer the knitter<br />
back up to the pertinent sections.<br />
The sentence after the three<br />
asterisks (***) in the bodice front<br />
directions differs on the back, so<br />
I wrote the pattern in a way I<br />
can explain it without having to<br />
repeat a lot of text.<br />
Finishing is an area that can<br />
make or break a project, yet<br />
very few patterns give detailed<br />
directions for finishing. The knitter<br />
is left to decide how to do the<br />
various steps. Here’s what I’d do:<br />
Shoulder seams: As I noted<br />
earlier in this post, the shoulder<br />
seams are the “coat hanger” of<br />
your garment. I like to see a<br />
sturdy cast off and a solid seam.<br />
32 <strong>KNITmuch</strong> | issue 7
For this little tunic, I chose whip stitch. Wherever<br />
possible, I like to use an existing yarn end to sew<br />
into a seam – it gives the yarn end a place to go,<br />
and it reduces bulk at the point where a new strand<br />
of yarn would be added. In this project, I took the<br />
tail from the strap’s cast off. I threaded it into a<br />
tapestry needle, and placed the straps right sides<br />
together. The cast off edge of both straps form a<br />
nice, double chain. I pierce the opposite strap, right<br />
in the beginning stitch of its cast off edge, then I<br />
go back through the first strap and sew back into<br />
the original strap. Then, I go over the edge, and<br />
put the tapestry needle under the “V” strands of<br />
both straps’ chain edge, repeating this all along<br />
the edge. When I’m a few stitches away from the<br />
end of the seam, I weave that strand of yarn back<br />
toward the beginning. There’s another strand of<br />
yarn, and it needs to be woven in, too. I’ll thread<br />
that strand, and finish my seam by working toward<br />
the completed seam, then work this strand into the<br />
seam as well.<br />
While we’re talking about weaving in ends, as<br />
long as the yarn end can be woven into a seam, I<br />
recommend that you do that. However, we have one<br />
yarn end at the neckline on both the front and back<br />
of the bodice that have no seam in which to hide. My<br />
preferred method of weaving these ends is to thread<br />
the whole strand in a tapestry needle, find a nearby<br />
place to get that strand to the back of the work, then<br />
weave it through for a stitch or two. At that point, I<br />
split the yarn into individual plies or pairs of plies if<br />
possible. Then, I weave each of those ends into the<br />
back of the fabric in different directions. This not only<br />
makes it harder to detect the woven in ends from<br />
the front of the work, but in the case of a garment<br />
that will be treated with less-than-ideal care, it also<br />
anchors those ends in more securely and makes it<br />
difficult for cut ends to come loose.<br />
The tip of the needle shows where our yarn end began. I’ve woven the whole<br />
strand in several stitches, by following the path of the stitches in the fabric.<br />
The yarn has been split, and these two ends will be woven off in different<br />
directions to make a strong weave that will be difficult to detect from the<br />
right side.<br />
In the top photo, the yarn end originated in the back piece, and the tapestry<br />
needle is pointing toward the knitter, through the edge stitch of the cast off<br />
on the front piece.<br />
In the bottom photo, the seam has been whip stitched part way across the<br />
seam, and the yarn tail is being held at the back. The tapestry needle now<br />
holds the yarn end from the front strap, and it’s been inserted under the cast<br />
off edge of both pieces from front to back.<br />
<strong>KNITmuch</strong> | issue 7<br />
33
Mattress stitch is worked by laying the project pieces side-by-side and picking up the “bumps” from<br />
each piece in an alternating fashion.<br />
Cynthia MacDougall<br />
cgknitters.ca<br />
Finally, the finishing instructions talk about<br />
using mattress stitch to sew up those<br />
short, 1″ seams of the bodice below the<br />
under arms. I’ve already explained why I<br />
designed this pattern to have these two<br />
short seams, so let’s talk about mattress<br />
stitch. It’s the one technique that elevated<br />
my knits from looking home made to<br />
looking hand made.<br />
I begin the mattress stitch by threading a<br />
yarn end into a tapestry needle. I lay the<br />
pieces out side-by-side with the right sides<br />
up, then, I put the needle into the bump<br />
of the other piece opposite my yarn end.<br />
I work up (in this case) or down the seam,<br />
picking up one bump from the edge of<br />
each piece alternately all the way. On a<br />
long seam, I will do a back stitch through<br />
the last two bumps every couple inches.<br />
I hope my explanations about what goes<br />
through the mind of a designer, and my<br />
tips for elevating the quality of your knits<br />
have been helpful. I know they’ve been<br />
wordy!<br />
I’ve really enjoyed testing and working<br />
with Papyrus yarn and recommend that<br />
you give it a try!<br />
10 th Annual Woodstock Fleece Festival<br />
Saturday<br />
October 13 th<br />
2018<br />
dyeing<br />
felting<br />
knitting<br />
rug hooking<br />
spinning<br />
weaving<br />
www.fleecefestival.com<br />
Workshops<br />
Demonstrations<br />
Food<br />
Woodstock Fairgrounds<br />
875 Nellis Street<br />
Woodstock, Ontario<br />
34 <strong>KNITmuch</strong> | issue 7
don't miss these<br />
projects & tutorials online!<br />
KNIT much<br />
...to K, is to<br />
.com<br />
READ NOW<br />
Unraveling<br />
Unity and Unity Beyond:<br />
what makes this yarn unique?<br />
READ NOW<br />
Unimaginable drape<br />
and comfort in knit<br />
designs made with<br />
Unity Beyond<br />
and<br />
there's<br />
so<br />
much<br />
more!<br />
READ NOW<br />
It’s a Wrap<br />
yarn<br />
enhances<br />
simple knit<br />
and purl<br />
stitches<br />
pattern<br />
<strong>KNITmuch</strong> | issue 7<br />
35
Red Heart Dreamy yarn<br />
Michelle Nguyen<br />
Dreamy yarn in the color Ivory.<br />
You can really see the brushed halo around the<br />
yarn in this photo. Dreamy truly looks and feels<br />
like real wool.<br />
All that yardage, it’s amazing what only a couple<br />
of balls will get you. If you’re knitting a lot of baby<br />
blankets this is a great place to start.<br />
Red Heart Dreamy yarn truly<br />
lives up to its name with the soft<br />
brushed texture and miles of<br />
yardage. Whether you’re talking<br />
about the price point or the yarn<br />
itself everything about Dreamy<br />
is complete nirvana. From the<br />
minute you first touch it, you’ll be<br />
pinching yourself.<br />
The fiber content is 100% acrylic,<br />
but it’s not normal acrylic. The<br />
fiber has a brushed texture rather<br />
than a sleek smooth texture. This<br />
makes it seem like natural wool.<br />
If you have someone in your life<br />
who is knit-worthy but is allergic<br />
to wool Dreamy is the perfect<br />
option for you. There are a lot of<br />
synthetic fibers out there but not<br />
too many that feel like wool.<br />
Dreamy’s yardage (I mentioned<br />
earlier) is nothing to sneeze at<br />
either. A whole 466 yds is a lot of<br />
yarn to work with, especially in a<br />
bulky weight. Red Heart recently<br />
made a blog post about 5 Fave<br />
Blankets, two of them are crochet,<br />
but the other three are knit, and<br />
one is even knit in Dreamy yarn.<br />
The Calming Colors Chevron<br />
Throw measures 45” x 55” when<br />
complete and calls for 5 balls of<br />
Dreamy. At $7.99 per ball, that is<br />
a steal. Normally the bigger the<br />
yarn, the shorter the yardage,<br />
but Dreamy blows that wives’<br />
tale right out of the water.<br />
I also wanted to mention the post<br />
about Gorgeous Knit Throws on<br />
the Red Heart Blog. There are an<br />
additional 15 knitted throw patterns<br />
there. Several of the blankets are<br />
for really large yarn, but there are<br />
many that can be adapted to work<br />
with Dreamy yarn, and since it’s a<br />
blanket, your gauge won’t have to<br />
be as important a factor as with<br />
fitted garments.<br />
If you’re not keen on blanket<br />
knitting because you don’t want<br />
to wrangle that many balls of<br />
yarn or you don’t want to be<br />
knitting it forever, Dreamy is the<br />
yarn for you. The bulky yarn<br />
makes for quick project work and<br />
the yardage means you don’t<br />
have to source 87 individual balls<br />
of yarn. If you’ve been looking for<br />
the perfect yarn for cozy throws<br />
and blankets, look no further.<br />
Dreamy is an amazing yarn with<br />
an incredibly luxurious feel and<br />
a price tag that won’t break the<br />
bank.<br />
The weight of this yarn is so versatile. You can use<br />
it for almost anything! It knits up very quickly.<br />
36 <strong>KNITmuch</strong> | issue 7<br />
Photos by Michelle Nguyen
Dreamy<br />
Relaxation<br />
Photo courtesy of Red Heart<br />
Socks<br />
The toe here has been Kitchener stitched, or grafted, shut. It looks as though the<br />
end has been knitted shut, but it’s all in the grafting!<br />
Let's look at a smaller project.<br />
Socks are one of the most<br />
requested hand knit items. With<br />
the Relaxation Sock pattern<br />
from Red Heart, you won’t<br />
have the heart to say ‘no’ to<br />
a request and you won’t want<br />
to. Mostly what discourages<br />
people from knitting socks is<br />
the yarn size. Fingering weight<br />
yarn will make a very functional<br />
sock, but Dreamy yarn will make<br />
something really special.<br />
I wouldn’t want anyone to think<br />
the only thing Dreamy yarn is<br />
good for is blankets and throws.<br />
The Relaxation Sock pattern<br />
is knit as a tube with an after<br />
thought heel, which is a fantastic<br />
technique. If you’re not sure how<br />
to do it, this is the perfect time<br />
to learn. Bigger yarn and a larger<br />
project will make the structure<br />
easier to see.<br />
The sock itself is a very easy<br />
pattern to follow. It’s knit from<br />
the cuff down with a 1×1 rib,<br />
then it switches to a 2×2 garter<br />
rib for the body. This consists<br />
of knitting one complete round,<br />
then switching to a 2×2 rib and<br />
repeating those two rows.<br />
When you get down to the<br />
toe you simply use decreases<br />
to shape it, and graft the ends<br />
together. If you’re not sure how<br />
to graft stitches this is, again, a<br />
really useful technique to learn.<br />
There are some really great<br />
YouTube videos about grafting.<br />
If you were to simply search<br />
grafting sock toes, you would be<br />
able to find exactly what you’re<br />
looking for. I know there are a<br />
lot of different variations, but I<br />
don’t like recommending one<br />
in particular because everyone<br />
learns differently.<br />
Some may be auditory learners<br />
where a video with a lot of<br />
talking would do well for them,<br />
while others may be visual or<br />
mechanic learners where they<br />
just have to see it done and do it<br />
themselves. Start going through<br />
videos and one of them will<br />
make it click for you.<br />
These Relaxation Socks would<br />
be the perfect gift to put in a<br />
basket with a book, some tea,<br />
and a mug. Perhaps for Mother’s<br />
day? It’s never too early to start<br />
thinking about future holidays<br />
and birthdays.<br />
The toe here has been Kitchener stitched, or<br />
grafted, shut. It looks as though the end has been<br />
knitted shut, but it’s all in the grafting!<br />
Doesn’t this look like the coziest sock you’ve ever<br />
seen? It certainly feels that way.<br />
<strong>KNITmuch</strong> | issue 7<br />
37
The Calming Colors Chevron Throw product photo from<br />
the Red Heart website<br />
Let’s continue with more ideal<br />
patterns to knit with Dreamy<br />
yarn. I specifically mentioned<br />
the Calming Colors Chevron<br />
Throw as a great companion to<br />
Dreamy yarn. This is what I think<br />
of as a “classic” knitted throw. It’s<br />
a large blanket with increases<br />
and decreases making a zigzag<br />
pattern throughout.<br />
I love this pattern, no really, I<br />
do. The entire Calming Colors<br />
Chevron Throw pattern consists<br />
of two rows repeated over and<br />
over again. This is the kind of<br />
thing that makes me smile.<br />
It doesn’t look like it’s the simplest<br />
pattern ever, but it really is. The<br />
sequence is so easy to memorize<br />
and the only thing you need to<br />
keep track of is the length of your<br />
stripe, so you know when to start<br />
another color.<br />
38 <strong>KNITmuch</strong> | issue 7<br />
How<br />
Dreamy<br />
yarn is<br />
perfect<br />
for knitting<br />
throws<br />
A swatch for the Calming Colors Chevron Throw<br />
knit from Dark Taupe and Ivory<br />
Throws are one of the most<br />
versatile things you can knit. They<br />
can be used as an extra blanket<br />
on the bed, something to cozy<br />
up with on the couch, or a couch<br />
cover. I have three cats and one<br />
thing they can all agree on is<br />
how delightful it is to claw the<br />
couch. When I had an old handme-down<br />
couch that had already<br />
been clawed to death by another<br />
cat, it wasn’t such a big deal. We,<br />
of course, discouraged the cats<br />
as much as we could, but you<br />
know cats.<br />
When purchasing a new couch,<br />
my husband and I decided to<br />
keep it covered with knit throws,<br />
for its protection. This ended up<br />
working out better than either of<br />
us could’ve imagined.<br />
The throws are very easy to<br />
clean, all in acrylic we can just<br />
throw them into the washer and<br />
drier. The couch underneath<br />
only needs a quick vacuum. It<br />
also keeps the cats’ claws away<br />
from the surface. Knit fabric<br />
being super stretchy and flexible<br />
works in our favor. If the cats<br />
attempt to scratch the couch, the<br />
fabric of the throw gets tangled<br />
in their claws. It’s an amazing<br />
deterrent, we just need to make<br />
sure we straighten them every<br />
now and again so the throws are<br />
completely covering all sides of<br />
the couch.<br />
The Calming Colors Chevron<br />
Throw would be a great element<br />
to your living room decor. The<br />
brushed texture of Dreamy<br />
yarn is luxuriously soft, while<br />
maintaining the easy washing<br />
instructions. You can use Dreamy<br />
color palette to complement the<br />
theme you already have in your<br />
living room. If you’re not finding a<br />
coordinating color, you’re always<br />
safe going with calming neutrals.<br />
If you’re like me and anticipating having your<br />
knitting pulled in and out of shape by sharp<br />
kitty claws, this is a great pattern. It already has<br />
zigzags, so any time a kitty pulls the throw a bit, it<br />
usually looks intentional.
Knitting a lace shawl using a<br />
brushed acrylic yarn makes it<br />
Dreamy<br />
The Lacy Stripes Knit Shawl is a<br />
repeat of three different stitch<br />
patterns. Now, the skill level for<br />
this pattern is intermediate, but I<br />
have no doubt you’ll be able to<br />
tackle it.<br />
The only difficult part of this<br />
pattern is the lace sections, and<br />
they’re not really that bad.<br />
The lace sections are not exactly<br />
a 4-5 row repeat, they’re quite a<br />
few rows of stitches in different<br />
orders. The saving grace is the<br />
same stitches repeat so you<br />
become very familiar with them.<br />
I encourage you not to be afraid<br />
of knitting the Lacy Stripes<br />
Knit Shawl because after all, it’s<br />
intermediate. I thought for the<br />
first couple rows that it was going<br />
to be really complex, but after<br />
those couple rows I really picked<br />
up the knack for reading the<br />
stitches. Once that happened I<br />
didn’t have to think about it quite<br />
as often and the knitting just<br />
flowed from there.<br />
A close up of the stitches used in<br />
this shawl. The lace stitch carries<br />
one knit stitch up while the rest<br />
is in garter. There are occasion<br />
eyelets throughout.<br />
I don’t know what it is about<br />
lace knit in a chunkier yarn, but I<br />
absolutely love the look. It gives<br />
it a classy look and adds texture<br />
to the stitches.<br />
While this pattern was originally<br />
knit in the beautiful Dreamy<br />
Stripes, I think knitting it in a<br />
plain color really brings out the<br />
work you’re doing with the lace<br />
sections. If I’m taking the time to<br />
knit a lace pattern, I make sure<br />
the work is visible and stands out.<br />
I want it to be the main attraction<br />
of the garment.<br />
On the other hand I do like<br />
the stripes in this shawl for a<br />
completely different reason.<br />
If you’re a beginner knitter<br />
interested in lace, I would<br />
definitely give this pattern a try.<br />
The sections of lace are broken<br />
up by garter and stockinette<br />
stitch, so you’ll get breaks from<br />
the lace knitting. It’s a good<br />
pattern to start knitting lace<br />
because it isn’t a whole garment<br />
made of lace, and the lace<br />
pattern really isn’t that difficult.<br />
It just looks intimidating when<br />
you’re reading it, but in practice,<br />
the Lacy Stripes Knit Shawl<br />
pattern isn’t difficult.<br />
Go ahead, knowing that I believe<br />
in you and you can do it!<br />
The pattern photo from the Red Heart website. This<br />
was knit in Dreamy Stripes in the color Sweetdreams.<br />
Red Heart Dreamy yarn Stripes Sweetdreams<br />
Photo courtesy of Red Heart<br />
A close up of the stitches used in this shawl. The<br />
lace stitch carries one knit stitch up while the rest is<br />
in garter. There are occasion eyelets throughout.<br />
A look at how the pattern looks in a solid color. The<br />
stitches stand out much more than they did in the<br />
multicolored shawl.<br />
<strong>KNITmuch</strong> | issue 7<br />
39
How does a scalene triangle relate to knitting?<br />
A scalene triangle comes in many shapes and<br />
sizes, but it essentially means all three sides are<br />
different lengths. This is the particular shape I’m<br />
talking about though.<br />
The stripes hint at how this garment is<br />
constructed. You can see how they are thicker on<br />
the right.<br />
Red Heart Dreamy Stripes<br />
I want to talk a knit further about<br />
the construction of the Lacy<br />
Stripes Knit Shawl, if you look at<br />
a finished product, it looks like a<br />
scalene triangle.<br />
Now that I have scared everyone<br />
with flashbacks from grade 9<br />
math, I’ll explain why this is a<br />
good thing.<br />
This shawl construction has been<br />
getting a lot of traction and I<br />
couldn’t be happier about it.<br />
With one side being a very small<br />
angle than the other side, this<br />
means the longer side keeps the<br />
shawl on your shoulders and<br />
curls around you.<br />
Shawl pins are amazing, and<br />
there is still a need for them,<br />
believe me, but these shawls are<br />
perfect for the one you just want<br />
to throw on and go.<br />
This kind of shawl will be the one<br />
you keep at the office, the one<br />
you store in your diaper bag, the<br />
one you take travelling. In other<br />
words, a very practical shawl for<br />
any where and any occasion.<br />
I specifically mentioned that I<br />
liked this shawl knit from the<br />
Dreamy Stripes yarn. When<br />
you’re knitting an asymmetrical<br />
shawl from a self-striping yarn<br />
the stripes highlight how the<br />
garment comes together and<br />
progresses. You can see this<br />
clearly in the photo below. The<br />
cast on edge is the one on the<br />
right where the stripes are larger.<br />
The stripes progressively get<br />
smaller as the shawl becomes<br />
wider. I think this creates a really<br />
neat effect of stripes that aren’t<br />
all the same size and asymmetric<br />
stripes on an asymmetric shawl<br />
looks pretty neat.<br />
Whether you’re going for a solid<br />
color yarn or you choose the<br />
striped option this shawl is going<br />
to look beautiful. Now you’ll<br />
be able to tell the difference<br />
between the two different yarn<br />
styles and how they make the<br />
shawl look. Now you’re able<br />
to make an informed decision<br />
about your yarn choice. What<br />
version do you like better? Stripes<br />
or solids?<br />
Michelle Nguyen<br />
stitchesbeslippin.com<br />
Just looking at Red Heart Dreamy yarn Solids<br />
makes you cozy all over.<br />
40 <strong>KNITmuch</strong> | issue 7<br />
With the top layer moved away, you can see the edge of the shawl sitting flat on my shoulder. It curls<br />
around and hugs the curve of the shoulder.
41
BUSINESS DIRECTORY To list your business in this space please call 1.866.969.2678.<br />
Brenda Franklin Designs<br />
7570 Mapleton SR 18 RR 1, Alma, ON N0B 1A0<br />
519.638.9958 bfdesigns.on.ca<br />
help@bfdesigns.on.ca<br />
More than 500 charts available for counted<br />
needlework, latch hook rugs, beadwork, beaded<br />
knits and knitting patterns. Mail/fax order or ask<br />
for our products at your local shop. Contact us for<br />
custom designs or needle felted sculpture.<br />
Brampton Sew & Serge<br />
289 Rutherford Rd S, Unit 7, Brampton, ON L6W 3R9<br />
905.874.1564 sewnserge.com<br />
monique@bramptonsewnserge.com<br />
Welcome to Your One Stop Sewing Centre! We are<br />
authorized dealers of Baby Lock, Husqvarna Viking,<br />
and Singer sewing machines and sergers. We also<br />
offer a full schedule of sewing classes for everyone.<br />
Bytowne Threads - Ottawa, ON<br />
1.888.831.4095 bytownethreads.com<br />
mlj@bytownethreads.com<br />
Featuring Aurifil thread from Italy. Long staple<br />
Egyptian cotton threads - 270 colours in 12, 28, 40<br />
and 50 wt; 88 colours in 80 wt. Polyester Aurilux -<br />
240 high sheen colours. Wool threads - 192 colours.<br />
Many kits available. Check our website!<br />
Canadian National Fabric - Melancthon, ON<br />
https://canadiannationalfabric.com/<br />
info@canadiannationalfabric.com<br />
We are an online fabric shoppe offering a wide<br />
variety of fabrics, patterns, books and notions for all<br />
your sewing needs. Flat rate Canada wide shipping<br />
of $5 with FREE SHIPPING for orders over $75. Shop<br />
in person available by appointment!<br />
Country Concessions<br />
1 Dufferin St, Cookstown, ON L0L 1L0<br />
705.458.4546 or toll-free 1.888.834.44<strong>07</strong><br />
countryconcessions.com<br />
info@countryconcessions.com<br />
Visit our lovely and unique quilt shop in the quaint<br />
village of Cookstown. We have over 7000 bolts of<br />
cotton fabrics plus a wide selection of patterns, books<br />
& notions. You will be so glad you came for a visit.<br />
Gitta's<br />
271 Lakeshore Rd E, Mississauga, ON L5G 1G8<br />
905.274.7198 gittas.com<br />
questions@gittas.com<br />
Gitta's, named after owner Gitta Al-Basi, nestled in<br />
the east village of Port Credit, is the place where<br />
stitchers meet with their stitching friends, shop for<br />
stitching supplies and see the new stitching designs<br />
from Europe and the United States.<br />
Hardanger House, designs by Betty Stokoe<br />
PO Box 1223, Stettler, AB T0C 2L0<br />
403.742.2749 bettystokoe@gmail.com<br />
tnplisting.com/hardanger-house.html<br />
Hardanger embroidery charts and kits. Designs<br />
feature contemporary adaptations of this traditional<br />
cutwork embroidery from Norway. Shop online<br />
at etsy.com/shop/HardangerHouse. Some digital<br />
downloads available.<br />
Haus of Stitches<br />
626 Main Street, Humboldt, SK S0K 2A0<br />
306.682.<strong>07</strong>72 or toll-free 1.800.344.6024<br />
hausofstitches.ca<br />
Our one of a kind store offers everything you need<br />
for sewing, quilting, knitting, rug hooking and<br />
needlework. Authorized dealers for Janome and Elna.<br />
Heartfelt Fibre Arts<br />
42 Industrial St, Toronto, ON M4G 1Y9<br />
647.920.3616 heartfeltfibrearts.com<br />
info@hearftfeltfibrearts.com<br />
Canadian Fibre Arts supply store specializing in<br />
high-quality, unique fibre and tools for all of your<br />
knitting, felting, rug hooking and stitching needs.<br />
42 <strong>KNITmuch</strong> | issue 7<br />
Impressions Embroidery & Engraving<br />
#8-449 Mayor Magrath Dr S, Lethbridge, AB T1J 3L8<br />
403.942.3934 impressionslethbridge.ca<br />
impressions22@shaw.ca<br />
Our shop does embroidery and laser engraving.<br />
Laser engraving is a beautiful process for fabric,<br />
as nothing cuts cleaner and more precisely than a<br />
laser. We now carry a nice array of fabric as well to<br />
compliment the abilities of the laser.<br />
Kelly's Creative Sewing<br />
804 Main St, Dartmouth, NS B2W 3V1<br />
902.435.7380 kellyscreativesewing.ca<br />
kellyscreativesewing@gmail.com<br />
We offer sales and on-site service of high-end<br />
domestic embroidery, sewing machines and sergers,<br />
as well as a variety of educational programs.<br />
Needles & Knits<br />
15040 Yonge St, Aurora, ON L4G 1M4<br />
905.713.2066 needlesandknits.com<br />
Fabulous selection of yarns. Extremely<br />
knowledgable and expert help. Cozy and friendly<br />
atmosphere. Classes. Guild night every first Tuesday<br />
of the month. Tea with Tove, the owner, every<br />
Thursday from 6-8pm.<br />
Needleworker's Delight / Silkweaver Fabrics<br />
Plaza K 181 Route 1 South, Metuchen, NJ 08840<br />
732-388-4545 needleworkersdelight.com<br />
info@needleworkersdelight.com<br />
Standard & specialty Zweigart Fabrics & canvas,<br />
hand-dyed fabrics, floss, fibers, towels, tableware,<br />
leaflets/designs, painted canvases, notions, tools,<br />
baby items, home decor, and so much more!<br />
Pine Ridge Knit & Sew<br />
17477 Hwy 2 PO Box 68, Trenton, ON K8V 5R1<br />
613.392.1422 pineridgeknitsew.com<br />
yvette@pineridgeknitsew.com<br />
We have knitting machines by Artisan and Silver<br />
Reed, embroidery machines by Husqvarna/Viking<br />
& White. Sewing notions and supplies, books and<br />
software. Hands-on lessons and classes. Wide variety<br />
of yarns, threads, dress and pant zippers.<br />
Ruby Pearl Quilts<br />
500 King St W, Suite 8, Oshawa, ON L1J 2K9<br />
905.436.3535 rubypearlquilts.com<br />
joy@rubypearlquilts.com<br />
We are your full service source of professional quilting<br />
equipment, products, & courses. Led by 44 years of<br />
sewing experience & more than 20 years of quilting<br />
experience, we have the experience necessary to help<br />
you push your hobby to the next level!<br />
Serenity Knits<br />
525 Brooker Ridge #102, Newmarket, ON L3X 2M2<br />
905.710.3283 serenityknits.ca<br />
info@serenityknits.ca<br />
We offer a wide selection of high quality yarns as well<br />
as needles, hooks, patterns and notions. We also offer<br />
a large variety of classes from beginner to the more<br />
advanced.<br />
Sew Fancy Inc.<br />
Guelph, ON<br />
519.824.4127 sewfancy.com<br />
sales@sewfancy.com<br />
Your Premier Canadian Source for Specialty Sewing<br />
Supplies including Smocking, Heirloom Sewing,<br />
Goldwork, Silk Ribbon Embroidery, Needle Tatting,<br />
Swarovski Crystals, Sashiko, Quilting and more. Visit<br />
the website for the latest in sewing supplies.<br />
Sew Inspired<br />
375 Daniel St S, Arnprior, ON K7S 3K6<br />
613.623.0500 sewinspired.ca<br />
info@sewinspired.ca<br />
Your Ottawa Valley PFAFF® Authorized Dealer. We<br />
have a large supply of quilting & sewing supplies,<br />
knitting supplies, as well as in stock PFAFF® sewing<br />
machines. We also have a listing of sewing and<br />
quilting classes.<br />
Sew With Vision<br />
480 Parkland Dr, Halifax, NS B3S 1P9<br />
902.479.2227 sewwithvision.net<br />
Authorized PFAFF, HUSQVARNA VIKING, and SINGER<br />
dealer and service provider offering an extensive<br />
line of sewing, embroidery and serger machines, as<br />
well as long-arm quilting systems.<br />
That Sewing Place<br />
16610 Bayview Ave #10, Newmarket, ON L3X 1X3<br />
905.715.7725 thatsewingplace.ca<br />
jaret&liana@thatsewingplace.ca<br />
Introducing That Sewing Place as your sewing<br />
source and Authorized Dealers for Bernina and<br />
Brother machines. Jaret & Liana focus on placing<br />
your sewing needs first, providing outstanding<br />
support, service, and training.<br />
The Quilt Store / Evelyn's Sewing Centre<br />
17817 Leslie St, Unit 40, Newmarket, ON L3Y 8C6<br />
905.853.7001 or toll-free 1.888.853.7001<br />
The Quilt Store West<br />
695 Plains Rd E, Unit 6, Burlington, ON L7T 2E8<br />
905.631.0894 or toll-free 1.877.367.7<strong>07</strong>0<br />
thequiltstore.ca<br />
Now with 2 locations to serve you, we are your Quilt<br />
Store Destination! The staff here at The Quilt Store<br />
is always on hand to provide Quilt Wisdom, Quilt<br />
Inspiration and most of all we pride ourselves as the<br />
place to make... All Your Quilt Dreams Come True!<br />
The Stitcher's Muse<br />
99 Commercial Street, Nanaimo, BC V9R 5G3<br />
250.591.6873 thestitchersmuse.com<br />
info@thestitchersmuse.com<br />
A divine little shop with supplies for all your hand<br />
stitching needs! Friendly, knowledgeable, helpful<br />
staff. Cross stitch, canvaswork, needlepoint,<br />
embroidery, counted thread, lace making and<br />
more. Books, patterns, fabric, threads, tools.<br />
The Yarn Guy<br />
15 Gower St, Toronto, ON M4B 1E3<br />
416.752.1828 or toll-free 1.800.836.6536<br />
theyarnguy.com info@sewknit.ca<br />
See us on Facebook, follow us on Twitter!<br />
Knitting machines, sewing machines, repairs, parts<br />
for Passap, Studio, Singer, Silver Reed, Superba,<br />
White. Sewing notions and supplies, books, ball<br />
yarns, coned yarns, TAMM yarns, Paton's yarns,<br />
Bernat yarns, Phentex yarns, Bernat kits & crafts.<br />
Ultimate Sewing Centre<br />
191 Bloor St East, Oshawa, ON L1H 3M3<br />
905.436.9193 ultimatesewing.com<br />
ultimatesewing@bellnet.ca<br />
For all your sewing needs be sure to call Durham’s<br />
largest one stop shop: Janome and Elna Sewing<br />
Machines, Sergers, & Embroidery machines,<br />
over 3000 bolts of first quality cottons, Floriani<br />
Embroidery supplies, the latest notions, books, &<br />
patterns, year round classes, and so much more!<br />
Upper Canada Quiltworks<br />
PO Box 64, Brockville, ON K6V 5T7<br />
613.345.3956 Fax: 613.342.3327<br />
uppercanadaquiltworks.com<br />
Visit us online for a wide selection quilt patterns<br />
and books. Techniques include felted wool, fusible<br />
appliqué, punchneedle, rag quilting and printing<br />
photos on fabric.
100%<br />
merino wool<br />
Available in<br />
24 happy colors<br />
Feather Chic Sweater &<br />
Removable Cowl<br />
LW59<strong>07</strong><br />
Discover more free patterns<br />
available at redheart.com/chicsheep<br />
18-0<strong>07</strong> © 2018 Coats & Clark. All rights reserved. Coats & Clark is a registered trademark.<br />
43
Standards & Guidelines For Crochet and Knitting • YarnStandards.com<br />
Standard Yarn Weight System<br />
Standard Yarn Weight System<br />
Categories of yarn, gauge ranges, and recommended needle and hook sizes<br />
Categories of yarn, gauge ranges, and recommended needle and hook sizes<br />
Yarn Weight<br />
Yarn Symbol Weight &<br />
Symbol Category &<br />
Category Names<br />
Names<br />
Type of<br />
Fingering,<br />
Type Yarns of in Fingering, 10 count<br />
Yarns Category in<br />
crochet 10 count thread<br />
Category crochet thread<br />
Knit Gauge<br />
Knit<br />
Range*<br />
Gauge<br />
in<br />
Range* in<br />
33–40**<br />
Stockinette 33–40**<br />
Stockinette<br />
sts<br />
Stitch to<br />
sts<br />
Stitch to<br />
4 inches<br />
4 inches<br />
Recommended<br />
Recommended<br />
Needle<br />
Needle<br />
in<br />
in<br />
1.5–2.25<br />
1.5–2.25<br />
Metric<br />
Metric<br />
Size<br />
Size<br />
mm<br />
mm<br />
Range Range<br />
Recommended<br />
Recommended<br />
Needle Needle U.S. U.S.<br />
Size Size Range Range<br />
Crochet<br />
Gauge*Ranges<br />
in Single<br />
Crochet to to<br />
4 4 inch inch<br />
Sock,<br />
Sock, Fingering,<br />
Fingering, Baby<br />
Baby<br />
27–32<br />
27–32<br />
sts<br />
sts<br />
2.25–3.25<br />
2.25–3.25<br />
mm<br />
mm<br />
Sport,<br />
Sport, Baby<br />
Baby<br />
23–26<br />
23–26<br />
sts<br />
sts<br />
3.25–3.75<br />
3.25–3.75<br />
mm<br />
mm<br />
DK,<br />
DK, Light<br />
Light Worsted<br />
Worsted<br />
21–24<br />
21–24<br />
sts<br />
sts<br />
3.75–4.5<br />
3.75–4.5<br />
mm<br />
mm<br />
11<br />
11<br />
Worsted,<br />
Worsted, Afghan,<br />
Afghan, Aran<br />
Aran<br />
16–20<br />
16–20<br />
sts<br />
sts<br />
4.5–5.5<br />
4.5–5.5<br />
mm<br />
mm<br />
Chunky,<br />
Chunky, Craft,<br />
Craft, Rug<br />
Rug<br />
12–15<br />
12–15<br />
sts<br />
sts<br />
5.5–8<br />
5.5–8<br />
mm<br />
mm<br />
Bulky,<br />
Bulky, Roving<br />
Roving<br />
000 000 to 1to 1 1 to 13to 3 3 to 35 to 5 5 to 57 to 7 7 to 97 to 9 9 to 11 9 to 11 11 to 17 11 to 17<br />
32–42 32–42<br />
double double<br />
crochets**<br />
Steel***<br />
Recommended<br />
1.6–1.4 mm<br />
Hook<br />
mm<br />
Hook in in Metric<br />
Regular hook<br />
Size<br />
hook<br />
Size Range<br />
2.25 2.25 mm mm<br />
Recommended<br />
Hook Hook U.S. U.S. Size Size<br />
Range Range<br />
Steel*** Steel***<br />
6, 7, 6, 87, 8<br />
Regular Regular<br />
hook hook<br />
B–1<br />
B–1<br />
Standards & Guidelines For Crochet and Knitting • YarnStandards.com<br />
21–32 21–32<br />
sts sts<br />
2.25–3.25<br />
mm mm<br />
16–20 16–20<br />
sts sts<br />
3.5–4.5 3.5–4.5<br />
mm mm<br />
12–17 12–17<br />
sts sts<br />
4.5–5.5 4.5–5.5<br />
mm mm<br />
B–1 B–1 to E–4 to E–4 E–4 E–4 to 7to 7 7 to 7 I–9 to I–9<br />
11–14 11–14<br />
sts sts<br />
5.5–6.5mm 5.5–6.5mm<br />
I–9 I–9<br />
to to<br />
K–10 K–10 1 ⁄2 1 ⁄2<br />
8–11 8–11<br />
sts sts<br />
6.5–9 6.5–9<br />
mm mm<br />
K–10 K–10 1 ⁄2 1 ⁄2<br />
to M-13 to M-13<br />
7–11<br />
sts<br />
Jumbo,<br />
Jumbo, Roving<br />
Roving<br />
6 sts<br />
6 sts<br />
and<br />
and<br />
fewer<br />
fewer<br />
12.75 mm<br />
8–12.75 12.75 mm<br />
8–12.75<br />
and<br />
mm<br />
mm and<br />
larger<br />
larger<br />
7–9<br />
sts<br />
9–15<br />
mm<br />
M-13<br />
to Q<br />
17<br />
and<br />
larger<br />
6 sts 6 sts<br />
and and<br />
fewer fewer<br />
15 mm 15 mm<br />
and and<br />
larger larger<br />
* GUIDELINES ONLY: The above reflect the most commonly used gauges and needle or hook sizes for specific yarn categories.<br />
* GUIDELINES ONLY: The above reflect the most commonly used gauges and needle or hook sizes for specific yarn categories.<br />
** Lace weight yarns are usually knitted or crocheted on larger needles and hooks to create lacy, openwork patterns. Accordingly, a<br />
gauge ** Lace range weight is difficult yarns to are determine. usually knitted Always or follow crocheted the gauge on larger stated needles in your and pattern. hooks to create lacy, openwork patterns. Accordingly, a<br />
gauge range is difficult to determine. Always follow the gauge stated in your pattern.<br />
*** Steel crochet hooks are sized differently from regular hooks--the higher the number, the smaller the hook, which is the reverse<br />
of *** regular Steel hook crochet sizing. hooks are sized differently from regular hooks--the higher the number, the smaller the hook, which is the reverse<br />
of regular hook sizing.<br />
This Standards & Guidelines booklet and downloadable symbol artwork are available at: YarnStandards.com<br />
This Standards & Guidelines booklet and downloadable symbol artwork are available at: YarnStandards.com<br />
7–11<br />
sts<br />
7–9<br />
sts<br />
9–15<br />
mm<br />
M-13<br />
to Q<br />
17<br />
and<br />
larger<br />
Q<br />
and<br />
larger<br />
Q<br />
and<br />
larger<br />
KNIT much .com<br />
...to K, is to<br />
Standard abbreviations & terms<br />
alt = alternate<br />
approx = approximately<br />
beg = begin(ning)<br />
BO= bind off<br />
CC = contrast color<br />
ch = chain<br />
cm = centimetre(s)<br />
cn = cable needle<br />
CO = cast on<br />
cont = continue, continuing<br />
dc = double crochet<br />
dec = decrease(s), decreasing<br />
dpn = double-pointed needle(s)<br />
foll = following<br />
g = gram(s)<br />
inc = increase(s), increasing<br />
in(s) = inch(es)<br />
k = knit<br />
kf&b or kfb = knit into front and back of st (increase)<br />
ktbl = Knit through the back loop.<br />
k2tog = knit 2 sts tog (right-leaning decrease)<br />
k3tog = knit 3 sts together (double right-leaning<br />
decrease)<br />
M = marker<br />
m = metre(s)<br />
M1 = Make 1 stitch: pick up the horizontal strand<br />
between 2 stitches from front to back and knit<br />
it tbl (lifted increase)<br />
MC = main color<br />
mm = millimetre(s)<br />
oz = ounce(s)<br />
p = purl<br />
p2tog = purl 2 sts tog (decrease)<br />
patt = pattern<br />
pfb = purl into front and back of stitch (increase)<br />
ptbl = knit through the back loop.<br />
pm = place marker<br />
psso = slip 1 stitch together knitwise, knit 1, then<br />
pass slipped stitches over<br />
p2sso = slip 2 stitches together knitwise, knit 1,<br />
then pass slipped stitches over<br />
RS = right side<br />
rem = remain(ing)<br />
rep = repeat<br />
rev = reverse<br />
rnd = round<br />
sc = single crochet<br />
sl = slip<br />
skp = slip one st, knit next st, pass slipped st over<br />
knit st (dec)<br />
ssk = slip, slip, knit: slip 2 sts knitwise, 1 at a time,<br />
insert left-hand needle into front of both sts<br />
and knit them tog (left-leaning decrease)<br />
sssk = Slip next three stitches individually, knitwise.<br />
Insert tip of left needle from front to back into<br />
the fronts of these three stitches and knit them<br />
together (double left-leaning decrease)<br />
st(s) = stitch(es)<br />
St st = stocking stitch<br />
tbl = through back loop<br />
tog = together<br />
tr = treble crochet<br />
WS = wrong side<br />
yfwd = bringing yarn forward to create a yarn<br />
over when working into next st(s)<br />
yo = yarn over<br />
44


