The DIY Energy Efficient Home Project Magazine By EcoMaster
Learn from award-winning experts, Lyn & Maurice Beinat at ecoMaster on how their astronomical energy bill was the catalyst to two decades of research, product development and trial and error in the search for the most economical way to make their home more energy efficient on a budget. Fast forward to today, and their home is now a 7.6-star energy rated home with zero energy costs and carbon emissions. ecoMaster is here to show you simple, practical DIY projects; room by room that any DIYers can do. It was all filmed at the ecoMaster test home in the Macedon Ranges, Victoria, Australia. Visit ecoMasterStore.com.au
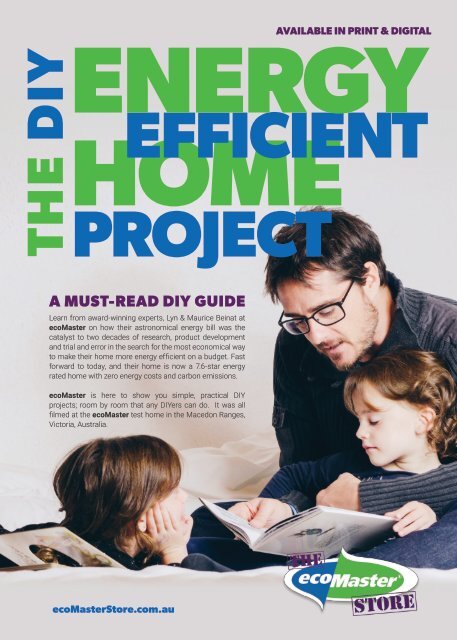
Learn from award-winning experts, Lyn & Maurice Beinat at ecoMaster on how their astronomical energy bill was the catalyst to two decades of research, product development and trial and error in the search for the most economical way to make their home more energy efficient on a budget.
Fast forward to today, and their home is now a 7.6-star energy rated home with zero energy costs and carbon emissions.
ecoMaster is here to show you simple, practical DIY projects; room by room that any DIYers can do. It was all filmed at the ecoMaster test home in the Macedon Ranges, Victoria, Australia.
Visit ecoMasterStore.com.au

Create successful ePaper yourself
Turn your PDF publications into a flip-book with our unique Google optimized e-Paper software.
THE <strong>DIY</strong><br />
ENERGY<br />
HOME<br />
EFFICIENT<br />
PROJECT<br />
AVAILABLE IN PRINT & DIGITAL<br />
A MUST-READ <strong>DIY</strong> GUIDE<br />
Learn from award-winning experts, Lyn & Maurice Beinat at<br />
ecoMaster on how their astronomical energy bill was the<br />
catalyst to two decades of research, product development<br />
and trial and error in the search for the most economical way<br />
to make their home more energy efficient on a budget. Fast<br />
forward to today, and their home is now a 7.6-star energy<br />
rated home with zero energy costs and carbon emissions.<br />
ecoMaster is here to show you simple, practical <strong>DIY</strong><br />
projects; room by room that any <strong>DIY</strong>ers can do. It was all<br />
filmed at the ecoMaster test home in the Macedon Ranges,<br />
Victoria, Australia.<br />
ecoMasterStore.com.au<br />
ecoMasterStore.com.au 1
AS FEATURED:<br />
WE’VE BEEN<br />
AROUND FOR<br />
AWHILE!<br />
CONT<br />
ENTS<br />
Use this code<br />
“<strong>DIY</strong>EEH” at<br />
our store for<br />
some great<br />
offers<br />
ecoMasterStore.com.au<br />
04<br />
05<br />
Visit Our Store<br />
Insider Secrets To An <strong>Energy</strong><br />
<strong>Efficient</strong> <strong>Home</strong>.<br />
06<br />
Our <strong>Home</strong> Is Making A Difference<br />
08<br />
Why We Did It<br />
10<br />
Your Roadmap<br />
12<br />
What Our Clients Say<br />
13<br />
What We Did, What We Learned &<br />
What We Will Do Next<br />
14<br />
Outside <strong>DIY</strong> <strong>Project</strong>s<br />
15<br />
Solar Hot Water<br />
15<br />
Sun Lizard & Solar Panels<br />
16<br />
Solar Hot Water &<br />
Solarventi<br />
16<br />
Split Systems<br />
17<br />
Nature’s Lawn Mowers<br />
17<br />
Water System<br />
18<br />
Inside <strong>DIY</strong> <strong>Project</strong>s<br />
20<br />
Entrance<br />
21<br />
Lounge / Dining Room<br />
26<br />
Kitchen<br />
27<br />
Study<br />
28<br />
Bedrooms<br />
31<br />
Ensuite / Bathroom<br />
33<br />
<strong>The</strong> Top And Bottom<br />
(Building Envelope)<br />
ecoMasterStore.com.au 2<br />
<strong>The</strong> <strong>DIY</strong> <strong>Energy</strong> <strong>Efficient</strong> <strong>Home</strong> <strong>Project</strong> <strong>Magazine</strong> by ecoMaster is owned and published<br />
electronically by ecoMaster. Copyright 2019 ecoMaster. All rights reserved. No part<br />
of this electronic or printed magazine may be reproduced without the written consent of<br />
ecoMaster. Requests for permission should be directed to: LYN BEINAT - Co-Founder,<br />
ecoMaster - store@ecoMaster.com.au<br />
36<br />
39<br />
40<br />
Featured Products / Shop Our Store<br />
Thank You<br />
Follow Us
STAY WARM<br />
IN WINTER<br />
& COOL IN<br />
SUMMER<br />
LEVEL UP YOUR <strong>DIY</strong><br />
KNOWLEDGE AND ‘HOW<br />
TO’ WITH THE EXPERTS<br />
AT ECOMASTERSTORE.<br />
Watch Videos •<br />
Shop For <strong>The</strong> Products You Need •<br />
Get Inspired •<br />
Save Money •<br />
GET OUR<br />
SECRETS<br />
$25 - All proceeds go<br />
to charity<br />
https://ecomasterstore.com.<br />
au/pages/insider-secrets<br />
Australia’s energy efficiency experts reveal<br />
the best-kept secrets to reducing your<br />
energy cost and improving your thermal<br />
comfort PERMANENTLY. <strong>The</strong> insiders<br />
tricks and downright “I NEVER would that<br />
thought of THAT” tips to make your home<br />
comfy, cheaper to run and better for the<br />
environment’. It is two decades of handson-retrofit<br />
experience and guaranteed to<br />
save 10 times the investment. And what<br />
could be better than doing something<br />
great for your home, your family and your<br />
environment? <strong>The</strong> profits from Insider<br />
Secrets To An <strong>Energy</strong> <strong>Efficient</strong><br />
<strong>Home</strong> go to the environmental and<br />
social charities that ecoMaster<br />
supports.<br />
ecoMaster has donated<br />
over $24,000 to charities<br />
since 2017.<br />
ecoMasterStore.com.au 4 ecoMasterStore.com.au 5
Initially, we set out to make a<br />
difference to climate change.<br />
Our home was the ideal<br />
candidate and became the test<br />
bed for ecoMaster. Consequently, we<br />
only provide solutions that we have<br />
empirically tested and have proven to<br />
ourselves to be 100% effective.<br />
We think that is a pretty novel<br />
way to run a business these days.<br />
Actually, it’s not even a business,<br />
it’s “an obsession” that went well<br />
past being a “passion” many years<br />
ago. Our solutions are the highest<br />
quality available. We rarely provide an<br />
alternative because our testing has<br />
shown us which product is “best of<br />
breed”. So why would we offer you<br />
anything less?<br />
Our philosophy is to do a great<br />
job - once. Best product, best<br />
installation. Great outcome.<br />
Job done! For years we<br />
only worked on a personalised<br />
assessment and customised<br />
installation approach. ecoMaster<br />
provides that service and is a multi<br />
award-winning business. However,<br />
we understood there was a limit<br />
to how many homes we would be<br />
able to support that way. To reach a<br />
OUR HOME<br />
IS MAKING A<br />
DIFFERENCE<br />
wider audience, faster, the ecoMasterStore<br />
was born. Our aim is to provide the same<br />
high-quality solutions that ecoMaster is<br />
famous for, but to clients who prefer to<br />
take a <strong>DIY</strong> path. We obsessed with how to<br />
achieve the same outcomes as our bespoke<br />
service, so we support our <strong>DIY</strong> clients with<br />
the same high-quality products as well as<br />
full instructional videos for every solution to<br />
ensure a brilliant result.<br />
Over the years, we have learnt that most of<br />
our clients were sick of living in a home that is<br />
freezing in winter and sweltering in summer.<br />
<strong>The</strong>y would rather spend their money on<br />
a pint of beer than a huge power bill, and<br />
ultimately they really want to do something<br />
about the environment. Warren Buffet does<br />
not see us as an acquisition target. Nor are<br />
we the focus of a venture capitalist. We are<br />
an honest, trustworthy business providing an<br />
ethical, values linked service in which<br />
we passionately believe; determined to<br />
ensure that every client achieves a great<br />
outcome. We love the fact that we are<br />
always learning and looking for ways<br />
(sometimes well outside the norm) to<br />
find solutions to a particular challenge.<br />
We believe that the built environment<br />
can be truly sustainable – and we work<br />
steadily towards that every day.<br />
<strong>The</strong>re are not many occupations that<br />
you can say you made a difference every<br />
day. We are so fortunate to have this<br />
opportunity - and we would love to share<br />
it with you and your family. Would you<br />
like to join us?<br />
ecoMasterStore is home<br />
to <strong>DIY</strong>ers<br />
who want a comfortable<br />
home, comfortable family.<br />
LYN & MAURICE BEINAT<br />
Founders - ecoMaster<br />
Macedon Ranges, Victoria, Australia.<br />
OTHER AWARDS WE<br />
HAVE WON<br />
Visit: ecoMaster.com.au/awards<br />
ecoMasterStore.com.au 6<br />
ecoMasterStore.com.au 7
ABOUT THE<br />
ECOMASTER<br />
TEST HOUSE<br />
- WHY WE<br />
DID IT<br />
<strong>The</strong> retrofit began! A series of unique ecoMaster products<br />
were developed along the journey where we found the<br />
existing offerings were either poor quality, did not work, were<br />
ridiculously expensive or just plain wrong (like throwing out<br />
perfectly good windows that just happened to be single<br />
glazed). Architectural quality draught proofing, secondary<br />
glazing, and retrofit wall insulation were all developed over<br />
several years.<br />
That same home is now rated 7.6 stars with zero energy<br />
costs and carbon emissions. Even with minimal heating, it is<br />
a cosy warm home during winter. Summers are naturally cool<br />
with air-conditioning that is just not needed, even when it is<br />
46 degrees outside. Having retrofitted our own home to such<br />
an impressive standard, we understood the unique nature of<br />
what we had achieved. We wanted to share that knowledge.<br />
So we established ecoMaster to support<br />
other homeowners more easily down<br />
the same “make my home comfortable,<br />
lower energy costs and low carbon”<br />
pathway.<br />
Our objective was (and still is) to provide<br />
honest advice and effective solutions<br />
to enable others to retrofit their homes<br />
for energy efficiency as practically and<br />
pragmatically as possible.<br />
We concentrate on our core strengths:<br />
honesty, quality, and innovation to<br />
support our obsession with a low<br />
carbon future.<br />
Our journey started in 2003 as a response to<br />
an astronomical energy bill accompanied by an<br />
incredibly cold home (rated 1.5 stars) and the<br />
realisation that our lounge room emitted almost<br />
double the national average in carbon emissions.<br />
<strong>The</strong>rmally, financially and ethically - it was “not ok”.<br />
Told to ‘Suck it up princess... you live in the Macedon<br />
Ranges, it’s winter, you’re gunna be cold!’ by local<br />
builders, we were not sure where to start to fix our<br />
home. Clearly, it wasn’t with them! With those gruff<br />
words, the journey to retrofit our home for comfort,<br />
reduced costs and reduced carbon took its first,<br />
defiant step. Research to retrofit our own home was<br />
extensive.<br />
We built a heat chamber (as you do!) and hired a<br />
cool room (as you also must do!) and tested every<br />
insulation product on the market with 2-minute timing<br />
tests using multiple temperature probes.<br />
After 6 months of testing, we had our own library of<br />
temperature performance curves, developed from our<br />
own empirical testing.<br />
ALAN<br />
PEARS<br />
AM<br />
THANK YOU<br />
Alan Pears AM is the closest thing to “Green Royalty” in<br />
Australia. A dedicated environmental consultant, and a<br />
pioneer of energy efficiency policy in Australia since the late<br />
1970s. He has been an environmental consultant for decades,<br />
involved in energy/environmental rating and regulation of<br />
buildings, green building developments, and efficient appliance<br />
development. Often the lone sensible voice advocating “energy<br />
efficiency” first, he is a highly regarded analyst, consultant, and<br />
commentator on sustainable energy and climate policy.<br />
A natural thought leader, he has written or peer-reviewed<br />
many articles in specialist media such as <strong>The</strong> Conversation ,<br />
<strong>Energy</strong> Policy, and ReNew magazine, as well as other academic<br />
journals, chapters of books and major reports. Alan was<br />
made a Member of the Order of Australia (AM) in 2009 for his<br />
contribution to environmental and energy policy. He has also<br />
received a number of awards from industry associations and<br />
RMIT media awards. Lyn and Maurice would like to take this<br />
opportunity to thank Alan for his mentorship of ecoMaster. We<br />
were deeply touched that Alan took an interest in the work we<br />
started nearly two decades ago and took the time to lend his<br />
considerable expertise to our learning journey. We salute you<br />
and thank you.<br />
ecoMasterStore.com.au 8<br />
ecoMasterStore.com.au 9
THE <strong>DIY</strong> ENERGY EFFICIENT HOME PROJECT<br />
KNOW WHERE TO START TO GET THE BEST<br />
RETURN ON INVESTMENT<br />
7<br />
SOLAR PANEL<br />
››<br />
Make your home energy efficient first,<br />
6<br />
SOLAR HOT WATER<br />
››<br />
Eliminate gas hot water<br />
THEN install solar panels<br />
››<br />
Use appliance timers to maximise the<br />
use of your energy when it is being made<br />
››<br />
Check the output from your panels<br />
››<br />
Use evacuated tube solar collectors or<br />
heat pumps<br />
››<br />
Insulate your hot water pipes<br />
regularly to detect issues early<br />
2<br />
LIGHTING<br />
››<br />
Have downlights? Replace them with IC4<br />
rated LEDs to eliminate draught and allow<br />
for complete ceiling insulation cover<br />
3<br />
CEILING INSULATION<br />
››<br />
Adopt best practice rather than minimum<br />
building standards<br />
››<br />
Ensure complete coverage to external<br />
walls<br />
››<br />
No gaps!<br />
START<br />
HERE<br />
1<br />
DRAUGHT PROOFING<br />
››<br />
Controls your ventilation!<br />
››<br />
Provides the biggest bang for your<br />
retrofit buck<br />
5<br />
GLAZING<br />
››<br />
Shade the windows in summer<br />
››<br />
Secondary or double glaze<br />
››<br />
Use good quality, long-lasting<br />
components<br />
››<br />
Have thermally efficient window<br />
coverings/pelmets<br />
8<br />
LIFESTYLE - WASTE<br />
››<br />
Reduce your food miles - grow your own<br />
4<br />
UNDERFLOOR<br />
INSULATION<br />
››<br />
Without insulation, your floor will be the<br />
veggies and fruit<br />
outside temperature<br />
››<br />
Chickens eat your kitchen scraps and<br />
provide you with eggs<br />
››<br />
Share your garden abundance with<br />
*Wall insulation is important, but it has been<br />
excluded here, because it is generally not<br />
a <strong>DIY</strong> activity.<br />
››<br />
Insulated floor means warm feet and<br />
cosy comfort<br />
››<br />
Works well in summer too!<br />
friends and neighbours<br />
COPYRIGHT © 2019. ECOMASTER STORE<br />
ALL RIGHTS RESERVED<br />
ecoMasterStore.com.au<br />
ecoMasterStore.com.au 10<br />
ecoMasterStore.com.au 11
Joel (sales) was a great help. Explained<br />
the process and quickly confirmed I<br />
could pick up the goods same day.<br />
<strong>The</strong> products you’re offering, especially<br />
the Shugg window draught excluders<br />
are rare and difficult to find, so your<br />
website was invaluable. Joel met me<br />
in the office, I signed out the goods<br />
and was on my way in minutes - great<br />
service. Thanks! - W.T.<br />
When I rang to explain what I needed,<br />
the gentlemen I had spoken to was<br />
amazing. He waited patiently while I<br />
logged in, and helped me navigate the<br />
website to place an order. Truly<br />
appreciated his help, thank you! - M.K.<br />
Hi! I installed the Draught Dodger last<br />
weekend. Good product - works well.<br />
Thanks. - G.B.<br />
Thanks Ken and please thank June.<br />
Normally I don’t order materials<br />
online however I couldn’t find a<br />
similar (let alone better) product<br />
locally that suits my current needs<br />
at an affordable price. If this benefits<br />
as much as I believe it will, I (or<br />
better yet the wife) will probably<br />
insist I retrofit the rest of the house!<br />
Thank you for your patience with<br />
me and look forward to an ongoing<br />
relationship as needs require. - S.M.<br />
WHAT WE DID,<br />
WHAT WE LEARNED<br />
& WHAT WE WILL<br />
DO NEXT<br />
Hello, I’m Maurice Beinat. I’m Technical Director at<br />
ecoMaster; and together with my wife Lyn, we started<br />
ecoMaster quite some years ago. I’m standing now<br />
on our property in the Macedon Ranges, and this<br />
is actually the reason that we started ecoMaster.<br />
When we moved into our beautiful home here, we<br />
discovered that it was mightily uncomfortable,<br />
freezing cold in the winter, almost unheatable, but<br />
more to the point, it was an environmental disaster<br />
- emitting more than twice the average household<br />
carbon just from the living room.<br />
That was a motivating factor for us to start making<br />
some changes. So I’d like to take you now on a tour of<br />
our home, but more than that, I’d like to take you on<br />
a journey of testing, trial and error, development and<br />
just everything that we went through to making our<br />
home from a 1.5 star home into a 7.6 star home.<br />
I very much hope that in this journey, you might find<br />
some things that you can implement in your own<br />
home. So let’s get started now.<br />
ecoMasterStore.com.au 12 ecoMasterStore.com.au 13
OUTSIDE<br />
<strong>DIY</strong><br />
PROJECTS<br />
››<br />
Solar Hot Water<br />
››<br />
Sun Lizard & Solar Panels<br />
››<br />
Solar Hot Water & Solarventi<br />
››<br />
Split Systems<br />
››<br />
Nature’s Lawn Mowers<br />
››<br />
Water System<br />
Solar Hot Water<br />
“One of the first things that we did here was to put both solar<br />
heating and also wood fire heating into the main hot water<br />
system.<br />
<strong>The</strong> main hot water system is in the roof behind me. It<br />
already had the connections for solar panels and it also had<br />
connections for what’s called a “wetback” on a wood fire,<br />
although neither of those things were in place.<br />
So the first thing that we did is we actually got evacuated<br />
tubes, as you can see on the roof behind me. We wanted 40<br />
tubes. Unfortunately at the time 30 tubes was the biggest<br />
panel so we got another 10 to put beside it, and hence that’s<br />
why it’s in two pieces. But those are connected up to a lowpressure<br />
400-litre water tank in the roof behind them.<br />
You might notice that the tubes are on a bit of a slope.<br />
That’s because there is no pump on this system, its just a<br />
thermo-syphon. As the water in the header of the evacuated<br />
Sun Lizard &<br />
Solar Panels<br />
“This is the family cat, Vodka. On the roof behind me you’ll<br />
see a device called a Sun Lizard. <strong>The</strong> Sun Lizard is another<br />
box that seeks to heat up air and pump it into the home in<br />
the winter time and in the summer time seeks to extract<br />
hot air.<br />
Now it’s slightly different to the Solarventi’s that we saw at<br />
the other end. <strong>The</strong> Solarventi always brings in fresh warmed<br />
air whereas the Sun Lizard actually recirculates air, so it<br />
seeks to keep adding heat as it goes. So it draws in the air<br />
from inside, heats it and pumps it back in.<br />
<strong>By</strong> and large it works pretty well. It has a control system,<br />
a powered control system in the roof, and a panel inside<br />
from which to control the device. So you can switch it from<br />
heating to cooling. It’s not as automatic as such.<br />
tubes heats up, it gets less dense. <strong>The</strong> water goes “uphill”<br />
into the tank and the cooler water comes into the lower level<br />
of the header from a lower outlet in the tank. So that’s how<br />
our water is heated - just from the sun.<br />
We’ll see inside the wet flue that connects to the same tank.<br />
In the first year that this system was connected to the tank,<br />
we had zero boosting. That means all 100% of our hot water<br />
was from the sun and the wood fire.<br />
<strong>The</strong> other thing you can see on the roof here is just a very<br />
common solar panel system. It’s a 2.7 kilowatt system and<br />
it just sits there. When the sun’s on there, it generates power<br />
and sometimes it gets fed into the grid and sometimes it<br />
gets used in the home. We certainly try to maximise the use<br />
of that energy within the home when we possibly can.”<br />
ecoMasterStore.com.au 14<br />
ecoMasterStore.com.au 15
Solar Hot Water &<br />
Solarventi<br />
“You can see behind me quite a lot of stuff on the roof.<br />
Originally it did have a solar panel inside the box. When the sun<br />
hit the box it heated up the air and excited the solar panel. <strong>The</strong><br />
panel drove a fan that pumped the air from the Solarventi down<br />
into our home.<br />
It draws new air from the back that gets heated up and the cycle<br />
just continues. So, when there is a nice winter sun, it actually<br />
works really well, and we’ll have a look at an outlet a little bit later<br />
inside. We have actually ducted it down and provided a means<br />
of directing the hot air either into the ensuite, which is a dead air<br />
space, or into the bedroom to warm the bedroom. As I say, when<br />
the winter sun is nice and bright, it actually works brilliantly well.<br />
Of course, when there is no sun, nothing happens! But one of<br />
the issues with this particular box is that because the summer<br />
sun here is so strong, it actually cooked the solar panel inside the<br />
box. <strong>The</strong>re is a fix for that now. But we just decided to put an<br />
external solar panel on to drive it, and maybe you can see that on<br />
the roof just below it.<br />
A fair bit later, we added a second Solarventi. That one actually<br />
exhausts into the living room to heat it in the wintertime. In the<br />
summertime, these can work kind of in reverse so that it still<br />
uses the solar panel to drive a fan, but instead of pumping hot air<br />
in, because obviously that’s not very useful in the summertime, it<br />
actually drives a fan to extract air through a ceiling outlet, which<br />
is kind of just marginally useful. But the main purpose of these<br />
is winter heating. <strong>The</strong> other thing you’ll see on the roof<br />
behind me are another 40 evacuated tube solar panel<br />
for hot water. So, because this house is so very long, it<br />
actually has two hot water systems in the roof. For a time<br />
we were just using the one down the west end. It was<br />
being piped up here, but of course the bathroom up this<br />
end, there’s a lot of pipe work in between, and so there<br />
was quite a lot of water wastage waiting for the hot water<br />
to get through.<br />
So, we did decide to again split the two systems apart. At<br />
this time, of course, we were able to get 40 tubes in one<br />
header. Again, you’ll notice that it’s not straight across the<br />
roof, it’s on a slant. Of course, that’s because it’s thermo<br />
syphoned. Okay?<br />
So, really great in the winter time, providing you a lot of<br />
your hot water. In the summertime, the hot water can<br />
get quite hot because there’s no control over how much<br />
heat the evacuated tubes are adding to the water. So, in<br />
the summertime, yeah, you have to be a bit more careful<br />
about adjusting the hot water.”<br />
Nature’s Lawn<br />
Mowers!<br />
“One of the things we have here are great lawnmowers and<br />
behind me, you can see lawnmower one, two, and three!”<br />
Water System<br />
“You’ll see the two pipes? <strong>The</strong>y are risers that come up and<br />
carry water into the tank. One pipe comes from each side of<br />
the house. Whatever water falls on the roof ends up in the<br />
tank. This arrangement is called “loaded lines” and these<br />
pipes are always full of water.<br />
That’s assuming it hasn’t been a really, really long time since<br />
rain, but generally, those are full of water and whatever falls<br />
on the roof is added to the pipes and pushes all the water<br />
that’s in the pipe into the tank, so we have never, ever run<br />
out of water here.<br />
<strong>The</strong> other thing that happens here is that there is a pump<br />
below us - an electric pump. One of the things that I’ve never<br />
got around to is to replacing that with a solar-driven pump,<br />
but it’s still on the list of things to do.<br />
on the hill. That makes room in this tank, should there be a<br />
nice shower of rain.<br />
In the wintertime, usually both tanks are full or almost full<br />
and in the summertime, of course, there’s a bit less rain.<br />
We do get down a little bit, but unless there’s been a water<br />
leak somewhere, really we’ve never had less than one and a<br />
quarter tanks of water, so that’s still loads of water and we’re<br />
not miserly about it.<br />
We don’t particularly worry about flushing the toilets,<br />
having baths or having long showers. That’s all great. It’s an<br />
enormous amount of water and it’s great infrastructure that<br />
we were the beneficiaries of. So that’s the water<br />
system here.”<br />
What happens is that the water is pumped up to another<br />
Split Systems<br />
tank on the hill. That second tank provides the water<br />
pressure for our home. Every couple of weeks, usually on<br />
a weekend, we’ll put the pump on and it tops up the tank<br />
“In more recent years, we added a couple of highefficiency<br />
split systems. <strong>The</strong>se are Mitsubishi Heavy,<br />
hyper inverter. I don’t really know what hyper means,<br />
but really, they are fantastically good because they are<br />
so convenient. Of course, you just hit the remote and<br />
within a couple of minutes, you’ve got really great heat<br />
coming out of them. And of course, if you need to, you<br />
can use them for cooling as well. So they have been really<br />
fantastic units.”<br />
Don’t forget to sign up to<br />
‘Insider Secrets To An <strong>Energy</strong><br />
<strong>Efficient</strong> <strong>Home</strong>’. $25 - All proceeds go to charity<br />
ecoMasterStore.com.au 16 ecoMasterStore.com.au 17
INSIDE<br />
<strong>DIY</strong><br />
PROJECTS<br />
››<br />
Entrance<br />
- Draught proofing the front door<br />
- Air lock<br />
- Entrance landing<br />
››<br />
Lounge / Dining<br />
- Introduction<br />
- Draught proofing<br />
- Stainless flue hot water heating<br />
- Window treatments<br />
- Big Ass fan<br />
- Acoustics - 3D wall tiles<br />
- Acoustics - suspended circles<br />
››<br />
Kitchen<br />
- Windows - Testing and more draught proofing<br />
- Replacement cooktop (future project)<br />
- Lighting evolution<br />
››<br />
Bedroom<br />
- Introduction<br />
• Lighting<br />
• Seal up heating outlets<br />
• Double insulated heavy drapes and pelmets<br />
• Improved air circulation - external door<br />
• Draught proofed cavity slider<br />
››<br />
Top And Bottom (Building Envelope)<br />
- Introduction<br />
- Testing ceiling insulation<br />
- Attic<br />
• Insulate the manhole<br />
• Insulation, smoke alarm, insulated hot water pipes<br />
• Insulating the cathedral ceiling<br />
• Draft stoppa<br />
- Underfloor Insulation<br />
››<br />
Study<br />
- Draught proofed awning window<br />
- Heavy drapes & pelmets<br />
- Personal heating<br />
- Retrofit wall insulation<br />
››<br />
Ensuite /Bathroom<br />
- <strong>The</strong> Bathroom Evolution<br />
• Exhaust fans<br />
• Draft Stoppa<br />
• Timer switch<br />
• Heated towel rail<br />
• Showerdome look-a-like<br />
- Zoning<br />
- Solarventi Outlet<br />
ecoMasterStore.com.au 18<br />
ecoMasterStore.com.au 19
ENTRANCE<br />
Draught Proofing<br />
<strong>The</strong> Front Door<br />
This is our front door. Because this is the ecoMaster test<br />
house, this door has over the years had lots of different<br />
treatments; door perimeter seals and door bottom<br />
treatments. We have learnt lots about things that don’t work<br />
and how to design things that do work.<br />
as thorough as the draught-proofing that we would do today.<br />
Nonetheless, it reduced our heating bill by 50% just doing<br />
that. So, doing this kind of work has real dividends behind it.<br />
Entrance Landing<br />
In the entrance down into our living room, there’s a couple of<br />
steps. When we first came here, there were a few little steps<br />
with really sharp edges, making it a little tricky to navigate. One<br />
of the things that we did was to make this a larger entrance.<br />
<strong>The</strong> platform is made from bamboo. We chose bamboo for<br />
two reasons. One is it looks great, but also it’s a reasonably<br />
sustainable material to use and we’re really happy with the way<br />
it’s turned out.<br />
One of the things that we were concerned about with making<br />
this kind of structure, is the amount of noise that it might<br />
generate from just walking across it. For that reason, we<br />
actually filled it underneath with acoustic blanket and so it<br />
hasn’t been an issue.<br />
For example, originally for the perimeter seals, we started<br />
with typical weather stripping but soon found that to be not<br />
very satisfactory. We tried other seals, including ones that<br />
had bulb seals on them which had some promise, but there<br />
are issues with bulb seals particularly getting jammed in<br />
the hinge side of the door. This led to the development of<br />
Draught Dodgers, which you see on these doors at<br />
the moment.<br />
We came to use this bottom treatment (RP35), which, in<br />
all the years that we have installed this device in various<br />
places, have not had one failure. We’ve hit upon a formula<br />
that’s really good. Our initial draught-proofing was not<br />
very thorough. It didn’t involve the doors - just a little bit of<br />
caulking and treating the light fittings. It was by no means<br />
See our Product Feature for Draught<br />
Dodgers for Doors + RP35<br />
https://ecomasterstore.com.au/collections/<br />
perimeter-seals/products/draughtdodgers-for-doors<br />
https://ecomasterstore.com.au/collections/<br />
draught-proofing-door-bottom-draught-excluder/<br />
products/door-draught-proofing-rp3-automaticdrop-down-draught-excluder<br />
LOUNGE / DINING ROOM<br />
Introduction<br />
Our family room is quite a big space, with a living area on one side, a<br />
dining area on the other, a kitchen, and a great big cathedral ceiling.<br />
It is a big space, and there’s quite a lot happening here to talk about.<br />
<strong>The</strong>re’s a drying rack, a ceiling fan, the lighting upgrade, an acoustic<br />
upgrade and there’s also hot water heating happening here. And<br />
there’s the heating systems themselves. <strong>The</strong>re is quite a lot of<br />
draught-proofing to talk about. And of course, there’s a ceiling and<br />
underfloor installation as well. So, let’s make a start.<br />
Air Lock<br />
Draught-proofing a front door is one thing, but when people<br />
are coming and going, if this is your main heated area,<br />
you’re definitely losing a lot of heat every time the door<br />
opens. And of course, if you’ve got kids you can expect the<br />
door to be left open. That’s just a fact of life. To take energy<br />
efficiency to the next level, an airlock is a great idea so<br />
you can certainly come and go without losing a lot of your<br />
winter heating.<br />
Draught Proofing<br />
<strong>The</strong> journey really started with draught-proofing. In the living room,<br />
it turned out that there were a lot of draughts. We didn’t really think<br />
that it was a draughty place, but when you look carefully, there<br />
was quite a lot to do. Because this is a cathedral ceiling, there are<br />
loads of gaps where the rafters meet the wall, where the rafters<br />
meet the external wall, the architraves around the glazing, but<br />
also the aluminium sliding doors were not very good. As well as<br />
that, of course, the external hinge doors and the awning windows<br />
were also draughty. So all those have been treated. And initially<br />
we didn’t do it all, but in the first year we actually saved 50% of our<br />
heating just by doing the draught-proofing.<br />
See our Product Feature Section for<br />
Draught Proofing - Ultraclear<br />
https://ecomasterstore.com.au/products/<br />
draughtproofing-gaps-fullers-ultraclear<br />
ecoMasterStore.com.au 20 ecoMasterStore.com.au 21
Stainless Flue Hot<br />
Water Heating<br />
In the early days here, one of the first things that we did was we<br />
decommissioned the two central gas-fired heating systems.<br />
Now, because we live in the countryside, it was LPG. It was really<br />
expensive to run and not very helpful because the heating simply<br />
came out from the ceiling outlets, which is not ideal.<br />
We got rid of the LPG tank and we stopped using the heating<br />
systems. <strong>The</strong> wood-fire became our main heating source. Now if<br />
you’re going to use a wood fire to heat hot water, normally there’s<br />
a water jacket built into the wood-fire, but this one was new and<br />
it didn’t have water jackets. We decided to add a wet flue. <strong>The</strong><br />
bottom section of flue here is a stainless steel jacket and the<br />
pipes at the back lead up into the hot water tank, which is just<br />
above it.<br />
You run the fire to heat the living room. <strong>The</strong> fire heats up the flue,<br />
the flue heats the water up and it’s a simple thermosyphon. Again,<br />
it goes around and heats up the water in the hot water tank.<br />
If you are thinking of doing this, there’s just one little fault we<br />
didn’t do. <strong>The</strong> pipes are nicely curved going up, but in fact, what<br />
that leads to is when the hot water system gets pretty hot, you<br />
can have the thermosyphon stagnate and this starts sounding<br />
like it’s going to be a bomb that blows up, but eventually it boils,<br />
ecoGlaze<br />
One of the things that were paramount in improving the overall<br />
thermal performance of this home was to do something with the<br />
glazing. Because it’s such a big place, it’s got so much glass, and<br />
especially here in the living room, it was really where we had to<br />
do something.<br />
Way back when we started looking at this, we got some pricing<br />
for replacement double glazing and it was just astronomical. We<br />
just weren’t going to devote that amount of resources and also<br />
trash perfectly good joinery and glass. That’s where the idea for<br />
ecoGlaze (secondary glazing) came from - how to figure out<br />
has a bit of a hissy fit and it starts again. This can be<br />
prevented if the pipe at the back here actually went down<br />
before it went up and that would circumvent that little<br />
issue. It’s not really a problem, but it just sounds a bit<br />
ominous when it happens.<br />
That’s it. Earlier, we saw that we’ve got the 40 evacuated<br />
tubes on the roof in a set of 30 in a set of 10 that feed into<br />
the same tank. When the sun’s out, it heats up the hot<br />
water. When we’ve got the wood-fire on, which is less so<br />
now that we’ve got a couple of really good split systems<br />
(they’re just so convenient), and of course wood fire, not<br />
really very good environmentally. We use it at a minimum<br />
now. So, the wet flue doesn’t actually do very much for us<br />
these days, but when we put it in, it was the main source<br />
of heating and did a fantastic job of providing hot water<br />
as well.<br />
what we can do to make existing glazing effectively<br />
double-glazed.<br />
In this home, there are lots of experiments along those<br />
lines as we were developing ideas, and they still kind of<br />
work, and I’m glad we didn’t go with some of them, but<br />
eventually we developed ecoGlaze.<br />
Behind me, now you can see the real McCoy. We kept the<br />
living room in reserve to install the actual product that we<br />
could supply to everybody, which is ecoGlaze. I think it<br />
looks especially great when it’s colour-matched with<br />
the existing.<br />
Renshade<br />
Roller Blinds<br />
<strong>The</strong> blind that you see behind me is a Renshade chain pull blind.<br />
Renshade is this material that you see. It’s reflective on both<br />
sides, it’s got little holes in it, and it’s amazing at stopping the<br />
heat. In particular, it’s great for western facing windows, where<br />
you’ve got the blistering sun. Here it’s on the north side of our<br />
home because in full summer we can get a lot of heat coming in<br />
through these windows. We’ve made it into chain pull blinds so<br />
it could be pulled up and we can get the full benefit of the winter<br />
sun. <strong>The</strong>se have been really, really good.<br />
<strong>The</strong>y did operate in conjunction with heavy line drapes and a<br />
box pelmet. Unfortunately, those drapes became, well worn, not<br />
helped by a couple of our dogs. So, the drapes have gone, which<br />
has left us only with the Renshade roller blinds. <strong>The</strong> next project<br />
in hand is actually to replace both of those window coverings<br />
with one. What we’re planning to do here is to take out these<br />
Renshade chain pull blinds and replace them with cellular blinds<br />
otherwise called honeycomb blinds as you might know them.<br />
<strong>The</strong> advantage of fitting this on existing windows with<br />
ecoGlaze, is the cost and less material going to waste.<br />
We’re still using the same joinery, it’s still just as good as<br />
it was all those years ago and we’ve kept it and just added<br />
the ecoGlaze components. It’s really made a massive<br />
difference to the overall thermal performance of our<br />
home at a very reasonable cost. So, that’s it. That’s how<br />
ecoGlaze came about, and here it is.<br />
We’re hoping that those are going to perform most of the<br />
function of the Renshade in the summertime. I don’t think<br />
they’re going to be quite as good, but because here we’re<br />
at 500 metres of elevation, it’s more of a winter issue<br />
here, and the cellular blinds should perform quite well in<br />
that respect.<br />
See our Product Feature Section for<br />
Renshade<br />
https://ecomasterstore.com.au/products/<br />
renshade-reflective-foils<br />
Suspended<br />
Drying Rack<br />
One of the things that’s reasonably challenging here in the<br />
Macedon Ranges in the wintertime is how to dry your washing.<br />
We don’t like to use the dryer, so here’s something that we<br />
really love. A drying rack! Now because we’ve got a really high<br />
cathedral ceiling, this is ideal. You can just put your drying on<br />
there and hoik it up out of the way. Whatever heating you use,<br />
whether it’s a split system or the wood fire, the washing gets the<br />
most of the heat and, and dries off brilliantly.<br />
ecoMasterStore.com.au 22 ecoMasterStore.com.au 23
Panel LED &<br />
Painted Ceiling &<br />
Solarventi Outlet<br />
Sometimes things are done for aesthetic reasons and<br />
others are done for energy reasons. So above us, we’ve<br />
got these LED panels which we use to replace the previous<br />
energy-intensive lighting.<br />
When these panels came, they were a really harsh daylight<br />
colour and there were a lot of complaints. So rather than<br />
replace the panels, we got a roll of Change to Orange<br />
film. It’s a translucent film that’s actually used in the<br />
photographic industry. We pulled the panels apart and we<br />
put the film in it. It’s transformed what was a really harsh<br />
light into quite a mellow, yellow light, and there was peace.<br />
In conjunction with this, we got rid of a lot of “brown”. So the<br />
cathedral ceiling above me, as so many cathedral ceilings<br />
are, were just clear finished timber, so it was brown, brown,<br />
brown. <strong>The</strong> wall behind me also was a brown feature brick<br />
wall. We also have brown slate on the floor. It’s a typical<br />
1980s arrangement. So we painted the ceiling white and we<br />
plastered and painted the wall.<br />
While that’s changed the aesthetic quite a bit, it’s has also<br />
improved the light quality in the whole room. We are really<br />
pleased with the results.<br />
On the back wall here, there is also an old heating outlet in the<br />
wall. It’s no longer a heating outlet because we discontinued<br />
the heating system, but we have made use of it to be the<br />
actual port that brings in the warm air from the Solarventi.<br />
Better Acoustics -<br />
3D Wall Tiles<br />
Here’s something that we’ve done quite recently to this home.<br />
You can see behind me in these red tiles. <strong>The</strong>se are called<br />
Quietspace 3D tiles, and we’ve put them up in conjunction with<br />
a hanging feature above me. That’s called a “Horizon Circle”.<br />
Why have we done this? Well, it’s about sound quality in the<br />
room. As you get older, you get less tolerant of reflected<br />
sound. That is, sound coming at you from multiple directions.<br />
That makes it really difficult to understand speech. So what<br />
we were finding was that we’d be sitting here watching the TV,<br />
and we’d be having this conversation over and over again,“Did<br />
you hear what they said?” “No. Did you hear what they said?”<br />
“Hmm, Not sure.” It was very irritating, and you can put the<br />
volume up, and make a lot more noise, but it doesn’t improve<br />
your understanding of speech.<br />
So, the idea of this arrangement is that it absorbs sound, and<br />
it eliminates some of the reflected sound, so that you just hear<br />
the direct sound. And I have to say, it’s made an astonishing<br />
difference. We don’t have those conversations anymore.<br />
It’s a great thing. If you’re getting older and you’re finding<br />
difficulty with understanding dialogue, then that’s a great<br />
thing, and also, if you’ve got a home theatre, I would suggest<br />
that it’s a fantastic thing to use for that.<br />
See our Product Feature Section for<br />
Quietspace 3D Tiles<br />
https://ecomasterstore.com.au/collections/soundinsulation<br />
Big Ass Fan<br />
“What you see above me is the Haiku Big Ass Fan. Now this<br />
is a pretty big room so we thought we’d need a pretty big fan.<br />
We did in the past have just a regular fan, and the quality was<br />
not very good, so we thought we’d go with this.<br />
I have to say that this fan, it’s an amazing piece of engineering.<br />
It’s brilliantly well-made. You get a remote control to operate it<br />
with. It actually has a light in it as well that you can dim. It’s a<br />
brilliant product. <strong>The</strong> one thing that I don’t like about it is that<br />
it doesn’t have a reverse function. It won’t run backwards, like<br />
most fans where you can actually physically flip the reverse<br />
switch on the side of the fan. This one just doesn’t have that<br />
function, and so it can only actually blow<br />
air down.<br />
In the wintertime, its actually more pleasant if the air is blown<br />
upwards. That distributes the heating in the room better as<br />
the heating comes down around the edges of the room at a<br />
lower velocity.<br />
If you stand under this, even though the air is warm because<br />
of the air velocity, it actually feels cool, and that’s kind of<br />
disappointing.”<br />
Acoustics -<br />
Suspended Circle<br />
Being of Italian extraction, when we get together we can get<br />
quite boisterous, and we’ve got a lot less soft furnishings in<br />
this room than we used to have. So again, lots of reflected<br />
sound. And so that’s why we’ve added another Horizon Circle<br />
over the table.<br />
Don’t forget to sign up to<br />
‘Insider Secrets To An <strong>Energy</strong><br />
<strong>Efficient</strong> <strong>Home</strong>’. $25 - All proceeds go to charity<br />
See our Product Feature Section for<br />
Horizon Circle<br />
https://ecomasterstore.com.au/collections/soundinsulation<br />
ecoMasterStore.com.au 24 ecoMasterStore.com.au 25
Lighting Upgrade<br />
LED downlights, and so we have replaced the compact<br />
fluorescents with those. <strong>The</strong> LEDs are completely sealed<br />
units with an amazing light output.<br />
KITCHEN<br />
Awning Window<br />
Treatments<br />
Well as you can see, these are the kitchen window. We<br />
have a few things going on here. Firstly, as well as<br />
developing ecoGlaze (secondary glazing) in this home, we<br />
do continually test other things, and on this window, we’re<br />
testing one of the heat shrink films. You can probably see<br />
that it’s got a bit of misting around the centre that’s on the<br />
inside of the external glass.<br />
How does it perform? I think from a thermal performance<br />
point of view, pretty good because it’s trapping about 20<br />
millimetres of air. Aesthetically, well, it doesn’t look all that<br />
great. It’s pretty hard to trim nicely and keep looking nice<br />
over time. It’s pretty hard to clean - you have to be ever so<br />
gentle trying to clean it. But, thermally and cost-wise, I think<br />
it’s pretty good. It would be particularly good if you are<br />
renting.<br />
is that it’s very long-lasting. Maintenance wise, it’s pretty<br />
good, but it does tend to warp over time. What generally<br />
happens with these sashes in that they bow and leave<br />
quite substantial gaps. So, in these awning windows, we’ve<br />
replaced the original beads with Draught Dodgers for<br />
Awning Windows. It’s a great seal around the whole window<br />
- no more draught!<br />
See our Product Feature Section for<br />
Draught Dodgers For Awning Windows<br />
One of the things that we did really early on was dealing with<br />
the lighting. We had about 40 of these halogens downlights<br />
fitted in a gimbaled fitting (that is they had the ability to tilt).<br />
But they were all 100% flat on the ceiling, and there was an<br />
enormous gap around each. So there was lots of draught into<br />
the roof, lots of electrical energy used in the halogen lamps,<br />
and lots of ceiling insulation missing as well because you’ve<br />
got to leave a big spice around the hot lamps.<br />
What did we do? We took the lamps out and took the centre<br />
out of each fitting. That just left the space that actually fits<br />
the hole in the ceiling, and then we installed 11-watt compact<br />
fluorescent lamps into that existing ring.<br />
So that effectively sealed the draught, greatly reduced the<br />
electrical energy for lighting. And of course, we can fix up the<br />
ceiling installation pretty closely to these. <strong>The</strong> downside of that<br />
was compact fluorescents take about 30 seconds to come up<br />
to reasonable light and about a minute to come up to full light.<br />
That’s pretty irritating. We put up with that for a very long time<br />
because that’s all there was. But now there are these amazing<br />
STUDY<br />
<strong>The</strong>se particular ones have got a switch that enables you<br />
to change the colour of the light. We like the warm light, so<br />
that’s what we use. <strong>The</strong>y’ve got a regular plug on the end so<br />
that they can plug easily into what’s called plugged bases<br />
in the ceiling. So if you’ve got plug bases, then it’s a <strong>DIY</strong><br />
installation. You can just take out the existing inefficient<br />
lights and plug that into the plug base, then pop that into<br />
the ceiling and the job’s done. <strong>The</strong> result is just amazingly<br />
different - it’s a really amazing light and surprisingly cheap.<br />
<strong>The</strong> other thing about this window is that we’ve draught<br />
proofed it and others like it. So in this home, we’ve got<br />
hardwood joinery. And what tends to happen with hardwood<br />
https://ecomasterstore.com.au/collections/<br />
windows/products/draughtdodgers-for-awningwindows<br />
Replacement<br />
Cooktop<br />
When we came here, this was an electric cooktop. We did<br />
change it for a gas one that runs on LPG. This has been here quite<br />
a long time now, and it is slated for replacement. LPG or piped<br />
gas is not sustainable and not great in terms of greenhouse gas<br />
emissions. This is particulary true in the production stage. We’re<br />
going to change this for an induction cooktop. This has all the<br />
really great control features that gas has, and in fact, is better than<br />
gas but without the emission issues.<br />
Introduction<br />
Working in a study can be a reasonably uncomfortable<br />
experience. For a start, you’re just sitting sedentary. If space<br />
is cool, you’re soon going to be feeling frozen. <strong>The</strong>re are a few<br />
things that have been done here to try and alleviate that. Firstly,<br />
on the window side. We have draught-proofed the opening<br />
window, added ecoGlaze (secondary glazing) to reduce the<br />
conducted heat through the glazing and added the Renshade<br />
roller blinds as well to reduce the incoming summer heat.<br />
<strong>The</strong>re’s also heavy lined drapes with the box pelmet. So the<br />
windows in this room are pretty well taken care of. Of course,<br />
during the day, we don’t really want to use the drapes.<br />
We’ve also fitted a quite a good LED light to the ceiling to<br />
provide a good level of lighting. And finally, the thing to make<br />
you really comfortable is to create your own little personal heat<br />
bubble. And how do you do that? Well, you might notice that<br />
I’m wearing a jacket, but it’s a special jacket. This is a heated<br />
jacket and we put a battery in it, push the button, and hey,<br />
presto, in a few minutes you get a nice, warm feeling all over.<br />
<strong>The</strong> other thing is, of course, a heated floor mat. Here it is!<br />
This particular one uses 75 watts of electricity, which is not<br />
a huge amount, but certainly, if your feet are warm and your<br />
body’s warm, then it’s going to be a fair bit more pleasant<br />
sitting here doing your work.<br />
See our Product Feature Section for Draught<br />
Dodgers For Awning Windows<br />
https://ecomasterstore.com.au/collections/windows/<br />
products/draughtdodgers-for-awning-windows<br />
ecoMasterStore.com.au 26 ecoMasterStore.com.au 27
Retrofit Wall<br />
Insulation<br />
One of the questions that we had was, “What exactly is in<br />
the walls of this home?” When we looked, we discovered a<br />
high-quality reflective house wrap. And while it was really<br />
good quality, it was not very well installed. It was not fixed to<br />
the bottom of the walls (so it was just flapping in the breeze)<br />
and lapped in the middle. But it only came to 2.4 metre<br />
high. As most of this house has 2.7-metre ceilings, the top<br />
300mm of the walls were actually just open to the elements.<br />
In effect, the reflective nature of the wrap became completely<br />
pointless, because there was absolutely no chance of still<br />
air space. So the next question is what to do about it? We<br />
decided to remove the plasterboard, treat the walls and then<br />
put the plasterboard back on. We cut the plasterboard about<br />
a 100mm from the corners of the room, 100mm in from<br />
architraves, skirts and corners so that we didn’t have to disturb<br />
those. <strong>The</strong>n we took the plasterboard off. We got material like<br />
this - RetroShield - and cut it into sections that would fit into<br />
a stud noggin space. We installed that, made little hospital<br />
corners and stapled it in all the way around. So the idea is to<br />
BEDROOMS<br />
make a still air space. Next, we glued some battens to it. <strong>The</strong><br />
purpose of that was to hold the bulk material off the reflective<br />
surface. We put the polyester wall batts in. <strong>The</strong>n we installed<br />
new plasterboard and jointed it. <strong>The</strong>n, of course, you have to<br />
redecorate. So that’s how we retrofitted wall insulation. It made<br />
a massive difference. We left this little piece open here just so<br />
we could show people what we actually did in the walls.<br />
Introduction<br />
I’m standing in the main bedroom. <strong>The</strong>re are quite a few<br />
energy efficient features to see. Starting with the drapes, the<br />
lighting treatment, an example of sealing up heating outlets,<br />
improving cross-flow ventilation and draught proofing a walkin<br />
robe.<br />
See Our Product Feature Section For<br />
Autex Wall Insulation<br />
sealing-kit<br />
https://ecomasterstore.com.au/collections/polyesterwall-insulation<br />
Sealing Up<br />
Heating Outlets<br />
About a year after we stopped using the central heating<br />
system, we decided to have a go at blocking up the outlets.<br />
What you see here, is a typical ceiling outlet of a heating<br />
system. You might see a silvery part inside, or if I open these<br />
louvres, we can see inside.<br />
We got a piece of polyester insulation and pushed it just up<br />
into the ducting. <strong>The</strong>n we cut a piece of Foilboard and pushed<br />
it in nice and airtight and put the louvres back on. Normally<br />
the louvres are closed. But the point of doing this was that it<br />
made a massive difference because the heating system is a<br />
closed-loop. It wasn’t really draughty, but any heating in the<br />
room was drifting up into the ducting. <strong>The</strong> ducting is insulated<br />
a tiny bit, but not as insulated as a ceiling should be. A lot of<br />
heat loss occurs in the ducting. <strong>The</strong> air in the ducting then<br />
gap). And these about 13 Watts. So it reduced the power<br />
consumption of the lighting quite a lot. <strong>The</strong> downside of<br />
compact fluorescence, apart from having some mercury in<br />
them, is that they take a long time to come up to full light,<br />
and that’s kind of irritating. But once they are in full light,<br />
they’re okay. It’s a nice warm light as well. And that’s why<br />
we’ve kind of persevered with this and left them to the last<br />
for replacing.<br />
cools and comes down, so it was a continuous cooling cycle<br />
in the wintertime. Sealing up the vents made a surprising<br />
amount of difference.<br />
See our Product Feature Section for<br />
Goodbye Heating Vents<br />
https://ecomasterstore.com.au/products/duct-<br />
Lighting<br />
When we first moved into this home, it was absolutely full of<br />
50 watt halogen downlights. <strong>The</strong>y were fitted into gimballed<br />
fittings (the ones that can tilt) which have an amazing gap<br />
around each one.<br />
Very early on we decided we had to do something about<br />
those halogens. While many of our lighting upgrades have<br />
been superseded, this particular one was lasted. It is now<br />
slated for replacment with IC rated LED downlights, but it was<br />
pretty good at the time. Even today it is still working well.<br />
<strong>The</strong>se particular lamps were fitted onto the exterior rim of the<br />
gimballed fitting. We just kept the rim in the ceiling, took out<br />
the halogen centres and fitted the new lamps. <strong>The</strong>se are GX53<br />
compact fluroescent lamps. You can probably see the little<br />
fluoro going across it. So it’s sealed up the light fitting (no<br />
Double Insulated<br />
Heavy Drapes &<br />
Pelmets<br />
We’re probably all aware that amongst the most thermally<br />
effective window coverings are heavy lined drapes and box<br />
pelmets. <strong>The</strong> pelmet is very important because they eliminate<br />
the airflow going down behind the drapes. One way to<br />
rejuvenate all drapes is to simply sew the new material onto<br />
the old. That way you get a new look, you get added insulation,<br />
and you don’t trash the old drapes and linings. Bear in mind<br />
though you’re probably going to need a curtain maker to<br />
help you do that.<br />
ecoMasterStore.com.au 28 ecoMasterStore.com.au 29
Improved Air<br />
Circulation<br />
I’m standing at the east end of the home. One of the things<br />
that we did was to improve the cross-flow ventilation of the<br />
home. <strong>The</strong>re use to be a regular awning window here, which<br />
are really poor for ventilation purposes. We took out the<br />
whole awning window unit and replaced it with this doubleglazed<br />
door. On those few really scorching hot summer days,<br />
in the evening, we can open this door and get a rush of air<br />
straight through the home. This resets the home at a lower<br />
temperature for the next day and we have a more pleasant<br />
evening. As you can see, it’s got a blind tilt and very easy<br />
to operate. You can also pull up the blind with this other<br />
control. It’s been a really great thing.<br />
Draught Proofed<br />
Cavity Sliding Door<br />
So the next thing that we did is we got an electric towel rail.<br />
We figured, “Well, we’ve got damp towels all day long. That’s<br />
not really good, so let’s get an electric towel rail and have nice<br />
warm and dry towels.” It is connected to a timer, so it comes<br />
on in the morning and dries the towels, and a little bit at night.<br />
Again, it helped a little bit, and we did have nice, toasty, warm<br />
towels, which is great but still not really fantastic. We did install<br />
the Solaventi, which did help a lot. And finally, the thing that<br />
really made a really big difference is that we fitted on top of our<br />
shower our own version of Showerdome. I’m a big fan of the<br />
Showerdome product, and I would have bought the real McCoy if<br />
our shower had been a standard size, but it’s not.<br />
So what we’ve done is made our own effective shower dome,<br />
making the shower a booth rather than just an enclosure.<br />
Having done that, there actually is almost never a reason to run<br />
the exhaust fan, because all the steam from the shower actually<br />
condenses on the glass in the shower, and none of it comes in<br />
the room at all. Our shower’s big enough, that you can towel dry<br />
in there in a nice, warm space rather than out here, so it actually<br />
has worked fantastically well. After showering, we leave the<br />
shower door open, and the Solarventi actually just dries<br />
out the shower during the day, so makes everything dry.<br />
And there certainly is no tendency towards any mould<br />
issue here at all anymore.<br />
See our Product Feature Section for Draft<br />
Stoppas<br />
https://ecomasterstore.com.au/products/<br />
draughtproofing-exhaust-fans-draftstoppa<br />
As is usually the case with master bedrooms, there’s often a walkin<br />
robe. In this case, we’ve got a cavity sliding door that slides into<br />
an external wall, so almost always causes a draught issue. In this<br />
case, we fitted the Draught Dodgers for Cavity Sliding Door, so that<br />
we can shut the door and have it draught-proofed on this side.<br />
Zoning<br />
See our Product Feature Section for<br />
Draught Dodgers - Cavity Sliding Door Kit<br />
ENSUITE / BATHROOM<br />
Introduction<br />
<strong>The</strong>re is a longish story of evolution in here. <strong>The</strong>re’s a little bit<br />
of an echo in here because there is no external opening to this<br />
room. You can see behind me that we can see straight out the<br />
back, but that’s because there’s a glass wall on the other side of<br />
the shower enclosure. So it looks very nice, but the problem was<br />
that it was always damp in here. We’ve progressed over time,<br />
and done various things to try and address that dampness, and<br />
there was also the tendency towards mould on the ceiling.<br />
<strong>The</strong> original fan was choked with dust and it wasn’t really<br />
a great fan, so we replaced it. But replacing it didn’t really<br />
make a lot of difference.<br />
As we used to accidentally leave the fan on for a long<br />
time, we put a pneumatic push button on the fan. We<br />
would push the button and it would run the fan just for a<br />
number of minutes rather than all day long. That kind of<br />
helped a little bit - but not very much really.<br />
See our Product Feature Section for RP2A,<br />
Draft Stoppa<br />
internal_door<br />
https://ecomasterstore.com.au/products/<br />
draughtproofing-exhaust-fans-draftstoppa<br />
https://ecomasterstore.com.au/products/door-draughtproofing-draught-dodgers-cavity-sliding-doors-set<br />
https://ecomasterstore.com.au/products/doordraught-proofing-rp2a-19mm-door-brush-seal_<br />
https://ecomasterstore.com.au/collections/perimeter-<br />
seals/products/door-draught-proofing-emv-one-door-<br />
set-effective-low-cost-door-perimeter-seal<br />
When we heat our home, it’s a good idea, not to heat areas<br />
that you don’t really need to heat. And for us, it’s the wet<br />
areas. It’s the laundry, toilet and bathrooms.<br />
We treat the doors (as in draught-proof them) and keep them<br />
closed. Now here’s an interesting thing - if you’ve got little<br />
kids, it’s pretty hard to keep them closed!. But we don’t have<br />
little kids. So this door has been treated with an experimental<br />
perimeter seal and just a regular brush on the bottom.<br />
So when we close it, it’s pretty well draught proofed. We can<br />
leave the window open if we wish to ventilate the bathroom.<br />
It’s not going to affect the rest of the home. Another thing<br />
that’s in this bathroom, is that we’ve treated the exhaust fan<br />
with a draught stopper, and we’ll have a look at that when we<br />
get in the roof.<br />
ecoMasterStore.com.au 30 ecoMasterStore.com.au 31
Solarventi Outlet<br />
This is the outlet for the Solarventi that we first saw on the<br />
roof. It’s a simple MDF box that leads from the ceiling down to<br />
the floor. <strong>The</strong> Solarventi has a flexible duct that adapts to the<br />
top of the box. So, the warm air comes down here, and maybe<br />
you can hear it going? I can certainly feel quite a nice warm<br />
airflow on my hand, even though there’s not really very much<br />
sun at the moment.<br />
One of the things that we did was to organise this so we<br />
could direct this airflow into two rooms. At the moment<br />
we’re in the ensuite, which is a dead air space. It has no<br />
opening window and so, usually, the warm air is directed in<br />
here to dry out the shower. But we can direct the airflow into<br />
the other room which is the master bedroom. It’s quite a<br />
simple arrangement that just works brilliantly well.<br />
<strong>The</strong> other part of the Solarventi is the control system. I was<br />
explaining earlier that the box on the roof that draws air from<br />
outside through the backplate, heats it up, passes it down<br />
the shoot into the ensuite or the master bedroom. <strong>The</strong> last<br />
part of the puzzle is actually the controls. <strong>The</strong> bottom control<br />
here is a speed controller for the fan so you can slow the fan<br />
down if you wish. It’s a solar-powered fan, so I just leave it on<br />
full. <strong>The</strong> other part is the thermostat. It’s just a really simple<br />
thermostat and when it hits the set temperature, the system<br />
is going to change from pouring in heat to energising the<br />
extraction fan. That’s it.<br />
In the wintertime, we normally set it up to a reasonably high<br />
temperature, so there’s no risk of it switching to cooling<br />
mode. I really love the simplicity of this - it’s a beautiful thing.<br />
Testing Ceiling<br />
Insulation<br />
Before upgrading the ceiling insulation, we had to decide<br />
how much to upgrade it and what to upgrade it with. Without<br />
knowing very much about insulation products, we decided<br />
to build a controlled heat chamber and we hired a cool<br />
room. We built a simulated house and insulated it with all<br />
the different bulk insulations and reflective installations and<br />
basically tested how they performed in heat and in cold.<br />
So the result was that polyester performed really, really well.<br />
Not only that, but it was a nice product to work with. It is much<br />
more pleasant than the fibreglass batts that we had in the<br />
roof already. We went with a combination of the polyester<br />
bulk insulation and reflective insulation. We’ll see that very<br />
shortly. Before we did that, we actually took the existing R2.5<br />
fibreglass batts from one end of the home and used them to<br />
double up in the opposite end of the home so that we had R5<br />
fibreglass batts.<br />
So, one end of the home is end’s slightly smaller than the<br />
other. We had enough extra installation to make good all the<br />
gaps around the downlights that we now didn’t need to have<br />
and doubled it all up. Effectively, we had about R5 down one<br />
of the home. At the other end of the home, we used R3.5<br />
polyester batts and pleated foil batts over the top. So with the<br />
combination of those we found worked really well.<br />
See Our Product Feature Section For Autex<br />
Ceiling Insulation<br />
https://ecomasterstore.com.au/collections/polyesterceiling-insulation<br />
THE TOP & BOTTOM<br />
Introduction<br />
One of the things that we did really early on was to improve<br />
the ceiling insulation. Some years later, we did underfloor<br />
insulation as well. Now, before we look at those in detail,<br />
let’s talk a little bit about the structure of this home because<br />
there are some things that are a little unusual and not found<br />
in many other homes. So although we’re in a cathedral<br />
ceiling here, the cathedral ceiling is not actually the roof as<br />
is normally the case. So that cathedral ceiling is a structure<br />
within the greater roof, and so there is actually crawl space<br />
above the cathedral ceiling. <strong>The</strong> other thing is that although<br />
we’re on a concrete slab, the concrete slab is on stumps.<br />
So there is crawl space underneath the slab. So those two<br />
things are really unusual features that you don’t normally find<br />
in homes but have enabled us to insulate under the slab and<br />
actually over the cathedral ceiling, as well.<br />
See Our Product Feature Section For Autex<br />
Ceiling Insulation<br />
https://ecomasterstore.com.au/collections/polyesterceiling-insulation<br />
Attic - Insulate<br />
<strong>The</strong> Manhole<br />
We are just about to go up in the roof to have a look at things<br />
up there. But before we do, I’d just like to point out that in our<br />
case, we’ve got attic stairs, but nonetheless it’s a manhole.<br />
And in your home, you might have a more regular size<br />
manhole in the ceiling. Just remember it’s part of the ceiling,<br />
so it needs to be insulated as well as the ceiling.<br />
ecoMasterStore.com.au 32 ecoMasterStore.com.au 33
Smoke Alarm &<br />
Insulated Hot<br />
Water Pipes<br />
to the tubes, and it comes back this way. So actually, I’m just<br />
going to test the difference in the temperature here. Pretty hot.<br />
Ouch, really hot. So, it is a sunny winter’s day outside. And so<br />
those evacuated tubes are definitely working fantastically well.<br />
Underfloor<br />
Insulation<br />
one after the other, and glue them up under the galvanised<br />
deck. We used water-based liquid nails to do that. <strong>The</strong>y fitted<br />
together just like a jigsaw puzzle, making little still air pockets,<br />
which you need for reflective insulation to work properly. So<br />
that’s what we did and it’s still there and working today.<br />
Firstly, we decided to put a smoke alarm up here because<br />
if there’s a fire that happens to get started in the roof, this<br />
is likely to warn us a long time before a smoke alarm in the<br />
house would do.<br />
<strong>The</strong> other thing is the hot water system here. We’ve got a<br />
low-pressure copper tank with 400 litres of very hot water. So,<br />
this hot water pipe here is pretty well insulated. And this is the<br />
return from the tubes on the roof. Down below here, we’ve<br />
got the flow to the tubes on the roof. So it goes out that way<br />
vimeo.com/356774717<br />
Because this house is a slab on stumps, it gave us the<br />
opportunity to insulate under the concrete slab. It’s great<br />
thermal mass but not a very good insulator. So normally under<br />
a floor, you would use the polyester rolls between the joists,<br />
which are fantastic. But under this floor is a galvanised tray<br />
that was used to pour the slab on top. And so very difficult to<br />
fit any kind of bulk installation to that.<br />
So what we had to do was invent our own insulation and we<br />
decided to use reflective insulation. So you can see here we’ve<br />
got 15mm Foilboard cut into 600mm tiles and fitted with this<br />
25mm border on two sides. What enabled us to lap them<br />
See Our Product Feature Section For<br />
R2.5 Underfloor Insulation<br />
https://ecomasterstore.com.au/collections/<br />
underfloor-insulation<br />
vimeo.com/356774925<br />
Insulating <strong>The</strong><br />
Cathedral Ceiling<br />
We’re currently in the roof, looking over the cathedral ceiling.<br />
And what we can see here is the original fibreglass bats laid<br />
on black plastic over the cathedral ceiling, and then on top,<br />
we’ve actually fitted R2.5 Underfloor Insulation Rolls that were<br />
pulled across the cathedral ceiling. You can also see that<br />
while the cathedral ceiling actually holds up the roof, it is not<br />
the roof itself.<br />
Don’t forget to sign up to<br />
‘Insider Secrets To An <strong>Energy</strong><br />
<strong>Efficient</strong> <strong>Home</strong>’. $25 - All proceeds go to charity<br />
Draft Stoppa<br />
We are over the bathroom now, and specifically, we’re<br />
looking over the exhaust fan. This is a Draft Stoppa that’s<br />
fitted over the exhaust fan. It’s got two flaps that are pretty<br />
carefully weighted. When the exhaust fan is on, they tip up<br />
and the moist air comes out. When the exhaust fan switches<br />
off, they just fall down. Now you can probably hear that<br />
clickety-clack sound that they make. This is an old model.<br />
<strong>The</strong> newer models have got little rubber bumpers on them<br />
so that they don’t make that sound.<br />
vimeo.com/356774977<br />
See Our Product Feature Section For<br />
Draft Stoppa<br />
https://ecomasterstore.com.au/products/<br />
draughtproofing-exhaust-fans-draftstoppa<br />
ecoMasterStore.com.au 34 ecoMasterStore.com.au 35
SHOP OUR<br />
STORE<br />
ecoMasterStore.com.au<br />
Draught Dodgers<br />
Awning or Casement<br />
Windows<br />
ecoMaster - Draught<br />
Dodgers Cavity<br />
Slider Kit<br />
ecoMaster - Draft<br />
Stoppas<br />
Draught Proofing<br />
ecoMaster - Draught<br />
Dodgers For Doors<br />
ecoMaster - RP35<br />
- Bottom Door<br />
Draught Seal<br />
ecoMaster - RP2A<br />
- Bottom Door<br />
Draught Seal<br />
ecoMaster - Goodbye<br />
Heating Vents<br />
ecoMaster -<br />
Renshade<br />
Insulation<br />
ecoMaster - Autex -<br />
Ceiling Insulation<br />
Draught Dodgers<br />
Awning or Casement<br />
Windows<br />
ecoMaster - Autex -<br />
Wall Insulation<br />
Please use this<br />
discount code<br />
“<strong>DIY</strong>EEH” to get<br />
great offers in<br />
our store<br />
ecoMasterStore.com.au 36 ecoMasterStore.com.au 37
ecoMaster - Autex -<br />
Quietspace 3D tiles<br />
THANK<br />
YOU!<br />
ecoMaster - Autex -<br />
Horizon Circle<br />
Maurice and Lyn would like to thank you for reading<br />
the magazine. We would love to encourage you to take<br />
action with your own <strong>DIY</strong> <strong>Energy</strong> <strong>Efficient</strong> <strong>Home</strong> <strong>Project</strong>.<br />
So please use this Discount Code “<strong>DIY</strong>EEH” with our<br />
complements to get great offers on<br />
www.ecoMasterStore.com.au<br />
ecoMaster - Autex<br />
- Underfloor<br />
Insulation R2.5<br />
ecoMasterStore.com.au 38 ecoMasterStore.com.au 39
facebook.com/ecoMaster.com.au<br />
instagram.com/ecomasteraustralia<br />
youtube.com/user/ecoMasterAustralia<br />
twitter.com/ecoMaster<br />
linkedin.com/in/lyn-beinat-9600135<br />
COMFORTABLE<br />
HOME.<br />
COMFORTABLE<br />
FAMILY.<br />
pinterest.com.au/ecoMasterAustralia<br />
Co-create with<br />
SomethingGood<br />
<strong>Magazine</strong>s.com<br />
<strong>EcoMaster</strong> magazine is printed on a high quality 100% post-consumer recycled<br />
premium art stock, using non-toxic inks and 100% solar power. This magazine is<br />
biodegradable and compostable (except the 2 staples which can be removed).<br />
ecoMasterStore.com.au 40