SkyHook RSL Packing Instructions for Vector 3/Vector 3 M-Series ...
SkyHook RSL Packing Instructions for Vector 3/Vector 3 M-Series ...
SkyHook RSL Packing Instructions for Vector 3/Vector 3 M-Series ...

You also want an ePaper? Increase the reach of your titles
YUMPU automatically turns print PDFs into web optimized ePapers that Google loves.
Rev 0<br />
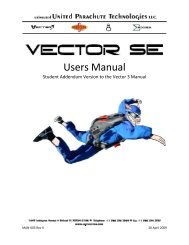
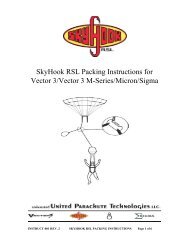
<strong>SkyHook</strong> <strong>RSL</strong> <strong>Packing</strong> <strong>Instructions</strong> <strong>for</strong><br />
<strong>Vector</strong> 3/<strong>Vector</strong> 3 M-<strong>Series</strong>/Micron/Sigma<br />
Plus Skyhook II Addendum<br />
Uninsured<br />
United Parachute<br />
Technologies<br />
,LLC<br />
1645 Lexington Avenue DeLand, Fl 32724-2106 USA<br />
Telephone: +1 386 736 7589 Fax: +1 386 734 7537<br />
www.uptvector.com upt@uptvector.com
SKYHOOK <strong>RSL</strong> PACKING INSTRUCTIONS<br />
A standard <strong>RSL</strong> does one thing. It pulls the reserve ripcord pin automatically after a<br />
breakaway. The Skyhook <strong>RSL</strong> does this, and then goes two steps further.<br />
A. It automatically releases the Left (non-<strong>RSL</strong>) riser, if the right (<strong>RSL</strong>) riser releases<br />
prematurely <strong>for</strong> any reason (Collins’ Lanyard). (You wouldn’t want your reserve container<br />
opened with one riser still attached, would you?)<br />
B. It then uses your departing main canopy as a super “pilot chute” to get your<br />
reserve to line stretch faster than ever be<strong>for</strong>e. Breakaway, to canopy-out-of-bag<br />
times are between ½ and ¾ of a second, depending on the size of your reserve<br />
canopy. This is up to three times faster than a pilot chute can do it alone.<br />
If you have a main total malfunction, or your AAD fires, the Skyhook Lanyard<br />
automatically releases, and there<strong>for</strong>e does nothing to hinder normal reserve<br />
deployment.<br />
The Skyhook <strong>RSL</strong> System has four parts:<br />
1. The <strong>RSL</strong> Lanyard (5/8 or 1”, black webbing) with a snap shackle that connects to<br />
your right main riser at one end, and the Collins’ Lanyard loop at the other.<br />
2. The White Ripcord Lanyard, with one end sewn to the <strong>RSL</strong> loop, and the reserve<br />
ripcord pin at the other.<br />
3. The Red Skyhook Lanyard, also sewn to the <strong>RSL</strong> loop, with the Skyhook attachment<br />
loop at its free end.<br />
4. The Skyhook itself, which is sewn to the reserve pilot chute bridle.<br />
(Because the <strong>RSL</strong> Lanyard, Collins’ Lanyard, and Skyhook Lanyard are all part of one<br />
integrated system, pulling the yellow tab on the <strong>RSL</strong> snap shackle inactivates all<br />
three.)<br />
Page 2:7 09109 - 11.26.2003<br />
Rev 0
09109 - 11.26.2003<br />
Rev 0<br />
SKYHOOK <strong>RSL</strong> PACKING INSTRUCTIONS<br />
WARNING<br />
Be<strong>for</strong>e <strong>Packing</strong>: There is no <strong>RSL</strong><br />
guide Ring on flap #6 on Skyhook<br />
equipped rigs. Make sure the <strong>RSL</strong><br />
guide ring has been removed on<br />
converted rigs. It was never really<br />
necessary, and someone might pass<br />
the Skyhook lanyard through it<br />
some day, causing a reserve total.<br />
Make sure the left hand (exposed)<br />
yellow breakaway cable passes<br />
through the Collins’ Lanyard loop at<br />
the end of the <strong>RSL</strong>. The Skyhook<br />
should not be used without a Collins’<br />
lanyard.<br />
Make sure that the Skyhook is sewn<br />
to the reserve freebag bridle<br />
correctly, with the pointed end of the<br />
hook facing toward the bag. If the<br />
Skyhook were sewn on the bridle<br />
facing the wrong way, a reserve pilot<br />
chute in tow would result if the<br />
reserve were pulled in response to a<br />
main total. (This pilot chute in tow<br />
could be cleared by pulling the<br />
yellow tab to release the <strong>RSL</strong>.)<br />
Remember, this malfunction can only<br />
occur if the Skyhook is SEWN to the<br />
bridle incorrectly. It cannot be<br />
caused by a packing error.<br />
Page 3:7
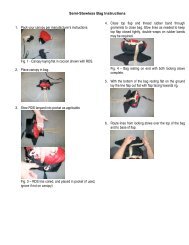
PACKING:<br />
1. Place the bagged reserve canopy in the<br />
container as described in the <strong>Vector</strong> 3<br />
Owner’s Manual.<br />
2. S-fold the 7-foot section of freebag bridle<br />
(up to the Green flex-tab) under pilot chute<br />
kicker flap #1, in the normal manner. Close<br />
flap #2, and secure with the reserve closing<br />
loop and temporary pin. Make sure the<br />
remaining bridle exits the closed kicker flaps<br />
to the wearer’s LEFT (Right in photos) of the<br />
#2 (upper) flap, with the flex-tab side up.<br />
3. Attach the RED Skyhook lanyard to flap #2<br />
by folding the stiffened section of the lanyard<br />
in half, and inserting it completely into the<br />
RED pocket on the flap. You may have to open<br />
the pocket a little with a pencil be<strong>for</strong>e inserting<br />
the flex-tab.<br />
SKYHOOK <strong>RSL</strong> PACKING INSTRUCTIONS<br />
Page 4:7 09109 - 11.26.2003<br />
Rev 0
09109 - 11.26.2003<br />
Rev 0<br />
SKYHOOK <strong>RSL</strong> PACKING INSTRUCTIONS<br />
4. Fold the bridle over the edge of flap #2, and<br />
insert the GREEN flex-tab on the freebag bridle<br />
into the GREEN pocket on the #2 flap.<br />
5. Lay the bridle over flap #2 with the Skyhook<br />
facing up. Lift the Lexan cover slightly, rotate<br />
the Skyhook enough to slip the loop on the<br />
end of the red Skyhook lanyard over the<br />
Skyhook, and rotate back into position. The<br />
Skyhook should be held firmly in place<br />
between the two pockets with less than ¼” of<br />
play. (Note: It should take a <strong>for</strong>ce of 5-7 lbs. to<br />
pull the red or green flex-tab out of its pouch,<br />
at a 180 degree angle to the mouth of the<br />
pouch.)<br />
NOTE<br />
The Skyhook has a Lexan cover piece<br />
designed to:<br />
1. Hinder anything but the Skyhook<br />
Lanyard from entering the Hookslot.<br />
2. Lower the chance that the hook<br />
area might be damaged by use or<br />
misuse<br />
Make sure this cover is in good<br />
condition and the hook area is<br />
smooth and free of burrs.<br />
Page 5:7
SKYHOOK II ADDENDUM<br />
Your rig is equipped with the new Skyhook II. It differs from the original<br />
Skyhook in the following ways:<br />
1. It is anodized blue.<br />
2. The “To Pilot Chute” instruction is laser etched on the top surface.<br />
3. There is a holographic serial number label under the surface.<br />
4. There are two Lexan cover pieces – on each side.<br />
5. The Lexan pieces have small holes drilled in them <strong>for</strong> safety tie thread.<br />
6. The upper attachment tape is red.<br />
7. The label on the rig has been updated to reflect some of these changes.<br />
The Skyhook II’S dimensions are exactly the same, and it functions in exactly the same<br />
way as the original Skyhook. There<strong>for</strong>e, it is fully compatible with any United Parachute<br />
Technologies rig set up <strong>for</strong> the original Skyhook.<br />
Reasons For The Changes<br />
1. The blue anodizing makes it easier to see damage to the hook section, while<br />
the second Lexan cover piece better protects the hook from any damage.<br />
2. The laser etching is much easier to read, and the holographic serial number<br />
seal makes it much easier <strong>for</strong> us to keep track of different Skyhook batches.<br />
Please notice that while the arrow on the Skyhook II points the same way as the<br />
original Skyhook, the “to pilot chute” text is flipped to make it “right side up”<br />
when viewed from the top of the rig.<br />
3. Sealing the Skyhook lanyard with a single piece of red rigger seal thread<br />
passed through the holes in the two Lexan cover pieces (instead of tacking the<br />
red lanyard to the freebag bridle, as was done in the original Skyhook) results<br />
in far greater percentage of freebags still attached to the broken away main all<br />
the way to the ground. There is no chance of needle damage to the bridle from<br />
successive tacking with a dull needle.<br />
4. Making the upper (toward the pilot chute) Skyhook attachment tape red<br />
makes it even less likely that someone, will some day sew a Skyhook to the<br />
bridle backwards.<br />
INSTRUCT-002 REV. 0 Page 1 of 1
6. Close the Skyhook cover flap (2A) over the<br />
Skyhook assemblage, pass the reserve closing<br />
loop through its grommet, and secure with<br />
the temporary pin.<br />
WARNING<br />
Make sure that the Skyhook lanyard<br />
goes directly from the <strong>RSL</strong> lanyard<br />
to the Skyhook hardware, without<br />
going through or under anything.<br />
(Except flap #2A)<br />
7. S-fold the remaining 5’ of freebag bridle<br />
on top of flap 1, and continue packing<br />
according to the exsisting <strong>Vector</strong> 3 Owner’s<br />
manual staring at page 28, #6.<br />
SKYHOOK <strong>RSL</strong> PACKING INSTRUCTIONS<br />
Completed<br />
packjob.<br />
Page 6:7 09109 - 11.26.2003<br />
Rev 0
Rev 0<br />
Uninsured<br />
United Parachute<br />
Technologies<br />
,LLC<br />
1645 Lexington Avenue DeLand, Fl 32724-2106 USA<br />
Telephone: +1 386 736 7589 Fax: +1 386 734 7537<br />
www.uptvector.com upt@uptvector.com