June 2022

You also want an ePaper? Increase the reach of your titles
YUMPU automatically turns print PDFs into web optimized ePapers that Google loves.
Perfectly Pitched<br />
LOW PITCH ROOFS<br />
Pitched Roofing Consultant John Mercer discusses the<br />
key considerations when constructing low pitch roofs.<br />
Of the many enquiries I receive, one of the<br />
most popular topics relates to low pitch<br />
roof construction. Experience has taught<br />
us that the ideal range of roof pitches for roof tiles<br />
and slates is anywhere between 30 to 50º. During<br />
rainfall or wind-driven rain spells, water is shed<br />
from one double lapped tile or slate course to the<br />
next one below, the tiles and slates having sufficient<br />
lap and pitch to prevent any sideways or upwards<br />
‘creep’ of the water through capillary action from<br />
penetrating the roof covering. Single lapped tiles<br />
perform the same function by virtue of their lap<br />
over the course below and side laps which can be<br />
either simple overlaps or more sophisticated<br />
interlocks with water bars and troughs.<br />
Although the trend in recent years is to build<br />
homes with steeper pitch roofs to provide living<br />
spaces within the roof, there are many tiles and<br />
slated roofs constructed at low pitches to reduce<br />
construction costs, for example, or reduce a<br />
building’s impact on the horizon, or very<br />
commonly, to enable the building of a home<br />
extension to fit below the upstairs windows.<br />
Roof tile manufacturers have developed and<br />
continue to develop roof tiles and associated<br />
systems that are suitable for use at low pitches.<br />
However, under certain weather conditions, water<br />
may be driven through the slating or tiling and must<br />
be captured by the underlay system and drained<br />
away to the gutter. Certainly, at low roof pitches,<br />
the risk of water ingress increases through or<br />
around the tiling, simply because everything is<br />
working closer to its limits. For example, though<br />
the individual components have been<br />
thoroughly tested and perform fine at the<br />
stated minimum roof pitch, constructing<br />
the roof with the same accuracy as<br />
that used under test conditions can<br />
be difficult. It only takes a small<br />
gap or two in the tiling where it<br />
passes over a flashing and the risk of water<br />
ingress is increased.<br />
BS 5534 states that the underlay layer should<br />
provide a continuous under-roof barrier to water,<br />
snow, and dust, and should be capable of<br />
draining any moisture that might be deposited<br />
onto the surface of the underlay to the roof<br />
drainage system. Although BS 5534 does not<br />
provide specific design details on how to<br />
construct a waterproof underlay system, it does<br />
recommend that consideration be given to sealing<br />
any penetrations through the underlay, such as<br />
nail holes, with suitable tapes or sealants.<br />
The design recommendations provided in<br />
BS 5534 are an acknowledgement that there will<br />
be occasions when rainwater finds its way<br />
through the tiling and onto the underlay, so the<br />
roof should be regarded as a system, rather than<br />
simply a collection of individual components.<br />
It is important to follow the installation<br />
recommendations given in BS 5534 and BS 8000-6<br />
for the underlay. Underlay laid unsupported, directly<br />
over the rafters or counterbattens, must be laid with<br />
a sufficient drape to enable water to run freely into<br />
the underlay troughs and under the tile battens<br />
towards the gutters. If the underlay is laid too tight,<br />
without a drape, water on the underlay will be<br />
trapped behind the tile battens and will eventually<br />
find its way through the batten nail holes in the<br />
underlay and leak into the roof structure.<br />
On low pitched roofs, rainwater is more likely to<br />
be driven through the tiling during heavy winddriven<br />
rain events, though roof design<br />
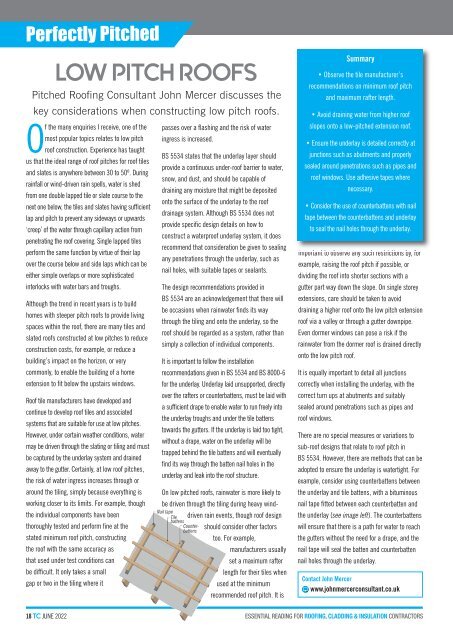
battens<br />
Counterbattens<br />
should consider other factors<br />
too. For example,<br />
manufacturers usually<br />
set a maximum rafter<br />
length for their tiles when<br />
used at the minimum<br />
recommended roof pitch. It is<br />
Nail tape<br />
Tile<br />
Summary<br />
• Observe the tile manufacturer’s<br />
recommendations on minimum roof pitch<br />
and maximum rafter length.<br />
• Avoid draining water from higher roof<br />
slopes onto a low-pitched extension roof.<br />
• Ensure the underlay is detailed correctly at<br />
junctions such as abutments and properly<br />
sealed around penetrations such as pipes and<br />
roof windows. Use adhesive tapes where<br />
necessary.<br />
• Consider the use of counterbattens with nail<br />
tape between the counterbattens and underlay<br />
to seal the nail holes through the underlay.<br />
important to observe any such restrictions by, for<br />
example, raising the roof pitch if possible, or<br />
dividing the roof into shorter sections with a<br />
gutter part way down the slope. On single storey<br />
extensions, care should be taken to avoid<br />
draining a higher roof onto the low pitch extension<br />
roof via a valley or through a gutter downpipe.<br />
Even dormer windows can pose a risk if the<br />
rainwater from the dormer roof is drained directly<br />
onto the low pitch roof.<br />
It is equally important to detail all junctions<br />
correctly when installing the underlay, with the<br />
correct turn ups at abutments and suitably<br />
sealed around penetrations such as pipes and<br />
roof windows.<br />
There are no special measures or variations to<br />
sub-roof designs that relate to roof pitch in<br />
BS 5534. However, there are methods that can be<br />
adopted to ensure the underlay is watertight. For<br />
example, consider using counterbattens between<br />
the underlay and tile battens, with a bituminous<br />
nail tape fitted between each counterbatten and<br />
the underlay (see image left). The counterbattens<br />
will ensure that there is a path for water to reach<br />
the gutters without the need for a drape, and the<br />
nail tape will seal the batten and counterbatten<br />
nail holes through the underlay.<br />
Contact John Mercer<br />
www.johnmercerconsultant.co.uk<br />
18 TC JUNE <strong>2022</strong>