September 2022

Create successful ePaper yourself
Turn your PDF publications into a flip-book with our unique Google optimized e-Paper software.
Step by Step Guide<br />
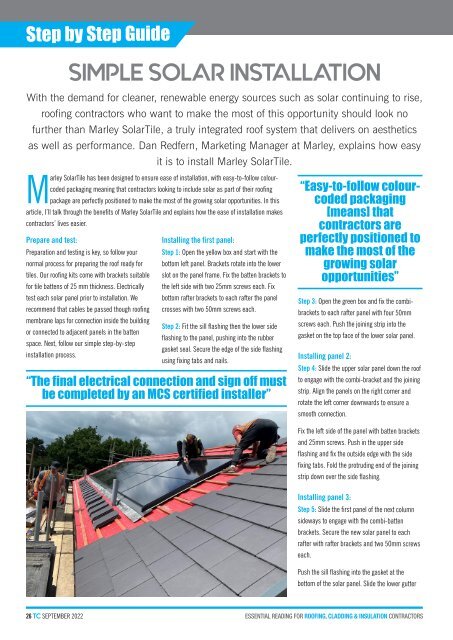
SIMPLE SOLAR INSTALLATION<br />
With the demand for cleaner, renewable energy sources such as solar continuing to rise,<br />
roofing contractors who want to make the most of this opportunity should look no<br />
further than Marley SolarTile, a truly integrated roof system that delivers on aesthetics<br />
as well as performance. Dan Redfern, Marketing Manager at Marley, explains how easy<br />
it is to install Marley SolarTile.<br />
Marley SolarTile has been designed to ensure ease of installation, with easy-to-follow colourcoded<br />
packaging meaning that contractors looking to include solar as part of their roofing<br />
package are perfectly positioned to make the most of the growing solar opportunities. In this<br />
article, I’ll talk through the benefits of Marley SolarTile and explains how the ease of installation makes<br />
contractors’ lives easier.<br />
Prepare and test:<br />
Preparation and testing is key, so follow your<br />
normal process for preparing the roof ready for<br />
tiles. Our roofing kits come with brackets suitable<br />
for tile battens of 25 mm thickness. Electrically<br />
test each solar panel prior to installation. We<br />
recommend that cables be passed though roofing<br />
membrane laps for connection inside the building<br />
or connected to adjacent panels in the batten<br />
space. Next, follow our simple step-by-step<br />
installation process.<br />
Installing the first panel:<br />
Step 1: Open the yellow box and start with the<br />
bottom left panel. Brackets rotate into the lower<br />
slot on the panel frame. Fix the batten brackets to<br />
the left side with two 25mm screws each. Fix<br />
bottom rafter brackets to each rafter the panel<br />
crosses with two 50mm screws each.<br />
Step 2: Fit the sill flashing then the lower side<br />
flashing to the panel, pushing into the rubber<br />
gasket seal. Secure the edge of the side flashing<br />
using fixing tabs and nails.<br />
“The final electrical connection and sign off must<br />
be completed by an MCS certified installer”<br />
“Easy-to-follow colourcoded<br />
packaging<br />
[means] that<br />
contractors are<br />
perfectly positioned to<br />
make the most of the<br />
growing solar<br />
opportunities”<br />
Step 3: Open the green box and fix the combibrackets<br />
to each rafter panel with four 50mm<br />
screws each. Push the joining strip into the<br />
gasket on the top face of the lower solar panel.<br />
Installing panel 2:<br />
Step 4: Slide the upper solar panel down the roof<br />
to engage with the combi-bracket and the joining<br />
strip. Align the panels on the right corner and<br />
rotate the left corner downwards to ensure a<br />
smooth connection.<br />
Fix the left side of the panel with batten brackets<br />
and 25mm screws. Push in the upper side<br />
flashing and fix the outside edge with the side<br />
fixing tabs. Fold the protruding end of the joining<br />
strip down over the side flashing.<br />
Installing panel 3:<br />
Step 5: Slide the first panel of the next column<br />
sideways to engage with the combi-batten<br />
brackets. Secure the new solar panel to each<br />
rafter with rafter brackets and two 50mm screws<br />
each.<br />
Push the sill flashing into the gasket at the<br />
bottom of the solar panel. Slide the lower gutter<br />
26 TC SEPTEMBER <strong>2022</strong>