FORGED: Making a Knife with Traditional Blacksmith Skills
This book will teach you to hand build a knife using the traditional method of blacksmiths of old — FORGING. Traditional forging of a knife blade is a process which uses the ancient techniques of moving hot steel with hammer and anvil alone into a knife-form that is ready for filing, heat treating and sharpening with no or very minimal electric grinding. This book also teaches traditional fit-and-finish skills using only hand tools. It explains an ancient riveted full-tang handle construction system that surpasses modern methods. In the author's words; "In my early blacksmithing years, I was lucky to get to know some old smiths who wrangled hot iron every day just to make a living. They unselfishly taught me traditional blacksmithing skills and knife forging methods. Every time I use those skills and methods, I honor their friendships, and by teaching you, the reader, we keep alive the memory of those old-time iron pounders." Hardcover, 132 pages, 150 photos and illustrations, $29.95.
This book will teach you to hand build a knife using the traditional method of blacksmiths of old — FORGING.
Traditional forging of a knife blade is a process which uses the ancient techniques of moving hot steel with hammer and anvil alone into a knife-form that is ready for filing, heat treating and sharpening with no or very minimal electric grinding.
This book also teaches traditional fit-and-finish skills using only hand tools. It explains an ancient riveted full-tang handle construction system that surpasses modern methods.
In the author's words; "In my early blacksmithing years, I was lucky to get to know some old smiths who wrangled hot iron every day just to make a living. They unselfishly taught me traditional blacksmithing skills and knife forging methods. Every time I use those skills and methods, I honor their friendships, and by teaching you, the reader, we keep alive the memory of those old-time iron pounders."
Hardcover, 132 pages, 150 photos and illustrations, $29.95.

Create successful ePaper yourself
Turn your PDF publications into a flip-book with our unique Google optimized e-Paper software.
There will be one or two additional heats and taps on the anvil face to re-flatten and<br />
realign the billet. Straighten the handle along both the handle edge and the flat axis.<br />
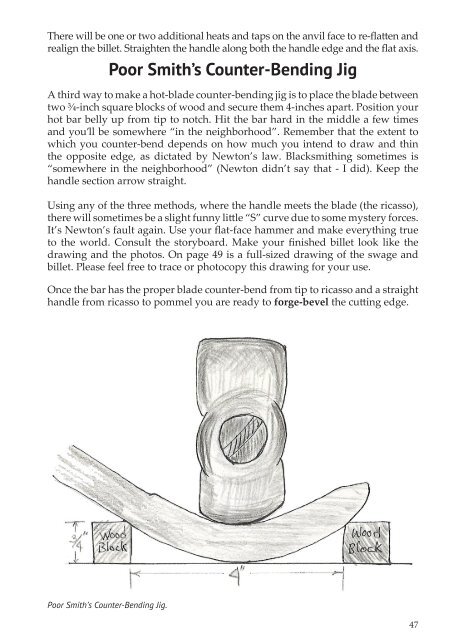
Poor Smith’s Counter-Bending Jig<br />
A third way to make a hot-blade counter-bending jig is to place the blade between<br />
two ¾-inch square blocks of wood and secure them 4-inches apart. Position your<br />
hot bar belly up from tip to notch. Hit the bar hard in the middle a few times<br />
and you’ll be somewhere “in the neighborhood”. Remember that the extent to<br />
which you counter-bend depends on how much you intend to draw and thin<br />
the opposite edge, as dictated by Newton’s law. <strong>Blacksmith</strong>ing sometimes is<br />
“somewhere in the neighborhood” (Newton didn’t say that - I did). Keep the<br />
handle section arrow straight.<br />
Using any of the three methods, where the handle meets the blade (the ricasso),<br />
there will sometimes be a slight funny little “S” curve due to some mystery forces.<br />
It’s Newton’s fault again. Use your flat-face hammer and make everything true<br />
to the world. Consult the storyboard. Make your finished billet look like the<br />
drawing and the photos. On page 49 is a full-sized drawing of the swage and<br />
billet. Please feel free to trace or photocopy this drawing for your use.<br />
Once the bar has the proper blade counter-bend from tip to ricasso and a straight<br />
handle from ricasso to pommel you are ready to forge-bevel the cutting edge.<br />
Poor Smith’s Counter-Bending Jig.<br />
47