Pump FZ-A - Bijur Delimon
Pump FZ-A - Bijur Delimon
Pump FZ-A - Bijur Delimon

You also want an ePaper? Increase the reach of your titles
YUMPU automatically turns print PDFs into web optimized ePapers that Google loves.
INDEX<br />
Page<br />
1. General ................................................................................. 2<br />
2. Safety .............................................................................. 2 – 4<br />
A <strong>Pump</strong> type ............................................................................ 5<br />
B Number of outlets ................................................................ 5<br />
C Inspection ............................................................................. 5<br />
D Kinds of drive ................................................................. 6 – 9<br />
E Position of drive .................................................................. 9<br />
F Reservoir ............................................................................ 10<br />
G Accessories ....................................................................... 10<br />
3. Application ......................................................................... 11<br />
4. Principle of operation ........................................................ 11<br />
5. Rotational direction of drive ............................................. 12<br />
6. Specifications .................................................................... 12<br />
7. Start-up ............................................................................... 12<br />
8. Maintenance ............................................................... 13 – 14<br />
9. Plates .................................................................................. 14<br />
Operating instructions<br />
<strong>Pump</strong> <strong>FZ</strong>-A<br />
Page 1 of 14 BA_2005_1_GB_<strong>FZ</strong>A
1. General<br />
Prior to start up, we recommend to read these operating instructions carefully as we do not assume any<br />
liability for damages and operating troubles which result from the nonobservance of these operating<br />
instructions!<br />
Any use beyond the applications described in these operating instructions is considered to be not in<br />
accordance with the product’s intended purposes. The manufacturer is not to be held responsible for any<br />
damages resulting from this: the user alone bears the corresponding risk.<br />
As to figures and indications in these operating instructions we reserve the right to make technical changes<br />
which might become necessary for improvements.<br />
The copyright on these operating instructions is kept reserved to the company DELIMON. These operating<br />
instructions are intended for the erecting, the operating and supervising personnel. They contain<br />
regulations and drawings of technical nature which must not – completely or partially - be distributed nor<br />
used nor communicated to others without authorization for competition purposes.<br />
Company address, spare parts and service address<br />
DELIMON Branch office<br />
Arminstraße 15 Am Bockwald 4<br />
D-40277 Düsseldorf D-08344 Grünhain-Beierfeld<br />
Phone : +49 211 77 74 0 E-mail : kontakt@bijurdelimon.com<br />
Fax : +49 211 77 74 210 www.bijurdelimon.com<br />
2. Safety<br />
These operating instructions contain fundamental instructions which are to be observed during erection,<br />
operation and maintenance. Therefore it is absolutely necessary for the fitter and the competent qualified<br />
staff/user to read these operating instructions before installation and start-up. The operating instructions<br />
must be available at all times at the place of use of the machine/system.<br />
Not only the general safety instructions stated under this main point “safety“ are to be observed, but also<br />
the other specific safety instructions stated under the other main points.<br />
2.1 Identification of safety warnings in the operating instructions<br />
The safety warnings contained in these operating instructions which, if not observed, may cause dangers to<br />
people, are specially marked with general danger symbols<br />
safety sign according to DIN 4844, warning about a danger spot ,<br />
in case of warning about electric voltage with<br />
safety sign according to DIN 4844, warning about dangerous electric voltage.<br />
In case of safety instructions which, if not observed, may cause damage to the machine and its function,<br />
the word<br />
ATTENTION<br />
is inserted.<br />
Instructions that are directly attached to the machine, as for example<br />
• rotational direction arrow<br />
• identifications for fluid connections<br />
must be observed at all events and maintained in a fully legible condition.<br />
• Note: There is an increased skid risk in case of spilled/leaked out lubricants. They are to be removed<br />
at once properly.<br />
Safety sign according to DIN 4844, warning about skid risk.<br />
Page 2 of 14 BA_2005_1_GB_<strong>FZ</strong>A
2. Safety (continuation)<br />
2.2 Personnel qualification and training<br />
The operating, maintaining, inspecting and erecting personnel must have the appropriate qualification for<br />
such work. Area of responsibility, competence and supervision of the personnel have to be regulated by<br />
the user. If the personnel do not have the necessary knowledge, they have to be trained and given<br />
instructions. This can be effected, if necessary, by the manufacturer/supplier on behalf of the user of the<br />
machine. Furthermore, the user has to make sure that the contents of the operating instructions are fully<br />
understood by the personnel.<br />
2.3 Dangers in case of nonobservance of the safety instructions<br />
The nonobservance of the safety instructions may result in hazards to persons, to the environment and to<br />
the machine. The nonobservance of the safety instructions may lead to the loss of any claims for<br />
damages.<br />
In detail, the nonobservance may for instance lead to the following hazards:<br />
• Failure of important functions of the machine/system<br />
• Failure of prescribed methods for maintenance and repair<br />
• Hazard to persons by electrical, mechanical and chemical influences<br />
• Hazard to the environment by the leakage of dangerous substances<br />
2.4 Safety conscious working<br />
The safety instructions stated in these operating instructions, the existing national regulations as to the<br />
accident preventation as well as possible internal working, operating and safety rules of the user are to be<br />
observed.<br />
2.5 Safety instructions for the user/operator<br />
• If hot or cold machine parts lead to dangers, these parts have to be protected against touch.<br />
• Protection against touch for moving parts (e. g. coupling) must not be removed when the machine is in<br />
operation.<br />
• Leakages (e. g. from the shaft seal) of hazardous goods to be delivered (e. g. explosive, toxic, hot)<br />
are to be removed in such a way that there is no danger to persons and environment. Legal rules are<br />
to be observed.<br />
• Hazards caused by electrical power are to be excluded (for details please refer for instance to the<br />
rules of the VDE and the local power supply companies).<br />
2.6 Safety instructions for maintenance, inspection and installation work<br />
The user has to take care that all the maintenance, inspection and installation work is executed by<br />
authorized and qualified skilled personnel who have informed themselves adequately by thoroughly<br />
studying the operating instructions.<br />
Basically, work on the machine is only to be carried out during shut-down. It is obligatory to observe the<br />
shut-down procedure described in the operating instructions.<br />
<strong>Pump</strong>s or pump aggregates that deliver media being hazardous to health have to be decontaminated.<br />
Immediately after completion of the work, all safety and protective equipments have to be reinstalled and/or<br />
reactivated.<br />
Dangers at the pump <strong>FZ</strong><br />
Danger of squeezing when closing the reservoir lid!<br />
When filling the reservoir while the pump is in operation, do not put your hand into the reservoir. Risk<br />
of injury by scraper and agitator.<br />
In case of drive by oscillating lever, there is an increased risk of injury in the area of the oscillating lever.<br />
During operation, the oscillating lever drive is to be protected against unintended touch by means of<br />
appropriate covers.<br />
When handling lubricants, avoid pollutions of the environment.<br />
For cleaning the outside of the pump use suitable solvent-free cleansing agents. Do not use high-pressure<br />
cleaning devices.<br />
Page 3 of 14 BA_2005_1_GB_<strong>FZ</strong>A
2. Safety (continuation)<br />
• Advice: When working with compressed air, do wear glasses.<br />
(DIN 4844 – Use breathing mask)<br />
• Advice: Observe EC-Safety Data Sheet for materials of consumption and additives used and use<br />
personal protective equipment.<br />
(DIN 4844 – Use breathing mask)<br />
Before recommissioning, observe the points stated in section “initial start-up“.<br />
2.7 Unauthorized conversion and manufacture of spare parts<br />
Conversion or modifications to the machine are only permitted when agreed with the manufacturer. Original<br />
spare parts and accessories authorized by the manufacturer serve to ensure safety. The use of other parts<br />
may render the liability for consequential losses null and void.<br />
2.8 Unacceptable modes of operation<br />
The operational reliability of the machine supplied is only guaranteed if the machine is used in accordance<br />
with its intended purposes as per section 1 - General - of the operating instructions. The limiting values<br />
specified in the data sheet must on no account be exceeded.<br />
2.9 Guidelines & standards<br />
1., 2. and 3. guideline (see data sheet: R&N_2009_1_GB)<br />
3.0 Notes on environmental protection and waste disposal<br />
In correct operation with lubricants, the components are subject to the special requirements set by<br />
environmental legislation.<br />
The general requirements for lubricants are specified in the respective safety data sheets.<br />
Used lubricants are hazardous forms of waste and therefore require special supervision in the sense of §<br />
41 paragraph 1 sentence 1 and paragraph 3 no. 1 of KrW-/AbfG (Closed-Loop Waste Management Act).<br />
Used oils must be handled in compliance with AltölV (Waste Oil Ordinance).<br />
The devices or components contaminated with lubricant must be disposed of by a certified waste<br />
management company.<br />
Records of proper waste management must be filed in conformance to NachwV (Ordinance on Waste<br />
Recovery and Disposal Records).<br />
Page 4 of 14 BA_2005_1_GB_<strong>FZ</strong>A
GENERAL PRODUCT CHARACTERISTICS<br />
• Central piston technique<br />
• Insert for anticlockwise and clockwise rotation<br />
• Feed volume per outlet up to 60cm 3 /h<br />
• Lubricants: oil, grease, liquid grease<br />
• Surface signal grey RAL 7004<br />
A PUMP TYPE <strong>FZ</strong>A<br />
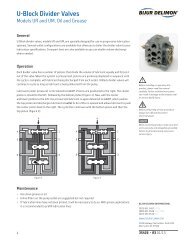
B NUMBER OF OUTLETS<br />
The outlets 1 - 6 are arranged in the upper row. Outlets being placed one above the other can only be<br />
joined in the order shown on the picture. Fusions begin at the outlets 1/7 and follow the direction of the<br />
arrow. Order of outlets see picture.<br />
The pump body comprises a control sleeve to guide the piston and, allocated to each outlet, a setting<br />
spindle to set the piston stroke and thus the delivery rate of each outlet (up to 6 outlets) or of two outlets<br />
together which are placed one above the other (7 up to 12 outlets).<br />
Designation and position of the outlets, order in case of combined outlets.<br />
When it deals with 2 outlets with half the total output volume each, one outlet of the upper and lower row<br />
can be opened.<br />
C INSPECTION<br />
Stage A<br />
Page 5 of 14 BA_2005_1_GB_<strong>FZ</strong>A
D. KINDS OF DRIVE<br />
Drive with oscillating lever<br />
The assembly group constitutes an extension of the assembly group drive with free shaft end containing<br />
those parts being necessary for the oscillating lever drive. The oscillating lever is reciprocated by a suitable<br />
component part of the machine to be lubricated via an eccentric, a crank and rod, and at the same time,<br />
the worm wheel is always turned – regardless of the rotational direction of the driving shaft - in the same<br />
direction via the switch mechanism.<br />
Drive with oscillating lever<br />
Page 6 of 14 BA_2005_1_GB_<strong>FZ</strong>A
D. KINDS OF DRIVE (continuation)<br />
Drive with free shaft end<br />
The assembly comprises the gearbox housing with the drive shaft and the worm wheel. The drive shaft is<br />
mounted in ball bearings. The plug screw is for filling the casing with oil. The plug screw is removed to<br />
facilitate the removal of the shaft with a mandrel.<br />
Rotary drive with free shaft end<br />
Page 7 of 14 BA_2005_1_GB_<strong>FZ</strong>A
D. KINDS OF DRIVE (continuation)<br />
Drive with reduction gear or with reduction gear and motor<br />
The assembly consists of the drive assembly with free shaft end, to which a second worm gear drive is<br />
added.<br />
Drive with reduction gear<br />
Page 8 of 14 BA_2005_1_GB_<strong>FZ</strong>A
D. KINDS OF DRIVE (continuation)<br />
Drive with reduction gear and motor<br />
E. POSITION OF DRIVE<br />
Position 1 left<br />
Position 5 right<br />
without<br />
Page 9 of 14 BA_2005_1_GB_<strong>FZ</strong>A
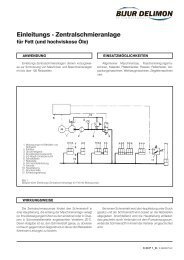
F. RESERVOIR<br />
The lid can be hinged upwards. It can be secured against unauthorized opening by a padlock. The tank<br />
contains a feed unit consisting of a scraper for scraping the grease from the tank wall and a feed screw for<br />
slightly pressurising the grease in the pump inlet chamber.<br />
A strainer is fitted in the bottom of the tank to protect the pump inlet chamber against dirt.<br />
G. ACCESSORIES<br />
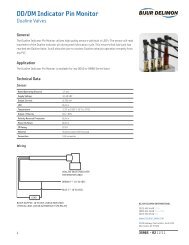
Level switch<br />
A level switch is available for the indication of the filling level in the reservoir. As sensor serves an<br />
ultrasonic sensor. As soon as the min. or max. level allowed has been obtained, a signal is released. With<br />
the help of a signal lamp at the reservoir, this signal can be used for the visual warning or for the control of<br />
an automatic filling facility. In case of receiving the order, we will attach particular operating instructions to<br />
the level switch with the following code: BA_2005_1_GB_76951_6011.<br />
Pressure control<br />
In case of receiving the order, we will attach particular operating instructions to the pressure control:<br />
PB_2005_1_GB_38132.<br />
Page 10 of 14 BA_2005_1_GB_<strong>FZ</strong>A
3. Application<br />
The pump <strong>FZ</strong>-A is designed as a single-piston pump with up to 12 outlets. It is predominantly intended for<br />
multiline - centralized lubrication systems. The pump is usually driven by the flange motor or by the<br />
machine to be lubricated via an oscillating lever or a coupling.<br />
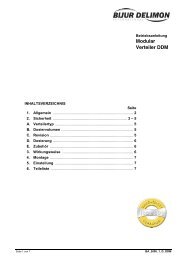
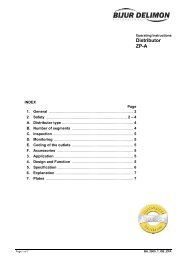
4. Principle of operation (figures 1 and 2)<br />
The top of the worm wheel (1) driven by a worm shaft is provided with 2 drivers with recesses in which a<br />
crosspiece (2) engages. In two other grooves of the crosspiece the drivers of the eccentric disk (3) engage<br />
and impart a rotary movement to the eccentric disk and the piston (4). The compression spring (5) located<br />
between the crosspiece and the eccentric disk presses the eccentric disk upwards. On its top surface the<br />
eccentric disk is provided with a cam which, due to its rotary movement, strikes the 6 setting spindles (6)<br />
arranged on the circumference of the pump and therefore forces the piston to perform one suction stroke<br />
each time.<br />
The lubricant is supplied to the pump inlet chamber (S) by a feed unit.<br />
The underside of the eccentric disk is provided with 6 cams. Due to the rotary movement the cams on the<br />
eccentric disk strike against a pressure cam (7), causing the piston to make a compression stroke each<br />
time. The piston has three vertical grooves (N), which terminate in an annular channel (R). On pumps with<br />
up to 12 (2 x 6) outlets the piston has two sets of three vertical grooves each terminating in an annular<br />
channel. During the suction stroke lubricant is drawn from the inlet chamber (S) into the vertical grooves of<br />
the piston and from there delivered into the annular channels (R). During the compression stroke the<br />
lubricant is delivered from the annular channel via a vertical groove into the pressure channel (D).<br />
In continuous operation the pump can overcome a backpressure of 200 bar. Transient pressures of up to<br />
250 bars are permitted. Safety valves can be installed in the discharge line as protection against overload.<br />
Fig. 1 Section through the pump <strong>FZ</strong>-A (6 outlets) Fig. 2 Principle of operation (<strong>FZ</strong>-A, 12 outlets)<br />
Page 11 of 14 BA_2005_1_GB_<strong>FZ</strong>A
5. Rotational direction of drive<br />
All pumps can be arranged for clockwise or anti-clockwise running, as required, with the same power and<br />
without modifications.<br />
6. Specifications<br />
Permissible back pressure: ............................................................................................................... 200 bar<br />
for a short time: .............................................................................................................. 250 bar<br />
Permissible pump piston speed:<br />
with running drive: ................................................................................................................... max. 10 r.p.m.<br />
with oscillating drive: .............................................................................................................. max. 16 r.p.m.<br />
Number of oscillating strokes: .............................................................................................. max. 300 min. -1<br />
In case that higher speed or less then < 1 is requested and also when distributors ZPA or E 4 are installed<br />
downstream, ask manufacturer.<br />
In case of using the oscillating lever drive, the lever rod should be installed in such a way, that the<br />
amplitude of the oscillating lever is same in both directions ∝ 1 = ∝ 2 = max. 50 o<br />
Lever amplitude max. : ........................................................................................................................... 100 o<br />
Lever amplitude min. : ............................................................................................................................. 10 o<br />
7. Start-up<br />
Installing and connecting the lubricating pump<br />
The pump should be installed and mounted vertically. Connection of the motor to be control box must be<br />
carried out in accordance with the circuit diagram (paragraph concerning the direction of drive rotation to be<br />
observed).<br />
Filling the lubricant tank and piping<br />
All piping must be carefully cleaned before descaling and blowing through and filled with clean grease<br />
using a grease gun. For initial start-up, the grease tank is first filled up to the strainer with oil and then with<br />
grease, because otherwise a longer start-up time is required to allow venting. Before connecting the piping<br />
the pump must operate long enough at full capacity to ensure that the grease emerges evenly and without<br />
air from each outlet. Next, the piping should be connected (use sealing washers), until air-free grease<br />
emerges at the ends of the piping.<br />
Once the bearings to be lubricated are also filled with grease, the piping can be connected to the lubricating<br />
points. The system can be started after adjustment of the required lubricant quantity.<br />
Setting the delivery rate (figure 3)<br />
At full capacity, corresponding to 0.1 cm 3 lubricant per discharge and piston stroke, an arrow on the<br />
discharge identification points to the number 4 stamped on the head of the setting spindle (2.5). By turning<br />
the spindle clockwise the delivery is reduced. Reduction below 1/4 of the max. delivery (setting 1) should<br />
be avoided. In case of pumps having 7 to 12 outlets, the delivery rate of two vertically arranged outlets is<br />
adjusted by means of an adjusting spindle. The second arrow of the discharge identification points to the<br />
outlet bore relating to the setting spindle.<br />
By changing the drive speed or the internal gear ratio of the pump or also by changing the altitude of the<br />
oscillating lever, the output volume of all outlets and thus the overall output volume is changed.<br />
Page 12 of 14 BA_2005_1_GB_<strong>FZ</strong>A
Figure 3 <strong>Pump</strong> body <strong>FZ</strong>-A<br />
* In case that the outlet bores are closed by item no. 2.17, item nos. 2.18 and 2.19 are to be removed<br />
from the pertaining relieving bores.<br />
8. Maintenance<br />
Filling the grease tank<br />
As soon as approximately 3/4 of the tank capacity are consumed, the grease tank should be refilled. The<br />
grease level should never drop to a level where the feed screw is visible, because air may otherwise<br />
penetrate into the piping. During filling, care should be taken to ensure that only clean grease is used and<br />
no dirt penetrates into the tank when the cover is opened, because this may result in malfunctioning. Filling<br />
via a filling valve and firmly installed pipelines is at all events to be preferred.<br />
Changing the number of outlets (figure 3)<br />
The pump is supplied with the required number of outlets in accordance with the order. If other operating<br />
conditions should arise, i.e. if outlets have to be blanked off or opened, the following procedure should be<br />
followed.<br />
An outlet is blanked off by connecting the pressure channel to the pump inlet chamber. For this purpose the<br />
top discharge channels are joined to the pump inlet chamber by threaded connections. To blank off an<br />
upper outlet, the tank is removed and the cap screw M 4 x 6 (2.19) is removed from its threaded hole.<br />
When opening a blanked-off outlet, the cap screw should be screwed in, taking care to ensure good<br />
tightness by means of the sealing A 4 x 8 (2.18). Generally the associated outlet is either closed by means<br />
of a screw plug (2.17) or opened by removing the plug.<br />
If it deals with of pumps having two vertically arranged outlets, and the lower outlet shall also be shut down,<br />
you have to remove the setting spindle (2.5), the ball (2.6) and the compression spring (2.7). Before taking<br />
out the spindle, unscrew the shank screw (2.9). After this, insert the plug (2.20) in the bore of the setting<br />
spindle. For a later installation of the setting spindle, successively insert – after having unscrewed the<br />
shank screw (2.9) with sealing ring (2.8) – the ball and the compression spring. The locating screw brings<br />
spring and ball into the correct position as far as the shank meshes analogously with the spiral groove of<br />
the setting spindle on the occasion of the screwing-in process which now follows. Advantageously, you<br />
should use a new sealing ring and lubricate both ball and spring prior to inserting them.<br />
When two outlets, which are arranged one upon the other, are shut down for a short time, the setting<br />
spindle is to be set to 0, and the outlets must not be closed. Use plastic plugs instead of screw plugs (2.17)<br />
to allow accidentally occurring delivery rates to escape and to thus avoid overpressure.<br />
ATTENTION!<br />
If the number of outlets is modified improperly, damage to the pump cannot be avoided.<br />
Page 13 of 14 BA_2005_1_GB_<strong>FZ</strong>A
8. Maintenance (continuation)<br />
Removal of the drive shaft (see figure)<br />
After removing the spring washer (3.11) and the cap, the circlip (3.13) should be removed. After loosening<br />
the plug (3.20) the drive shaft (3.12) including the roller bearings (3.17) and the sleeve (3.16) can be driven<br />
out using a copper dowel and a hammer.<br />
Gearboxes:<br />
The gearboxes are filled with lubricant type grease, Gearmaster LX00 (Messrs. Lubritech) or something<br />
comparable by the manufacturer. The filling should only be renewed when the gearbox is dismantled and<br />
cleaned.<br />
Filling plugs:<br />
Main gearbox 3.9<br />
Reduction gear 3.20<br />
9. Plates<br />
Name plate 110 x 60 mm (75511-1531) Type plate 110 x 60 mm (75511-1321)<br />
Page 14 of 14 BA_2005_1_GB_<strong>FZ</strong>A