Lenovo C3/C4/C5 Series
Lenovo C3/C4/C5 Series
Lenovo C3/C4/C5 Series
Create successful ePaper yourself
Turn your PDF publications into a flip-book with our unique Google optimized e-Paper software.
Replacing the optical drive<br />
Attention: Turn off the computer and wait 3 to 5 minutes to let it cool<br />
down before removing the cover.<br />
Note: It may be helpful to place the computer face-down on a soft flat<br />
surface for this procedure. <strong>Lenovo</strong> recommends that you use a blanket,<br />
towel, or other soft cloth to protect the touch screen from scratches or<br />
other damage.<br />
1. Remove any media (disks, CDs, or memory cards) from the drives, shut down<br />
the operating system, and turn off the computer and all attached devices.<br />
2. Unplug all power cords from electrical outlets.<br />
3. Disconnect all cables attached to the computer. This includes power cords,<br />
input/output (I/O) cables, and any other cables that are connected to the<br />
computer. Refer to “Left and right views” and “Rear view” for help with locating<br />
the various connectors.<br />
4. Remove the stand base. Refer to “Removing the stand base”.<br />
5. Remove the foot cover. Refer to “Removing the foot cover”.<br />
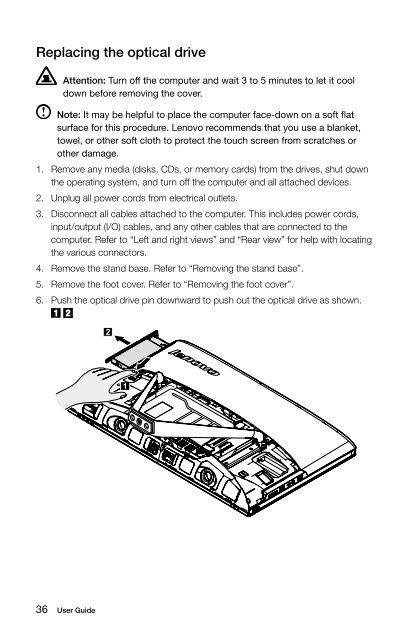
6. Push the optical drive pin downward to push out the optical drive as shown.<br />
36 User Guide


