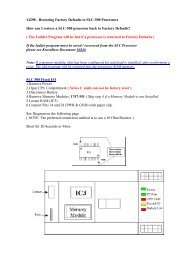
32324 - PanelView Plus Communications with MicroLogix
32324 - PanelView Plus Communications with MicroLogix
32324 - PanelView Plus Communications with MicroLogix

Create successful ePaper yourself
Turn your PDF publications into a flip-book with our unique Google optimized e-Paper software.
� Make sure that RSLinx has still stopped the driver.<br />
� Check the cabling.<br />
� Check that the devices have power.<br />
� Recheck your IP settings.<br />
10. The Local tab is now configured. That means it has the settings for<br />
connecting the PC to the other devices.<br />
Now you need to configure the Target tab, which has settings for connecting the<br />
<strong>PanelView</strong> <strong>Plus</strong> to its devices.<br />
On the Target tab, right-click on the Computer icon.<br />
11. Select Add Driver.<br />
Use the Serial DF1 driver again.<br />
12. The device is again a SLC or <strong>MicroLogix</strong>. Use Auto-Configure.<br />
13. Unlike the Local tab, on the Target tab, you must add devices yourself.<br />
Right-click on the DF1 driver.<br />
14. Select Add device.<br />
15. The <strong>MicroLogix</strong> is located under the following:<br />
PCCC DH485 devices -> SLC DH485 Devices -> 1761-xxxx xA <strong>MicroLogix</strong> 1500<br />
LRP, <strong>MicroLogix</strong> 1500 LRP<br />
You can call it whatever you want, but unless you changed the node number of the<br />
<strong>MicroLogix</strong>, the node number will still be 1.<br />
16. While still in the Communication setup, you must create shortcuts so the<br />
program knows how to access its variables. To do this, complete the following:<br />
a. Click the Add button. This adds a shortcut for our application which we<br />
can link to different devices.<br />
General practice is to give it the same name as you named your processor in RSLogix<br />
500.<br />
b. With the new shortcut selected, in the Target tab, also select the<br />
<strong>MicroLogix</strong>.<br />
well.<br />
c. To save the link, press the Apply button. Repeat this for the Local tab as<br />
d. Select your shortcut name and your <strong>MicroLogix</strong> at the same time.<br />
e. Click Apply.<br />
f. Click OK.<br />
17. In the Application Explorer, right-click on Displays.<br />
18. Select New.<br />
19. For the <strong>MicroLogix</strong> application above, the addresses the <strong>PanelView</strong> wants<br />
to communicate <strong>with</strong> are: