
Create successful ePaper yourself
Turn your PDF publications into a flip-book with our unique Google optimized e-Paper software.
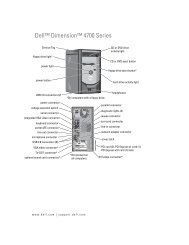
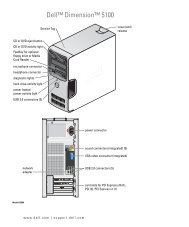
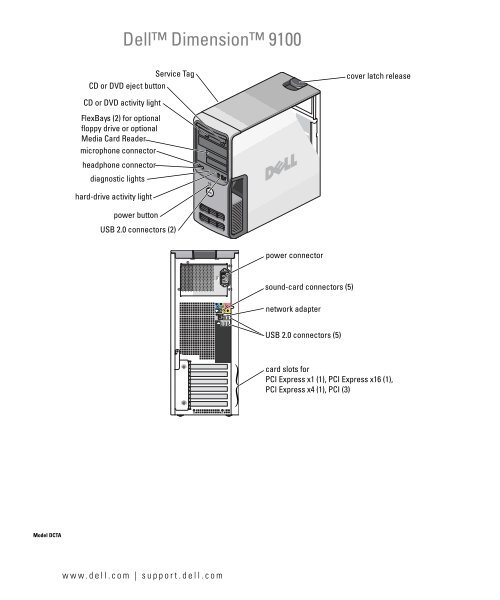
Model DCTA<br />
FlexBays (2) for optional<br />
floppy drive or optional<br />
Media Card Reader<br />
microphone connector<br />
headphone connector<br />
hard-drive activity light<br />
<strong>Dell</strong> Dimension <strong>9100</strong><br />
CD or DVD eject button<br />
CD or DVD activity light<br />
diagnostic lights<br />
power button<br />
Service Tag<br />
USB 2.0 connectors (2)<br />
www.dell.com | support.dell.com<br />
power connector<br />
sound-card connectors (5)<br />
network adapter<br />
USB 2.0 connectors (5)<br />
cover latch release<br />
card slots for<br />
PCI Express x1 (1), PCI Express x16 (1),<br />
PCI Express x4 (1), PCI (3)
Notes, Notices, and Cautions<br />
NOTE: A NOTE indicates important information that helps you make better use of your computer.<br />
NOTICE: A NOTICE indicates either potential damage to hardware or loss of data and tells you how to avoid the<br />
problem.<br />
CAUTION: A CAUTION indicates a potential for property damage, personal injury, or death.<br />
If you purchased a <strong>Dell</strong> n Series computer, any references in this document to Microsoft ® Windows ®<br />
operating systems are not applicable.<br />
____________________<br />
Information in this document is subject to change without notice.<br />
© 2005 <strong>Dell</strong> Inc. All rights reserved.<br />
Reproduction in any manner whatsoever without the written permission of <strong>Dell</strong> Inc. is strictly forbidden.<br />
Trademarks used in this text: <strong>Dell</strong>, the DELL logo, Inspiron, <strong>Dell</strong> Precision, Dimension, OptiPlex, Latitude, PowerEdge, PowerVault, PowerApp,<br />
<strong>Dell</strong>Net, and PowerConnect are trademarks of <strong>Dell</strong> Inc.; Intel and Pentium, and Intel SpeedStep are registered trademarks of Intel Corporation;<br />
Microsoft, Windows, and Outlook are registered trademarks of Microsoft Corporation.<br />
Other trademarks and trade names may be used in this document to refer to either the entities claiming the marks and names or their products.<br />
<strong>Dell</strong> Inc. disclaims any proprietary interest in trademarks and trade names other than its own.<br />
Model DCTA<br />
March 2005 P/N D8663 Rev. A00
Contents<br />
Finding Information . . . . . . . . . . . . . . . . . . . . . . . . . . . . . . . . 9<br />
1 Setting Up and Using Your Computer<br />
Setting Up a Printer . . . . . . . . . . . . . . . . . . . . . . . . . . . . . . . 13<br />
Printer Cable . . . . . . . . . . . . . . . . . . . . . . . . . . . . . . . . 13<br />
Connecting a USB Printer. . . . . . . . . . . . . . . . . . . . . . . . . . 14<br />
Connecting to the Internet . . . . . . . . . . . . . . . . . . . . . . . . . . . . 14<br />
Setting Up Your Internet Connection . . . . . . . . . . . . . . . . . . . . 15<br />
Playing CDs and DVDs . . . . . . . . . . . . . . . . . . . . . . . . . . . . . . 16<br />
Adjusting the Volume . . . . . . . . . . . . . . . . . . . . . . . . . . . . 17<br />
Adjusting the Picture . . . . . . . . . . . . . . . . . . . . . . . . . . . . 18<br />
Copying CDs and DVDs. . . . . . . . . . . . . . . . . . . . . . . . . . . . . . 18<br />
How to Copy a CD or DVD. . . . . . . . . . . . . . . . . . . . . . . . . . 18<br />
Using Blank CD-Rs and CD-RWs . . . . . . . . . . . . . . . . . . . . . . 19<br />
Helpful Tips . . . . . . . . . . . . . . . . . . . . . . . . . . . . . . . . . 19<br />
Using a Media Card Reader (Optional) . . . . . . . . . . . . . . . . . . . . . 20<br />
Connecting Two Monitors . . . . . . . . . . . . . . . . . . . . . . . . . . . . 21<br />
Connecting Two Monitors With VGA Connectors . . . . . . . . . . . . . 22<br />
Connecting One Monitor With a VGA Connector and One Monitor<br />
With a DVI Connector. . . . . . . . . . . . . . . . . . . . . . . . . . . . 22<br />
Connecting a TV . . . . . . . . . . . . . . . . . . . . . . . . . . . . . . 23<br />
Changing the Display Settings . . . . . . . . . . . . . . . . . . . . . . . 23<br />
Setting Up a Home and Office Network . . . . . . . . . . . . . . . . . . . . . 24<br />
Connecting to a Network Adapter . . . . . . . . . . . . . . . . . . . . . 24<br />
Network Setup Wizard . . . . . . . . . . . . . . . . . . . . . . . . . . . 24<br />
Power Management . . . . . . . . . . . . . . . . . . . . . . . . . . . . . . . 25<br />
Standby Mode . . . . . . . . . . . . . . . . . . . . . . . . . . . . . . . 25<br />
Hibernate Mode. . . . . . . . . . . . . . . . . . . . . . . . . . . . . . . 25<br />
Power Options Properties . . . . . . . . . . . . . . . . . . . . . . . . . 26<br />
Contents 3
4 Contents<br />
IEEE 1394 . . . . . . . . . . . . . . . . . . . . . . . . . . . . . . . . . . . . . 27<br />
Hyper-Threading . . . . . . . . . . . . . . . . . . . . . . . . . . . . . . . . . 28<br />
2 Solving Problems<br />
Troubleshooting Tips . . . . . . . . . . . . . . . . . . . . . . . . . . . . . . . 29<br />
Battery Problems. . . . . . . . . . . . . . . . . . . . . . . . . . . . . . . . . 29<br />
Drive Problems . . . . . . . . . . . . . . . . . . . . . . . . . . . . . . . . . . 30<br />
CD and DVD drive problems . . . . . . . . . . . . . . . . . . . . . . . . 30<br />
Hard drive problems . . . . . . . . . . . . . . . . . . . . . . . . . . . . 31<br />
E-Mail, Modem, and Internet Problems . . . . . . . . . . . . . . . . . . . . . 31<br />
Error Messages . . . . . . . . . . . . . . . . . . . . . . . . . . . . . . . . . 33<br />
Media Card Reader Problems . . . . . . . . . . . . . . . . . . . . . . . . . . 34<br />
Keyboard Problems . . . . . . . . . . . . . . . . . . . . . . . . . . . . . . . 34<br />
Lockups and Software Problems . . . . . . . . . . . . . . . . . . . . . . . . 35<br />
The computer does not start up . . . . . . . . . . . . . . . . . . . . . . 35<br />
The computer stops responding . . . . . . . . . . . . . . . . . . . . . . 35<br />
A program stops responding . . . . . . . . . . . . . . . . . . . . . . . . 35<br />
A program crashes repeatedly . . . . . . . . . . . . . . . . . . . . . . . 35<br />
A program is designed for an earlier Windows operating system . . . . . 36<br />
A solid blue screen appears . . . . . . . . . . . . . . . . . . . . . . . . 36<br />
Other software problems . . . . . . . . . . . . . . . . . . . . . . . . . . 36<br />
Memory Problems . . . . . . . . . . . . . . . . . . . . . . . . . . . . . . . . 37<br />
Mouse Problems . . . . . . . . . . . . . . . . . . . . . . . . . . . . . . . . . 37<br />
Network Problems . . . . . . . . . . . . . . . . . . . . . . . . . . . . . . . . 38<br />
Power Problems . . . . . . . . . . . . . . . . . . . . . . . . . . . . . . . . . 39<br />
Printer Problems . . . . . . . . . . . . . . . . . . . . . . . . . . . . . . . . . 40<br />
Scanner Problems . . . . . . . . . . . . . . . . . . . . . . . . . . . . . . . . 40<br />
Sound and Speaker Problems . . . . . . . . . . . . . . . . . . . . . . . . . . 41<br />
No sound from speakers . . . . . . . . . . . . . . . . . . . . . . . . . . 41<br />
No sound from headphones . . . . . . . . . . . . . . . . . . . . . . . . 42
Video and Monitor Problems . . . . . . . . . . . . . . . . . . . . . . . . . . 42<br />
If the screen is blank . . . . . . . . . . . . . . . . . . . . . . . . . . . . 42<br />
If the screen is difficult to read . . . . . . . . . . . . . . . . . . . . . . . 43<br />
3 Troubleshooting Tools<br />
Diagnostic Lights. . . . . . . . . . . . . . . . . . . . . . . . . . . . . . . . . 45<br />
<strong>Dell</strong> Diagnostics . . . . . . . . . . . . . . . . . . . . . . . . . . . . . . . . . 48<br />
<strong>Dell</strong> Diagnostics Main Menu . . . . . . . . . . . . . . . . . . . . . . . . 48<br />
Drivers . . . . . . . . . . . . . . . . . . . . . . . . . . . . . . . . . . . . . . 49<br />
What Is a Driver? . . . . . . . . . . . . . . . . . . . . . . . . . . . . . . 49<br />
Identifying Drivers . . . . . . . . . . . . . . . . . . . . . . . . . . . . . 50<br />
Reinstalling Drivers . . . . . . . . . . . . . . . . . . . . . . . . . . . . . 50<br />
Resolving Software and Hardware Incompatibilities . . . . . . . . . . . . . 51<br />
Restoring Your Operating System . . . . . . . . . . . . . . . . . . . . . . . . 51<br />
Using Microsoft Windows XP System Restore . . . . . . . . . . . . . . . 52<br />
Using <strong>Dell</strong> PC Restore by Symantec . . . . . . . . . . . . . . . . . . . . 53<br />
4 Removing and Installing Parts<br />
Before You Begin. . . . . . . . . . . . . . . . . . . . . . . . . . . . . . . . . 55<br />
Recommended Tools . . . . . . . . . . . . . . . . . . . . . . . . . . . . 55<br />
Turn Off Your Computer . . . . . . . . . . . . . . . . . . . . . . . . . . . 55<br />
Before Working Inside Your Computer . . . . . . . . . . . . . . . . . . . 56<br />
Front View of the Computer . . . . . . . . . . . . . . . . . . . . . . . . . . . 57<br />
Back View of the Computer . . . . . . . . . . . . . . . . . . . . . . . . . . . 59<br />
Removing the Computer Cover. . . . . . . . . . . . . . . . . . . . . . . . . . 60<br />
Inside View of Your Computer . . . . . . . . . . . . . . . . . . . . . . . . . . 62<br />
System Board Components. . . . . . . . . . . . . . . . . . . . . . . . . . . . 63<br />
Memory. . . . . . . . . . . . . . . . . . . . . . . . . . . . . . . . . . . . . . 64<br />
Memory Overview . . . . . . . . . . . . . . . . . . . . . . . . . . . . . 64<br />
Installing Memory. . . . . . . . . . . . . . . . . . . . . . . . . . . . . . 66<br />
Removing Memory . . . . . . . . . . . . . . . . . . . . . . . . . . . . . 68<br />
Contents 5
6 Contents<br />
Cards . . . . . . . . . . . . . . . . . . . . . . . . . . . . . . . . . . . . . . . 68<br />
PCI Cards . . . . . . . . . . . . . . . . . . . . . . . . . . . . . . . . . . 69<br />
PCI Express Cards . . . . . . . . . . . . . . . . . . . . . . . . . . . . . 73<br />
Drive Panels . . . . . . . . . . . . . . . . . . . . . . . . . . . . . . . . . . . 82<br />
Removing the Drive Panel . . . . . . . . . . . . . . . . . . . . . . . . . 82<br />
Removing the Drive-Panel Insert . . . . . . . . . . . . . . . . . . . . . . 83<br />
Replacing the Drive-Panel Insert . . . . . . . . . . . . . . . . . . . . . . 84<br />
Replacing the Drive Panel . . . . . . . . . . . . . . . . . . . . . . . . . 84<br />
Drives. . . . . . . . . . . . . . . . . . . . . . . . . . . . . . . . . . . . . . . 85<br />
General Installation Guidelines . . . . . . . . . . . . . . . . . . . . . . . 85<br />
Hard Drive . . . . . . . . . . . . . . . . . . . . . . . . . . . . . . . . . . . . 86<br />
Removing a Hard Drive . . . . . . . . . . . . . . . . . . . . . . . . . . . 87<br />
Installing a Hard Drive . . . . . . . . . . . . . . . . . . . . . . . . . . . 88<br />
Adding a Second Hard Drive . . . . . . . . . . . . . . . . . . . . . . . . 89<br />
Floppy Drive . . . . . . . . . . . . . . . . . . . . . . . . . . . . . . . . . . . 91<br />
Removing a Floppy Drive . . . . . . . . . . . . . . . . . . . . . . . . . . 91<br />
Installing a Floppy Drive . . . . . . . . . . . . . . . . . . . . . . . . . . 93<br />
Media Card Reader . . . . . . . . . . . . . . . . . . . . . . . . . . . . . . . 93<br />
Removing a Media Card Reader . . . . . . . . . . . . . . . . . . . . . . 93<br />
Installing a Media Card Reader. . . . . . . . . . . . . . . . . . . . . . . 95<br />
CD/DVD Drive. . . . . . . . . . . . . . . . . . . . . . . . . . . . . . . . . . . 97<br />
Removing a CD/DVD Drive . . . . . . . . . . . . . . . . . . . . . . . . . 98<br />
Installing a CD/DVD Drive. . . . . . . . . . . . . . . . . . . . . . . . . . 99<br />
Battery . . . . . . . . . . . . . . . . . . . . . . . . . . . . . . . . . . . . . 101<br />
Replacing the Battery. . . . . . . . . . . . . . . . . . . . . . . . . . . 101<br />
Replacing the Computer Cover . . . . . . . . . . . . . . . . . . . . . . . . 102<br />
5 Appendix<br />
Specifications . . . . . . . . . . . . . . . . . . . . . . . . . . . . . . . . . 103<br />
System Setup . . . . . . . . . . . . . . . . . . . . . . . . . . . . . . . . . . 107<br />
Overview . . . . . . . . . . . . . . . . . . . . . . . . . . . . . . . . . 107<br />
Entering System Setup . . . . . . . . . . . . . . . . . . . . . . . . . . 108<br />
System Setup Options. . . . . . . . . . . . . . . . . . . . . . . . . . . 110<br />
Boot Sequence . . . . . . . . . . . . . . . . . . . . . . . . . . . . . . 113
Clearing Forgotten Passwords. . . . . . . . . . . . . . . . . . . . . . . . . 114<br />
Clearing CMOS Settings . . . . . . . . . . . . . . . . . . . . . . . . . . . . 115<br />
Cleaning Your Computer . . . . . . . . . . . . . . . . . . . . . . . . . . . . 116<br />
Computer, Keyboard, and Monitor . . . . . . . . . . . . . . . . . . . . 116<br />
Mouse . . . . . . . . . . . . . . . . . . . . . . . . . . . . . . . . . . . 116<br />
Floppy Drive . . . . . . . . . . . . . . . . . . . . . . . . . . . . . . . . 116<br />
CDs and DVDs. . . . . . . . . . . . . . . . . . . . . . . . . . . . . . . 117<br />
<strong>Dell</strong> Technical <strong>Support</strong> Policy (U.S. Only) . . . . . . . . . . . . . . . . . . . 117<br />
Definition of "<strong>Dell</strong>-Installed" Software and Peripherals . . . . . . . . . 117<br />
Definition of "Third-Party" Software and Peripherals. . . . . . . . . . . 118<br />
FCC Notices (U.S. Only) . . . . . . . . . . . . . . . . . . . . . . . . . . . . 118<br />
Class A . . . . . . . . . . . . . . . . . . . . . . . . . . . . . . . . . . 118<br />
Class B . . . . . . . . . . . . . . . . . . . . . . . . . . . . . . . . . . 118<br />
FCC Identification Information . . . . . . . . . . . . . . . . . . . . . . 119<br />
Contacting <strong>Dell</strong>. . . . . . . . . . . . . . . . . . . . . . . . . . . . . . . . . 119<br />
Index . . . . . . . . . . . . . . . . . . . . . . . . . . . . . . . . . . . . . . . . 137<br />
Contents 7
8 Contents
Finding Information<br />
What Are You Looking For? Find It Here<br />
Warranty information<br />
Terms and conditions (U.S. only)<br />
Safety instructions<br />
Regulatory information<br />
Ergonomics information<br />
End User License Agreement<br />
How to set up my computer Setup Diagram<br />
<strong>Dell</strong> Product Information Guide<br />
NOTE: This document is available as a PDF at<br />
support.dell.com.<br />
Finding Information 9
www.dell.com | support.dell.com<br />
What Are You Looking For? Find It Here<br />
Service Tag and Express Service Code<br />
Microsoft Windows License Label<br />
10 Finding Information<br />
Service Tag and Microsoft Windows License<br />
These labels are located on your computer.<br />
Use the Service Tag to<br />
identify your<br />
computer when you<br />
use support.dell.com<br />
or contact technical<br />
support.<br />
Enter the Express<br />
Service Code to direct your call when contacting<br />
technical support. The Express Service Code is not<br />
available in all countries.
What Are You Looking For? Find It Here<br />
Solutions — Troubleshooting hints and tips, articles<br />
from technicians, online courses, frequently asked<br />
questions<br />
Community — Online discussion with other <strong>Dell</strong><br />
customers<br />
Upgrades — Upgrade information for components, such<br />
as memory, the hard drive, and the operating system<br />
Customer Care — Contact information, service call and<br />
order status, warranty, and repair information<br />
Service and support — Service call status and support<br />
history, service contract, online discussions with<br />
technical support<br />
Reference — Computer documentation, details on my<br />
computer configuration, product specifications, and<br />
white papers<br />
Downloads — Certified drivers, patches, and software<br />
updates<br />
Desktop System Software (DSS)— If you reinstall the<br />
operating system for your computer, you should also<br />
reinstall the DSS utility. DSS provides critical updates<br />
for your operating system and support for <strong>Dell</strong><br />
3.5-inch USB floppy drives, Intel ® Pentium ® M<br />
processors, optical drives, and USB devices. DSS is<br />
necessary for correct operation of your <strong>Dell</strong> computer.<br />
The software automatically detects your computer and<br />
operating system and installs the updates appropriate<br />
for your configuration.<br />
To download Desktop System Software:<br />
1 Go to support.dell.com and click Downloads.<br />
2 Enter your Service Tag or product model.<br />
3 In the Download Category drop-down menu, click All.<br />
4 Select the operating system and operating system<br />
language for your computer, and click Submit.<br />
5 Under Select a Device, scroll to System and<br />
Configuration Utilities, and click <strong>Dell</strong> Desktop System<br />
Software.<br />
<strong>Dell</strong> <strong>Support</strong> Website — support.dell.com<br />
NOTE: Select your region to view the appropriate support<br />
site.<br />
NOTE: Corporate, government, and education customers<br />
can also use the customized <strong>Dell</strong> Premier <strong>Support</strong> website<br />
at premier.support.dell.com. The website may not be<br />
available in all regions.<br />
Finding Information 11
www.dell.com | support.dell.com<br />
What Are You Looking For? Find It Here<br />
How to use Windows XP<br />
Documentation for my computer<br />
Documentation for devices (such as a modem)<br />
12 Finding Information<br />
Windows Help and <strong>Support</strong> Center<br />
1 Click the Start button and click Help and <strong>Support</strong>.<br />
2 Type a word or phrase that describes your problem and<br />
click the arrow icon.<br />
3 Click the topic that describes your problem.<br />
4 Follow the instructions on the screen.
Setting Up and Using Your Computer<br />
Setting Up a Printer<br />
NOTICE: Complete the operating system setup before you connect a printer to the computer.<br />
See the documentation that came with the printer for setup information, including how to:<br />
Obtain and install updated drivers<br />
Connect the printer to the computer<br />
Load paper and install the toner or ink cartridge<br />
Contact the printer manufacturer for technical assistance<br />
Printer Cable<br />
Your printer connects to your computer with a USB cable. Your printer may not come with a printer<br />
cable, so if you purchase a cable separately, ensure that it is compatible with your printer. If you<br />
purchased a printer cable at the same time you purchased your computer, the cable may arrive in<br />
the computer box.<br />
Setting Up and Using Your Computer 13
www.dell.com | support.dell.com<br />
Connecting a USB Printer<br />
NOTE: You can connect USB devices while the computer is turned on.<br />
1 Complete the operating system setup, if you have not already done so.<br />
2 Install the printer driver if necessary. See the documentation that came with your printer.<br />
3 Attach the USB printer cable to the USB connectors on the computer and the printer. The<br />
USB connectors fit only one way.<br />
Connecting to the Internet<br />
NOTE: ISPs and ISP offerings vary by country.<br />
To connect to the Internet, you need a modem or network connection and an Internet service<br />
provider (ISP), such as AOL or MSN. Your ISP will offer one or more of the following Internet<br />
connection options:<br />
Dial-up connections that provide Internet access through a telephone line. Dial-up<br />
connections are considerably slower than DSL and cable modem connections.<br />
DSL connections that provide high-speed Internet access through your existing telephone<br />
line. With a DSL connection, you can access the Internet and use your telephone on the same<br />
line simultaneously.<br />
Cable modem connections that provide high-speed Internet access through your local cable<br />
TV line.<br />
14 Setting Up and Using Your Computer<br />
USB connector on computer<br />
USB printer cable<br />
USB connector<br />
on printer
NOTE: If you use a dial-up connection, you need an add-in PCI modem expansion card.<br />
If you are using a dial-up connection, connect a telephone line to the modem connector on your<br />
computer and to the telephone wall jack before you set up your Internet connection. If you are<br />
using a DSL or cable modem connection, contact your ISP for setup instructions.<br />
Setting Up Your Internet Connection<br />
To set up an AOL or MSN connection:<br />
1 Save and close any open files, and exit any open programs.<br />
2 Double-click the MSN Explorer or AOL icon on the Microsoft ® Windows ® desktop.<br />
3 Follow the instructions on the screen to complete the setup.<br />
If you do not have an MSN Explorer or AOL icon on your desktop or if you want to set up an<br />
Internet connection with a different ISP:<br />
1 Save and close any open files, and exit any open programs.<br />
2 Click the Start button and click Internet Explorer.<br />
The New Connection Wizard appears.<br />
3 Click Connect to the Internet.<br />
4 In the next window, click the appropriate option:<br />
If you do not have an ISP and want to select one, click Choose from a list of Internet<br />
service providers (ISPs).<br />
If you have already obtained setup information from your ISP but you did not receive a<br />
setup CD, click Set up my connection manually.<br />
If you have a CD, click Use the CD I got from an ISP.<br />
5 Click Next.<br />
If you selected Set up my connection manually, continue to step 6. Otherwise, follow the<br />
instructions on the screen to complete the setup.<br />
NOTE: If you do not know which type of connection to select, contact your ISP.<br />
6 Click the appropriate option under How do you want to connect to the Internet?, and then<br />
click Next.<br />
7 Use the setup information provided by your ISP to complete the setup.<br />
If you are having problems connecting to the Internet, see "E-Mail, Modem, and Internet<br />
Problems" on page 31. If you cannot connect to the Internet but have successfully connected in the<br />
past, the ISP might have a service outage. Contact your ISP to check the service status, or try<br />
connecting again later.<br />
Setting Up and Using Your Computer 15
www.dell.com | support.dell.com<br />
Playing CDs and DVDs<br />
NOTICE: Do not press down on the CD or DVD tray when you open or close it. Keep the tray closed when<br />
you are not using the drive.<br />
NOTICE: Do not move the computer when you are playing CDs or DVDs.<br />
1 Press the eject button on the front of the drive.<br />
2 Place the disc, label side up, in the center of the tray.<br />
3 Press the eject button or gently push in the tray.<br />
To format CDs for storing data, to create music CDs, or to copy CDs, see the CD software that<br />
came with your computer.<br />
NOTE: Ensure that you follow all copyright laws when you create CDs.<br />
A CD player includes the following basic buttons:<br />
Play<br />
16 Setting Up and Using Your Computer<br />
Move backward within the current track<br />
Pause<br />
Move forward within the current track<br />
Stop<br />
Go to the previous track
A DVD player includes the following basic buttons:<br />
For more information on playing CDs or DVDs, click Help on the CD or DVD player (if available).<br />
Adjusting the Volume<br />
Eject<br />
Go to the next track<br />
Stop<br />
Restart the current chapter<br />
Play<br />
Fast forward<br />
Pause<br />
Fast reverse<br />
Advance a single frame while in pause mode<br />
Go to the next title or chapter<br />
Continuously play the current title or chapter<br />
Go to the previous title or chapter<br />
Eject<br />
NOTE: When the speakers are muted, you do not hear the CD or DVD playing.<br />
1 Click the Start button, point to All Programs → Accessories→ Entertainment, and then click<br />
Volume Control.<br />
2 In the Volume Control window, click and drag the bar in the Volume Control column and<br />
slide it up or down to increase or decrease the volume.<br />
For more information on volume control options, click Help in the Volume Control window.<br />
Setting Up and Using Your Computer 17
www.dell.com | support.dell.com<br />
Adjusting the Picture<br />
If an error message notifies you that the current resolution and color depth are using too much<br />
memory and preventing DVD playback, adjust the display properties:<br />
1 Click the Start button and click Control Panel.<br />
2 Under Pick a category, click Appearance and Themes.<br />
3 Under Pick a task..., click Change the screen resolution.<br />
4 In the Display Properties window, click and drag the bar in Screen resolution to change the<br />
setting to 800 by 600 pixels.<br />
5 Click the drop-down menu under Color quality, and then click Medium (16 bit).<br />
6 Click OK.<br />
Copying CDs and DVDs<br />
NOTE: Ensure that you follow all copyright laws when you create CDs or DVDs.<br />
This section applies only to computers that have a CD-R, CD-RW, DVD+RW, DVD+R, or<br />
DVD/CD-RW combo drive.<br />
NOTE: The types of CD or DVD drives offered by <strong>Dell</strong> may vary by country.<br />
The following instructions show how to make an exact copy of a CD or DVD. You can also use<br />
Sonic RecordNow for other purposes, including creating CDs from audio files on your computer<br />
and creating MP3 CDs. For instructions, see the Sonic RecordNow documentation that came with<br />
your computer. Open Sonic RecordNow, click the question mark icon in the upper-right corner of<br />
the window, and then click RecordNow Help or RecordNow Tutorial.<br />
How to Copy a CD or DVD<br />
NOTE: If you have a DVD/CD-RW combo drive and you experience recording problems, check for<br />
available software patches at the Sonic support website at support.sonic.com.<br />
Currently, five DVD-writable disc formats are available: DVD+R, DVD+RW, DVD-R, DVD-RW,<br />
and DVD-RAM. The DVD-writable drives installed in <strong>Dell</strong> computers can write to DVD+R and<br />
DVD+RW media, and can read DVD-R and DVD-RW media. However, DVD-writable drives do<br />
not write to and might not read DVD-RAM media. In addition, commercially available DVD<br />
players for home theater systems might not read all five formats.<br />
NOTE: Most commercial DVDs have copyright protection and cannot be copied using Sonic<br />
RecordNow.<br />
1 Click the Start button, point to All Programs→ Sonic→ RecordNow!, and then click<br />
RecordNow!<br />
2 Click either the audio tab or the data tab, depending on the kind of CD or DVD you want to<br />
copy.<br />
18 Setting Up and Using Your Computer
3 Click Exact Copy.<br />
4 To copy the CD or DVD:<br />
If you have one CD or DVD drive, ensure that the settings are correct and click Copy. The<br />
computer reads your source CD or DVD and copies it to a temporary folder on your<br />
computer hard drive.<br />
When prompted, insert a blank CD or DVD into the CD or DVD drive and click OK.<br />
If you have two CD or DVD drives, select the drive into which you have inserted your<br />
source CD or DVD and click Copy. The computer copies the data on the CD or DVD to<br />
the blank CD or DVD.<br />
Once you have finished copying the source CD or DVD, the CD or DVD that you have<br />
created automatically ejects.<br />
Using Blank CD-Rs and CD-RWs<br />
Your CD-RW drive can write to two different types of recording media: CD-Rs and CD-RWs<br />
(including high-speed CD-RWs). Use blank CD-Rs to record music or permanently store data files.<br />
After creating a CD-R, you cannot write to that CD-R again (see the Sonic documentation for more<br />
information). Use blank CD-RWs to write to CDs or to erase, rewrite, or update data on CDs.<br />
Your DVD-writable drive can write to four different types of recording media: CD-Rs, CD-RWs<br />
(including high-speed CD-RWs), DVD+Rs, and DVD+RWs. Blank DVD+Rs can be used to<br />
permanently store large amounts of information. After you create a DVD+R disc, you may not be<br />
able to write to that disc again if the disc is "finalized" or "closed" during the final stage of the disc<br />
creation process. Use blank DVD+RWs if you plan to erase, rewrite, or update information on that<br />
disc later.<br />
Helpful Tips<br />
Use Microsoft ® Windows ® Explorer to drag and drop files to a CD-R or CD-RW only after<br />
you start Sonic RecordNow and open a RecordNow project.<br />
You must use CD-Rs to burn music CDs that you want to play in regular stereos. CD-RWs do<br />
not play in most home or car stereos.<br />
You cannot create audio DVDs with Sonic RecordNow.<br />
Music MP3 files can be played only on MP3 players or on computers that have MP3 software<br />
installed.<br />
Do not burn a blank CD-R or CD-RW to its maximum capacity; for example, do not copy a<br />
650-MB file to a 650-MB blank CD. The CD-RW drive needs 1 or 2 MB of the blank CD to<br />
finalize the recording.<br />
Setting Up and Using Your Computer 19
www.dell.com | support.dell.com<br />
Use a blank CD-RW to practice CD recording until you are familiar with CD recording<br />
techniques. If you make a mistake, you can erase the data on the CD-RW and try again. You<br />
can also use blank CD-RWs to test music file projects before you record the project<br />
permanently to a blank CD-R.<br />
See the Sonic support website at support.sonic.com for additional information.<br />
Using a Media Card Reader (Optional)<br />
Use the Media Card Reader to transfer data directly to your computer.<br />
The Media Card Reader supports the following memory types:<br />
xD-Picture Card<br />
SmartMedia (SMC)<br />
CompactFlash Type I and II (CF I/II)<br />
MicroDrive Card<br />
SecureDigital Card (SD)<br />
MultiMediaCard (MMC)<br />
Memory Stick (MS/MS Pro)<br />
20 Setting Up and Using Your Computer
For information on installing a Media Card Reader, see "Installing a Media Card Reader" on<br />
page 95.<br />
xD-Picture Card<br />
and SmartMedia (SMC)<br />
CompactFlash Type I<br />
and II (CF I/II) and<br />
MicroDrive Card<br />
SecureDigital Card (SD)/<br />
MultiMediaCard (MMC)<br />
To use the Media Card Reader:<br />
1 Check the media or card to determine the proper orientation for insertion.<br />
2 Slide the media or card into the appropriate slot until it is completely seated in the connector.<br />
If you encounter resistance, do not force the media or card. Check the card orientation and<br />
try again.<br />
Connecting Two Monitors<br />
Memory Stick<br />
(MS/MS Pro)<br />
CAUTION: Before you begin any of the procedures in this section, follow the safety instructions in the<br />
Product Information Guide.<br />
NOTE: If you are connecting two monitors that have VGA connectors, you must have the optional DVI<br />
adapter. If you are connecting two flat-panel monitors, at least one of them must have a VGA connector.<br />
If you are connecting a television, you may connect only one monitor (VGA or DVI) in addition to the<br />
television.<br />
Setting Up and Using Your Computer 21
www.dell.com | support.dell.com<br />
If you purchased a graphics card that supports dual monitors, follow these instructions to connect<br />
and enable your monitors. The instructions tell you how to connect either two monitors (each with<br />
a VGA connector), one monitor with a VGA connector and one monitor with a DVI connector, or<br />
aTV.<br />
Connecting Two Monitors With VGA Connectors<br />
1 Follow the procedures in "Before You Begin" on page 55.<br />
2 Connect one of the monitors to the VGA (blue) connector on the back of the computer.<br />
3 Connect the other monitor to the optional DVI adapter and connect the DVI adapter to the<br />
DVI (white) connector on the back of the computer.<br />
optional DVI adapter<br />
Connecting One Monitor With a VGA Connector and One Monitor With a DVI Connector<br />
1 Follow the procedures in "Before You Begin" on page 55.<br />
2 Connect the VGA connector on the monitor to the VGA (blue) connector on the back of the<br />
computer.<br />
3 Connect the DVI connector on the other monitor to the DVI (white) connector on the back<br />
of the computer.<br />
22 Setting Up and Using Your Computer<br />
VGA (blue) connector<br />
DVI (white) connector<br />
TV-OUT connector
Connecting a TV<br />
NOTE: To connect a TV to your computer, you must purchase an S-video cable, which is available at<br />
most consumer electronics stores. An S-video cable is not included with your computer.<br />
1 Follow the procedures in "Before You Begin" on page 55.<br />
2 Connect one end of the S-video cable to the TV-OUT connector on the back of the computer.<br />
3 Connect the other end of the S-video cable to the S-video input connector on your TV.<br />
4 Connect the VGA or DVI monitor.<br />
Changing the Display Settings<br />
1 After you connect the monitor(s) or TV, turn on the computer.<br />
The Microsoft ® Windows ® desktop displays on the primary monitor.<br />
2 Enable clone mode or extended desktop mode in the display settings.<br />
In clone mode, both monitors display the same image.<br />
In extended desktop mode, you can drag objects from one screen to the other, effectively<br />
doubling the amount of viewable work space.<br />
For information on changing the display settings for your graphics card, see the user’s guide in the<br />
Help and <strong>Support</strong> Center (click the Start button, click Help and <strong>Support</strong>, click User and system<br />
guides, click Device guides, and then click the guide for your graphics card).<br />
Setting Up and Using Your Computer 23
www.dell.com | support.dell.com<br />
Setting Up a Home and Office Network<br />
Connecting to a Network Adapter<br />
NOTICE: Plug the network cable into the network adapter connector on the computer. Do not plug the<br />
network cable into the modem connector on the computer. Do not plug a network cable into a telephone<br />
wall jack.<br />
1 Connect the network cable to the network adapter connector on the back of your computer.<br />
Insert the cable until it clicks into place, and then gently pull it to ensure that it is secure.<br />
2 Connect the other end of the network cable to a network device.<br />
network adapter<br />
connector<br />
network adapter connector on computer<br />
Network Setup Wizard<br />
The Microsoft ® Windows ® XP operating system provides a Network Setup Wizard to guide you<br />
through the process of sharing files, printers, or an Internet connection between computers in a<br />
home or small office.<br />
1 Click the Start button, point to All Programs→ Accessories→ Communications, and then<br />
click Network Setup Wizard.<br />
2 On the welcome screen, click Next.<br />
3 Click Checklist for creating a network.<br />
NOTE: Selecting the connection method This computer connects directly to the Internet enables the<br />
integrated firewall provided with Windows XP Service Pack.<br />
4 Complete the checklist and required preparations.<br />
5 Return to the Network Setup Wizard and follow the instructions on the screen.<br />
24 Setting Up and Using Your Computer<br />
network device<br />
network cable
Power Management<br />
The Microsoft ® Windows ® XP power management features can reduce the amount of electricity<br />
your computer uses when it is on and you are not using it. You can reduce power to just the monitor<br />
or the hard drive, or you can use standby mode or hibernate mode to reduce power to the entire<br />
computer. When the computer exits from a power conservation mode, the Windows desktop is<br />
restored to the state it was in before it entered the mode.<br />
NOTE: Windows XP Professional includes security and networking features not available in<br />
Windows XP Home Edition. When a Windows XP Professional computer is connected to a network,<br />
different options related to security and networking appear in certain windows.<br />
Standby Mode<br />
Standby mode conserves power by turning off the display and the hard drive after a time-out.<br />
When the computer exits from standby mode, it returns to the operating state it was in before it<br />
entered standby mode.<br />
To set standby mode to automatically activate after a defined period of inactivity:<br />
1 Click the Start button and click Control Panel.<br />
2 Under Pick a category, click Performance and Maintenance.<br />
3 Under or pick a Control Panel icon, click Power Options.<br />
To immediately activate standby mode without a period of inactivity, click the Start button, click<br />
Turn Off Computer, and then click Stand by.<br />
To exit from standby mode, press a key on the keyboard or move the mouse.<br />
NOTICE: If your computer loses power while in standby mode, it may lose data.<br />
Hibernate Mode<br />
Hibernate mode conserves power by copying system data to a reserved area on the hard drive and<br />
then completely turning off the computer. When the computer exits from hibernate mode, the<br />
desktop is restored to the state it was in before it entered hibernate mode.<br />
To activate hibernate mode:<br />
1 Click the Start button and click Control Panel.<br />
2 Under Pick a category, click Performance and Maintenance.<br />
3 Under or pick a Control Panel icon, click Power Options.<br />
4 Define your hibernate settings on the Power Schemes tab, Advanced tab, and Hibernate tab.<br />
To exit from hibernate mode, press the power button. The computer may take a short time to exit<br />
from hibernate mode. Pressing a key on the keyboard or moving the mouse does not bring the<br />
computer out of hibernation, because the keyboard and the mouse do not function when the<br />
computer is in hibernate mode.<br />
Setting Up and Using Your Computer 25
www.dell.com | support.dell.com<br />
Because hibernate mode requires a special file on your hard drive with enough disk space to store<br />
the contents of the computer memory, <strong>Dell</strong> creates an appropriately sized hibernate mode file<br />
before shipping the computer to you. If the computer’s hard drive becomes corrupted,<br />
Windows XP recreates the hibernate file automatically.<br />
Power Options Properties<br />
Define your standby mode settings, hibernate mode settings, and other power settings in the Power<br />
Options Properties window. To access the Power Options Properties window:<br />
1 Click the Start button and click Control Panel.<br />
2 Under Pick a category, click Performance and Maintenance.<br />
3 Under or pick a Control Panel icon, click Power Options.<br />
4 Define your power settings on the Power Schemes tab, Advanced tab, and Hibernate tab.<br />
Power Schemes Tab<br />
Each standard power setting is called a scheme. If you want to select one of the standard Windows<br />
schemes installed on your computer, choose a scheme from the Power schemes drop-down menu.<br />
The settings for each scheme appear in the fields below the scheme name. Each scheme has<br />
different settings for starting standby mode or hibernate mode, turning off the monitor, and<br />
turning off the hard drive.<br />
The Power schemes drop-down menu displays the following schemes:<br />
Always On (default) — If you want to use your computer with no power conservation.<br />
Home/Office Desk — If you use your computer as a home or office computer and you require<br />
minimal power conservation.<br />
Presentation — If you want your computer to run without interruption (using no power<br />
conservation).<br />
Minimal Power Management — If you want your computer to run with minimal power<br />
conservation.<br />
Max Battery — If your computer is a portable computer and you run your computer from<br />
batteries for extended periods of time.<br />
If you want to change the default settings for a scheme, click the drop-down menu in the Turn off<br />
monitor, Turn off hard disks, System stand by, or System hibernates field, and then select a timeout<br />
from the displayed list. Changing the time-out for a scheme field permanently changes the<br />
default settings for that scheme, unless you click Save As and enter a new name for the changed<br />
scheme.<br />
NOTICE: If you set the hard drive (hard disk) to time-out before the monitor does, your computer may<br />
appear to be locked up. To recover, press any key on the keyboard or click the mouse. To avoid this<br />
problem, always set the monitor to time-out before the hard drive.<br />
26 Setting Up and Using Your Computer
Advanced Tab<br />
The Advanced tab allows you to:<br />
Place the power options icon in the Windows taskbar for quick access.<br />
Set the computer to prompt you for your Windows password before the computer exits from<br />
standby mode or hibernate mode.<br />
Program the power button to activate standby mode, activate hibernate mode, or turn off the<br />
computer.<br />
To program these functions, click an option from the corresponding drop-down menu and<br />
click OK.<br />
Hibernate Tab<br />
The Hibernate tab allows you to enable hibernate mode. If you want to use the hibernate settings<br />
you defined on the Power Schemes tab, click the Enable hibernate support check box on the<br />
Hibernate tab.<br />
For more information on power management options:<br />
1 Click the Start button and click Help and <strong>Support</strong>.<br />
2 In the Help and <strong>Support</strong> window, click Performance and maintenance.<br />
3 In the Performance and maintenance window, click Conserving power on your computer.<br />
IEEE 1394<br />
IEEE 1394 is a digital interface that can move large amounts of data between computers and<br />
peripheral devices. IEEE 1394 is ideal for use with multimedia devices because it speeds the<br />
transfer of data and large files, which enables a computer to connect directly to devices such as<br />
digital video cameras.<br />
NOTE: The connector can accept 4-pin IEEE 1394 devices with the use of an adapter.<br />
Your computer may have an optional front IEEE 1394 connector (see "Front View of the<br />
Computer" on page 57). This connector is only available if you purchased an add-in card that uses<br />
IEEE 1394. To purchase a card, contact <strong>Dell</strong>.<br />
Setting Up and Using Your Computer 27
www.dell.com | support.dell.com<br />
Hyper-Threading<br />
Hyper-Threading is an Intel ® technology that can enhance overall computer performance by<br />
allowing one physical processor to function as two logical processors, capable of performing certain<br />
tasks simultaneously. It is recommended that you use the Microsoft ® Windows ® XP Service Pack 1<br />
(SP1) or later operating system because Windows XP is optimized to take advantage of<br />
Hyper-Threading technology. While many programs can benefit from Hyper-Threading, some<br />
programs have not been optimized for Hyper-Threading and may require an update from the<br />
software manufacturer. Contact the software manufacturer for updates and information about<br />
using Hyper-Threading with your software.<br />
To determine if your computer is using Hyper-Threading technology:<br />
1 Click the Start button, right-click My Computer, and then click Properties.<br />
2 Click Hardware and click Device Manager.<br />
3 In the Device Manager window, click the plus (+) sign next to Processors. If Hyper-Threading<br />
is enabled, the processor is listed twice.<br />
You can enable or disable Hyper-Threading through system setup. For more information on<br />
accessing system setup, see page 108. For more information on Hyper-Threading, search the<br />
Knowledge Base on the <strong>Dell</strong> <strong>Support</strong> website at support.dell.com.<br />
28 Setting Up and Using Your Computer
Solving Problems<br />
Troubleshooting Tips<br />
Follow these tips when you troubleshoot your computer:<br />
If you added or removed a part before the problem started, review the installation procedures<br />
and ensure that the part is correctly installed.<br />
If a peripheral device does not work, ensure that the device is properly connected.<br />
If an error message appears on the screen, write down the exact message. This message may<br />
help technical support personnel diagnose and fix the problem(s).<br />
If an error message occurs in a program, see the program’s documentation.<br />
If you cannot boot into your operating system after you have changed your SATA operation<br />
settings, restore your previous SATA operation settings and retry booting into the operating<br />
system.<br />
Battery Problems<br />
CAUTION: There is a danger of a new battery exploding if it is incorrectly installed. Replace the<br />
battery only with the same or equivalent type recommended by the manufacturer. Discard used<br />
batteries according to the manufacturer's instructions.<br />
CAUTION: Before you begin any of the procedures in this section, follow the safety instructions in the<br />
Product Information Guide.<br />
R EPLACE THE BATTERY — If you have to repeatedly reset time and date information after turning on<br />
the computer, or if an incorrect time or date displays during start-up, replace the battery (see page 101).<br />
If the battery still does not work properly, contact <strong>Dell</strong> (see page 119).<br />
Solving Problems 29
www.dell.com | support.dell.com<br />
Drive Problems<br />
30 Solving Problems<br />
CAUTION: Before you begin any of the procedures in this section, follow the safety instructions in the<br />
Product Information Guide.<br />
E NSURE THAT MICROSOFT ® WINDOWS ® RECOGNIZES THE DRIVE — Click the Start button and<br />
click My Computer. If the floppy, CD, or DVD drive, is not listed, perform a full scan with your<br />
antivirus software to check for and remove viruses. Viruses can sometimes prevent Windows from<br />
recognizing the drive.<br />
TEST THE DRIVE —<br />
Insert another floppy, CD, or DVD to eliminate the possibility that the original one is defective.<br />
Insert a bootable floppy and restart the computer.<br />
C LEAN THE DRIVE OR DISK — See page 116.<br />
C HECK THE CABLE CONNECTIONS<br />
R UN THE HARDWARE TROUBLESHOOTER — See page 52.<br />
R UN THE DELL DIAGNOSTICS — See page 48.<br />
CD and DVD drive problems<br />
NOTE: High-speed CD or DVD drive vibration is normal and may cause noise, which does not indicate a<br />
defect in the drive or the CD or DVD.<br />
NOTE: Because of different regions worldwide and different disc formats, not all DVD titles work in all<br />
DVD drives.<br />
A DJUST THE WINDOWS VOLUME CONTROL —<br />
Click the speaker icon in the lower-right corner of your screen.<br />
Ensure that the volume is turned up by clicking the slidebar and dragging it up.<br />
Ensure that the sound is not muted by clicking any boxes that are checked.<br />
C HECK THE SPEAKERS AND SUBWOOFER — See "Sound and Speaker Problems" on page 41.
Problems writing to a CD/DVD-RW drive<br />
C LOSE OTHER PROGRAMS — The CD/DVD-RW drive must receive a steady stream of data when<br />
writing. If the stream is interrupted, an error occurs. Try closing all programs before you write to the<br />
CD/DVD-RW.<br />
TURN OFF STANDBY MODE IN WINDOWS BEFORE WRITING TO A CD/DVD-RW DISC — Search for<br />
the keyword standby in Windows Help.<br />
Hard drive problems<br />
R UN CHECK DISK —<br />
1 Click the Start button and click My Computer.<br />
2 Right-click Local Disk C:.<br />
3 Click Properties.<br />
4 Click the Tools tab.<br />
5 Under Error-checking, click Check Now.<br />
6 Click Scan for and attempt recovery of bad sectors.<br />
7 Click Start.<br />
E-Mail, Modem, and Internet Problems<br />
CAUTION: Before you begin any of the procedures in this section, follow the safety instructions in the<br />
Product Information Guide.<br />
NOTE: Connect the modem to an analog telephone jack only. The modem does not operate while it is<br />
connected to a digital telephone network.<br />
C HECK THE MICROSOFT OUTLOOK ® EXPRESS SECURITY SETTINGS — If you cannot open your<br />
e-mail attachments:<br />
1 In Outlook Express, click Tools, click Options, and then click Security.<br />
2 Click Do not allow attachments to remove the checkmark.<br />
Solving Problems 31
www.dell.com | support.dell.com<br />
32 Solving Problems<br />
C HECK THE TELEPHONE LINE CONNECTION —<br />
C HECK THE TELEPHONE JACK —<br />
C ONNECT THE MODEM DIRECTLY TO THE TELEPHONE WALL JACK —<br />
U SE A DIFFERENT TELEPHONE LINE —<br />
Verify that the telephone line is connected to the jack on the modem. (The jack has either a green label<br />
or a connector-shaped icon next to it.)<br />
Ensure that you feel a click when you insert the telephone line connector into the modem.<br />
Disconnect the telephone line from the modem and connect it to a telephone. Listen for a dial tone.<br />
If you have other telephone devices sharing the line, such as an answering machine, fax machine, surge<br />
protector, or line splitter, then bypass them and use the telephone to connect the modem directly to the<br />
telephone wall jack. If you are using a line that is 3 m (10 ft) or more in length, try a shorter one.<br />
R UN THE MODEM HELPER DIAGNOSTICS — Click the Start button, point to All Programs, and then<br />
click Modem Helper. Follow the instructions on the screen to identify and resolve modem problems.<br />
(Modem Helper is not available on all computers.)<br />
VERIFY THAT THE MODEM IS COMMUNICATING WITH WINDOWS —<br />
1 Click the Start button and click Control Panel.<br />
2 Click Printers and Other Hardware.<br />
3 Click Phone and Modem Options.<br />
4 Click the Modems tab.<br />
5 Click the COM port for your modem.<br />
6 Click Properties, click the Diagnostics tab, and then click Query Modem to verify that the modem is<br />
communicating with Windows.<br />
If all commands receive responses, the modem is operating properly.<br />
E NSURE THAT YOU ARE CONNECTED TO THE INTERNET — Ensure that you have subscribed to an<br />
Internet provider. With the Outlook Express e-mail program open, click File. If Work Offline has a<br />
checkmark next to it, click the checkmark to remove it and connect to the Internet. For help, contact<br />
your Internet service provider.
Error Messages<br />
If the message is not listed, see the documentation for the operating system or the program that<br />
was running when the message appeared.<br />
A FILENAME CANNOT CONTAIN ANY OF THE FOLLOWING CHARACTERS: \ / : * ? “ < > | — Do not<br />
use these characters in filenames.<br />
A REQUIRED .DLL FILE WAS NOT FOUND — The program that you are trying to open is missing an<br />
essential file. To remove and then reinstall the program:<br />
1 Click the Start button, click Control Panel, and then click Add or Remove Programs.<br />
2 Select the program you want to remove.<br />
3 Click the Change or Remove Program icon.<br />
4 See the program documentation for installation instructions.<br />
drive letter :\ IS NOT ACCESSIBLE. THE DEVICE IS NOT READY — The drive cannot read the disk.<br />
Insert a disk into the drive and try again.<br />
I NSERT BOOTABLE MEDIA — Insert a bootable floppy or CD.<br />
N ON-SYSTEM DISK ERROR — Remove the floppy from the drive and restart your computer.<br />
N OT ENOUGH MEMORY OR RESOURCES. CLOSE SOME PROGRAMS AND TRY AGAIN — Close all<br />
windows and open the program that you want to use. In some cases, you might have to restart your<br />
computer to restore computer resources. If so, run the program that you want to use first.<br />
OPERATING SYSTEM NOT FOUND — Contact <strong>Dell</strong> (see page 119).<br />
Solving Problems 33
www.dell.com | support.dell.com<br />
Media Card Reader Problems<br />
N O DRIVE LETTER IS ASSIGNED — When Microsoft Windows XP detects the Media Card Reader, the<br />
device is automatically assigned a drive letter as the next logical drive after all other physical drives in<br />
the system. If the next logical drive after the physical drives is mapped to a network drive, Windows XP<br />
does not automatically assign a drive letter to the Media Card Reader.<br />
To manually assign a drive for the Media Card Reader:<br />
1 Right-click My Computer and select Manage.<br />
2 Select the Disk Management option.<br />
3 Right-click the corresponding drive letter in the right pane that needs to be changed.<br />
Keyboard Problems<br />
34 Solving Problems<br />
4 Select Drive Letter and Paths.<br />
5 From the drop-down list, select the new drive letter assignment for the Media Card Reader.<br />
6 Click OK to confirm your selection.<br />
NOTE: The Media Card Reader appears as a mapped drive only when it is connected. Each of the four<br />
Media Card Reader slots are mapped to a drive even if no media is installed. If you attempt to access the<br />
Media Card Reader when no media is inserted, you are prompted to insert media.<br />
F LEXBAY DEVICE IS DISABLED — There is a FlexBay disable option in the BIOS setup that appears<br />
only when the FlexBay device is installed. If the FlexBay device is physically installed, but it is not<br />
running, check to see if it is enabled in the BIOS setup.<br />
CAUTION: Before you begin any of the procedures in this section, follow the safety instructions in the<br />
Product Information Guide.<br />
C HECK THE KEYBOARD CABLE —<br />
Ensure that the keyboard cable is firmly connected to the computer.<br />
Shut down the computer (see page 55), reconnect the keyboard cable as shown on the setup diagram for<br />
your computer, and then restart the computer.<br />
Check the cable connector for bent or broken pins and for damaged or frayed cables. Straighten bent<br />
pins.<br />
Remove keyboard extension cables and connect the keyboard directly to the computer.<br />
TEST THE KEYBOARD — Connect a properly working keyboard to the computer, and try using the<br />
keyboard.<br />
R UN THE HARDWARE TROUBLESHOOTER — See page 52.
Lockups and Software Problems<br />
CAUTION: Before you begin any of the procedures in this section, follow the safety instructions in the<br />
Product Information Guide.<br />
The computer does not start up<br />
C HECK THE DIAGNOSTIC LIGHTS — See page 45.<br />
ENSURE THAT THE POWER CABLE IS FIRMLY CONNECTED TO THE COMPUTER AND TO THE<br />
ELECTRICAL OUTLET<br />
The computer stops responding<br />
NOTICE: You might lose data if you are unable to perform an operating system shutdown.<br />
TURN THE COMPUTER OFF — If you are unable to get a response by pressing a key on your keyboard or<br />
moving your mouse, press and hold the power button for at least 8 to 10 seconds until the computer<br />
turns off. Then restart your computer.<br />
A program stops responding<br />
END THE PROGRAM —<br />
1 Press simultaneously.<br />
2 Click Applications.<br />
3 Click the program that is no longer responding.<br />
4 Click End Task.<br />
A program crashes repeatedly<br />
NOTE: Software usually includes installation instructions in its documentation or on a floppy or CD.<br />
C HECK THE SOFTWARE DOCUMENTATION — If necessary, uninstall and then reinstall the program.<br />
Solving Problems 35
www.dell.com | support.dell.com<br />
A program is designed for an earlier Windows operating system<br />
R UN THE PROGRAM COMPATIBILITY WIZARD — The Program Compatibility Wizard configures a<br />
program so it runs in an environment similar to non-Windows XP operating system environments.<br />
1 Click the Start button, point to All Programs→ Accessories, and then click Program Compatibility<br />
Wizard.<br />
2 In the welcome screen, click Next.<br />
3 Follow the instructions on the screen.<br />
A solid blue screen appears<br />
Other software problems<br />
36 Solving Problems<br />
TURN THE COMPUTER OFF — If you are unable to get a response by pressing a key on your keyboard or<br />
moving your mouse, press and hold the power button for at least 8 to 10 seconds until the computer<br />
turns off. Then restart your computer.<br />
C HECK THE SOFTWARE DOCUMENTATION OR CONTACT THE SOFTWARE MANUFACTURER FOR<br />
TROUBLESHOOTING INFORMATION —<br />
Ensure that the program is compatible with the operating system installed on your computer.<br />
Ensure that your computer meets the minimum hardware requirements needed to run the software. See<br />
the software documentation for information.<br />
Ensure that the program is installed and configured properly.<br />
Verify that the device drivers do not conflict with the program.<br />
If necessary, uninstall and then reinstall the program.<br />
B ACK UP YOUR FILES IMMEDIATELY<br />
U SE A VIRUS-SCANNING PROGRAM TO CHECK THE HARD DRIVE, FLOPPY DISKS, OR CDS<br />
S AVE AND CLOSE ANY OPEN FILES OR PROGRAMS AND SHUT DOWN YOUR COMPUTER THROUGH THE<br />
START MENU
Memory Problems<br />
CAUTION: Before you begin any of the procedures in this section, follow the safety instructions in the<br />
Product Information Guide.<br />
I F YOU RECEIVE AN INSUFFICIENT MEMORY MESSAGE —<br />
Save and close any open files and exit any open programs you are not using to see if that resolves the<br />
problem.<br />
See the software documentation for minimum memory requirements. If necessary, install additional<br />
memory (see page 66).<br />
Reseat the memory modules (see page 66) to ensure that your computer is successfully communicating<br />
with the memory.<br />
Run the <strong>Dell</strong> Diagnostics (see page 48).<br />
I F YOU EXPERIENCE OTHER MEMORY PROBLEMS —<br />
Reseat the memory modules (see page 66) to ensure that your computer is successfully communicating<br />
with the memory.<br />
Ensure that you are following the memory installation guidelines (see page 66).<br />
Your computer supports DDR2 memory. For more information about the type of memory supported by<br />
your computer, see "Memory" on page 103.<br />
Run the <strong>Dell</strong> Diagnostics (see page 48).<br />
Mouse Problems<br />
CAUTION: Before you begin any of the procedures in this section, follow the safety instructions in the<br />
Product Information Guide.<br />
C LEAN THE MOUSE — For instructions on cleaning the mouse, see "Mouse" on page 116.<br />
C HECK THE MOUSE CABLE —<br />
1 Remove mouse extension cables, if used, and connect the mouse directly to the computer.<br />
2 Reconnect the mouse cable as shown on the setup diagram for your computer.<br />
Solving Problems 37
www.dell.com | support.dell.com<br />
Network Problems<br />
38 Solving Problems<br />
R ESTART THE COMPUTER —<br />
1 Simultaneously press to display the Start menu.<br />
2 Type u, press the keyboard arrow keys to highlight Shut down or Turn Off, and then press .<br />
3 After the computer turns off, reconnect the mouse cable as shown on the on the setup diagram for your<br />
computer.<br />
4 Start the computer.<br />
TEST THE MOUSE — Connect a properly working mouse to the computer, and try using the mouse.<br />
C HECK THE MOUSE SETTINGS —<br />
1 Click the Start button, click Control Panel, and then click Printers and Other Hardware.<br />
2 Click Mouse.<br />
3 Try adjusting the settings.<br />
R EINSTALL THE MOUSE DRIVER — See page 50.<br />
R UN THE HARDWARE TROUBLESHOOTER — See page 52.<br />
CAUTION: Before you begin any of the procedures in this section, follow the safety instructions in the<br />
Product Information Guide.<br />
C HECK THE NETWORK CABLE CONNECTOR — Ensure that the network cable is firmly inserted into<br />
both the network connector on the back of the computer and the network jack.<br />
C HECK THE NETWORK LIGHTS ON THE BACK OF THE COMPUTER — If the link integrity light is off,<br />
that indicates no network communication exists. Replace the network cable. For a description of<br />
network lights, see "Controls and Lights" on page 106.<br />
R ESTART THE COMPUTER AND LOG ON TO THE NETWORK AGAIN<br />
C HECK YOUR NETWORK SETTINGS — Contact your network administrator or the person who set up<br />
your network to verify that your network settings are correct and that the network is functioning.<br />
R UN THE HARDWARE TROUBLESHOOTER — See page 52.
Power Problems<br />
CAUTION: Before you begin any of the procedures in this section, follow the safety instructions in the<br />
Product Information Guide.<br />
I F THE POWER LIGHT IS GREEN AND THE COMPUTER IS NOT RESPONDING — See "<strong>Dell</strong> Diagnostics"<br />
on page 48.<br />
I F THE POWER LIGHT IS BLINKING GREEN — The computer is in standby mode. Press a key on the<br />
keyboard, move the mouse, or press the power button to resume normal operation.<br />
I F THE POWER LIGHT IS OFF — The computer is either turned off or is not receiving power.<br />
Reseat the power cable into both the power connector on the back of the computer and the electrical<br />
outlet.<br />
If the computer is plugged into a power strip, ensure that the power strip is plugged into an electrical<br />
outlet and that the power strip is turned on. Also bypass power protection devices, power strips, and<br />
power extension cables to verify that the computer turns on properly.<br />
Ensure that the electrical outlet is working by testing it with another device, such as a lamp.<br />
Ensure that the main power cable and front panel cable are securely connected to the system board (see<br />
page 63).<br />
I F THE POWER LIGHT IS STEADY AMBER — A device might be malfunctioning or incorrectly installed.<br />
Remove and then reinstall the memory modules (see page 66).<br />
Remove and then reinstall any cards (see page 68).<br />
Remove and then reinstall the graphics card, if applicable (see page 68).<br />
I F THE POWER LIGHT IS BLINKING AMBER — The computer is receiving electrical power, but an<br />
internal power problem might exist.<br />
Ensure that the voltage selection switch is set to match the AC power at your location (if applicable).<br />
Ensure that the processor power cable is securely connected to the system board (see page 63).<br />
ELIMINATE INTERFERENCE — Some possible causes of interference are:<br />
Power, keyboard, and mouse extension cables<br />
Too many devices on a power strip<br />
Multiple power strips connected to the same electrical outlet<br />
Solving Problems 39
www.dell.com | support.dell.com<br />
Printer Problems<br />
40 Solving Problems<br />
CAUTION: Before you begin any of the procedures in this section, follow the safety instructions in the<br />
Product Information Guide.<br />
NOTE: If you need technical assistance for your printer, contact the printer’s manufacturer.<br />
C HECK THE PRINTER DOCUMENTATION — See the printer documentation for setup and<br />
troubleshooting information.<br />
E NSURE THAT THE PRINTER IS TURNED ON<br />
C HECK THE PRINTER CABLE CONNECTIONS —<br />
See the printer documentation for cable connection information.<br />
Ensure that the printer cables are securely connected to the printer and the computer (see page 13).<br />
TEST THE ELECTRICAL OUTLET — Ensure that the electrical outlet is working by testing it with another<br />
device, such as a lamp.<br />
VERIFY THAT THE PRINTER IS RECOGNIZED BY WINDOWS —<br />
1 Click the Start button, click Control Panel, and then click Printers and Other Hardware.<br />
2 Click View installed printers or fax printers.<br />
If the printer is listed, right-click the printer icon.<br />
3 Click Properties and click the Ports tab. For a USB printer, ensure that the Print to the following<br />
port(s): setting is USB.<br />
R EINSTALL THE PRINTER DRIVER — See the printer documentation for instructions.<br />
Scanner Problems<br />
CAUTION: Before you begin any of the procedures in this section, follow the safety instructions in the<br />
Product Information Guide.<br />
NOTE: If you need technical assistance for your scanner, contact the scanner’s manufacturer.<br />
C HECK THE SCANNER DOCUMENTATION — See the scanner documentation for setup and<br />
troubleshooting information.<br />
U NLOCK THE SCANNER — Ensure that your scanner is unlocked if it has a locking tab or button.
R ESTART THE COMPUTER AND TRY THE SCANNER AGAIN<br />
C HECK THE CABLE CONNECTIONS —<br />
See the scanner documentation for cable connection information.<br />
Ensure that the scanner cables are securely connected to the scanner and the computer.<br />
VERIFY THAT THE SCANNER IS RECOGNIZED BY MICROSOFT WINDOWS —<br />
1 Click the Start button, click Control Panel, and then click Printers and Other Hardware.<br />
2 Click Scanners and Cameras.<br />
If your scanner is listed, Windows recognizes the scanner.<br />
R EINSTALL THE SCANNER DRIVER — See the scanner documentation for instructions.<br />
Sound and Speaker Problems<br />
CAUTION: Before you begin any of the procedures in this section, follow the safety instructions in the<br />
Product Information Guide.<br />
No sound from speakers<br />
NOTE: The volume control in some MP3 players overrides the Windows volume setting. If you have been<br />
listening to MP3 songs, ensure that you did not turn the player volume down or off.<br />
C HECK THE SPEAKER CABLE CONNECTIONS — Ensure that the speakers are connected as shown on<br />
the setup diagram supplied with the speakers. If you purchased a sound card, ensure that the speakers<br />
are connected to the card.<br />
ENSURE THAT THE SUBWOOFER AND THE SPEAKERS ARE TURNED ON — See the setup diagram<br />
supplied with the speakers. If your speakers have volume controls, adjust the volume, bass, or treble to<br />
eliminate distortion.<br />
ADJUST THE WINDOWS VOLUME CONTROL — Click or double-click the speaker icon in the lower-right<br />
corner of your screen. Ensure that the volume is turned up and that the sound is not muted.<br />
DISCONNECT HEADPHONES FROM THE HEADPHONE CONNECTOR — Sound from the speakers is<br />
automatically disabled when headphones are connected to the computer’s front-panel headphone<br />
connector.<br />
Solving Problems 41
www.dell.com | support.dell.com<br />
No sound from headphones<br />
Video and Monitor Problems<br />
42 Solving Problems<br />
TEST THE ELECTRICAL OUTLET — Ensure that the electrical outlet is working by testing it with another<br />
device, such as a lamp.<br />
E LIMINATE POSSIBLE INTERFERENCE — Turn off nearby fans, fluorescent lights, or halogen lamps to<br />
check for interference.<br />
R EINSTALL THE SOUND DRIVER — See page 51.<br />
R UN THE HARDWARE TROUBLESHOOTER — See page 52.<br />
C HECK THE HEADPHONE CABLE CONNECTION — Ensure that the headphone cable is securely inserted<br />
into the headphone connector (see page 58).<br />
A DJUST THE WINDOWS VOLUME CONTROL — Click or double-click the speaker icon in the lower-right<br />
corner of your screen. Ensure that the volume is turned up and that the sound is not muted.<br />
CAUTION: Before you begin any of the procedures in this section, follow the safety instructions in the<br />
Product Information Guide.<br />
NOTE: See the monitor documentation for troubleshooting procedures.<br />
If the screen is blank<br />
C HECK THE MONITOR CABLE CONNECTION —<br />
Ensure that the graphics cable is connected as shown on the setup diagram for your computer.<br />
If you are using a graphics extension cable and removing the cable solves the problem, the cable is<br />
defective.<br />
Swap the computer and monitor power cables to determine if the power cable is defective.<br />
Check the connector for bent or broken pins. (It is normal for monitor cable connectors to have missing<br />
pins.)<br />
C HECK THE MONITOR POWER LIGHT — If the power light is off, firmly press the button to ensure that<br />
the monitor is turned on. If the power light is lit or blinking, the monitor has power. If the power light is<br />
blinking, press a key on the keyboard or move the mouse.
TEST THE ELECTRICAL OUTLET — Ensure that the electrical outlet is working by testing it with another<br />
device, such as a lamp.<br />
C HECK THE DIAGNOSTIC LIGHTS — See page 45.<br />
If the screen is difficult to read<br />
C HECK THE MONITOR SETTINGS — See the monitor documentation for instructions on adjusting the<br />
contrast and brightness, demagnetizing (degaussing) the monitor, and running the monitor self-test.<br />
M OVE THE SUBWOOFER AWAY FROM THE MONITOR — If your speaker system includes a subwoofer,<br />
ensure that the subwoofer is at least 60 cm (2 ft) away from the monitor.<br />
M OVE THE MONITOR AWAY FROM EXTERNAL POWER SOURCES — Fans, fluorescent lights, halogen<br />
lamps, and other electrical devices can cause the screen image to appear "shaky." Turn off nearby devices<br />
to check for interference.<br />
R OTATE THE MONITOR TO ELIMINATE SUNLIGHT GLARE AND POSSIBLE INTERFERENCE<br />
ADJUST THE WINDOWS DISPLAY SETTINGS —<br />
1 Click the Start button, click Control Panel, and then click Appearance and Themes.<br />
2 Click Display and click the Settings tab.<br />
3 Try different settings for Screen resolution and Color quality.<br />
Solving Problems 43
www.dell.com | support.dell.com<br />
44 Solving Problems
Troubleshooting Tools<br />
Diagnostic Lights<br />
CAUTION: Before you begin any of the procedures in this section, follow the safety instructions in the<br />
Product Information Guide.<br />
To help you troubleshoot a problem, your computer has four lights labeled "1," "2," "3," and "4"<br />
on the front panel (see page 57). When the computer starts normally, the lights flash. After the<br />
computer starts, all four lights display solid green. If the computer malfunctions, the color and<br />
sequence of the lights identify the problem.<br />
Light Pattern Problem Description Suggested Resolution<br />
The computer is in a normal "off"<br />
condition or a possible pre-BIOS failure<br />
has occurred.<br />
All four diagnostic lights display solid<br />
green and then turn off after the system<br />
successfully boots to the operating<br />
system.<br />
Plug the computer into a working<br />
electrical outlet. Also see "Power<br />
Problems" on page 39.<br />
A possible processor failure has occurred. If the problem persists, contact <strong>Dell</strong> (see<br />
page 119).<br />
Memory modules are detected, but a<br />
memory failure has occurred.<br />
If you have two or more memory<br />
modules installed, remove the<br />
modules, reinstall one module (see<br />
page 66), and then restart the<br />
computer. If the computer starts<br />
normally, reinstall an additional<br />
module. Continue until you have<br />
identified a faulty module or<br />
reinstalled all modules without error.<br />
If available, install properly working<br />
memory of the same type into your<br />
computer (see page 66).<br />
If the problem persists, contact <strong>Dell</strong><br />
(see page 119).<br />
Troubleshooting Tools 45
www.dell.com | support.dell.com<br />
Light Pattern Problem Description Suggested Resolution<br />
46 Troubleshooting Tools<br />
A possible graphics card failure has<br />
occurred.<br />
A possible floppy drive or hard drive<br />
failure has occurred.<br />
If the computer has a graphics card,<br />
remove the card (see page 68), reinstall<br />
it, and then restart the computer.<br />
If the problem still exists, install a<br />
graphics card that you know works and<br />
restart the computer.<br />
If the problem persists, contact <strong>Dell</strong><br />
(see page 119).<br />
Reseat all power and data cables and<br />
restart the computer.<br />
A possible USB failure has occurred. Reinstall all USB devices, check cable<br />
connections, and then restart the<br />
computer.<br />
No memory modules are detected. If you have two or more memory<br />
modules installed, remove the<br />
modules, reinstall one module (see<br />
page 66), and then restart the<br />
computer. If the computer starts<br />
normally, reinstall an additional<br />
module. Continue until you have<br />
identified a faulty module or<br />
reinstalled all modules without error.<br />
If available, install properly working<br />
memory of the same type into your<br />
computer (see page 66).<br />
If the problem persists, contact <strong>Dell</strong><br />
(see page 119).<br />
Memory modules are detected, but a<br />
memory configuration or compatibility<br />
error exists.<br />
Ensure that no special memory<br />
module/memory connector placement<br />
requirements exist (see page 64).<br />
Verify that the memory modules that<br />
you are installing are compatible with<br />
your computer (see page 64).<br />
If the problem persists, contact <strong>Dell</strong><br />
(see page 119).
Light Pattern Problem Description Suggested Resolution<br />
A possible expansion card failure has<br />
occurred.<br />
1 Determine if a conflict exists by<br />
removing a card (not a graphics card)<br />
and restarting the computer (see<br />
page 68).<br />
2 If the problem persists, reinstall the<br />
card that you removed, remove a<br />
different card, and then restart the<br />
computer.<br />
3 Repeat this process for each card. If the<br />
computer starts normally, troubleshoot<br />
the last card removed from the<br />
computer for resource conflicts (see<br />
page 51).<br />
4 If the problem persists, contact <strong>Dell</strong><br />
(see page 119).<br />
Another failure has occurred. Ensure that the cables are properly<br />
connected to the system board from<br />
the hard drive, CD drive, and DVD<br />
drive (see page 63).<br />
If there is an error message on your<br />
screen identifying a problem with a<br />
device (such as the floppy drive or hard<br />
drive), check the device to ensure that<br />
it is functioning properly.<br />
The operating system is attempting to<br />
boot from a device (such as the floppy<br />
drive or hard drive); check system<br />
setup (see page 107) to make sure the<br />
boot sequence is correct for the devices<br />
installed on your computer.<br />
If the problem persists, contact <strong>Dell</strong><br />
(see page 119).<br />
All four diagnostic lights display solid<br />
green and then turn off after the system<br />
successfully boots to the operating<br />
system.<br />
None.<br />
Troubleshooting Tools 47
www.dell.com | support.dell.com<br />
<strong>Dell</strong> Diagnostics<br />
48 Troubleshooting Tools<br />
CAUTION: Before you begin any of the procedures in this section, follow the safety instructions in the<br />
Product Information Guide.<br />
If you experience a problem with your computer, perform the checks in "Solving Problems" on<br />
page 29 and run the <strong>Dell</strong> Diagnostics before you contact <strong>Dell</strong> for technical assistance.<br />
NOTICE: The <strong>Dell</strong> Diagnostics works only on <strong>Dell</strong> computers.<br />
1 Turn on (or restart) your computer.<br />
2 When the DELL logo appears, press immediately.<br />
If you wait too long and the operating system logo appears, continue to wait until you see the<br />
Microsoft ® Windows ® desktop. Then shut down your computer (see page 55) and try again.<br />
3 When the boot device list appears, highlight Boot to Utility Partition and press .<br />
4 When the <strong>Dell</strong> Diagnostics Main Menu appears, select the test you want to run.<br />
<strong>Dell</strong> Diagnostics Main Menu<br />
1 After the <strong>Dell</strong> Diagnostics loads and the Main Menu screen appears, click the button for the<br />
option you want.<br />
Option Function<br />
Express Test Performs a quick test of devices. This test typically takes 10 to<br />
20 minutes and requires no interaction on your part. Run<br />
Express Test first to increase the possibility of tracing the<br />
problem quickly.<br />
Extended Test Performs a thorough check of devices. This test typically takes<br />
1 hour or more and requires you to answer questions<br />
periodically.<br />
Custom Test Tests a specific device. You can customize the tests you want<br />
to run.<br />
Symptom Tree Lists the most common symptoms encountered and allows<br />
you to select a test based on the symptom of the problem you<br />
are having.<br />
2 If a problem is encountered during a test, a message appears with an error code and a<br />
description of the problem. Write down the error code and problem description and follow<br />
the instructions on the screen.<br />
If you cannot resolve the error condition, contact <strong>Dell</strong> (see page 119).<br />
NOTE: The Service Tag for your computer is located at the top of each test screen. If you contact <strong>Dell</strong>,<br />
technical support will ask for your Service Tag.
3 If you run a test from the Custom Test or Symptom Tree option, click the applicable tab<br />
described in the following table for more information.<br />
4 Close the test screen to return to the Main Menu screen. To exit the <strong>Dell</strong> Diagnostics and<br />
restart the computer, close the Main Menu screen.<br />
Drivers<br />
Tab Function<br />
Results Displays the results of the test and any error conditions<br />
encountered.<br />
Errors Displays error conditions encountered, error codes, and the<br />
problem description.<br />
Help Describes the test and may indicate requirements for running the<br />
test.<br />
Configuration Displays your hardware configuration for the selected device.<br />
The <strong>Dell</strong> Diagnostics obtains configuration information for all<br />
devices from system setup, memory, and various internal tests,<br />
and it displays the information in the device list in the left pane<br />
of the screen. The device list may not display the names of all the<br />
components installed on your computer or all devices attached to<br />
your computer.<br />
Parameters Allows you to customize the test by changing the test settings.<br />
What Is a Driver?<br />
A driver is a program that controls a device such as a printer, mouse, or keyboard. All devices require<br />
a driver program.<br />
A driver acts like a translator between the device and any other programs that use the device. Each<br />
device has its own set of specialized commands that only its driver recognizes.<br />
<strong>Dell</strong> ships your computer to you with required drivers already installed—no further installation or<br />
configuration is needed.<br />
Many drivers, such as the keyboard driver, come with your Microsoft ® Windows ® operating<br />
system. You may need to install drivers if you:<br />
Upgrade your operating system<br />
Reinstall your operating system<br />
Connect or install a new device<br />
Troubleshooting Tools 49
www.dell.com | support.dell.com<br />
Identifying Drivers<br />
If you experience a problem with any device, identify whether the driver is the source of your<br />
problem and, if necessary, update the driver.<br />
Windows XP<br />
1 Click the Start button and click Control Panel.<br />
2 Under Pick a Category, click Performance and Maintenance.<br />
3 Click System.<br />
4 In the System Properties window, click the Hardware tab.<br />
5 Click Device Manager.<br />
6 Scroll down the list to see if any device has an exclamation point (a yellow circle with a [!]) on<br />
the device icon.<br />
If an exclamation point is next to the device name, you may need to reinstall the driver or<br />
install a new driver.<br />
Reinstalling Drivers<br />
50 Troubleshooting Tools<br />
NOTICE: The <strong>Dell</strong> <strong>Support</strong> website at support.dell.com provides approved drivers for <strong>Dell</strong> computers.<br />
If you install drivers obtained from other sources, your computer might not work correctly.<br />
Using Windows XP Device Driver Rollback<br />
If a problem occurs on your computer after you install or update a driver, use Windows XP Device<br />
Driver Rollback to replace the driver with the previously installed version.<br />
1 Click the Start button and click Control Panel.<br />
2 Under Pick a Category, click Performance and Maintenance.<br />
3 Click System.<br />
4 In the System Properties window, click the Hardware tab.<br />
5 Click Device Manager.<br />
6 Right-click the device for which the new driver was installed and click Properties.<br />
7 Click the Drivers tab.<br />
8 Click Roll Back Driver.<br />
If Device Driver Rollback does not resolve the problem, then use System Restore to return your<br />
computer to the operating state that existed before you installed the new driver.
Manually Reinstalling Drivers<br />
1 After copying the required driver files to your hard drive, click the Start button and right-click<br />
My Computer.<br />
2 Click Properties.<br />
3 Click the Hardware tab and click Device Manager.<br />
4 Double-click the type of device for which you are installing the driver.<br />
5 Double-click the name of the device for which you are installing the driver.<br />
6 Click the Driver tab and click Update Driver.<br />
7 Click Install from a list or specific location (Advanced) and click Next.<br />
8 Click Browse and browse to the location to which you previously extracted the driver files.<br />
9 When the name of the appropriate driver appears, click Next.<br />
10 Click Finish and restart your computer.<br />
Resolving Software and Hardware Incompatibilities<br />
If a device is either not detected during the operating system setup or is detected but incorrectly<br />
configured, you can use the Hardware Troubleshooter to resolve the incompatibility.<br />
To resolve incompatibilities using the Hardware Troubleshooter:<br />
1 Click the Start button and click Help and <strong>Support</strong>.<br />
2 Type hardware troubleshooter in the Search field and click the arrow to start the search.<br />
3 Click Hardware Troubleshooter in the Search Results list.<br />
4 In the Hardware Troubleshooter list, click I need to resolve a hardware conflict on my<br />
computer, and click Next.<br />
Restoring Your Operating System<br />
You can restore your operating system in the following ways:<br />
Microsoft Windows XP System Restore returns your computer to an earlier operating state<br />
without affecting data files.<br />
<strong>Dell</strong> PC Restore by Symantec restores your hard drive to the operating state it was in when<br />
you purchased the computer. <strong>Dell</strong> PC Restore permanently deletes all data on the hard drive<br />
and removes any applications installed after you received the computer.<br />
Troubleshooting Tools 51
www.dell.com | support.dell.com<br />
Using Microsoft Windows XP System Restore<br />
The Microsoft Windows XP operating system provides System Restore to allow you to return your<br />
computer to an earlier operating state (without affecting data files) if changes to the hardware,<br />
software, or other system settings have left the computer in an undesirable operating state. See the<br />
Windows Help and <strong>Support</strong> Center for information on using System Restore.<br />
52 Troubleshooting Tools<br />
NOTICE: Make regular backups of your data files. System Restore does not monitor your data files or<br />
recover them.<br />
NOTE: The procedures in this document were written for the Windows default view, so they may not<br />
work if you set your <strong>Dell</strong> computer to the Windows Classic view.<br />
Creating a Restore Point<br />
1 Click the Start button and click Help and <strong>Support</strong>.<br />
2 Click System Restore.<br />
3 Follow the instructions on the screen.<br />
Restoring the Computer to an Earlier Operating State<br />
If problems occur after you install a device driver, use Device Driver Rollback (see page 50) to<br />
resolve the problem. If that is unsuccessful, then use System Restore.<br />
NOTICE: Before you restore the computer to an earlier operating state, save and close any open files<br />
and exit any open programs. Do not alter, open, or delete any files or programs until the system<br />
restoration is complete.<br />
1 Click the Start button, point to All Programs→ Accessories→ System Tools, and then click<br />
System Restore.<br />
2 Ensure that Restore my computer to an earlier time is selected and click Next.<br />
3 Click a calendar date to which you want to restore your computer.<br />
The Select a Restore Point screen provides a calendar that allows you to see and select restore<br />
points. All calendar dates with available restore points appear in boldface type.<br />
4 Select a restore point and click Next.<br />
If a calendar date has only one restore point, then that restore point is automatically selected.<br />
If two or more restore points are available, click the restore point that you prefer.<br />
5 Click Next.<br />
The Restoration Complete screen appears after System Restore finishes collecting data and<br />
then the computer restarts.<br />
6 After the computer restarts, click OK.<br />
To change the restore point, you can either repeat the steps using a different restore point, or you<br />
can undo the restoration.
Undoing the Last System Restore<br />
NOTICE: Before you undo the last system restore, save and close all open files and exit any open<br />
programs. Do not alter, open, or delete any files or programs until the system restoration is complete.<br />
1 Click the Start button, point to All Programs→ Accessories→ System Tools, and then click<br />
System Restore.<br />
2 Click Undo my last restoration and click Next.<br />
Enabling System Restore<br />
If you reinstall Windows XP with less than 200 MB of free hard-disk space available, System<br />
Restore is automatically disabled. To see if System Restore is enabled:<br />
1 Click the Start button and click Control Panel.<br />
2 Click Performance and Maintenance.<br />
3 Click System.<br />
4 Click the System Restore tab.<br />
5 Ensure that Turn off System Restore is unchecked.<br />
Using <strong>Dell</strong> PC Restore by Symantec<br />
NOTE: <strong>Dell</strong> PC Restore is not available in all countries.<br />
Use <strong>Dell</strong> PC Restore by Symantec only as the last method to restore your operating system. PC<br />
Restore restores your hard drive to the operating state it was in when you purchased the computer.<br />
Any programs or files added since you received your computer—including data files—are<br />
permanently deleted from the hard drive. Data files include documents, spreadsheets, e-mail<br />
messages, digital photos, music files, and so on. If possible, back up all data before using PC<br />
Restore.<br />
NOTICE: Using PC Restore permanently deletes all data on the hard drive and removes any applications<br />
or drivers installed after you received your computer. If possible, back up the data before using PC<br />
Restore.<br />
To use PC Restore:<br />
1 Turn on the computer.<br />
During the boot process, a blue bar with www.dell.com appears at the top of the screen.<br />
2 Immediately upon seeing the blue bar, press .<br />
If you do not press in time, let the computer finish restarting, and then<br />
restart the computer again.<br />
NOTICE: If you do not want to proceed with PC Restore, click Reboot in the following step.<br />
3 On the next screen that appears, click Restore.<br />
Troubleshooting Tools 53
www.dell.com | support.dell.com<br />
4 On the next screen, click Confirm.<br />
The restore process takes approximately 6–10 minutes to complete.<br />
5 When prompted, click Finish to reboot the computer.<br />
NOTE: Do not manually shut down the computer. Click Finish and let the computer completely reboot.<br />
6 When prompted, click Yes.<br />
The computer restarts. Because the computer is restored to its original operating state, the<br />
screens that appear, such as the End User License Agreement, are the same ones that<br />
appeared the first time the computer was turned on.<br />
7 Click Next.<br />
The System Restore screen appears and the computer restarts.<br />
8 After the computer restarts, click OK.<br />
54 Troubleshooting Tools
Removing and Installing Parts<br />
Before You Begin<br />
This chapter provides procedures for removing and installing the components in your computer.<br />
Unless otherwise noted, each procedure assumes that the following conditions exist:<br />
You have performed the steps in "Turn Off Your Computer" and "Before Working Inside Your<br />
Computer."<br />
You have read the safety information in your <strong>Dell</strong> Product Information Guide.<br />
A component can be replaced by performing the removal procedure in reverse order.<br />
Recommended Tools<br />
The procedures in this document may require the following tools:<br />
Small flat-blade screwdriver<br />
Phillips screwdriver<br />
Flash BIOS update program floppy disk or CD<br />
Turn Off Your Computer<br />
NOTICE: To avoid losing data, save and close any open files and exit any open programs before you turn<br />
off your computer.<br />
1 Shut down the operating system:<br />
a Save and close any open files, exit any open programs, click the Start button, and then<br />
click Turn Off Computer.<br />
b In the Turn off computer window, click Turn off.<br />
The computer turns off after the operating system shutdown process finishes.<br />
2 Ensure that the computer and any attached devices are turned off. If your computer and<br />
attached devices did not automatically turn off when you shut down your operating system,<br />
press and hold the power button for 4 seconds.<br />
Removing and Installing Parts 55
www.dell.com | support.dell.com<br />
Before Working Inside Your Computer<br />
Use the following safety guidelines to help protect your computer from potential damage and to<br />
help ensure your own personal safety.<br />
CAUTION: Before you begin any of the procedures in this section, follow the safety instructions in the<br />
Product Information Guide.<br />
CAUTION: Handle components and cards with care. Do not touch the components or contacts on a<br />
card. Hold a card by its edges or by its metal mounting bracket. Hold a component such as a processor<br />
by its edges, not by its pins.<br />
NOTICE: Only a certified service technician should perform repairs on your computer. Damage due to<br />
servicing that is not authorized by <strong>Dell</strong> is not covered by your warranty.<br />
NOTICE: When you disconnect a cable, pull on its connector or on its strain-relief loop, not on the cable<br />
itself. Some cables have a connector with locking tabs; if you are disconnecting this type of cable, press<br />
in on the locking tabs before you disconnect the cable. As you pull connectors apart, keep them evenly<br />
aligned to avoid bending any connector pins. Also, before you connect a cable, ensure that both<br />
connectors are correctly oriented and aligned.<br />
NOTICE: To avoid damaging the computer, perform the following steps before you begin working inside<br />
the computer.<br />
1 Turn off your computer.<br />
NOTICE: To disconnect a network cable, first unplug the cable from your computer and then unplug it<br />
from the network wall jack.<br />
2 Disconnect any telephone or telecommunication lines from the computer.<br />
3 Disconnect your computer and all attached devices from their electrical outlets, and then<br />
press the power button to ground the system board.<br />
NOTICE: Before touching anything inside your computer, ground yourself by touching an unpainted<br />
metal surface, such as the metal at the back of the computer. While you work, periodically touch an<br />
unpainted metal surface to dissipate any static electricity that could harm internal components.<br />
56 Removing and Installing Parts
Front View of the Computer<br />
12<br />
11<br />
10<br />
9<br />
8<br />
7<br />
13<br />
6<br />
1 cover latch release Use this latch to remove the cover. See "Removing the<br />
Computer Cover" on page 60.<br />
2 CD or DVD activity light The drive light is on when the computer reads data from the<br />
CD or DVD drive.<br />
3 CD or DVD eject button Press to eject a disc from the CD or DVD drive.<br />
4 FlexBay drives (2) Can contain an optional floppy drive or optional Media Card<br />
Reader. For information on using the Media Card Reader, see<br />
"Using a Media Card Reader (Optional)" on page 20.<br />
5<br />
4<br />
1<br />
2<br />
3<br />
Removing and Installing Parts 57
www.dell.com | support.dell.com<br />
5 IEEE 1394 connector<br />
(optional)<br />
58 Removing and Installing Parts<br />
Use the optional IEEE 1394 connector for high-speed data<br />
devices such as digital video cameras and external storage<br />
devices.<br />
6 vents For adequate cooling, do not block any of the vents.<br />
NOTICE: Ensure that there is a minimum of two inches of space<br />
between all vents and any object near these vents.<br />
NOTICE: Keep the vent area clean and dust-free to ensure that<br />
the system is adequately ventilated. Use only a dry cloth to clean<br />
the vent area to avoid water damage to the system.<br />
7 USB 2.0 connectors (2) Use the front USB connectors for devices that you connect<br />
occasionally, such as joysticks or cameras, or for bootable USB<br />
devices (see "System Setup Options" on page 110 for more<br />
information on booting to a USB device). It is recommended<br />
that you use the back USB connectors for devices that typically<br />
remain connected, such as printers and keyboards.<br />
8 power button Press to turn on the computer.<br />
NOTICE: To avoid losing data, do not use the power button to<br />
turn off the computer. Instead, perform an operating system<br />
shutdown.<br />
9 hard-drive activity light The hard drive activity light is on when the computer reads<br />
data from or writes data to the hard drive. The light might also<br />
be on when a device such as a CD player is operating.<br />
10 diagnostic lights (4) Use the lights to help you troubleshoot a computer problem<br />
based on the diagnostic code. For more information, see<br />
"Diagnostic Lights" on page 45.<br />
11 headphone connector Use the headphone connector to attach headphones and most<br />
kinds of speakers.<br />
12 microphone connector Use the microphone connector to attach a personal computer<br />
microphone for voice or musical input into a sound or<br />
telephony program.<br />
13 Service Tag Used to identify your computer when you access the <strong>Dell</strong><br />
<strong>Support</strong> website or call technical support.
Back View of the Computer<br />
1 power connector Insert the power cable.<br />
2 sound card connectors (5) Line-in connector — Use the blue line-in connector to attach a record/playback<br />
device such as a cassette player, CD player, or VCR.<br />
Line-out connector — Use the green line-out connector to attach headphones<br />
and most speakers with integrated amplifiers.<br />
Microphone connector — Use the pink microphone connector to attach a<br />
personal computer microphone for voice or musical input into a sound or<br />
telephony program.<br />
Surround connector — Use the black surround connector to attach multichannelcapable<br />
speakers.<br />
Center/subwoofer (Center/LFE) connector — Use the yellow subwoofer<br />
connector to attach multiple speakers.<br />
1<br />
2<br />
3<br />
4<br />
5<br />
Removing and Installing Parts 59
www.dell.com | support.dell.com<br />
3 network connector To attach your computer to a network or broadband device, connect one end of a<br />
network cable to either a network jack or your network or broadband device.<br />
Connect the other end of the network cable to the network connector on your<br />
computer. A click indicates that the network cable has been securely attached.<br />
NOTE: Do not plug a telephone cable into the network connector.<br />
On computers with a network connector card, use the connector on the card.<br />
It is recommended that you use Category 5 wiring and connectors for your<br />
network. If you must use Category 3 wiring, force the network speed to 10 Mbps to<br />
ensure reliable operation.<br />
4 USB 2.0 connectors (5) Use the back USB connectors for devices that typically remain connected, such as<br />
printers and keyboards.<br />
It is recommended that you use the front USB connectors for devices that you<br />
connect occasionally, such as joysticks or cameras, or for bootable USB devices.<br />
5 card slots (6) Access connectors for any installed PCI or PCI Express cards.<br />
Removing the Computer Cover<br />
CAUTION: Before you begin any of the procedures in this section, follow the safety instructions in the<br />
Product Information Guide.<br />
CAUTION: To guard against electrical shock, always unplug your computer from the electrical outlet<br />
before removing the cover.<br />
NOTICE: Before touching anything inside your computer, ground yourself by touching an unpainted<br />
metal surface, such as the metal at the back of the computer. While you work, periodically touch an<br />
unpainted metal surface to dissipate any static electricity that could harm internal components.<br />
1 Follow the procedures in "Before You Begin" on page 55.<br />
2 If you have installed a security cable, remove it from the security cable slot.<br />
NOTICE: Ensure that sufficient space exists to support the removed cover—at least 30 cm (1 ft) of desk<br />
top space.<br />
NOTICE: Ensure that you are working on a level, protected surface to avoid scratching either the<br />
computer or the surface on which it is resting.<br />
3 Lay your computer on its side with the computer cover facing up.<br />
4 Pull back the cover latch release on the top panel.<br />
60 Removing and Installing Parts
cover latch release<br />
5 Locate the three hinge tabs on the bottom edge of the computer.<br />
6 Grip the sides of the computer cover and pivot the cover up.<br />
7 Lift the cover away and set it aside in a secure location.<br />
computer cover<br />
back of computer<br />
hinge tabs (3)<br />
Removing and Installing Parts 61
www.dell.com | support.dell.com<br />
Inside View of Your Computer<br />
CAUTION: Before you begin any of the procedures in this section, follow the safety instructions in the<br />
Product Information Guide.<br />
CD or DVD drive<br />
*floppy drive<br />
*may not be present on all computers<br />
62 Removing and Installing Parts<br />
power supply system board<br />
hard drive
System Board Components<br />
memory module<br />
connectors<br />
(1, 2, 3, 4)<br />
processor<br />
power<br />
connector<br />
processor and<br />
heat sink<br />
connector<br />
fan connector<br />
(CPU FAN)<br />
fan cardcage<br />
connector<br />
Serial 2<br />
connector<br />
battery socket<br />
(BATTERY)<br />
password jumper<br />
(PSWD)<br />
floppy drive<br />
connector (FLOPPY)<br />
memory fan<br />
connector<br />
front panel I/O<br />
connector<br />
main power<br />
connector<br />
IDE drive<br />
connector<br />
SATA connectors<br />
(4) (SATA0,<br />
SATA1, SATA2,<br />
SATA3)<br />
clear CMOS<br />
jumper<br />
(RTCRST)<br />
FlexBay USB<br />
connector<br />
PCI Express x1<br />
card connector<br />
PCI Express x16<br />
card connector<br />
PCI Express x4<br />
card connector<br />
PCI card connectors<br />
Removing and Installing Parts 63
www.dell.com | support.dell.com<br />
Memory<br />
You can increase your computer memory by installing memory modules on the system board.For<br />
information on the type of memory supported by your computer, see "Specifications."<br />
Memory Overview<br />
Memory modules should be installed in pairs of matched memory size, speed, and technology. If<br />
the memory modules are not installed in matched pairs, the computer will continue to<br />
operate, but with a slight reduction in performance. See the label in the upper-right corner of<br />
the module to determine the module’s capacity.<br />
NOTE: Always install memory modules in the order indicated on the system board.<br />
The recommended memory configurations are:<br />
– A pair of matched memory modules installed in connectors DIMM_1 and DIMM_2<br />
or<br />
– A pair of matched memory modules installed in connectors DIMM_1 and DIMM_2 and<br />
another matched pair installed in connectors DIMM_3 and DIMM_4<br />
If you install mixed pairs of DDR2 400-MHz (PC2-3200), DDR2 533-MHz (PC2-4300) and<br />
DDR2 667-MHz (PC2-5300) memory, the modules function at the slowest speed installed.<br />
Be sure to install a single memory module in the DIMM_1 connector, the connector closest to<br />
the processor, before you install modules in the other connectors.<br />
While installing memory modules, ensure that you do not mix ECC and non-ECC memory.<br />
64 Removing and Installing Parts
Channel A: matched pair of memory<br />
modules in connectors DIMM_1<br />
and DIMM_2 (white securing clips)<br />
Channel B: matched pair of memory<br />
modules in connectors DIMM_3<br />
and DIMM_4 (black securing clips)<br />
NOTE: Memory purchased from <strong>Dell</strong> is covered under your computer warranty.<br />
NOTICE: If you remove your original memory modules from the computer during a memory upgrade,<br />
keep them separate from any new modules that you may have, even if you purchased the new modules<br />
from <strong>Dell</strong>. If possible, do not pair an original memory module with a new memory module. Otherwise, your<br />
computer may not start properly. You should install your original memory modules in pairs either in<br />
connectors DIMM_1 and DIMM_2 or connectors DIMM_3 and DIMM_4.<br />
Addressing Memory With 4-GB Configurations<br />
Your computer supports a maximum of 4 GB of memory when you use four 1-GB DIMMs. Current<br />
operating systems, such as Microsoft ® Windows ® XP, can only use a maximum of 4 GB of address<br />
space; however, the amount of memory available to the operating system is less than 4 GB. Certain<br />
components within the computer require address space in the 4-GB range. Any address space<br />
reserved for these components cannot be used by computer memory.<br />
Removing and Installing Parts 65
www.dell.com | support.dell.com<br />
Installing Memory<br />
CAUTION: Before you begin any of the procedures in this section, follow the safety instructions in the<br />
Product Information Guide.<br />
NOTICE: To prevent static damage to components inside your computer, discharge static electricity<br />
from your body before you touch any of your computer’s electronic components. You can do so by<br />
touching an unpainted metal surface on the computer.<br />
1 Follow the procedures in "Before You Begin" on page 55.<br />
2 Remove the computer cover (see page 60).<br />
3 Lay the computer on its side so that the system board is on the bottom of the inside of the<br />
computer.<br />
4 Press out the securing clip at each end of the memory module connector.<br />
5 Align the notch on the bottom of the module with the crossbar in the connector.<br />
66 Removing and Installing Parts<br />
memory module<br />
cutouts (2)<br />
notch<br />
memory connector closest<br />
to processor<br />
connector<br />
securing clips (2)<br />
crossbar
NOTICE: To avoid damage to the memory module, press the module straight down into the connector<br />
while you apply equal force to each end of the module.<br />
6 Insert the module into the connector until the module snaps into position.<br />
If you insert the module correctly, the securing clips snap into the cutouts at each end of the<br />
module.<br />
7 Close the computer cover.<br />
memory module<br />
cutouts (2)<br />
memory module<br />
cutouts (2)<br />
notches<br />
notches<br />
crossbars<br />
crossbars<br />
NOTICE: To connect a network cable, first plug the cable into the network wall jack and then plug it into<br />
the computer.<br />
Removing and Installing Parts 67
www.dell.com | support.dell.com<br />
8 Connect your computer and devices to electrical outlets, and turn them on.<br />
9 Right-click the My Computer icon and click Properties.<br />
10 Click the General tab.<br />
11 To verify that the memory is installed correctly, check the amount of memory (RAM) listed.<br />
Removing Memory<br />
CAUTION: Before you begin any of the procedures in this section, follow the safety instructions in the<br />
Product Information Guide.<br />
NOTICE: To prevent static damage to components inside your computer, discharge static electricity<br />
from your body before you touch any of your computer’s electronic components. You can do so by<br />
touching an unpainted metal surface on the computer.<br />
1 Follow the procedures in "Before You Begin" on page 55.<br />
2 Remove the computer cover (see page 60).<br />
3 Press out the securing clip at each end of the memory module connector.<br />
4 Grasp the module and pull up.<br />
If the module is difficult to remove, gently ease the module back and forth to remove it from<br />
the connector.<br />
Cards<br />
CAUTION: Before you begin any of the procedures in this section, follow the safety instructions in the<br />
Product Information Guide.<br />
NOTICE: To prevent static damage to components inside your computer, discharge static electricity<br />
from your body before you touch any of your computer’s electronic components. You can do so by<br />
touching an unpainted metal surface on the computer.<br />
Your <strong>Dell</strong> computer provides the following slots for PCI and PCI Express cards:<br />
Three PCI card slots<br />
One PCI Express x1 card slot<br />
One PCI Express x16 card slot<br />
One PCI Express x4 card slot<br />
68 Removing and Installing Parts
PCI Cards<br />
If you are installing or replacing a card, follow the procedures in the next section. If you are<br />
removing but not replacing a card, see ""Removing a PCI Card" on page 72".<br />
If you are replacing a card, remove the current driver for the card from the operating system.<br />
If you are installing or replacing a PCI Express card, see "Installing a PCI Express Card" on page 74.<br />
Installing a PCI Card<br />
NOTE: <strong>Dell</strong> offers an optional customer kit for Audigy II and IEEE 1394 PCI add-in-cards that includes a<br />
front-mounted IEEE 1394 connector.<br />
1 Follow the procedures in "Before You Begin" on page 55.<br />
2 Remove the computer cover (see page 60).<br />
release tabs (2)<br />
card retention<br />
door<br />
alignment bar<br />
alignment guide<br />
filler bracket<br />
Removing and Installing Parts 69
www.dell.com | support.dell.com<br />
3 Push the two release tabs on the card retention door from the inside to pivot the door open.<br />
Because the door is captive, it will remain in the open position.<br />
4 If your computer includes a card retention mechanism, to secure the x16 card in place from<br />
the top:<br />
a Pivot the mechanism upward and gently press the release tab downward to release the<br />
mechanism from the two tab slots holding it in place.<br />
b Set the retention mechanism aside in a secure location.<br />
5 If you are installing a new card, remove the filler bracket to create a card-slot opening. Then<br />
continue with step 7.<br />
6 If you are replacing a card that is already installed in the computer, remove the card.<br />
If necessary, disconnect any cables connected to the card. Grasp the card by its top corners,<br />
and ease it out of its connector.<br />
7 Prepare the card for installation.<br />
See the documentation that came with the card for information on configuring the card,<br />
making internal connections, or otherwise customizing it for your computer.<br />
70 Removing and Installing Parts<br />
release tab card retention mechanism<br />
card retention<br />
door
CAUTION: Some network adapters automatically start the computer when they are connected to a<br />
network. To guard against electrical shock, be sure to unplug your computer from its electrical outlet<br />
before installing any cards.<br />
8 Place the card in the connector and press down firmly. Ensure that the card is fully seated in<br />
the slot.<br />
not fully seated card<br />
fully seated card<br />
alignment guide<br />
alignment bar<br />
bracket within<br />
slot<br />
bracket caught<br />
outside of slot<br />
9 Before you close the card retention door, ensure that:<br />
The tops of all cards and filler brackets are flush with the alignment bar.<br />
The notch in the top of the card or filler bracket fits around the alignment guide.<br />
card retention<br />
door<br />
release tabs (2)<br />
Removing and Installing Parts 71
www.dell.com | support.dell.com<br />
10 Close the card retention door by snapping it into place to secure the card(s).<br />
NOTICE: Do not route card cables over or behind the cards. Cables routed over the cards can prevent<br />
the computer cover from closing properly or cause damage to the equipment.<br />
11 Connect any cables that should be attached to the card.<br />
See the documentation for the card for information about the card cable connections.<br />
NOTICE: To connect a network cable, first plug the cable into the network device and then plug the<br />
cable into the computer.<br />
12 If you replaced a card that was already installed in the computer and you removed the<br />
retention mechanism, you may reinstall the retention mechanism.<br />
13 Before replacing the card retention mechanism, ensure that:<br />
The tops of all cards and filler brackets are flush with the alignment bar.<br />
The notch in the top of the card or filler bracket fits around the alignment guide.<br />
14 Snap the card retention mechanism into place, securing the x16 PCI card.<br />
15 Replace the computer cover, reconnect the computer and devices to electrical outlets, and<br />
then turn them on.<br />
16 If you installed a sound card:<br />
a Enter system setup, select Integrated Audio Controller, and then change the setting to<br />
Off.<br />
b Connect external audio devices to the sound card connectors. Do not connect external<br />
audio devices to the microphone, speaker/headphone, or line-in connectors on the back<br />
panel.<br />
17 If you installed an add-in network adapter and want to disable the integrated network<br />
adapter:<br />
a Enter system setup, select Integrated NIC Controller, and then change the setting to<br />
Off.<br />
b Connect the network cable to the add-in network adapter connectors. Do not connect<br />
the network cable to the integrated connector on the back panel.<br />
18 Install any drivers required for the card as described in the card documentation.<br />
Removing a PCI Card<br />
1 Follow the procedures in "Before You Begin" on page 55.<br />
2 Remove the computer cover (see page 60).<br />
3 If you are removing the card permanently, install a filler bracket in the empty card-slot<br />
opening.<br />
If you need a filler bracket, contact <strong>Dell</strong> (see page 119).<br />
72 Removing and Installing Parts
NOTE: Installing filler brackets over empty card-slot openings is necessary to maintain FCC certification<br />
of the computer. The brackets also keep dust and dirt out of your computer.<br />
NOTICE: To connect a network cable, first plug the cable into the network device and then plug the<br />
cable into the computer.<br />
4 Replace the computer cover, reconnect the computer and devices to electrical outlets, and<br />
then turn them on.<br />
5 Remove the card driver from the operating system.<br />
6 If you removed a sound card:<br />
a Enter system setup, select Integrated Audio Controller, and then change the setting to<br />
On.<br />
b Connect external audio devices to the audio connectors on the back panel of the<br />
computer.<br />
7 If you removed an add-in network connector:<br />
a Enter system setup, select Integrated NIC Controller, and then change the setting to<br />
On.<br />
b Connect the network cable to the integrated connector on the back panel of the<br />
computer.<br />
PCI Express Cards<br />
Your computer supports:<br />
One PCI Express x1 card<br />
One PCI Express x16 card<br />
One PCI Express x4 card<br />
If you are installing or replacing a PCI Express card, follow the procedures in the next section. If<br />
you are removing but not replacing a card, see "Removing a PCI Express Card" on page 79.<br />
If you are replacing a card, remove the current driver for the card from the operating system.<br />
If you are installing or replacing a PCI card, see "Installing a PCI Card" on page 69.<br />
Removing and Installing Parts 73
www.dell.com | support.dell.com<br />
Installing a PCI Express Card<br />
1 Follow the procedures in "Before You Begin" on page 55.<br />
release tabs (2)<br />
card retention<br />
door<br />
alignment bar<br />
2 If present on your computer, rotate the lever on the chassis wall upward.<br />
3 Push the two release tabs on the card retention door toward each other and pivot the door<br />
open. Because the door is captive, it will remain in the open position.<br />
74 Removing and Installing Parts<br />
alignment guide<br />
filler bracket<br />
*lever on chassis wall<br />
*may not be present on all computers
*"piano" bracket<br />
release tab card retention mechanism*<br />
4 If your computer includes a card retention mechanism:<br />
*may not be present on all computers<br />
a Pivot the mechanism upward and gently squeeze in on the sides to release the<br />
mechanism from the two tab slots holding it in place.<br />
b Set the retention mechanism aside in a secure location.<br />
card retention<br />
door<br />
NOTE: For full-length PCI-E cards, if a "piano" bracket is present on your computer you need to rotate it<br />
upward by pressing the tabs on the side of the bracket toward each other.<br />
5 If you are installing a new card, remove the filler bracket to create a card-slot opening. Then<br />
continue with step 7.<br />
6 If you are replacing a card that is already installed in the computer, remove the existing card.<br />
If necessary, disconnect any cables connected to the card. If your card includes a retention<br />
mechanism, remove the top of the retention mechanism by pressing the tab and pulling up<br />
on the top.<br />
NOTE: For full-length PCI-E cards, if a "piano" bracket is present on your computer you need to rotate it<br />
upward by pressing the tabs on the side of the bracket toward each other.<br />
Removing and Installing Parts 75
www.dell.com | support.dell.com<br />
7 Pull the securing tab, grasp the card by its top corners, and then ease it out of its connector.<br />
PCI Express<br />
x16 card<br />
PCI Express x16<br />
card slot<br />
8 Prepare the card for installation.<br />
See the documentation that came with the card for information on configuring the card,<br />
making internal connections, or otherwise customizing it for your computer.<br />
CAUTION: Some network adapters automatically start the computer when they are connected to a<br />
network. To guard against electrical shock, be sure to unplug your computer from its electrical outlet<br />
before installing any cards.<br />
9 If you are installing the card into the x16 card connector, position the card so that the<br />
securing slot is aligned with the securing tab.<br />
NOTICE: Ensure that you release the securing tab to seat the card. If the card is not installed correctly,<br />
you may damage the system board.<br />
10 Place the card in the connector and press down firmly. Ensure that the card is fully seated in<br />
the slot.<br />
76 Removing and Installing Parts<br />
securing tab<br />
PCI Express x1<br />
card<br />
PCI Express x1<br />
card slot
not fully seated card<br />
fully seated card<br />
alignment guide<br />
alignment bar<br />
bracket within slot<br />
bracket caught<br />
outside of slot<br />
11 Ensure that:<br />
The tops of all cards and filler brackets are flush with the alignment bar.<br />
The notch in the top of the card or filler bracket fits around the alignment guide.<br />
12 If you removed a card retention mechanism, snap it into place, securing the x16 PCI-E card.<br />
*"piano" bracket<br />
release tab card retention mechanism*<br />
*may not be present on all computers<br />
card<br />
retention<br />
door<br />
Removing and Installing Parts 77
www.dell.com | support.dell.com<br />
NOTICE: Do not route card cables over or behind the cards. Cables routed over the cards can prevent<br />
the computer cover from closing properly or cause damage to the equipment.<br />
NOTICE: To connect a network cable, first plug the cable into the network device and then plug the<br />
cable into the computer.<br />
NOTE: or full-length PCI-E cards, if a "piano" bracket is present on your computer you need to rotate it<br />
down into place.<br />
13 Replace the computer cover, reconnect the computer and devices to electrical outlets, and<br />
then turn them on.<br />
14 If you installed a sound card:<br />
a Enter system setup, select Integrated Audio Controller, and then change the setting to<br />
Off.<br />
b Connect external audio devices to the sound card’s connectors. Do not connect external<br />
audio devices to the microphone, speaker/headphone, or line-in connectors on the back<br />
panel.<br />
15 If you installed an add-in network adapter and want to disable the integrated network<br />
adapter:<br />
a Enter system setup select Integrated NIC Controller, and then change the setting to<br />
Off.<br />
b Connect the network cable to the add-in network adapter’s connectors. Do not connect<br />
the network cable to the integrated connector on the back panel.<br />
16 Install any drivers required for the card as described in the card documentation.<br />
78 Removing and Installing Parts
Removing a PCI Express Card<br />
1 Follow the procedures in "Before You Begin" on page 55.<br />
2 Remove the computer cover (see page 60).<br />
release tabs (2)<br />
card retention<br />
door<br />
alignment bar<br />
alignment guide<br />
filler bracket<br />
*may not be present on all computers<br />
3 If present on your computer, rotate the lever on the chassis wall upward.<br />
*lever on chassis wall<br />
Removing and Installing Parts 79
www.dell.com | support.dell.com<br />
4 Push the two release tabs on the card retention door toward each other and pivot the door<br />
open. Because the door is captive, it will remain in the open position.<br />
5 If your computer includes a card retention mechanism, to remove the x16 card:<br />
a Pivot the mechanism upward and gently squeeze in on the sides to release the<br />
mechanism from the two tab slots holding it in place.<br />
b Set the retention mechanism aside in a secure location.<br />
NOTE: For full-length PCI-E cards, if a "piano" bracket is present on your computer you need to rotate it<br />
upward by pressing the tabs on the side of the bracket toward each other.<br />
PCI Express<br />
x16 card<br />
PCI Express x16<br />
card slot<br />
release tab<br />
*"piano" bracket<br />
80 Removing and Installing Parts<br />
card retention mechanism<br />
*may not be present on all computers<br />
securing tab<br />
card retention<br />
door<br />
PCI Express x1<br />
card<br />
PCI Express x1<br />
card slot
NOTICE: Ensure that you release the securing tab to unseat the card. If the card is not removed<br />
correctly, the system board may be damaged.<br />
6 Release the securing tab on the card slot to unseat the card.<br />
7 If you are removing the card permanently, install a filler bracket in the empty card-slot<br />
opening.<br />
If you need a filler bracket, contact <strong>Dell</strong> (see page 119).<br />
NOTE: Installing filler brackets over empty card-slot openings is necessary to maintain FCC certification<br />
of the computer. The brackets also keep dust and dirt out of your computer.<br />
8 Reseat the card retention mechanism in the tabs and pivot downward to snap it into place.<br />
9 Close the card retention door to snap it into place, securing the card(s).<br />
NOTE: For full-length PCI-E cards, if a "piano" bracket is present on your computer you need to rotate it<br />
down into place.<br />
NOTICE: To connect a network cable, first plug the cable into the network device and then plug the<br />
cable into the computer.<br />
10 Replace the computer cover, reconnect the computer and devices to electrical outlets, and<br />
then turn them on.<br />
11 Remove the card driver from the operating system.<br />
12 If you removed a sound card:<br />
a Enter system setup, select Integrated Audio Controller, and then change the setting to<br />
On.<br />
b Connect external audio devices to the audio connectors on the back panel of the<br />
computer.<br />
13 If you removed an add-in network connector:<br />
a Enter system setup, select Integrated NIC Controller, and then change the setting to<br />
On.<br />
b Connect the network cable to the integrated connector on the back panel of the computer.<br />
NOTE: Install any drivers required for the card as described in the card documentation.<br />
Removing and Installing Parts 81
www.dell.com | support.dell.com<br />
Drive Panels<br />
CAUTION: Before you begin any of the procedures in this section, follow the safety instructions in the<br />
Product Information Guide.<br />
CAUTION: To guard against electrical shock, always unplug your computer from the electrical outlet<br />
before removing the cover.<br />
Removing the Drive Panel<br />
1 Follow the procedures in "Before You Begin" on page 55.<br />
sliding plate<br />
2 Grasping the lever on the sliding plate, pull the sliding plate to the right and hold in place.<br />
NOTE: The sliding plate secures and releases the drive panel and helps to secure the drives.<br />
82 Removing and Installing Parts<br />
sliding plate lever<br />
drive panel
3 Push from the inside and pivot the drive panel to the left to release the panel from its side<br />
hinges.<br />
4 Set the drive panel aside in a secure location.<br />
Removing the Drive-Panel Insert<br />
drive panel<br />
1 Turn the drive panel sideways and find the tip of the drive-panel insert tab that latches over a<br />
tab on the right side of the drive panel.<br />
2 Pull the inner tip of the drive-panel insert tab away from the drive panel.<br />
3 Pivot the drive-panel insert out and away from the drive panel.<br />
4 Set the drive-panel insert aside in a secure location.<br />
drive-panel insert<br />
drive-panel<br />
insert tab<br />
Removing and Installing Parts 83
www.dell.com | support.dell.com<br />
Replacing the Drive-Panel Insert<br />
1 Slide the tab on the left side of the drive-panel insert under the center drive panel tab.<br />
2 Rotate the drive-panel insert into place and snap the drive-panel insert tab over the<br />
corresponding tab on the drive panel.<br />
3 Ensure that the drive-panel insert is correctly seated in the drive panel.<br />
Replacing the Drive Panel<br />
1 Follow the procedures in "Before You Begin" on page 55.<br />
84 Removing and Installing Parts<br />
center drive-<br />
panel tab<br />
drive panel<br />
drive-panel<br />
insert tab<br />
drive-panel insert
2 Align the drive panel tabs with the side-door hinges.<br />
3 Rotate the drive panel toward the computer until the sliding plate lever clicks into place and<br />
the drive panel snaps into place on the front panel.<br />
Drives<br />
sliding plate<br />
sliding plate lever<br />
drive panel<br />
Your computer supports:<br />
Two hard drives (Serial ATA)<br />
Two FlexBay drives (can contain an optional floppy drive or optional Media Card Reader)<br />
Two CD or DVD drives<br />
General Installation Guidelines<br />
Connect hard drives to the connector labeled "SATA" and connect CD/DVD drives to the<br />
connector labeled “IDE".<br />
Removing and Installing Parts 85
www.dell.com | support.dell.com<br />
Serial ATA hard drives should be connected to the connector labeled SATA on the system board.<br />
IDE CD/DVD drives should be connected to the connector labeled IDE.<br />
When connecting an IDE cable, ensure you align the colored stripe with the pin 1 connector.<br />
When disconnecting an IDE cable, grasp the colored pull tab and pull until the connector<br />
detaches.<br />
When connecting and disconnecting a serial ATA cable, hold the cable by the connector at each<br />
end.<br />
Hard Drive<br />
CAUTION: Before you begin any of the procedures in this section, follow the safety instructions in the<br />
Product Information Guide.<br />
CAUTION: To guard against electrical shock, always unplug your computer from the electrical outlet<br />
before opening the cover.<br />
NOTICE: To avoid damage to the drive, do not set it on a hard surface. Instead, set the drive on a<br />
surface, such as a foam pad, that will sufficiently cushion it.<br />
1 If you are replacing a hard drive that contains data you want to keep, back up your files before<br />
you begin this procedure.<br />
2 Follow the procedures in "Before You Begin" on page 55.<br />
3 Remove the computer cover (see page 60).<br />
86 Removing and Installing Parts
Removing a Hard Drive<br />
1 Disconnect the power and hard drive cables from the drive.<br />
hard drive cable<br />
2 Press in on the tabs on each side of the drive and slide the drive up and out.<br />
tabs (2)<br />
hard drive<br />
power cable<br />
Removing and Installing Parts 87
www.dell.com | support.dell.com<br />
Installing a Hard Drive<br />
1 Unpack the replacement hard drive, and prepare it for installation.<br />
2 Check the documentation for the drive to verify that the drive is configured for your<br />
computer.<br />
3 If your replacement hard drive does not have the hard drive bracket attached, remove the<br />
bracket from the old hard drive by unsnapping it from the drive.<br />
4 Snap the hard drive bracket onto the replacement hard drive.<br />
5 Install the hard drive into the computer by sliding the drive into place until you feel it click<br />
into place.<br />
88 Removing and Installing Parts<br />
hard drive<br />
hard drive bracket
6 Connect the power and hard drive cables to the hard drive.<br />
hard drive cable<br />
7 Check all connectors to be certain that they are properly cabled and firmly seated.<br />
8 Close the computer cover.<br />
NOTICE: To connect a network cable, first plug the cable in to the network wall jack and then plug the<br />
cable in to the computer.<br />
9 Connect your computer and devices to electrical outlets, and turn them on.<br />
See the documentation that came with the hard drive for instructions about installing any<br />
software required for the operation of the hard drive.<br />
Adding a Second Hard Drive<br />
CAUTION: Before you begin any of the procedures in this section, follow the safety instructions in the<br />
Product Information Guide.<br />
CAUTION: To guard against electrical shock, always unplug your computer from the electrical outlet<br />
before opening the cover.<br />
NOTICE: To avoid damage to the drive, do not set it on a hard surface. Instead, set the drive on a<br />
surface, such as a foam pad, that will sufficiently cushion it.<br />
1 Check the documentation for the drive to verify that it is configured for your computer.<br />
2 Follow the procedures in "Before You Begin" on page 55.<br />
power cable<br />
Removing and Installing Parts 89
www.dell.com | support.dell.com<br />
3 Press in on the tabs on each side of the hard drive bracket in the empty drive bay and slide the<br />
bracket up and out.<br />
4 Snap the hard drive bracket onto the new hard drive.<br />
NOTICE: Do not install any drive into the lower hard-drive bay until you have removed the hard drive<br />
bracket from the inside of the hard drive bay.<br />
5 Slide the new hard drive into empty bay until you feel a click.<br />
NOTE: If your replacement hard drive does not have the hard drive bracket attached, remove the<br />
bracket from the old hard drive by unsnapping it from the drive. Snap the bracket onto the new hard<br />
drive.<br />
6 Gently slide the drive into place until you feel a click or feel the drive securely installed.<br />
90 Removing and Installing Parts<br />
hard drive<br />
hard drive bracket
7 Connect the power and hard drive cables to the drive.<br />
8 Check all connectors to be certain that they are properly cabled and firmly seated.<br />
9 Replace the computer cover (page 102).<br />
NOTICE: To connect a network cable, first plug the cable into the network wall jack and then plug it into<br />
the computer.<br />
10 Connect your computer and devices to electrical outlets, and turn them on.<br />
See the documentation that came with the drive for instructions on installing any software<br />
required for drive operation.<br />
Floppy Drive<br />
CAUTION: Before you begin any of the procedures in this section, follow the safety instructions in the<br />
Product Information Guide.<br />
CAUTION: To guard against electrical shock, always unplug your computer from the electrical outlet<br />
before opening the cover.<br />
NOTE: If you are adding a floppy drive, see ""Installing a Floppy Drive" on page 93."<br />
Removing a Floppy Drive<br />
1 Follow the procedures in "Before You Begin" on page 55.<br />
2 Remove the computer cover (see page 60).<br />
Removing and Installing Parts 91
www.dell.com | support.dell.com<br />
3 Disconnect the power and floppy drive cables from the back of the floppy drive.<br />
4 Disconnect the other end of the floppy drive cable from the system board.<br />
sliding plate<br />
floppy drive<br />
5 Pull the sliding plate to the right and hold in place.<br />
6 Slide the floppy drive out of the floppy drive bay.<br />
92 Removing and Installing Parts<br />
sliding plate lever<br />
power cable<br />
floppy drive cable
Installing a Floppy Drive<br />
1 If you are installing a new floppy drive, remove the shoulder screws from the inside of the<br />
drive-panel insert and attach the screws to the new drive.<br />
2 Slide the floppy drive into the floppy drive bay until the sliding plate clicks into place and the<br />
drive snaps into position.<br />
3 Attach the power and floppy-drive cables to the floppy drive.<br />
4 For more information on system board, see "System Board Components" on page 63.<br />
5 Check all cable connections, and fold cables out of the way to provide airflow for the fan and<br />
cooling vents.<br />
6 Close the computer cover.<br />
NOTICE: To connect a network cable, first plug the cable in to the network wall jack and then plug it in to<br />
the computer.<br />
7 Connect your computer and devices to their electrical outlets, and turn them on.<br />
See the documentation that came with the floppy drive for instructions on installing any<br />
software required for the operation of the drive.<br />
8 Enter system setup (see page 108) and select the appropriate Diskette Drive option.<br />
9 Verify that your computer works correctly by running the <strong>Dell</strong> Diagnostics (see page 48).<br />
Media Card Reader<br />
For information on using the Media Card Reader, see "Using a Media Card Reader (Optional)" on<br />
page 20.<br />
Removing a Media Card Reader<br />
floppy drive<br />
shoulder<br />
screws (4)<br />
CAUTION: Before you begin any of the procedures in this section, follow the safety instructions in the<br />
Product Information Guide.<br />
Removing and Installing Parts 93
www.dell.com | support.dell.com<br />
NOTICE: To prevent static damage to components inside your computer, discharge static electricity<br />
from your body before you touch any of your computer’s electronic components. You can do so by<br />
touching an unpainted metal surface on the computer chassis.<br />
1 Follow the procedures in "Before You Begin" on page 55.<br />
2 Lay the computer on its side so that the system board is on the bottom of the inside of the<br />
computer.<br />
3 Remove the computer cover (see page 60).<br />
4 Remove the drive panel (see page 82).<br />
*Media Card Reader<br />
94 Removing and Installing Parts<br />
USB cable<br />
* Not present on all computers.
5 Disconnect the USB cable on the back of the Media Card Reader to the front panel USB<br />
connector on the system board (see page 63) and route the cable through the clip on the<br />
shroud.<br />
sliding plate<br />
sliding plate lever<br />
*Media Card Reader<br />
* Not present on all computers.<br />
6 While pushing on the back of the drive, remove the Media Card Reader by sliding and<br />
holding the sliding plate.<br />
7 Replace the drive panel (see page 84).<br />
8 Replace the computer cover (see page 102).<br />
Installing a Media Card Reader<br />
CAUTION: Before you begin any of the procedures in this section, follow the safety instructions in the<br />
Product Information Guide.<br />
Removing and Installing Parts 95
www.dell.com | support.dell.com<br />
NOTICE: To prevent static damage to components inside your computer, discharge static electricity<br />
from your body before you touch any of your computer’s electronic components. You can do so by<br />
touching an unpainted metal surface on the computer chassis.<br />
1 Follow the procedures in "Before You Begin" on page 55.<br />
2 Lay the computer on its side so that the system board is on the bottom of the inside of the<br />
computer.<br />
3 Remove the computer cover (see page 60).<br />
4 Remove the drive panel (see page 82).<br />
5 Remove the Media Card Reader from its packaging and ensure that all four screws are<br />
included..<br />
6 Gently slide the drive into place until you feel a click or feel the drive securely installed.<br />
Ensure that the Media Card Reader is installed before the FlexBay cable is connected.<br />
7 Connect the FlexBay USB cable to the back of the Media Card Reader and to the Media Card<br />
Reader connector on the system board (see page 63).<br />
96 Removing and Installing Parts<br />
Media Card<br />
Reader<br />
screws (4)
*Media Card Reader<br />
8 Insert the Media Card Reader into the bay and slide the drive in to seat it in the computer.<br />
9 Route the USB cable through the cable routing clip.<br />
10 Replace the computer cover (see page 102).<br />
CD/DVD Drive<br />
USB cable<br />
* Not present on all computers.<br />
CAUTION: Before you begin any of the procedures in this section, follow the safety instructions in the<br />
Product Information Guide.<br />
CAUTION: To guard against electrical shock, always unplug your computer from the electrical outlet<br />
before opening the cover.<br />
Removing and Installing Parts 97
www.dell.com | support.dell.com<br />
Removing a CD/DVD Drive<br />
1 Follow the procedures in "Before You Begin" on page 55.<br />
2 Remove the computer cover (see page 60).<br />
3 Disconnect the power cable from the back of the drive and the CD/DVD drive cable from the<br />
back of the drive and the system board.<br />
CD/DVD drive cable<br />
98 Removing and Installing Parts<br />
power cable<br />
system board
4 Slide the drive release mechanism to the right to release the shoulder screw and slide the drive<br />
out to remove it from the drive bay.<br />
Installing a CD/DVD Drive<br />
1 If you are installing a new drive, unpack the drive and prepare it for installation.<br />
Check the documentation that accompanied the drive to verify that the drive is configured<br />
for your computer. If you are installing an IDE drive, configure the drive for the cable select<br />
setting.<br />
2 If you are installing a new drive, remove the three shoulder screws from the inside of the drivepanel<br />
insert and attach the screws to the new drive.<br />
CD/DVD drive<br />
shoulder screws (3)<br />
Removing and Installing Parts 99
www.dell.com | support.dell.com<br />
3 Slide the drive into the drive bay until the drive clicks into position.<br />
4 Connect the power cable to the drive and the CD/DVD cable to the drive and system board.<br />
CD/DVD drive<br />
5 If you are installing a new CD/DVD drive rather than replacing a drive, remove the front<br />
panel inserts.<br />
6 Check all cable connections, and fold cables out of the way to provide airflow for the fan and<br />
cooling vents.<br />
7 Close the computer cover.<br />
NOTICE: To connect a network cable, first plug the cable in to the network wall jack and then plug it in to<br />
the computer.<br />
8 Connect your computer and devices to their electrical outlets, and turn them on.<br />
See the documentation that came with the drive for instructions on installing any software<br />
required for drive operation.<br />
9 Enter system setup (see page 108) and select the appropriate Drive option.<br />
10 Verify that your computer works correctly by running the <strong>Dell</strong> Diagnostics (see page 48).<br />
100 Removing and Installing Parts<br />
power cable<br />
system board
Battery<br />
Replacing the Battery<br />
CAUTION: Before you begin any of the procedures in this section, follow the safety instructions in the<br />
Product Information Guide.<br />
NOTICE: To prevent static damage to components inside your computer, discharge static electricity<br />
from your body before you touch any of your computer’s electronic components. You can do so by<br />
touching an unpainted metal surface on the computer.<br />
A coin-cell battery maintains computer configuration, date, and time information. The battery can<br />
last several years.<br />
If you have to repeatedly reset time and date information after turning on the computer, replace<br />
the battery.<br />
CAUTION: A new battery can explode if it is incorrectly installed. Replace the battery only with the<br />
same or equivalent type recommended by the manufacturer. Discard used batteries according to the<br />
manufacturer’s instructions.<br />
To replace the battery:<br />
1 Record all the screens in system setup (see page 107) so that you can restore the correct<br />
settings in step 10.<br />
2 Follow the procedures in "Before You Begin" on page 55.<br />
3 Remove the computer cover (see page 60).<br />
4 Locate the battery socket.<br />
NOTICE: If you pry the battery out of its socket with a blunt object, be careful not to touch the system<br />
board with the object. Ensure that the object is inserted between the battery and the socket before you<br />
attempt to pry out the battery. Otherwise, you may damage the system board by prying off the socket or<br />
by breaking circuit traces on the system board.<br />
5 Remove the battery by carefully prying it out of its socket with your fingers or with a blunt,<br />
nonconducting object such as a plastic screwdriver.<br />
6 Insert the new battery into the socket with the side labeled "+" facing up, and snap the<br />
battery into place.<br />
Removing and Installing Parts 101
www.dell.com | support.dell.com<br />
7 Replace the computer cover.<br />
NOTICE: To connect a network cable, first plug the cable into the network device and then plug it into<br />
the computer.<br />
8 Connect your computer and devices to electrical outlets, and turn them on.<br />
9 Enter system setup and restore the settings you recorded in step 1.<br />
10 Properly dispose of the old battery.<br />
Replacing the Computer Cover<br />
CAUTION: Before you begin any of the procedures in this section, follow the safety instructions in the<br />
Product Information Guide.<br />
1 Ensure that all cables are connected, and fold cables out of the way.<br />
Gently pull the power cables toward you so that they do not get caught underneath the drives.<br />
2 Ensure that no tools or extra parts are left inside the computer.<br />
3 Close the cover:<br />
a Pivot the cover down.<br />
b Press down on the right side of the cover until it closes.<br />
c Press down on the left side of the cover until it closes.<br />
d Ensure that both sides of the cover are locked. If not, repeat all of step 3.<br />
NOTICE: To connect a network cable, first plug the cable into the network wall jack and then plug it into<br />
the computer.<br />
4 Connect your computer and devices to electrical outlets, and turn them on.<br />
102 Removing and Installing Parts<br />
battery socket<br />
tab<br />
battery
Appendix<br />
Specifications<br />
Processor<br />
Processor type Intel ® Pentium ® 4 Socket-T with Hyper-Threading technology<br />
Cache 1 MB or 2 MB<br />
Memory<br />
Type dual-channel 400-, 533-, and 667-MHz DDR2<br />
Memory connectors four<br />
Memory capacities 256 MB, 512 MB, or 1 GB<br />
Minimum memory 512 MB<br />
Maximum memory 4 GB<br />
BIOS address F0000h<br />
Computer Information<br />
Chipset Intel 945P<br />
DMA channels eight<br />
Interrupt levels 24<br />
BIOS chip (NVRAM) 4 Mb<br />
NIC Integrated network interface capable of 10/100 communication<br />
System clock 800- or 1066-MHz data rate (depending on your processor)<br />
Video<br />
Type PCI Express<br />
Audio<br />
Type Internal 7.1 channel or PCI option cards<br />
Appendix 103
www.dell.com | support.dell.com<br />
104 Appendix<br />
Expansion Bus<br />
Bus type PCI 32 bit<br />
PCI Express x1, x4, and x16<br />
Bus speed PCI: 33 MHz<br />
PCI Express:100 MHz<br />
Bus throughput PCI Express:<br />
x1 slot bidirectional speed - 500 MB/s<br />
x4 slot bidirectional speed - 2 GB/s<br />
x16 slot bidirectional speed - 8 GB/s<br />
PCI<br />
connectors three<br />
connector size 120 pins<br />
connector data width (maximum) 32 bits<br />
PCI Express<br />
connector one x1<br />
connector size 36 pins<br />
connector data width (maximum) 1 PCI Express lane<br />
PCI Express<br />
connector one x4<br />
connector size 98 pins<br />
connector data width (maximum) 4 PCI Express lanes<br />
PCI Express<br />
connector one x16<br />
connector size 164 pins<br />
connector data width (maximum) 16 PCI Express lanes
Drives<br />
Externally accessible:<br />
two 3.5-inch drive bays (FlexBay)<br />
two 5.25-inch drive bays<br />
Available devices serial ATA drives (2), floppy drive, USB memory devices, CD drive,<br />
CD-RW drive, DVD drive, DVD-RW drive, Media Card Reader,<br />
and DVD/CD-RW combo drive<br />
Internally accessible: two 3.5-inch hard-drive bays<br />
Connectors<br />
External connectors:<br />
IEEE 1394 one front-panel 6-pin serial connector (with optional card)<br />
Video 15-pin VGA connector<br />
28-pin DVI connector<br />
Network adapter RJ-45 connector<br />
USB two front-panel and five back-panel USB 2.0-compliant connectors<br />
Audio five back-panel connectors for line-in, line-out, microphone,<br />
surround, and center/Low Frequency Effects (LFE) channel; two<br />
front-panel connectors for headphones/microphone<br />
System board connectors:<br />
Primary IDE drive 40-pin connector on PCI local bus<br />
Serial ATA four 7-pin connectors<br />
FlexBay Drive USB 10-pin header for optional floppy drive or optional Media<br />
Card Reader (3.5-inch bay devices)<br />
Fan 5-pin connector<br />
PCI three 120-pin connectors<br />
PCI Express x1 36-pin connector<br />
PCI Express x4 98-pin connector<br />
PCI Express x16 164-pin connector<br />
Appendix 105
www.dell.com | support.dell.com<br />
106 Appendix<br />
Controls and Lights<br />
Power control push button<br />
Power light green light — Blinking green in sleep state; solid green for power-on<br />
state.<br />
amber light — Blinking amber indicates a problem with the power<br />
supply inside the computer. If the system cannot boot and there is a<br />
solid amber light, this indicates a problem with the system board<br />
(see "Power Problems" on page 39).<br />
Hard-drive access light green<br />
Link integrity light (on integrated green light — A good connection exists between a 10-Mbps<br />
network adapter)<br />
network and the computer.<br />
orange light — A good connection exists between a 100-Mbps<br />
network and the computer.<br />
off (no light) — The computer is not detecting a physical<br />
connection to the network.<br />
Activity light (on integrated network<br />
adapter)<br />
yellow light — Blinking indicates activity on the network.<br />
Diagnostic lights four lights on the front panel (see "Diagnostic Lights" on page 45.)<br />
Standby power light AUXPWR on the system board<br />
Power<br />
DC power supply:<br />
Wattage 375 W<br />
Heat dissipation 1280 BTU/hr<br />
Voltage (See the safety instructions 90 to 135 V and 180 to 265 V at 50/60 Hz<br />
in the Product Information Guide<br />
for important voltage setting<br />
information.)<br />
Backup battery 3-V CR2032 lithium coin cell<br />
Physical<br />
Height 44.45 cm (17.5 inches)<br />
Width 16.764 cm (6.6 inches)<br />
Depth 44.45 cm (17.5 inches)<br />
Weight 12.7 kg (28 lb)
Environmental<br />
Temperature:<br />
Operating 10° to 35°C (50° to 95°F)<br />
Storage –40° to 65°C (–40° to 149°F)<br />
Relative humidity 20% to 80% (noncondensing)<br />
Maximum vibration:<br />
Operating 0.25 G at 3 to 200 Hz at 0.5 octave/min<br />
Storage 0.5 G at 3 to 200 Hz at 1 octave/min<br />
Maximum shock:<br />
Operating bottom half-sine pulse with a change in velocity of 20 inches/sec<br />
(50.8 cm/sec)<br />
Storage 27-G faired square wave with a velocity change of 200 inches/sec<br />
(508 cm/sec)<br />
Altitude:<br />
Operating –15.2 to 3048 m (–50 to 10,000 ft)<br />
Storage –15.2 to 10,668 m (–50 to 35,000 ft)<br />
System Setup<br />
Overview<br />
Use system setup as follows:<br />
To change the system configuration information after you add, change, or remove any<br />
hardware in your computer<br />
To set or change a user-selectable option such as the user password<br />
To read the current amount of memory or set the type of hard drive installed<br />
Before you use system setup, it is recommended that you write down the system setup screen<br />
information for future reference.<br />
NOTICE: Unless you are an expert computer user, do not change the settings for this program. Certain<br />
changes can make your computer work incorrectly.<br />
Appendix 107
www.dell.com | support.dell.com<br />
108 Appendix<br />
Entering System Setup<br />
1 Turn on (or restart) your computer.<br />
2 When the blue DELL logo is displayed, you must watch for the F2 prompt to appear.<br />
3 Once this F2 prompt appears, press immediately.<br />
NOTE: The F2 prompt indicates that the keyboard has initialized. This prompt can appear very quickly, so<br />
you must watch for it to display, and then press . If you press before you are prompted, this<br />
keystroke will be lost.<br />
4 If you wait too long and the operating system logo appears, continue to wait until you see the<br />
Microsoft ® Windows ® desktop. Then, shut down your computer (see page 55) and try again.<br />
System Setup Screens<br />
The system setup screen displays current or changeable configuration information for your<br />
computer. Information on the screen is divided into three areas: the options list, active options<br />
field, and key functions.
Options List — This<br />
field appears on the left<br />
side of the system setup<br />
window. The field is a<br />
scrollable list containing<br />
features that define the<br />
configuration of your<br />
computer, including<br />
installed hardware,<br />
power conservation, and<br />
security features.<br />
Scroll up and down the<br />
list with the up- and<br />
down-arrow keys. As an<br />
option is highlighted, the<br />
Option Field displays<br />
more information about<br />
that option and the<br />
option’s current and<br />
available settings. By<br />
pressing or the<br />
left and right arrow keys,<br />
you can toggle between a<br />
primary topic (collapsed)<br />
and subtopics<br />
(expanded).<br />
Option Field — This field contains information about each<br />
option. In this field you can view your current settings and<br />
make changes to your settings.<br />
Use the right and left arrow keys to highlight an option. Press<br />
to make that selection active.<br />
Key Functions — This field appears below the Option Field<br />
and lists keys and their functions within the active system<br />
setup field.<br />
Appendix 109
www.dell.com | support.dell.com<br />
110 Appendix<br />
System Setup Options<br />
NOTE: Depending on your computer and installed devices, the items listed in this section may not<br />
appear, or may not appear exactly as listed.<br />
System<br />
System Info Lists system information such as the computer name, the BIOS version<br />
number and date, system tags, and other system-specific information.<br />
CPU Info Identifies whether the computer’s processor supports Hyper-Threading and<br />
lists the processor bus speed, processor ID, clock speed, and L2 cache.<br />
Memory Info Indicates amount of installed memory, memory speed, channel mode (dual<br />
or single), and type of memory installed.<br />
Date/Time Displays current date and time settings.<br />
Boot Sequence The computer attempts to boot from the sequence of devices specified in<br />
this list.<br />
NOTE: If you insert a boot device and restart the computer, this option appears<br />
in the system setup menu. To boot from a USB memory device, select the USB<br />
device and move it so it becomes the first device in the list.<br />
Drives<br />
Diskette Drive Identifies and defines the floppy drive attached to the FLOPPY connector<br />
on the system board as Off, USB, Internal, or Read Only.<br />
Drives 0 through 3 Identifies the drives attached to the SATA connectors on the system board,<br />
and lists the capacity for hard drives.<br />
SATA Operation Identifies and defines the SATA controller settings for RAID. You can set<br />
the SATA controller to RAID Autodetect/AHCI, RAID Autodetect/ATA, or<br />
RAID On.<br />
Onboard Devices<br />
Integrated NIC You can set the NIC to On (default), Off, or On w/ PXE. When the On<br />
Controller<br />
w/ PXE setting is active (available only for the future boot process), the<br />
computer prompts you to press . Pressing this key<br />
combination causes a menu to display that allows you to select a method for<br />
booting from a network server. If a boot routine is not available from the<br />
network server, the computer attempts to boot from the next device in the<br />
boot sequence list.<br />
Integrated Audio Enables or disables the onboard audio controller.<br />
Controller<br />
USB Controller Set to On (default) so that USB devices will be detected and supported in<br />
the operating system.
USB for FlexBay This field enables and disables the internal USB for FlexBay.<br />
Off = Internal USB for FlexBay is disabled.<br />
On = Internal USB for FlexBay is enabled.<br />
No Boot = Internal USB for FlexBay is enabled but not bootable.<br />
The factory default setting is No Boot.<br />
NOTE: This USB option appears only if a FlexBay device is installed.<br />
Video<br />
Primary Video This setting specifies which video controller is primary when two video<br />
controllers are present on the computer.<br />
Video Memory Size Offering selectable options of 1MB and 8MB, this field configures the<br />
system memory allocation reserved for the integrated video controller.<br />
Performance<br />
SpeedStep If applicable, Intel SpeedStep ® appears in the Options List under<br />
Performance.<br />
HyperThreading If your computer processor supports Hyper-Threading, this option appears<br />
in the Options List.<br />
Hard Drive<br />
Acoustics<br />
Bypass (default) — Your computer does not test or change the current<br />
acoustics mode setting.<br />
Quiet — The hard drive operates at its most quiet setting.<br />
Suggested — The hard drive operates at the level suggested by the drive<br />
manufacturer.<br />
Performance — The hard drive operates at its maximum speed.<br />
NOTE: Switching to performance mode will cause the drive heads to move<br />
faster, causing the hard drive to be noisier. However, some drives may not see<br />
an increase in data transfer rates.<br />
NOTE: Changing the acoustics setting does not alter your hard drive image.<br />
Security This section displays available system security options.<br />
Admin Password This option provides restricted access to the computer's system setup<br />
program in the same way that access to the system can be restricted with<br />
the System Password option.<br />
System Password Displays the current status of the system's password security feature and<br />
allows a new system password to be assigned and verified.<br />
Password Status This option locks the system password field with the setup password. When<br />
the field is locked, you can no longer disable password security by pressing<br />
when the computer starts.<br />
Power Management<br />
AC Recovery Determines what happens when AC power is restored to the computer.<br />
Appendix 111
www.dell.com | support.dell.com<br />
112 Appendix<br />
Auto Power On Sets the computer to automatically turn on. Choices are every day or every<br />
Monday through Friday.<br />
The default setting is Off.<br />
This feature does not work if you turn off your computer using a power strip<br />
or surge protector.<br />
Auto Power Time Sets time to automatically turn on the computer.<br />
Time is kept in the standard 12-hour format (hours:minutes). Change the<br />
startup time by pressing the right- or left-arrow key to increase or decrease<br />
the numbers, or type numbers in both the date and time fields.<br />
This feature does not work if you turn off your computer using a power strip<br />
or surge protector.<br />
Low Power Mode When Low Power Mode is selected, remote wakeup events no longer power<br />
up from Hibernate or Off.<br />
Remote Wake Up This option allows the computer to power up when a NIC or Remote<br />
Wakeup-capable modem receives a wake up signal.<br />
On is the default setting. On w/ Boot to NIC allows the computer to<br />
attempt to boot from a network prior to using the boot sequence.<br />
NOTE: Normally, the system can be powered up remotely from suspend mode,<br />
hibernate mode, or when powered off. When Low Power Mode (in the Power<br />
Management menu) is enabled, the computer can only be powered up<br />
remotely from Suspend.<br />
Suspend Mode The options are S1, a suspend state where the computer is running in a lowpower<br />
mode, and S3, a standby state where the power is reduced or turned<br />
off for most components, however, system memory remains active.<br />
Maintenance<br />
CMOS Defaults This setting restores the computer’s default settings.<br />
Event Log Displays the system event log.<br />
POST Behavior<br />
Fastboot When set to On (default), your computer starts more quickly because it<br />
skips certain configurations and tests.<br />
Numlock Key This option involves the rightmost bank of keys on your keyboard. When set<br />
to On (default), this option activates the numeric and mathematical<br />
features shown at the top of each key. When set to Off, this option activates<br />
the cursor-control functions labeled on the bottom of each key.<br />
POST Hotkeys This option allows you to specify the function keys to display on the screen<br />
when the computer starts.<br />
Keyboard Errors This option disables or enables keyboard error reporting when the computer<br />
starts.
Boot Sequence<br />
This feature allows you to change the boot sequence for devices.<br />
Option Settings<br />
Diskette Drive — The computer attempts to boot from the floppy drive. If the floppy in the<br />
drive is not bootable, the computer attempts to boot to the hard drive.<br />
Hard Drive — The computer attempts to boot from the primary hard drive. If no operating<br />
system is on the drive, the computer attempts to boot to the next bootable device.<br />
CD Drive — The computer attempts to boot from the CD drive. If no CD is in the drive, or<br />
if the CD has no operating system, the computer attempts to boot to the next bootable<br />
device.<br />
NOTE: The computer attempts to boot to all bootable devices but if no bootable device is found, the<br />
computer generates the No boot device available error message. Press the key to retry<br />
the boot, or press the key to enter the setup utility.<br />
USB Flash Device — Insert the memory device into a USB port and restart the computer.<br />
When F12 = Boot Menu appears in the upper-right corner of the screen, press . The<br />
BIOS detects the device and adds the USB flash option to the boot menu.<br />
NOTE: To boot to a USB device, the device must be bootable. To ensure that your device is bootable,<br />
check the device documentation.<br />
Changing Boot Sequence for the Current Boot<br />
You can use this feature, for example, to restart your computer to a USB device such as a floppy<br />
drive, memory key, or CD-RW drive.<br />
NOTE: If you are booting to a USB floppy drive, you must first set the floppy drive to OFF in system setup<br />
(see page 107).<br />
1 If you are booting to a USB device, connect the USB device to a USB connector (see<br />
page 105).<br />
2 Turn on (or restart) your computer.<br />
3 When F2 = Setup, F12 = Boot Menu appears in the upper-right corner of the screen,<br />
press .<br />
If you wait too long and the operating system logo appears, continue to wait until you see the<br />
Microsoft Windows desktop. Then shut down your computer (see page 55) and try again.<br />
The Boot Device Menu appears, listing all available boot devices. Each device has a number<br />
next to it.<br />
4 At the bottom of the menu, enter the number of the device that is to be used for the current<br />
boot only.<br />
For example, if you are booting to a USB memory key, highlight USB Flash Device and press<br />
.<br />
Appendix 113
www.dell.com | support.dell.com<br />
114 Appendix<br />
NOTE: To boot to a USB device, the device must be bootable. To make sure your device is bootable,<br />
check the device documentation.<br />
Changing Boot Sequence for Future Boots<br />
1 Enter system setup (see page 108).<br />
2 Use the arrow keys to highlight the Boot Sequence menu option and press to access<br />
the menu.<br />
NOTE: Write down your current boot sequence in case you want to restore it.<br />
3 Press the up- and down-arrow keys to move through the list of devices.<br />
4 Press the spacebar to enable or disable a device (enabled devices have a checkmark).<br />
5 Press plus (+) or minus (–) to move a selected device up or down the list.<br />
Clearing Forgotten Passwords<br />
CAUTION: Before you begin any of the procedures in this section, follow the safety instructions in the<br />
Product Information Guide.<br />
1 Follow the procedures in "Before You Begin" on page 55.<br />
3 2 1<br />
PSWD<br />
3 2 1<br />
RTCRST
2 Locate the 3-pin password jumper (PSWD) on the system board (see page 63), and attach the<br />
jumper plug to pins 2 and 3 to clear the password.<br />
NOTE: When you receive your computer, the jumper plug is attached to pins 1 and 2.<br />
3 Close the computer cover (see page 102).<br />
4 Connect your computer and monitor to electrical outlets, and turn them on.<br />
5 After the Microsoft ® Windows ® desktop appears on your computer, shut down the computer<br />
(see page 55).<br />
6 Turn off the monitor and disconnect it from the electrical outlet.<br />
7 Disconnect the computer power cable from the electrical outlet, and press the power button<br />
to ground the system board.<br />
8 Open the computer cover (see page 60).<br />
9 Locate the 3-pin password jumper (PSWD) on the system board (see page 63) and attach the<br />
jumper to pins 1 and 2 to reenable the password feature.<br />
10 Close the computer cover (see page 102).<br />
NOTICE: To connect a network cable, first plug the cable into the network device and then plug it into<br />
the computer.<br />
11 Connect your computer and devices to electrical outlets, and turn them on.<br />
Clearing CMOS Settings<br />
CAUTION: Before you begin any of the procedures in this section, follow the safety instructions in the<br />
Product Information Guide.<br />
1 Follow the procedures in "Before You Begin" on page 55.<br />
2 Reset the current CMOS settings:<br />
a Locate the 3-pin CMOS jumper (RTCRST) on the system board (see page 63).<br />
b Remove the jumper plug from pins 2 and 3.<br />
c Place the jumper plug on pins 1 and 2 and wait approximately five seconds.<br />
d Replace the jumper plug on pins 2 and 3.<br />
3 Close the computer cover (see page 102).<br />
NOTICE: To connect a network cable, first plug the cable into the network wall jack and then plug it into<br />
the computer.<br />
4 Connect your computer and devices to electrical outlets, and turn them on.<br />
Appendix 115
www.dell.com | support.dell.com<br />
116 Appendix<br />
Cleaning Your Computer<br />
CAUTION: Before you begin any of the procedures in this section, follow the safety instructions in the<br />
Product Information Guide.<br />
Computer, Keyboard, and Monitor<br />
Mouse<br />
CAUTION: Before you clean your computer, disconnect the computer from the electrical outlet. Clean<br />
your computer with a soft cloth dampened with water. Do not use liquid or aerosol cleaners, which may<br />
contain flammable substances.<br />
Use a vacuum cleaner with a brush attachment to gently remove dust from the slots and holes<br />
on your computer and from between the keys on the keyboard.<br />
NOTICE: Do not wipe the display screen with any soap or alcohol solution. Doing so may damage the<br />
antiglare coating.<br />
To clean your monitor screen, lightly dampen a soft, clean cloth with water. If possible, use a<br />
special screen-cleaning tissue or solution suitable for the monitor’s antistatic coating.<br />
Wipe the keyboard, computer, and plastic part of the monitor with a soft cleaning cloth<br />
moistened with a solution of three parts water and one part dishwashing detergent.<br />
Do not soak the cloth or let water drip inside your computer or keyboard.<br />
If your screen cursor skips or moves abnormally, clean the mouse. To clean a non-optical mouse:<br />
1 Turn the retainer ring on the underside of your mouse counterclockwise, and then remove the<br />
ball.<br />
2 Wipe the ball with a clean, lint-free cloth.<br />
3 Blow carefully into the ball cage to dislodge dust and lint.<br />
4 If the rollers inside the ball cage are dirty, clean the rollers with a cotton swab moistened<br />
lightly with isopropyl alcohol.<br />
5 Recenter the rollers in their channels if they are misaligned. Ensure that fluff from the swab is<br />
not left on the rollers.<br />
6 Replace the ball and retainer ring, and turn the retainer ring clockwise until it clicks into<br />
place.<br />
Floppy Drive<br />
NOTICE: Do not attempt to clean drive heads with a swab. You might accidentally misalign the heads,<br />
which prevents the drive from operating.<br />
Clean your floppy drive using a commercially available cleaning kit. These kits contain pretreated<br />
floppies to remove contaminants that accumulate during normal operation.
CDs and DVDs<br />
NOTICE: Always use compressed air to clean the lens in the CD/DVD drive, and follow the instructions<br />
that come with the compressed air. Never touch the lens in the drive.<br />
If you notice problems, such as skipping, with the playback quality of your CDs or DVDs, try<br />
cleaning the discs.<br />
1 Hold the disc by its outer edge. You can also touch the inside edge of the center hole.<br />
NOTICE: To prevent damaging the surface, do not wipe in a circular motion around the disc.<br />
2 With a soft, lint-free cloth, gently wipe the bottom of the disc (the unlabeled side) in a<br />
straight line from the center to the outer edge of the disc.<br />
For stubborn dirt, try using water or a diluted solution of water and mild soap. You can also<br />
purchase commercial products that clean discs and provide some protection from dust,<br />
fingerprints, and scratches. Cleaning products for CDs are safe to use on DVDs.<br />
<strong>Dell</strong> Technical <strong>Support</strong> Policy (U.S. Only)<br />
Technician-assisted technical support requires the cooperation and participation of the customer<br />
in the troubleshooting process and provides for restoration of the operating system, software<br />
programs, and hardware drivers to the original default configuration as shipped from <strong>Dell</strong>, as well as<br />
the verification of appropriate functionality of the computer and all <strong>Dell</strong>-installed hardware. In<br />
addition to this technician-assisted technical support, online technical support is available at<br />
support.dell.com. Additional technical support options may be available for purchase.<br />
<strong>Dell</strong> provides limited technical support for the computer and any "<strong>Dell</strong>-installed" software and<br />
peripherals 1 . <strong>Support</strong> for third-party software and peripherals is provided by the original<br />
manufacturer, including those purchased and/or installed through <strong>Dell</strong> Software and Peripherals,<br />
Readyware, and Custom Factory Integration 2 .<br />
1<br />
Repair services are provided pursuant to the terms and conditions of your limited warranty and any optional<br />
support service contract purchased with the computer.<br />
2<br />
All <strong>Dell</strong>-standard components included in a Custom Factory Integration (CFI) project are covered by the standard<br />
<strong>Dell</strong> limited warranty for your computer. However, <strong>Dell</strong> also extends a parts replacement program to<br />
cover all nonstandard, third-party hardware components integrated through CFI for the duration of the computer’s<br />
service contract.<br />
Definition of "<strong>Dell</strong>-Installed" Software and Peripherals<br />
<strong>Dell</strong>-installed software includes the operating system and some of the software programs that are<br />
installed on the computer during the manufacturing process (Microsoft ® Office, Norton Antivirus,<br />
and so on).<br />
<strong>Dell</strong>-installed peripherals include any internal expansion cards, or <strong>Dell</strong>-branded module bay or PC<br />
Card accessories. In addition, any <strong>Dell</strong>-branded monitors, keyboards, mice, speakers, microphones<br />
for telephonic modems, docking stations/port replicators, networking products, and all associated<br />
cabling are included.<br />
Appendix 117
www.dell.com | support.dell.com<br />
118 Appendix<br />
Definition of "Third-Party" Software and Peripherals<br />
Third-party software and peripherals include any peripheral, accessory, or software program sold by<br />
<strong>Dell</strong> not under the <strong>Dell</strong> brand (printers, scanners, cameras, games, and so on). <strong>Support</strong> for all thirdparty<br />
software and peripherals is provided by the original manufacturer of the product.<br />
FCC Notices (U.S. Only)<br />
Most <strong>Dell</strong> computer systems are classified by the Federal Communications Commission (FCC) as<br />
Class B digital devices. To determine which classification applies to your computer system,<br />
examine all FCC registration labels on the bottom, side, or back panel of your computer, on cardmounting<br />
brackets, and on the cards themselves. If any one of the labels carries a Class A rating,<br />
your entire system is considered to be a Class A digital device. If all labels carry an FCC Class B<br />
rating as distinguished by either an FCC ID number or the FCC logo, ( ), your system is<br />
considered to be a Class B digital device.<br />
Once you have determined your system’s FCC classification, read the appropriate FCC notice.<br />
Note that FCC regulations provide that changes or modifications not expressly approved by <strong>Dell</strong><br />
could void your authority to operate this equipment.<br />
This device complies with Part 15 of the FCC Rules. Operation is subject to the following two<br />
conditions:<br />
This device may not cause harmful interference.<br />
This device must accept any interference received, including interference that may cause undesired<br />
operation.<br />
Class A<br />
This equipment has been tested and found to comply with the limits for a Class A digital device<br />
pursuant to Part 15 of the FCC Rules. These limits are designed to provide reasonable protection<br />
against harmful interference when the equipment is operated in a commercial environment. This<br />
equipment generates, uses, and can radiate radio frequency energy and, if not installed and used in<br />
accordance with the manufacturer’s instruction manual, may cause harmful interference with radio<br />
communications. Operation of this equipment in a residential area is likely to cause harmful<br />
interference, in which case you will be required to correct the interference at your own expense.<br />
Class B<br />
This equipment has been tested and found to comply with the limits for a Class B digital device<br />
pursuant to Part 15 of the FCC Rules. These limits are designed to provide reasonable protection<br />
against harmful interference in a residential installation. This equipment generates, uses, and can<br />
radiate radio frequency energy and, if not installed and used in accordance with the manufacturer’s<br />
instruction manual, may cause interference with radio communications. However, there is no<br />
guarantee that interference will not occur in a particular installation. If this equipment does cause
harmful interference to radio or television reception, which can be determined by turning the<br />
equipment off and on, you are encouraged to try to correct the interference by one or more of the<br />
following measures:<br />
Reorient or relocate the receiving antenna.<br />
Increase the separation between the equipment and the receiver.<br />
Connect the equipment into an outlet on a circuit different from that to which the receiver is<br />
connected.<br />
Consult the dealer or an experienced radio/television technician for help.<br />
FCC Identification Information<br />
The following information is provided on the device or devices covered in this document in<br />
compliance with FCC regulations:<br />
Model number: DCTA<br />
Company name:<br />
<strong>Dell</strong> Inc.<br />
One <strong>Dell</strong> Way<br />
Round Rock, Texas 78682 USA<br />
512-338-4400<br />
Contacting <strong>Dell</strong><br />
To contact <strong>Dell</strong> electronically, you can access the following websites:<br />
www.dell.com<br />
support.dell.com (technical support)<br />
premiersupport.dell.com (technical support for educational, government, healthcare, and<br />
medium/large business customers, including Premier, Platinum, and Gold customers)<br />
For specific web addresses for your country, find the appropriate country section in the table below.<br />
NOTE: Toll-free numbers are for use within the country for which they are listed.<br />
NOTE: In certain countries, technical support specific to <strong>Dell</strong> Inspiron XPS computers is available at a<br />
separate telephone number listed for participating countries. If you do not see a telephone number listed that is<br />
specific for Inspiron XPS computers, you may contact <strong>Dell</strong> through the technical support number listed and<br />
your call will be routed appropriately.<br />
When you need to contact <strong>Dell</strong>, use the electronic addresses, telephone numbers, and codes<br />
provided in the following table. If you need assistance in determining which codes to use, contact a<br />
local or an international operator.<br />
Appendix 119
www.dell.com | support.dell.com<br />
Country (City)<br />
International Access Code<br />
Country Code<br />
City Code<br />
120 Appendix<br />
Department Name or Service Area,<br />
Website and E-Mail Address<br />
Area Codes,<br />
Local Numbers, and<br />
Toll-Free Numbers<br />
Anguilla General <strong>Support</strong> toll-free: 800-335-0031<br />
Antigua and Barbuda General <strong>Support</strong> 1-800-805-5924<br />
Argentina (Buenos Aires) Website: www.dell.com.ar<br />
International Access Code: 00 E-mail: us_latin_services@dell.com<br />
Country Code: 54<br />
E-mail for desktop and portable computers:<br />
City Code: 11<br />
la-techsupport@dell.com<br />
E-mail for servers and EMC ® storage products:<br />
la_enterprise@dell.com<br />
Customer Care toll-free: 0-800-444-0730<br />
Tech <strong>Support</strong> toll-free: 0-800-444-0733<br />
Tech <strong>Support</strong> Services toll-free: 0-800-444-0724<br />
Sales 0-810-444-3355<br />
Aruba General <strong>Support</strong> toll-free: 800-1578<br />
Australia (Sydney)<br />
E-mail (Australia): au_tech_support@dell.com<br />
International Access Code: 0011 E-mail (New Zealand): nz_tech_support@dell.com<br />
Country Code: 61<br />
Home and Small Business 1-300-655-533<br />
City Code: 2<br />
Government and Business toll-free: 1-800-633-559<br />
Preferred Accounts Division (PAD) toll-free: 1-800-060-889<br />
Customer Care toll-free: 1-800-819-339<br />
Technical <strong>Support</strong> (portables and desktops) toll-free: 1-300-655-533<br />
Technical <strong>Support</strong> (servers and workstations) toll-free: 1-800-733-314<br />
Corporate Sales toll-free: 1-800-808-385<br />
Transaction Sales toll-free: 1-800-808-312<br />
Fax toll-free: 1-800-818-341
Country (City)<br />
International Access Code<br />
Country Code<br />
City Code<br />
Austria (Vienna)<br />
Website: support.euro.dell.com<br />
International Access Code: 900 E-mail: tech_support_central_europe@dell.com<br />
Country Code: 43<br />
Home/Small Business Sales 0820 240 530 00<br />
City Code: 1<br />
Home/Small Business Fax 0820 240 530 49<br />
Home/Small Business Customer Care 0820 240 530 14<br />
Preferred Accounts/Corporate Customer Care 0820 240 530 16<br />
Home/Small Business Technical <strong>Support</strong> 0820 240 530 14<br />
Preferred Accounts/Corporate Technical <strong>Support</strong> 0660 8779<br />
Switchboard 0820 240 530 00<br />
Bahamas General <strong>Support</strong> toll-free: 1-866-278-6818<br />
Barbados General <strong>Support</strong> 1-800-534-3066<br />
Belgium (Brussels)<br />
International Access Code: 00<br />
Country Code: 32<br />
City Code: 2<br />
Department Name or Service Area,<br />
Website and E-Mail Address<br />
Area Codes,<br />
Local Numbers, and<br />
Toll-Free Numbers<br />
Website: support.euro.dell.com<br />
E-mail for French-speaking Customers:<br />
support.euro.dell.com/be/fr/emaildell/<br />
Technical <strong>Support</strong> for Inspiron XPS computers only 024819296<br />
Technical <strong>Support</strong> for all other <strong>Dell</strong> computers 02 481 92 88<br />
Technical <strong>Support</strong> Fax 02 481 92 95<br />
Customer Care 02 713 15 .65<br />
Corporate Sales 02 481 91 00<br />
Fax 02 481 92 99<br />
Switchboard 02 481 91 00<br />
Bermuda General <strong>Support</strong> 1-800-342-0671<br />
Bolivia General <strong>Support</strong> toll-free: 800-10-0238<br />
Brazil<br />
Website: www.dell.com/br<br />
International Access Code: 00 Customer <strong>Support</strong>, Technical <strong>Support</strong> 0800 90 3355<br />
Country Code: 55<br />
Technical <strong>Support</strong> Fax 51 481 5470<br />
City Code: 51<br />
Customer Care Fax 51 481 5480<br />
Sales 0800 90 3390<br />
British Virgin Islands General <strong>Support</strong> toll-free: 1-866-278-6820<br />
Appendix 121
www.dell.com | support.dell.com<br />
Country (City)<br />
International Access Code<br />
Country Code<br />
City Code<br />
Brunei<br />
Country Code: 673<br />
122 Appendix<br />
Customer Technical <strong>Support</strong> (Penang, Malaysia) 604 633 4966<br />
Customer Service (Penang, Malaysia) 604 633 4949<br />
Transaction Sales (Penang, Malaysia) 604 633 4955<br />
Canada (North York, Ontario) Online Order Status: www.dell.ca/ostatus<br />
International Access Code: 011 AutoTech (automated technical support) toll-free: 1-800-247-9362<br />
Customer Care (Home Sales/Small Business) toll-free: 1-800-847-4096<br />
Customer Care (med./large business, government) toll-free: 1-800-326-9463<br />
Technical <strong>Support</strong> (Home Sales/Small Business) toll-free: 1-800-847-4096<br />
Technical <strong>Support</strong> (med./large bus., government) toll-free: 1-800-387-5757<br />
Technical <strong>Support</strong> (printers, projectors, televisions,<br />
handhelds, digital jukebox, and wireless)<br />
1-877-335-5767<br />
Sales (Home Sales/Small Business) toll-free: 1-800-387-5752<br />
Sales (med./large bus., government) toll-free: 1-800-387-5755<br />
Spare Parts Sales & Extended Service Sales 1 866 440 3355<br />
Cayman Islands General <strong>Support</strong> 1-800-805-7541<br />
Chile (Santiago)<br />
Country Code: 56<br />
City Code: 2<br />
Department Name or Service Area,<br />
Website and E-Mail Address<br />
Area Codes,<br />
Local Numbers, and<br />
Toll-Free Numbers<br />
Sales, Customer <strong>Support</strong>, and Technical <strong>Support</strong> toll-free: 1230-020-4823
Country (City)<br />
International Access Code<br />
Country Code<br />
City Code<br />
China (Xiamen)<br />
Country Code: 86<br />
City Code: 592<br />
Department Name or Service Area,<br />
Website and E-Mail Address<br />
Area Codes,<br />
Local Numbers, and<br />
Toll-Free Numbers<br />
Technical <strong>Support</strong> website: support.dell.com.cn<br />
Technical <strong>Support</strong> E-mail: cn_support@dell.com<br />
Customer Care E-mail: customer_cn@dell.com<br />
Technical <strong>Support</strong> Fax 592 818 1350<br />
Technical <strong>Support</strong> (<strong>Dell</strong> Dimension and<br />
toll-free: 800 858 2969<br />
Inspiron)<br />
Technical <strong>Support</strong> (OptiPlex, Latitude, and<br />
toll-free: 800 858 0950<br />
<strong>Dell</strong> Precision)<br />
Technical <strong>Support</strong> (servers and storage) toll-free: 800 858 0960<br />
Technical <strong>Support</strong> (projectors, PDAs, switches,<br />
toll-free: 800 858 2920<br />
routers, and so on)<br />
Technical <strong>Support</strong> (printers) toll-free: 800 858 2311<br />
Customer Care toll-free: 800 858 2060<br />
Customer Care Fax 592 818 1308<br />
Home and Small Business toll-free: 800 858 2222<br />
Preferred Accounts Division toll-free: 800 858 2557<br />
Large Corporate Accounts GCP toll-free: 800 858 2055<br />
Large Corporate Accounts Key Accounts toll-free: 800 858 2628<br />
Large Corporate Accounts North toll-free: 800 858 2999<br />
Large Corporate Accounts North Government and<br />
Education<br />
toll-free: 800 858 2955<br />
Large Corporate Accounts East toll-free: 800 858 2020<br />
Large Corporate Accounts East Government and<br />
Education<br />
toll-free: 800 858 2669<br />
Large Corporate Accounts Queue Team toll-free: 800 858 2572<br />
Large Corporate Accounts South toll-free: 800 858 2355<br />
Large Corporate Accounts West toll-free: 800 858 2811<br />
Large Corporate Accounts Spare Parts toll-free: 800 858 2621<br />
Colombia General <strong>Support</strong> 980-9-15-3978<br />
Costa Rica General <strong>Support</strong> 0800-012-0435<br />
Appendix 123
www.dell.com | support.dell.com<br />
Country (City)<br />
International Access Code<br />
Country Code<br />
City Code<br />
Czech Republic (Prague)<br />
International Access Code: 00<br />
Country Code: 420<br />
124 Appendix<br />
Website: support.euro.dell.com<br />
E-mail: czech_dell@dell.com<br />
Technical <strong>Support</strong> 22537 2727<br />
Customer Care 22537 2707<br />
Fax 22537 2714<br />
Tech Fax 22537 2728<br />
Switchboard 22537 2711<br />
Denmark (Copenhagen) Website: support.euro.dell.com<br />
International Access Code: 00 E-mail: support.euro.dell.com/dk/da/emaildell/<br />
Country Code: 45<br />
Technical <strong>Support</strong> for Inspiron XPS computers only 7010 0074<br />
Technical <strong>Support</strong> for all other <strong>Dell</strong> computers 7023 0182<br />
Customer Care (Relational) 7023 0184<br />
Home/Small Business Customer Care 3287 5505<br />
Switchboard (Relational) 3287 1200<br />
Switchboard Fax (Relational) 3287 1201<br />
Switchboard (Home/Small Business) 3287 5000<br />
Switchboard Fax (Home/Small Business) 3287 5001<br />
Dominica General <strong>Support</strong> toll-free: 1-866-278-6821<br />
Dominican Republic General <strong>Support</strong> 1-800-148-0530<br />
Ecuador General <strong>Support</strong> toll-free: 999-119<br />
El Salvador General <strong>Support</strong> 01-899-753-0777<br />
Finland (Helsinki)<br />
International Access Code: 990<br />
Country Code: 358<br />
City Code: 9<br />
Department Name or Service Area,<br />
Website and E-Mail Address<br />
Area Codes,<br />
Local Numbers, and<br />
Toll-Free Numbers<br />
Website: support.euro.dell.com<br />
E-mail: support.euro.dell.com/fi/fi/emaildell/<br />
Technical <strong>Support</strong> 09 253 313 60<br />
Customer Care 09 253 313 38<br />
Fax 09 253 313 99<br />
Switchboard 09 253 313 00
Country (City)<br />
International Access Code<br />
Country Code<br />
City Code<br />
France (Paris) (Montpellier)<br />
International Access Code: 00<br />
Country Code: 33<br />
City Codes: (1) (4)<br />
Germany (Langen)<br />
International Access Code: 00<br />
Country Code: 49<br />
City Code: 6103<br />
Department Name or Service Area,<br />
Website and E-Mail Address<br />
Area Codes,<br />
Local Numbers, and<br />
Toll-Free Numbers<br />
Website: support.euro.dell.com<br />
E-mail: support.euro.dell.com/fr/fr/emaildell/<br />
Home and Small Business<br />
Technical <strong>Support</strong> for Inspiron XPS computers only 0825 387 129<br />
Technical <strong>Support</strong> for all other <strong>Dell</strong> computers 0825 387 270<br />
Customer Care 0825 823 833<br />
Switchboard 0825 004 700<br />
Switchboard (calls from outside of France) 04 99 75 40 00<br />
Sales 0825 004 700<br />
Fax 0825 004 701<br />
Fax (calls from outside of France) 04 99 75 40 01<br />
Corporate<br />
Technical <strong>Support</strong> 0825 004 719<br />
Customer Care 0825 338 339<br />
Switchboard 01 55 94 71 00<br />
Sales 01 55 94 71 00<br />
Fax 01 55 94 71 01<br />
Website: support.euro.dell.com<br />
E-mail: tech_support_central_europe@dell.com<br />
Technical <strong>Support</strong> for Inspiron XPS computers only 06103 766-7222<br />
Technical <strong>Support</strong> for all other <strong>Dell</strong> computers 06103 766-7200<br />
Home/Small Business Customer Care 0180-5-224400<br />
Global Segment Customer Care 06103 766-9570<br />
Preferred Accounts Customer Care 06103 766-9420<br />
Large Accounts Customer Care 06103 766-9560<br />
Public Accounts Customer Care 06103 766-9555<br />
Switchboard 06103 766-7000<br />
Appendix 125
www.dell.com | support.dell.com<br />
Country (City)<br />
International Access Code<br />
Country Code<br />
City Code<br />
Greece<br />
Website: support.euro.dell.com<br />
International Access Code: 00 E-mail: support.euro.dell.com/gr/en/emaildell/<br />
Country Code: 30<br />
Technical <strong>Support</strong> 00800-44 14 95 18<br />
Gold Service Technical <strong>Support</strong> 00800-44 14 00 83<br />
Switchboard 2108129810<br />
Gold Service Switchboard 2108129811<br />
Sales 2108129800<br />
Fax 2108129812<br />
Grenada General <strong>Support</strong> toll-free: 1-866-540-3355<br />
Guatemala General <strong>Support</strong> 1-800-999-0136<br />
Guyana General <strong>Support</strong> toll-free: 1-877-270-4609<br />
Hong Kong<br />
Website: support.ap.dell.com<br />
International Access Code: 001 Technical <strong>Support</strong> E-mail: apsupport@dell.com<br />
Country Code: 852<br />
Technical <strong>Support</strong> (Dimension and Inspiron) 2969 3188<br />
Technical <strong>Support</strong> (OptiPlex, Latitude, and <strong>Dell</strong><br />
Precision)<br />
2969 3191<br />
Technical <strong>Support</strong> (PowerApp, PowerEdge,<br />
PowerConnect, and PowerVault)<br />
2969 3196<br />
Customer Care 3416 0910<br />
Large Corporate Accounts 3416 0907<br />
Global Customer Programs 3416 0908<br />
Medium Business Division 3416 0912<br />
Home and Small Business Division 2969 3105<br />
India Technical <strong>Support</strong> 1600 33 8045<br />
126 Appendix<br />
Department Name or Service Area,<br />
Website and E-Mail Address<br />
Area Codes,<br />
Local Numbers, and<br />
Toll-Free Numbers<br />
Sales (Large Corporate Accounts) 1600 33 8044<br />
Sales (Home and Small Business) 1600 33 8046
Country (City)<br />
International Access Code<br />
Country Code<br />
City Code<br />
Ireland (Cherrywood)<br />
International Access Code: 16<br />
Country Code: 353<br />
City Code: 1<br />
Department Name or Service Area,<br />
Website and E-Mail Address<br />
Area Codes,<br />
Local Numbers, and<br />
Toll-Free Numbers<br />
Website: support.euro.dell.com<br />
E-mail: dell_direct_support@dell.com<br />
Technical <strong>Support</strong> for Inspiron XPS computers only 1850 200 722<br />
Technical <strong>Support</strong> for all other <strong>Dell</strong> computers 1850 543 543<br />
U.K. Technical <strong>Support</strong> (dial within U.K. only) 0870 908 0800<br />
Home User Customer Care 01 204 4014<br />
Small Business Customer Care 01 204 4014<br />
U.K. Customer Care (dial within U.K. only) 0870 906 0010<br />
Corporate Customer Care 1850 200 982<br />
Corporate Customer Care (dial within U.K. only) 0870 907 4499<br />
Ireland Sales 01 204 4444<br />
U.K. Sales (dial within U.K. only) 0870 907 4000<br />
Fax/Sales Fax 01 204 0103<br />
Switchboard 01 204 4444<br />
Italy (Milan)<br />
Website: support.euro.dell.com<br />
International Access Code: 00 E-mail: support.euro.dell.com/it/it/emaildell/<br />
Country Code: 39<br />
Home and Small Business<br />
City Code: 02<br />
Technical <strong>Support</strong> 02 577 826 90<br />
Customer Care 02 696 821 14<br />
Fax 02 696 821 13<br />
Switchboard<br />
Corporate<br />
02 696 821 12<br />
Technical <strong>Support</strong> 02 577 826 90<br />
Customer Care 02 577 825 55<br />
Fax 02 575 035 30<br />
Switchboard 02 577 821<br />
Jamaica General <strong>Support</strong> (dial from within Jamaica only) 1-800-682-3639<br />
Appendix 127
www.dell.com | support.dell.com<br />
Country (City)<br />
International Access Code<br />
Country Code<br />
City Code<br />
Japan (Kawasaki)<br />
International Access Code: 001<br />
Country Code: 81<br />
City Code: 44<br />
Korea (Seoul)<br />
International Access Code: 001<br />
Country Code: 82<br />
City Code: 2<br />
128 Appendix<br />
Department Name or Service Area,<br />
Website and E-Mail Address<br />
Area Codes,<br />
Local Numbers, and<br />
Toll-Free Numbers<br />
Website: support.jp.dell.com<br />
Technical <strong>Support</strong> (servers) toll-free: 0120-198-498<br />
Technical <strong>Support</strong> outside of Japan (servers) 81-44-556-4162<br />
Technical <strong>Support</strong> (Dimension and Inspiron) toll-free: 0120-198-226<br />
Technical <strong>Support</strong> outside of Japan (Dimension and<br />
Inspiron)<br />
81-44-520-1435<br />
Technical <strong>Support</strong> (<strong>Dell</strong> Precision, OptiPlex, and<br />
Latitude)<br />
toll-free:0120-198-433<br />
Technical <strong>Support</strong> outside of Japan (<strong>Dell</strong> Precision,<br />
OptiPlex, and Latitude)<br />
81-44-556-3894<br />
Technical <strong>Support</strong> (PDAs, projectors, printers,<br />
routers)<br />
toll-free: 0120-981-690<br />
Technical <strong>Support</strong> outside of Japan (PDAs,<br />
projectors, printers, routers)<br />
81-44-556-3468<br />
Faxbox Service 044-556-3490<br />
24-Hour Automated Order Service 044-556-3801<br />
Customer Care 044-556-4240<br />
Business Sales Division (up to 400 employees) 044-556-1465<br />
Preferred Accounts Division Sales (over 400<br />
employees)<br />
044-556-3433<br />
Large Corporate Accounts Sales (over 3500<br />
employees)<br />
044-556-3430<br />
Public Sales (government agencies, educational<br />
institutions, and medical institutions)<br />
044-556-1469<br />
Global Segment Japan 044-556-3469<br />
Individual User 044-556-1760<br />
Switchboard 044-556-4300<br />
Technical <strong>Support</strong> toll-free: 080-200-3800<br />
Sales toll-free: 080-200-3600<br />
Customer Service (Penang, Malaysia) 604 633 4949<br />
Fax 2194-6202<br />
Switchboard 2194-6000<br />
Technical <strong>Support</strong> (Electronics and Accessories) toll-free: 080-200-3801
Country (City)<br />
International Access Code<br />
Country Code<br />
City Code<br />
Latin America Customer Technical <strong>Support</strong> (Austin, Texas,<br />
U.S.A.)<br />
512 728-4093<br />
Customer Service (Austin, Texas, U.S.A.) 512 728-3619<br />
Fax (Technical <strong>Support</strong> and Customer Service)<br />
(Austin, Texas, U.S.A.)<br />
512 728-3883<br />
Sales (Austin, Texas, U.S.A.) 512 728-4397<br />
SalesFax (Austin, Texas, U.S.A.) 512 728-4600<br />
or 512 728-3772<br />
Luxembourg<br />
Website: support.euro.dell.com<br />
International Access Code: 00 E-mail: tech_be@dell.com<br />
Country Code: 352<br />
Technical <strong>Support</strong> (Brussels, Belgium) 3420808075<br />
Home/Small Business Sales (Brussels, Belgium) toll-free: 080016884<br />
Corporate Sales (Brussels, Belgium) 02 481 91 00<br />
Customer Care (Brussels, Belgium) 02 481 91 19<br />
Fax (Brussels, Belgium) 02 481 92 99<br />
Switchboard (Brussels, Belgium) 02 481 91 00<br />
Macao<br />
Technical <strong>Support</strong> toll-free: 0800 105<br />
Country Code: 853<br />
Customer Service (Xiamen, China) 34 160 910<br />
Malaysia (Penang)<br />
International Access Code: 00<br />
Country Code: 60<br />
City Code: 4<br />
Department Name or Service Area,<br />
Website and E-Mail Address<br />
Area Codes,<br />
Local Numbers, and<br />
Toll-Free Numbers<br />
Transaction Sales (Xiamen, China) 29 693 115<br />
Website: support.ap.dell.com<br />
Technical <strong>Support</strong> (<strong>Dell</strong> Precision, OptiPlex, and<br />
toll-free: 1 800 88 0193<br />
Latitude)<br />
Technical <strong>Support</strong> (Dimension, Inspiron, and<br />
toll-free: 1 800 88 1306<br />
Electronics and Accessories)<br />
Technical <strong>Support</strong> (PowerApp, PowerEdge,<br />
toll-free: 1800 88 1386<br />
PowerConnect, and PowerVault)<br />
Customer Service (Penang, Malaysia) 04 633 4949<br />
Transaction Sales toll-free:1800888202<br />
Corporate Sales toll-free:1800888213<br />
Appendix 129
www.dell.com | support.dell.com<br />
Country (City)<br />
International Access Code<br />
Country Code<br />
City Code<br />
Mexico<br />
Customer Technical <strong>Support</strong> 001-877-384-8979<br />
International Access Code: 00<br />
or 001-877-269-3383<br />
Country Code: 52<br />
Sales 50-81-8800<br />
or 01-800-888-3355<br />
Customer Service 001-877-384-8979<br />
or 001-877-269-3383<br />
Main 50-81-8800<br />
or 01-800-888-3355<br />
Montserrat General <strong>Support</strong> toll-free: 1-866-278-6822<br />
Netherlands Antilles General <strong>Support</strong> 001-800-882-1519<br />
Netherlands (Amsterdam)<br />
International Access Code: 00<br />
Country Code: 31<br />
City Code: 20<br />
New Zealand<br />
International Access Code: 00<br />
Country Code: 64<br />
130 Appendix<br />
Department Name or Service Area,<br />
Website and E-Mail Address<br />
Area Codes,<br />
Local Numbers, and<br />
Toll-Free Numbers<br />
Website: support.euro.dell.com<br />
Technical <strong>Support</strong> for Inspiron XPS computers only 020 674 45 94<br />
Technical <strong>Support</strong> for all other <strong>Dell</strong> computers 020 674 45 00<br />
Technical <strong>Support</strong> Fax 020 674 47 66<br />
Home/Small Business Customer Care 020 674 42 00<br />
Relational Customer Care 020 674 4325<br />
Home/Small Business Sales 020 674 55 00<br />
Relational Sales 020 674 50 00<br />
Home/Small Business Sales Fax 020 674 47 75<br />
Relational Sales Fax 020 674 47 50<br />
Switchboard 020 674 50 00<br />
Switchboard Fax 020 674 47 50<br />
E-mail (New Zealand): nz_tech_support@dell.com<br />
E-mail (Australia): au_tech_support@dell.com<br />
Technical <strong>Support</strong> (for desktop and portable<br />
computers)<br />
toll-free: 0800 446 255<br />
Technical <strong>Support</strong> (for servers and workstations) toll-free: 0800 443 563<br />
Home and Small Business 0800 446 255<br />
Government and Business 0800 444 617<br />
Sales 0800 441 567<br />
Fax 0800 441 566
Country (City)<br />
International Access Code<br />
Country Code<br />
City Code<br />
Nicaragua General <strong>Support</strong> 001-800-220-1006<br />
Norway (Lysaker)<br />
Website: support.euro.dell.com<br />
International Access Code: 00 E-mail: support.euro.dell.com/no/no/emaildell/<br />
Country Code: 47<br />
Technical <strong>Support</strong> 671 16882<br />
Relational Customer Care 671 17575<br />
Home/Small Business Customer Care 23162298<br />
Switchboard 671 16800<br />
Fax Switchboard 671 16865<br />
Panama General <strong>Support</strong> 001-800-507-0962<br />
Peru General <strong>Support</strong> 0800-50-669<br />
Poland (Warsaw)<br />
International Access Code: 011<br />
Country Code: 48<br />
City Code: 22<br />
Department Name or Service Area,<br />
Website and E-Mail Address<br />
Area Codes,<br />
Local Numbers, and<br />
Toll-Free Numbers<br />
Website: support.euro.dell.com<br />
E-mail: pl_support_tech@dell.com<br />
Customer Service Phone 57 95 700<br />
Customer Care 57 95 999<br />
Sales 57 95 999<br />
Customer Service Fax 57 95 806<br />
Reception Desk Fax 57 95 998<br />
Switchboard 57 95 999<br />
Portugal<br />
Website: support.euro.dell.com<br />
International Access Code: 00 E-mail: support.euro.dell.com/pt/en/emaildell/<br />
Country Code: 351<br />
Technical <strong>Support</strong> 707200149<br />
Customer Care 800 300 413<br />
Sales 800 300 410 or 800 300 411 or<br />
800 300 412 or 21 422 07 10<br />
Fax 21 424 01 12<br />
Puerto Rico General <strong>Support</strong> 1-800-805-7545<br />
St. Kitts and Nevis General <strong>Support</strong> toll-free: 1-877-441-4731<br />
St. Lucia General <strong>Support</strong> 1-800-882-1521<br />
St. Vincent and the Grenadines General <strong>Support</strong> toll-free: 1-877-270-4609<br />
Appendix 131
www.dell.com | support.dell.com<br />
Country (City)<br />
International Access Code<br />
Country Code<br />
City Code<br />
Singapore (Singapore)<br />
International Access Code: 005<br />
Country Code: 65<br />
Slovakia (Prague)<br />
International Access Code: 00<br />
Country Code: 421<br />
South Africa (Johannesburg)<br />
International Access Code:<br />
09/091<br />
Country Code: 27<br />
City Code: 11<br />
Southeast Asian and Pacific<br />
Countries<br />
132 Appendix<br />
Department Name or Service Area,<br />
Website and E-Mail Address<br />
Area Codes,<br />
Local Numbers, and<br />
Toll-Free Numbers<br />
Website: support.ap.dell.com<br />
Technical <strong>Support</strong> (Dimension, Inspiron, and<br />
toll-free: 1800 394 7430<br />
Electronics and Accessories)<br />
Technical <strong>Support</strong> (OptiPlex, Latitude, and <strong>Dell</strong><br />
toll-free: 1800 394 7488<br />
Precision)<br />
Technical <strong>Support</strong> (PowerApp, PowerEdge,<br />
toll-free: 1800 394 7478<br />
PowerConnect, and PowerVault)<br />
Customer Service (Penang, Malaysia) 604 633 4949<br />
Transaction Sales toll-free: 1 800 394 7412<br />
Corporate Sales toll-free: 1 800 394 7419<br />
Website: support.euro.dell.com<br />
E-mail: czech_dell@dell.com<br />
Technical <strong>Support</strong> 02 5441 5727<br />
Customer Care 420 22537 2707<br />
Fax 02 5441 8328<br />
Tech Fax 02 5441 8328<br />
Switchboard (Sales) 02 5441 7585<br />
Website: support.euro.dell.com<br />
E-mail: dell_za_support@dell.com<br />
Gold Queue 011 709 7713<br />
Technical <strong>Support</strong> 011 709 7710<br />
Customer Care 011 709 7707<br />
Sales 011 709 7700<br />
Fax 011 706 0495<br />
Switchboard 011 709 7700<br />
Customer Technical <strong>Support</strong>, Customer Service,<br />
and Sales (Penang, Malaysia)<br />
604 633 4810
Country (City)<br />
International Access Code<br />
Country Code<br />
City Code<br />
Spain (Madrid)<br />
International Access Code: 00<br />
Country Code: 34<br />
City Code: 91<br />
Sweden (Upplands Vasby)<br />
International Access Code: 00<br />
Country Code: 46<br />
City Code: 8<br />
Switzerland (Geneva)<br />
International Access Code: 00<br />
Country Code: 41<br />
City Code: 22<br />
Department Name or Service Area,<br />
Website and E-Mail Address<br />
Area Codes,<br />
Local Numbers, and<br />
Toll-Free Numbers<br />
Website: support.euro.dell.com<br />
E-mail: support.euro.dell.com/es/es/emaildell/<br />
Home and Small Business<br />
Technical <strong>Support</strong> 902 100 130<br />
Customer Care 902 118 540<br />
Sales 902 118 541<br />
Switchboard 902 118 541<br />
Fax<br />
Corporate<br />
902 118 539<br />
Technical <strong>Support</strong> 902 100 130<br />
Customer Care 902 115 236<br />
Switchboard 91 722 92 00<br />
Fax 91 722 95 83<br />
Website: support.euro.dell.com<br />
E-mail: support.euro.dell.com/se/sv/emaildell/<br />
Technical <strong>Support</strong> 08 590 05 199<br />
Relational Customer Care 08 590 05 642<br />
Home/Small Business Customer Care 08 587 70 527<br />
Employee Purchase Program (EPP) <strong>Support</strong> 20 140 14 44<br />
Technical <strong>Support</strong> Fax 08 590 05 594<br />
Sales 08 590 05 185<br />
Website: support.euro.dell.com<br />
E-mail: Tech_support_central_Europe@dell.com<br />
E-mail for French-speaking HSB and Corporate<br />
Customers: support.euro.dell.com/ch/fr/emaildell/<br />
Technical <strong>Support</strong> (Home and Small Business) 0844 811 411<br />
Technical <strong>Support</strong> (Corporate) 0844 822 844<br />
Customer Care (Home and Small Business) 0848 802 202<br />
Customer Care (Corporate) 0848 821 721<br />
Fax 022 799 01 90<br />
Switchboard 022 799 01 01<br />
Appendix 133
www.dell.com | support.dell.com<br />
Country (City)<br />
International Access Code<br />
Country Code<br />
City Code<br />
Taiwan<br />
International Access Code: 002<br />
Country Code: 886<br />
134 Appendix<br />
Department Name or Service Area,<br />
Website and E-Mail Address<br />
Area Codes,<br />
Local Numbers, and<br />
Toll-Free Numbers<br />
Website: support.ap.dell.com<br />
E-mail: ap_support@dell.com<br />
Technical <strong>Support</strong> (OptiPlex, Latitude, Inspiron,<br />
toll-free: 00801 86 1011<br />
Dimension, and Electronics and Accessories)<br />
Technical <strong>Support</strong> (PowerApp, PowerEdge,<br />
toll-free: 00801 60 1256<br />
PowerConnect, and PowerVault)<br />
Transaction Sales toll-free: 00801 65 1228<br />
Corporate Sales toll-free: 00801 651 227<br />
Thailand<br />
Website: support.ap.dell.com<br />
International Access Code: 001 Technical <strong>Support</strong> (OptiPlex, Latitude, and <strong>Dell</strong><br />
toll-free: 1800 0060 07<br />
Country Code: 66<br />
Precision)<br />
Technical <strong>Support</strong> (PowerApp, PowerEdge,<br />
PowerConnect, and PowerVault)<br />
toll-free: 1800 0600 09<br />
Customer Service (Penang, Malaysia) 604 633 4949<br />
Corporate Sales toll-free: 1800 006 009<br />
Transaction Sales toll-free: 1800 006 006<br />
Trinidad/Tobago General <strong>Support</strong> 1-800-805-8035<br />
Turks and Caicos Islands General <strong>Support</strong> toll-free: 1-866-540-3355
Country (City)<br />
International Access Code<br />
Country Code<br />
City Code<br />
Department Name or Service Area,<br />
Website and E-Mail Address<br />
Area Codes,<br />
Local Numbers, and<br />
Toll-Free Numbers<br />
U.K. (Bracknell)<br />
Website: support.euro.dell.com<br />
International Access Code: 00<br />
Country Code: 44<br />
Customer Care website: support.euro.dell.com/uk/en/ECare/Form/Home.asp<br />
City Code: 1344<br />
E-mail: dell_direct_support@dell.com<br />
Technical <strong>Support</strong> (Corporate/Preferred<br />
Accounts/PAD [1000+ employees])<br />
0870 908 0500<br />
Technical <strong>Support</strong> (direct and general) 0870 908 0800<br />
Global Accounts Customer Care 01344 373 186<br />
Home and Small Business Customer Care 0870 906 0010<br />
Corporate Customer Care 01344 373 185<br />
Preferred Accounts (500–5000 employees)<br />
Customer Care<br />
0870 906 0010<br />
Central Government Customer Care 01344 373 193<br />
Local Government & Education Customer Care 01344 373 199<br />
Health Customer Care 01344 373 194<br />
Home and Small Business Sales 0870 907 4000<br />
Corporate/Public Sector Sales 01344 860 456<br />
Home and Small Business Fax 0870 907 4006<br />
Uruguay General <strong>Support</strong> toll-free: 000-413-598-2521<br />
Appendix 135
www.dell.com | support.dell.com<br />
Country (City)<br />
International Access Code<br />
Country Code<br />
City Code<br />
U.S.A. (Austin, Texas) Automated Order-Status Service toll-free: 1-800-433-9014<br />
International Access Code: 011 AutoTech (portable and desktop computers) toll-free: 1-800-247-9362<br />
Country Code: 1<br />
Consumer (Home and Home Office)<br />
Technical <strong>Support</strong> toll-free: 1-800-624-9896<br />
Customer Service toll-free: 1-800-624-9897<br />
<strong>Dell</strong>Net Service and <strong>Support</strong> toll-free: 1-877-<strong>Dell</strong>net<br />
(1-877-335-5638)<br />
Employee Purchase Program (EPP) Customers<br />
Financial Services website:<br />
www.dellfinancialservices.com<br />
toll-free: 1-800-695-8133<br />
Financial Services (lease/loans) toll-free: 1-877-577-3355<br />
Financial Services (<strong>Dell</strong> Preferred Accounts [DPA])<br />
Business<br />
toll-free: 1-800-283-2210<br />
Customer Service and Technical <strong>Support</strong> toll-free: 1-800-822-8965<br />
Employee Purchase Program (EPP) Customers toll-free: 1-800-695-8133<br />
Printers and Projectors Technical <strong>Support</strong><br />
Public (government, education, and healthcare)<br />
toll-free: 1-877-459-7298<br />
Customer Service and Technical <strong>Support</strong> toll-free: 1-800-456-3355<br />
Employee Purchase Program (EPP) Customers toll-free: 1-800-234-1490<br />
<strong>Dell</strong> Sales toll-free: 1-800-289-3355<br />
or toll-free: 1-800-879-3355<br />
<strong>Dell</strong> Outlet Store (<strong>Dell</strong> refurbished computers) toll-free: 1-888-798-7561<br />
Software and Peripherals Sales toll-free: 1-800-671-3355<br />
Spare Parts Sales toll-free: 1-800-357-3355<br />
Extended Service and Warranty Sales toll-free: 1-800-247-4618<br />
Fax toll-free: 1-800-727-8320<br />
<strong>Dell</strong> Services for the Deaf, Hard-of-Hearing, or<br />
toll-free: 1-877-DELLTTY<br />
Speech-Impaired<br />
(1-877-335-5889)<br />
U.S. Virgin Islands General <strong>Support</strong> 1-877-673-3355<br />
Venezuela General <strong>Support</strong> 8001-3605<br />
136 Appendix<br />
Department Name or Service Area,<br />
Website and E-Mail Address<br />
Area Codes,<br />
Local Numbers, and<br />
Toll-Free Numbers
Index<br />
A<br />
audio. See sound<br />
B<br />
battery<br />
problems, 29<br />
replacing, 101<br />
BIOS, 107<br />
boot sequence<br />
about, 113<br />
changing, 113-114<br />
option settings, 113<br />
booting<br />
to a USB device, 113<br />
C<br />
cards<br />
installing PCI Express, 74<br />
PCI Express, 73<br />
removing PCI, 72<br />
removing PCI Express, 79<br />
slots, 60<br />
CD/DVD drive<br />
activity light, 57<br />
eject button, 57<br />
problems, 30<br />
CD-RW drive<br />
problems, 31<br />
CDs<br />
copying, 18<br />
playing, 16<br />
Check Disk, 31<br />
CMOS settings<br />
clearing, 115<br />
computer<br />
components inside, 62<br />
crashes, 35-36<br />
inside view, 62<br />
restore to previous state, 52<br />
stops responding, 35<br />
connectors<br />
center/LFE, 59<br />
headphone, 58<br />
IEEE 1394, 58<br />
line-in, 59<br />
line-out, 59<br />
microphone, 58-59<br />
network adapter, 60<br />
power, 59<br />
sound, 59<br />
surround, 59<br />
USB, 58, 60<br />
copying CDs and DVDs, 18<br />
cover<br />
replacing, 102<br />
D<br />
<strong>Dell</strong><br />
<strong>Dell</strong> Diagnostics, 48<br />
support policy, 117<br />
support site, 11<br />
<strong>Dell</strong> Premier <strong>Support</strong><br />
website, 9, 11<br />
diagnostic lights, 45<br />
diagnostics<br />
<strong>Dell</strong>, 48<br />
lights, 45, 58<br />
documentation<br />
online, 11<br />
Product Information Guide, 9<br />
Setup Diagram, 9<br />
drive panel, 58, 82<br />
removing, 82<br />
replacing, 84<br />
drive-panel insert<br />
removing, 83<br />
replacing, 84<br />
drivers<br />
about, 49<br />
identifying, 50<br />
drives<br />
problems, 30<br />
DVD drive<br />
problems, 30<br />
Index 137
DVDs<br />
copying, 18<br />
playing, 16<br />
E<br />
e-mail<br />
problems, 31<br />
error messages<br />
diagnostic lights, 45<br />
troubleshooting, 33<br />
F<br />
Files and Settings Transfer<br />
Wizard, 28<br />
Finding Information, 9<br />
Flex Bay drive<br />
Media Card Reader, 57<br />
H<br />
hard drive<br />
activity light, 58<br />
problems, 31<br />
hardware<br />
<strong>Dell</strong> Diagnostics, 48<br />
Hardware Troubleshooter, 51<br />
headphone<br />
connector, 58<br />
Help and <strong>Support</strong> Center, 12<br />
138 Index<br />
hibernate mode, 25, 27<br />
Hyper-Threading, 28<br />
I<br />
IEEE 1394<br />
connector, 58<br />
installing parts<br />
before you begin, 55<br />
recommended tools, 55<br />
turning off your computer, 55<br />
Internet<br />
connection, about, 14<br />
connection, options, 14<br />
connection, setting up, 15<br />
problems, 31<br />
K<br />
keyboard<br />
problems, 34<br />
L<br />
labels<br />
Microsoft Windows, 10<br />
Service Tag, 10, 58<br />
latch release<br />
cover, 57<br />
lights<br />
diagnostic, 45, 58<br />
front of computer, 45<br />
hard drive activity, 58<br />
M<br />
Media Card Reader<br />
installing, 93, 95<br />
problems, 34<br />
removing, 93<br />
using, 20<br />
memory<br />
problems, 37<br />
messages<br />
error, 33<br />
microphone<br />
connector, 58-59<br />
Microsoft Windows label, 10<br />
modem<br />
problems, 31<br />
monitor<br />
blank, 42<br />
clone mode, 23<br />
connect DVI, 21-22<br />
connect TV, 21, 23<br />
connect two, 21-22<br />
connect VGA, 21-22<br />
display settings, 23<br />
extended desktop mode, 23<br />
hard to read, 43<br />
motherboard. See system<br />
board<br />
mouse<br />
problems, 37
N<br />
network<br />
connector, 60<br />
Network Setup Wizard, 24<br />
problems, 38<br />
setting up, 24<br />
Network Setup Wizard, 24<br />
O<br />
operating system<br />
reinstalling Windows XP, 52<br />
P<br />
password<br />
clearing, 114<br />
jumper, 114<br />
PCI cards<br />
removing, 72<br />
PCI Express cards<br />
installing, 74<br />
removing, 79<br />
playing CDs and DVDs, 16<br />
power<br />
button, 58<br />
connector, 59<br />
conserving, 25<br />
hibernate mode, 25, 27<br />
managing, 25<br />
options, 26<br />
options, advanced, 27<br />
options, hibernate, 27<br />
options, schemes, 26<br />
power (continued)<br />
problems, 39<br />
standby mode, 25<br />
power light<br />
conditions, 39<br />
Power Options Properties, 26<br />
printer<br />
cable, 13<br />
connecting, 13<br />
problems, 40<br />
setting up, 13<br />
USB, 14<br />
problems<br />
battery, 29<br />
blue screen, 36<br />
CD drive, 30<br />
CD-RW drive, 31<br />
computer crashes, 35-36<br />
computer stops responding, 35<br />
<strong>Dell</strong> Diagnostics, 48<br />
diagnostic lights, 45<br />
drives, 30<br />
DVD drive, 30<br />
e-mail, 31<br />
error messages, 33<br />
general, 35<br />
hard drive, 31<br />
Internet, 31<br />
keyboard, 34<br />
Media Card Reader, 34<br />
memory, 37<br />
modem, 31<br />
monitor is blank, 42<br />
monitor is hard to read, 43<br />
mouse, 37<br />
network, 38<br />
power, 39<br />
problems (continued)<br />
power light conditions, 39<br />
printer, 40<br />
program crashes, 35<br />
program stops responding, 35<br />
programs and Windows<br />
compatibility, 36<br />
restore to previous state, 51-52<br />
scanner, 40<br />
screen is blank, 42<br />
screen is hard to read, 43<br />
software, 35-36<br />
sound and speakers, 41<br />
technical support policy, 117<br />
troubleshooting tips, 29<br />
volume adjusting, 41<br />
Program Compatibility<br />
Wizard, 36<br />
R<br />
reinstalling<br />
Windows XP, 52<br />
S<br />
safety instructions, 9<br />
scanner<br />
problems, 40<br />
Service Tag, 10, 58<br />
settings<br />
system setup, 107<br />
Setup Diagram, 9<br />
software<br />
Hyper-Threading, 28<br />
problems, 35-36<br />
Index 139
sound<br />
problems, 41<br />
volume, 41<br />
sound connectors, 59<br />
speaker<br />
problems, 41<br />
volume, 41<br />
specifications<br />
audio, 103<br />
computer information, 103<br />
connectors, 105<br />
controls and lights, 106<br />
drives, 105<br />
environmental, 107<br />
expansion bus, 104<br />
memory, 103<br />
physical, 106<br />
power, 106<br />
processor, 103<br />
technical, 103<br />
video, 103<br />
standby mode, 25<br />
support<br />
policy, 117<br />
system board, 63<br />
System Restore, 51-52<br />
system setup<br />
about, 107<br />
entering, 108<br />
options, 110<br />
screens, 108<br />
140 Index<br />
T<br />
technical support<br />
policy, 117<br />
transferring information to a<br />
new computer, 28<br />
troubleshooting<br />
<strong>Dell</strong> Diagnostics, 48<br />
diagnostic lights, 45<br />
Hardware Troubleshooter, 51<br />
Help and <strong>Support</strong> Center, 12<br />
restore to previous state, 51-52<br />
tips, 29<br />
TV<br />
connect to computer, 21, 23<br />
U<br />
USB<br />
booting to devices, 113<br />
connectors, 58, 60<br />
V<br />
vents, 58<br />
front panel, 58<br />
volume<br />
adjusting, 41<br />
W<br />
warranty, 9<br />
Windows XP<br />
Device Driver Rollback, 50<br />
Files and Settings Transfer<br />
Wizard, 28<br />
Hardware Troubleshooter, 51<br />
Help and <strong>Support</strong> Center, 12<br />
Hyper-Threading, 28<br />
Network Setup Wizard, 24<br />
Program Compatibility<br />
Wizard, 36<br />
reinstalling, 52<br />
scanner, 41<br />
System Restore, 51-52<br />
wizards<br />
Files and Settings Transfer<br />
Wizard, 28<br />
Network Setup Wizard, 24<br />
Program Compatibility<br />
Wizard, 36