VMware vSphere 5 On Dell PowerEdge Systems ... - Dell Support
VMware vSphere 5 On Dell PowerEdge Systems ... - Dell Support
VMware vSphere 5 On Dell PowerEdge Systems ... - Dell Support

You also want an ePaper? Increase the reach of your titles
YUMPU automatically turns print PDFs into web optimized ePapers that Google loves.
<strong>VMware</strong> <strong>vSphere</strong> 5 <strong>On</strong> <strong>Dell</strong> <strong>PowerEdge</strong> <strong>Systems</strong><br />
Deployment Guide
Notes, Cautions, and Warnings<br />
NOTE: A NOTE indicates important information that helps you make better use of your computer.<br />
CAUTION: A CAUTION indicates either potential damage to hardware or loss of data and tells you how to avoid the<br />
problem.<br />
WARNING: A WARNING indicates a potential for property damage, personal injury, or death.<br />
© 2012 <strong>Dell</strong> Inc.<br />
Trademarks used in this text: <strong>Dell</strong> , the <strong>Dell</strong> logo, <strong>Dell</strong> Boomi , <strong>Dell</strong> Precision , OptiPlex , Latitude , <strong>PowerEdge</strong> , PowerVault ,<br />
PowerConnect , OpenManage , EqualLogic , Compellent , KACE , FlexAddress , Force10 and Vostro are trademarks of <strong>Dell</strong><br />
Inc. Intel ®, Pentium ®, Xeon ®, Core ® and Celeron ® are registered trademarks of Intel Corporation in the U.S. and other countries. AMD ®<br />
is a registered trademark and AMD Opteron , AMD Phenom and AMD Sempron are trademarks of Advanced Micro Devices, Inc.<br />
Microsoft ®, Windows ®, Windows Server ®, Internet Explorer ®, MS-DOS ®, Windows Vista ® and Active Directory ® are either trademarks<br />
or registered trademarks of Microsoft Corporation in the United States and/or other countries. Red Hat ® and Red Hat ®<br />
Enterprise Linux ® are registered trademarks of Red Hat, Inc. in the United States and/or other countries. Novell ® and SUSE ® are<br />
registered trademarks of Novell Inc. in the United States and other countries. Oracle ® is a registered trademark of Oracle Corporation<br />
and/or its affiliates. Citrix ®, Xen ®, XenServer ® and XenMotion ® are either registered trademarks or trademarks of Citrix <strong>Systems</strong>, Inc. in<br />
the United States and/or other countries. <strong>VMware</strong> ®, Virtual SMP ®, vMotion ®, vCenter ® and <strong>vSphere</strong> ® are registered trademarks or<br />
trademarks of <strong>VMware</strong>, Inc. in the United States or other countries. IBM ® is a registered trademark of International Business Machines<br />
Corporation.<br />
2012 - 12<br />
Rev. A06
Contents<br />
Notes, Cautions, and Warnings...................................................................................................2<br />
1 Introduction..................................................................................................................................7<br />
<strong>vSphere</strong> 5 Architecture Overview............................................................................................................................7<br />
ESXi Architecture Overview.....................................................................................................................................8<br />
2 Getting Started With <strong>vSphere</strong> 5..............................................................................................11<br />
Related Information................................................................................................................................................11<br />
Technical <strong>Support</strong> Resources..........................................................................................................................11<br />
Discussion Forums...........................................................................................................................................11<br />
Knowledge Base..............................................................................................................................................12<br />
Contacting <strong>Dell</strong>.......................................................................................................................................................12<br />
3 Installing <strong>vSphere</strong> 5..................................................................................................................13<br />
Creating The ESXi Installer Media..........................................................................................................................13<br />
Important Information For The <strong>Dell</strong>-Customized ESXi Image...........................................................................13<br />
Installing, Enabling, And Disabling ESXi.................................................................................................................14<br />
USB Key Or SD Memory Card Installation.......................................................................................................14<br />
Installing ESXi <strong>On</strong> Flash Media........................................................................................................................14<br />
Installing ESXi <strong>On</strong> The Hard Drive....................................................................................................................15<br />
Enabling Or Disabling Flash Storage Device....................................................................................................15<br />
Configuring <strong>On</strong>e-Time Boot To ESXi.................................................................................................................16<br />
Configuring Recurring Boot To ESXi................................................................................................................16<br />
Downloading The Patches And Updates For ESXi.................................................................................................16<br />
Creating The vCenter Server Installation Media....................................................................................................17<br />
Installing vCenter Server........................................................................................................................................17<br />
Installing <strong>vSphere</strong> Web Client................................................................................................................................17<br />
Installing <strong>vSphere</strong> Client.........................................................................................................................................18<br />
Troubleshooting ESXi Installation...........................................................................................................................18<br />
ESXi Not Booting Or Displays A “No OS found” Message At Start Up ...........................................................18<br />
Purple Or Pink Screen While Booting Or Running Your ESXi...........................................................................18<br />
4 Deploying <strong>vSphere</strong> 5—Important Information.....................................................................19<br />
Best Practices Checklist For Deploying ESXi.........................................................................................................19<br />
<strong>vSphere</strong> Configuration Using <strong>Dell</strong> Fibre Channel SAN...........................................................................................20<br />
<strong>vSphere</strong> Configuration Using iSCSI SAN................................................................................................................21<br />
Booting ESXi...........................................................................................................................................................22
Configuring The Password...............................................................................................................................23<br />
Configuring Lockdown Mode...........................................................................................................................24<br />
Managing The Management Network Services..............................................................................................24<br />
5 Configuration Backup And Restore Procedures..................................................................25<br />
Backing Up The Configuration Of Your ESXi Host..................................................................................................25<br />
Restoring The Configuration Of Your ESXi Host.....................................................................................................25<br />
Image Recovery......................................................................................................................................................26<br />
Image Recovery For ESXi Embedded Edition...................................................................................................26<br />
6 Licensing Information...............................................................................................................27<br />
ESXi Single Server Edition Licensing For <strong>vSphere</strong> 5.0............................................................................................27<br />
License Evaluation..................................................................................................................................................27<br />
<strong>vSphere</strong> Licensing..................................................................................................................................................27<br />
Administering License Keys...................................................................................................................................28<br />
7 <strong>Support</strong>ed <strong>PowerEdge</strong> Configurations For <strong>vSphere</strong> 5........................................................29<br />
<strong>PowerEdge</strong> M820 Configuration.............................................................................................................................29<br />
<strong>PowerEdge</strong> M620 Configuration.............................................................................................................................29<br />
<strong>PowerEdge</strong> M520 Configuration.............................................................................................................................30<br />
<strong>PowerEdge</strong> M420 Configuration.............................................................................................................................30<br />
<strong>PowerEdge</strong> M915 Configuration.............................................................................................................................31<br />
<strong>PowerEdge</strong> M910 Configuration.............................................................................................................................31<br />
<strong>PowerEdge</strong> M710HD Configuration........................................................................................................................31<br />
<strong>PowerEdge</strong> M710 Configuration.............................................................................................................................32<br />
<strong>PowerEdge</strong> M610x Configuration...........................................................................................................................32<br />
<strong>PowerEdge</strong> M610 Configuration.............................................................................................................................33<br />
<strong>PowerEdge</strong> R820 Configuration..............................................................................................................................33<br />
<strong>PowerEdge</strong> R720 Configuration..............................................................................................................................33<br />
<strong>PowerEdge</strong> R720xd Configuration..........................................................................................................................34<br />
<strong>PowerEdge</strong> R620 Configuration..............................................................................................................................34<br />
<strong>PowerEdge</strong> R520 Configuration..............................................................................................................................35<br />
<strong>PowerEdge</strong> R420 Configuration..............................................................................................................................35<br />
<strong>PowerEdge</strong> R320 Configuration..............................................................................................................................36<br />
<strong>PowerEdge</strong> R910 Configuration..............................................................................................................................36<br />
<strong>PowerEdge</strong> R815 Configuration..............................................................................................................................36<br />
<strong>PowerEdge</strong> R810 Configuration..............................................................................................................................37<br />
<strong>PowerEdge</strong> R715 Configuration..............................................................................................................................37<br />
<strong>PowerEdge</strong> R710 Configuration..............................................................................................................................38<br />
<strong>PowerEdge</strong> R610 Configuration..............................................................................................................................38<br />
<strong>PowerEdge</strong> R515 Configuration..............................................................................................................................38<br />
<strong>PowerEdge</strong> R510 Configuration..............................................................................................................................39
<strong>PowerEdge</strong> R415 Configuration..............................................................................................................................39<br />
<strong>PowerEdge</strong> R410 Configuration..............................................................................................................................40<br />
<strong>PowerEdge</strong> R310 Configuration..............................................................................................................................40<br />
<strong>PowerEdge</strong> R210 II Configuration...........................................................................................................................40<br />
<strong>PowerEdge</strong> T320 Configuration..............................................................................................................................41<br />
<strong>PowerEdge</strong> T420 Configuration..............................................................................................................................41<br />
<strong>PowerEdge</strong> T620 Configuration..............................................................................................................................42<br />
<strong>PowerEdge</strong> T710 Configuration..............................................................................................................................42<br />
<strong>PowerEdge</strong> T610 Configuration..............................................................................................................................43<br />
<strong>PowerEdge</strong> T410 Configuration..............................................................................................................................43<br />
<strong>PowerEdge</strong> T310 Configuration..............................................................................................................................43<br />
<strong>PowerEdge</strong> T110 II Configuration...........................................................................................................................44
Introduction<br />
This document helps you to deploy <strong>VMware</strong> ESXi 5 on <strong>Dell</strong> systems and provides specific information on recommended<br />
configurations, best practices, and additional resources.<br />
NOTE: <strong>VMware</strong> <strong>vSphere</strong> 5 does not include the ESX classic edition.<br />
<strong>Dell</strong> offers the following <strong>VMware</strong> editions:<br />
• <strong>vSphere</strong> Essentials Plus<br />
• <strong>vSphere</strong> Standard<br />
• <strong>vSphere</strong> Enterprise<br />
• <strong>vSphere</strong> Enterprise Plus<br />
• <strong>VMware</strong> vCenter Server<br />
• <strong>vSphere</strong> Standard Acceleration Kit (6 sockets)<br />
• <strong>vSphere</strong> Enterprise Acceleration Kit (6 sockets)<br />
• <strong>vSphere</strong> Enterprise Plus Acceleration Kit (6 sockets)<br />
• <strong>vSphere</strong> Desktop (100 VM Pack)<br />
NOTE: In addition to the above, the <strong>vSphere</strong> 5.0 Single Server Edition licence offered by <strong>Dell</strong> has been discontinued<br />
from <strong>vSphere</strong> 5.2 onwards.<br />
NOTE: <strong>vSphere</strong> Essentials Plus is an all-inclusive package that includes licenses for three physical systems, each<br />
system with up to two processors. It also includes <strong>VMware</strong> vCenter Server to centrally manage the systems.<br />
<strong>vSphere</strong> Essentials Plus edition is supported only on two-socket systems. Additional licenses must still be deployed<br />
on approved systems for <strong>Dell</strong> support.<br />
NOTE: With the release of <strong>vSphere</strong> 5, all Partner Activation Codes shipped with current systems is for <strong>vSphere</strong> 5<br />
licensing. If you have an active <strong>vSphere</strong> subscription, you can downgrade or upgrade <strong>vSphere</strong> as you choose. To<br />
get your downgrade keys, register your Partner Activation Code and login to vmware.com/accounts. Go to Manage<br />
Product Licenses → <strong>vSphere</strong> v5 on the license administration portal.<br />
NOTE: <strong>vSphere</strong> Acceleration Kits are packages of <strong>vSphere</strong> licenses and a vCenter Server Standard license for<br />
initial deployments. All the licenses provided are on the same <strong>VMware</strong> contract and <strong>Dell</strong> support contract.<br />
Additional licenses must still be deployed on approved systems for <strong>Dell</strong> support.<br />
<strong>vSphere</strong> 5 Architecture Overview<br />
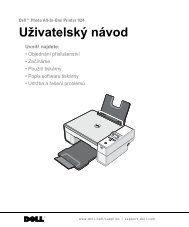
<strong>vSphere</strong> infrastructure consists of the following components:<br />
ESXi Allows multiple operating systems to run simultaneously on a single system.<br />
vCenter Server Management application that monitors and manages virtual machines and copies of ESXi. With<br />
vCenter Server, you can create, start, stop, and migrate virtual machines across the entire<br />
physical data center. vCenter Server is optional, but is required for advanced management<br />
capabilities such as <strong>VMware</strong> VMotion, Distributed Resource Scheduling (DRS), and High<br />
Availability (HA).<br />
1<br />
7
vCenter Server<br />
Database<br />
<strong>vSphere</strong> Web<br />
Client<br />
Stores all the configuration data about a <strong>VMware</strong> infrastructure environment. It is<br />
recommended that you use a production database such as Microsoft SQL Server or Oracle for<br />
the vCenter Server database.<br />
The core administrative interface for <strong>vSphere</strong> starting from ESXi 5.1. Shares functionality with<br />
the <strong>vSphere</strong> Client, but can be launched from Internet Explorer or Mozilla Firefox without<br />
requiring a specific client installation.<br />
<strong>vSphere</strong> Client Required to manage an ESXi host by directly connecting to it or through vCenter Server. It can<br />
be installed on a system running a supported Windows operating system. <strong>vSphere</strong> Client is<br />
being replaced by the <strong>vSphere</strong> Web Client for future releases.<br />
Virtual Machine<br />
DataStore<br />
Figure 1. <strong>vSphere</strong> Components<br />
Stores virtual machine configuration and virtual disk files. The virtual machine storage can<br />
either be an internal storage local to the ESXi or an external storage that can be shared by<br />
multiple ESXi systems. Advanced features such as HA and DRS require that the disk and<br />
configuration files are stored on the external shared storage.<br />
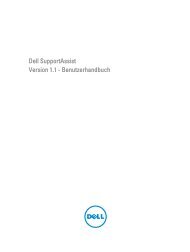
ESXi Architecture Overview<br />
ESXi is a bare-metal enterprise class hypervisor which can be pre-installed on <strong>Dell</strong> <strong>PowerEdge</strong> systems. With the<br />
reduced footprint of the hypervisor, ESXi is integrated on <strong>PowerEdge</strong> systems through embedded Secure Digital (SD).<br />
Integrated virtualization by <strong>VMware</strong> offers:<br />
8<br />
• Ease of deployment<br />
• Integrated hardware monitoring<br />
• Enhanced security<br />
• Reduced patch management<br />
• Improved reliability
Figure 2. ESXi 5 Architecture<br />
9
Getting Started With <strong>vSphere</strong> 5<br />
If you have ordered a license plan with your ESXi software, you must register and exchange the Partner Activation Code<br />
(PAC) for a product serial number or a license key. You can register the activation codes with either one or multiple<br />
license administrators. To activate your product, see the topic "Licensing Information" in this document.<br />
Related Information<br />
NOTE: For <strong>Dell</strong> <strong>VMware</strong> documentation and <strong>Dell</strong> systems management documentation for <strong>VMware</strong>, go to dell.com/<br />
support/manuals, then, Choose from a list of all <strong>Dell</strong> products → Software, Electronics & Peripherals → Software<br />
→ Virtualization Solutions .<br />
NOTE: For all <strong>Dell</strong> OpenManage documents, go to dell.com/support/manuals, then, Choose from a list of all <strong>Dell</strong><br />
products → Software, Electronics & Peripherals → Software → Enterprise System Management .<br />
NOTE: For all operating system documents, go to dell.com/support/manuals, then, Choose from a list of all <strong>Dell</strong><br />
products → Software, Electronics & Peripherals → Software → Operating System .<br />
NOTE: For all <strong>PowerEdge</strong> and PowerVault documentation, go to dell.com/support/manuals and enter the system<br />
service tag to get your system documentation.<br />
• For a complete list of <strong>Dell</strong> supported systems and storage, see <strong>VMware</strong> <strong>vSphere</strong> 5 on <strong>Dell</strong> <strong>PowerEdge</strong> and<br />
Storage <strong>Systems</strong> Compatibility Matrix .<br />
• For known issues, see <strong>VMware</strong> <strong>vSphere</strong> 5 on <strong>Dell</strong> <strong>PowerEdge</strong> <strong>Systems</strong> Release Notes .<br />
• For information on Configuration Maximums, see Configuration Maximums for <strong>VMware</strong> <strong>vSphere</strong> 5.<br />
• To ensure processor compatibility across systems for VMotion, see the <strong>VMware</strong> VMotion and 64-Bit Virtual<br />
Machine support for <strong>Dell</strong> <strong>PowerEdge</strong> <strong>Systems</strong> Compatibility Matrix .<br />
• For <strong>VMware</strong> <strong>vSphere</strong> 5 documents, technical resources, and knowledge base articles, see vmware.com/<br />
support.<br />
• For Hardware Compatibility Guides, see vmware.com/resources/compatibility/search.php.<br />
• For information on ESXi, other <strong>Dell</strong> <strong>VMware</strong> products, technical publications including white papers, articles,<br />
and case studies, see dell.com/vmware.<br />
Technical <strong>Support</strong> Resources<br />
• vmware.com/support<br />
• dell.com/support<br />
• dell.com/services for <strong>Dell</strong> deployment and professional services<br />
Discussion Forums<br />
• vmware.com/communities/content<br />
• dellcommunity.com<br />
2<br />
11
Knowledge Base<br />
vmware.com/support/kb<br />
Contacting <strong>Dell</strong><br />
NOTE: If you do not have an active Internet connection, you can find contact information on your purchase invoice,<br />
packing slip, bill, or <strong>Dell</strong> product catalog.<br />
<strong>Dell</strong> provides several online and telephone-based support and service options. Availability varies by country and<br />
product, and some services may not be available in your area. To contact <strong>Dell</strong> for sales, technical support, or customer<br />
service issues:<br />
1. Visit www.dell.com/support.<br />
2. Select your support category.<br />
3. Verify your country or region in the Choose a Country/Region drop-down menu at the top of page.<br />
4. Select the appropriate service or support link based on your need.<br />
12
Installing <strong>vSphere</strong> 5<br />
NOTE: If you had ordered <strong>VMware</strong> ESXi with your <strong>PowerEdge</strong> system, it is pre-installed on your system. The ESXi<br />
installer media is required only for the recovery of a corrupted image.<br />
NOTE: If you did not order ESXi with your system, you can order the Internal Dual SD Module kit (for supported<br />
<strong>PowerEdge</strong> systems) at dell.com and download the ESXi installation media from dell.com/support. For information<br />
on how to install and setup ESXi, see the topic Installing, Enabling, And Disabling ESXi.<br />
Creating The ESXi Installer Media<br />
You can download the <strong>Dell</strong>-customized ESXi installer image from dell.com/support. Follow the steps below to create the<br />
ESXi installer media:<br />
1. Navigate to dell.com/support.<br />
2. You may be asked to select your line of business. Select <strong>Support</strong> for Enterprise IT.<br />
3. Enter your <strong>Dell</strong> <strong>PowerEdge</strong> service tag and click Submit.<br />
4. Navigate to the Drivers & Downloads section.<br />
5. Select your operating system as ESXi and download the ISO image.<br />
Important Information For The <strong>Dell</strong>-Customized ESXi Image<br />
• The <strong>Dell</strong>-customized ESXi installer ISO image content does not include <strong>Dell</strong> OpenManage Server Administrator.<br />
For detailed instructions to install and use <strong>Dell</strong> OpenManage Server Administrator, see the <strong>Dell</strong> OpenManage<br />
documentation at dell.com/support/manuals, then, Choose from a list of all <strong>Dell</strong> products → Software,<br />
Electronics & Peripherals → Software → Enterprise System Management .<br />
• The files that <strong>Dell</strong> creates or modifies as part of customization are:<br />
– etc/vmware/oem.xml<br />
– etc/vmware/support<br />
– etc/vmware/vmware.lic<br />
NOTE: The list of files appended, modified or customized by <strong>Dell</strong> may change during a later release.<br />
NOTE: <strong>Dell</strong>-customized ESXi image may contain additional or <strong>VMware</strong>-I/O Vendor Program (IOVP) certified<br />
updated drivers. For more information, see the topic "Additional Information" of the Drivers release page at<br />
dell.com/support.<br />
• If needed, <strong>Dell</strong> may update the customized ISO for a critical patch impacting <strong>Dell</strong> to include <strong>VMware</strong> patches or<br />
bug fixes for <strong>Dell</strong> hardware.<br />
• <strong>Dell</strong> VIB (<strong>Dell</strong> OpenManage offline bundle) can be installed on ESXi systems using either the <strong>Dell</strong>-customized<br />
ESXi installation media or the ESXi installation media provided by <strong>VMware</strong>.<br />
3<br />
13
Installing, Enabling, And Disabling ESXi<br />
WARNING: Any installation that requires removal of the system cover is intended solely to be performed by trained<br />
service technicians. See the safety document that is shipped with your system for complete information about<br />
safety precautions, working inside the system, and protecting against electrostatic discharge.<br />
NOTE: For important regulatory information, see dell.com/regulatory_compliance.<br />
NOTE: If you did not order ESXi with your system, you can order the Internal Dual SD Module kit at dell.com and<br />
download the ESXi Installation media from support.dell.com. For information on creating your ESXi media, see the<br />
topic "Creating the ESXi Installer Media".<br />
NOTE: If you have ordered the ESXi kit separately and your <strong>PowerEdge</strong> system is not pre-installed with the<br />
software, you must follow the steps in this section to install ESXi.<br />
USB Key Or SD Memory Card Installation<br />
For instructions to install the internal USB key in the supported <strong>PowerEdge</strong> 1950III, 2900III, and 2950III systems, see the<br />
system-specific Information Update document at support.dell.com/manuals.<br />
NOTE: For more information about supported configurations of <strong>PowerEdge</strong> systems with the USB key or the SD<br />
memory card, see the <strong>VMware</strong> <strong>vSphere</strong> 5 on <strong>Dell</strong> <strong>PowerEdge</strong> and Storage <strong>Systems</strong> Compatibility Matrix at<br />
dell.com/support/manuals.<br />
NOTE: For instructions to install the internal USB key or the SD memory card on the system board for other<br />
supported <strong>PowerEdge</strong> systems, see the system-specific Owner's Manual at dell.com/support/manuals.<br />
Installing ESXi <strong>On</strong> Flash Media<br />
After installing the USB key or SD card in your system, locate the ESXi installer media that you had created in the topic<br />
"Creating the ESXi Installer Media".<br />
Follow the steps below to install ESXi on the flash media:<br />
1. Turn on the system.<br />
NOTE: Before installing ESXi, you must enable the flash storage device. For more information, see the topic<br />
"Enabling or Disabling Flash Storage Device".<br />
2. Insert the ESXi installer media into the optical drive.<br />
3. Reboot the system.<br />
4. When the DELL logo is displayed, press immediately.<br />
5. At the Boot Menu, use the up and down-arrow keys to select the optical drive and press .<br />
CAUTION: Step 6 erases all data on your USB or SD storage device.<br />
The installer environment starts. When the installer image loads, the system is ready to begin the flash storage<br />
imaging process.<br />
6. <strong>On</strong> the Select a Disk page, select the USB or SD storage device on which you want to install ESXi and press<br />
.<br />
7. Enter the root password and press to start the installation.<br />
8. When the installation process is complete, press to reboot the system.<br />
14
9. When the DELL logo is displayed, press immediately.<br />
10. At the Boot Menu, use the up- and down- arrow keys to select the internal USB or SD storage device, and then<br />
press .<br />
The system boots and launches ESXi.<br />
11. To enable recurring boot, see the topic "Configuring Recurring Boot to ESXi" .<br />
12. Set the correct licensing mode.<br />
For more information, see the topic "Licensing Information" .<br />
Installing ESXi <strong>On</strong> The Hard Drive<br />
Follow the steps below to install ESXi on the hard drive.<br />
1. Turn on the system.<br />
2. Insert the ESXi installer media that you created earlier into the optical drive.<br />
See the topic "Creating The ESXi Installer Media”.<br />
3. When the DELL logo is displayed, press immediately.<br />
4. At the Boot Menu, use the up and down-arrow keys to select the optical drive and press .<br />
When the installer image loads, the system is ready to begin the installation process.<br />
CAUTION: Step 5 erases all data on the selected hard drive.<br />
5. <strong>On</strong> the Select a Disk page, select the hard drive on which you want to install ESXi and press .<br />
6. Enter the root password and press to reboot the system.<br />
7. When the installation process is complete, press to reboot the system.<br />
The system reboots and launches ESXi.<br />
8. Set the correct licensing mode.<br />
For more information, see the topic "Licensing Information".<br />
Enabling Or Disabling Flash Storage Device<br />
ESXi installs on an internal flash storage device.<br />
CAUTION: Before you begin using the trial version of ESXi, you must enable the internal flash device port. Disable<br />
the internal flash storage device when booting to another operating system to avoid loss of data.<br />
NOTE: After the internal flash device port is enabled, you can configure the system to boot ESXi only when<br />
specified (one-time boot) or all the time (recurring boot).<br />
1. Turn on the system.<br />
2. When the DELL logo is displayed, press immediately to enter the System Setup screen.<br />
NOTE: If you hold down a key on the keyboard for extended periods of time, it may result in keyboard failure.<br />
To avoid possible keyboard failure, press and release in even intervals until the System Setup screen is<br />
displayed.<br />
If the operating system logo is displayed instead of the System Setup screen, wait until the operating system<br />
finishes loading. Turn off the system and try again.<br />
3. Use the up- and down-arrow keys to highlight Integrated Devices, and then press .<br />
4. To enable the Flash Storage device:<br />
a) Highlight SD Card or Internal USB Port, depending upon which device is valid for your system.<br />
15
) Use the right- and left-arrow keys to enable the device.<br />
To disable the Flash Storage device:<br />
a) Restart ESXi and access System Setup.<br />
b) Select SD Card or Internal USB Port, depending upon which device is valid for your system.<br />
c) Use the right- and left-arrow keys to disable the device.<br />
CAUTION: Booting into an operating system other than ESXi without disabling the flash media results in data<br />
loss.<br />
5. Press to save your selection.<br />
6. Press .<br />
7. Select Save Changes and Exit.<br />
8. Press to exit the System Setup screen.<br />
9. Reboot the system.<br />
10. To complete the process, follow the steps in the topic "Configuring <strong>On</strong>e-Time Boot to ESXi" or "Configuring<br />
Recurring Boot to ESXi".<br />
Configuring <strong>On</strong>e-Time Boot To ESXi<br />
1. Turn on your system.<br />
The DELL logo is displayed.<br />
2. Press to enter the one-time boot menu option.<br />
The menu entry changes to Entering Boot Menu, confirming your selection.<br />
3. The boot menu displays several boot options. Using the up- and down-arrow keys, select Hard Drive C:.<br />
4. Use the right-arrow key to select SD Card or Internal USB Port.<br />
5. Press to boot to the internal secure digital (SD) card or USB port.<br />
Configuring Recurring Boot To ESXi<br />
Follow the steps given below to boot your system to ESXi. <strong>On</strong>ce the internal flash device port is enabled, your system<br />
continues to boot to ESXi.<br />
1. Turn on your system.<br />
The DELL logo is displayed.<br />
2. Press to launch the Setup menu.<br />
After you complete the system boot, the system BIOS configuration menu is displayed.<br />
3. Using the up- and down-arrow keys, select Hard Disk Boot Sequence and then select SD Card: Multi Card.<br />
4. Press the hyphen key to move the SD card or internal USB port up in the order.<br />
CAUTION: It is recommended that you do not modify other settings unless you are familiar with the settings.<br />
Modifying settings could cause your system to fail to boot or function properly.<br />
5. Press , , and then to save these changes.<br />
6. Restart your system.<br />
Downloading The Patches And Updates For ESXi<br />
16<br />
NOTE: Ensure that you follow the instructions given in this section to install any patches or updates for ESXi.
NOTE: Check for the latest patch and update releases for your ESXi version regularly. After you install ESXi, check<br />
for the latest patches or updates. For some hardware configurations, <strong>VMware</strong> may list certain patches or updates<br />
as required on its hardware compatibility list at vmware.com/resources/compatibility/search.php.<br />
To check for and install the latest ESX or ESXi patch:<br />
1. Go to support.vmware.com/selfsupport/download.<br />
2. Select ESXi (Embedded and Installable) from the product drop-down menu.<br />
3. Select the version of your software from the version drop-down menu.<br />
4. Enter the Release Date of the patch or select the Release Date by clicking the calendar icon.<br />
5. Select All Classifications from the classifications drop-down menu.<br />
6. Select Search.<br />
The Download Patches page displays a list of all the patches that match the details you specified.<br />
7. Select the required patch and click Download Now to download the zip file.<br />
8. Install the patch using any of the update tools provided by <strong>VMware</strong> such as esxcli or vCenter Update Manager.<br />
NOTE: For more information on patch management, see vmware.com/support/pubs/.<br />
Creating The vCenter Server Installation Media<br />
1. Go to vmware.com/download.<br />
2. Select the <strong>VMware</strong> <strong>vSphere</strong> 5 download link.<br />
3. Use your <strong>VMware</strong> store account credentials to log in to the download portal.<br />
4. Follow the on-screen instructions to download the vCenter Server software.<br />
5. Use a blank media to burn the ISO image.<br />
You have now created your vCenter Server installation media.<br />
Installing vCenter Server<br />
NOTE: You must install and use vCenter Server to centrally manage your <strong>vSphere</strong> environment and to make use of<br />
all the features of <strong>vSphere</strong> Essentials Plus, Standard, Enterprise, or Enterprise Plus edition.<br />
1. Insert the vCenter Server media into the optical drive.<br />
2. Follow the on-screen instructions.<br />
NOTE: If the installation program does not start automatically, browse to the vCenter Server media directory and<br />
locate autorun.exe. Double-click autorun.exe and follow the on-screen instructions.<br />
Installing <strong>vSphere</strong> Web Client<br />
1. In the vCenter Server software installer directory, double-click the autorun.exe file to start the installer.<br />
2. Select <strong>VMware</strong> <strong>vSphere</strong> Web Client (Server) and click Install.<br />
3. Follow the wizard prompts to complete the installation.<br />
When the <strong>vSphere</strong> Web Client installation is finished, a browser opens.<br />
4. Register one or more vCenter Servers on the <strong>vSphere</strong> Web Client Administration Application page in the browser.<br />
17
Installing <strong>vSphere</strong> Client<br />
1. Point the web browser of your Windows management system to the IP address of your ESXi server host to<br />
download <strong>vSphere</strong> Client.<br />
The IP address of your system is displayed on the main screen of your system. The browser displays a webpage.<br />
2. Click on the Download <strong>VMware</strong> <strong>vSphere</strong> Client link and install the client software.<br />
NOTE: Ensure that the system is connected to the Internet.<br />
3. After the download is complete, launch the <strong>VMware</strong> <strong>vSphere</strong> Client by completing the tasks below.<br />
a) Specify the IP address of your ESXi Server host.<br />
b) Specify a username of root (default).<br />
c) Provide the password you specified in the topic "Configuring the Password".<br />
NOTE: If you did not specify a password, leave the password field blank.<br />
You receive a warning that the SSL certificate is not trusted and communication cannot be secured. You receive<br />
this notification because your host does not have a public key from <strong>VMware</strong>.<br />
4. Click Ignore to proceed. To ignore this warning always, select the Always Ignore check box.<br />
Troubleshooting ESXi Installation<br />
This section provides troubleshooting steps for common issues encountered during deployment of ESXi.<br />
ESXi Not Booting Or Displays A “No OS found” Message At Start Up<br />
Check the boot order. The correct storage device may no longer be selected as the first boot device. This can happen if<br />
the device has recently been removed due to failure. To correct this issue, ensure that the internal storage drive on<br />
which ESXi is installed is assigned as the first boot device in the hard drive sequence and the hard drive is assigned as<br />
the first boot device in the boot sequence.<br />
Purple Or Pink Screen While Booting Or Running Your ESXi<br />
This is a sign of a serious misconfiguration or system error, similar to a blue screen for a Windows operating system or a<br />
core dump for a Linux-based system. Contact <strong>Dell</strong> <strong>Support</strong> for technical assistance. See the topic "Contacting <strong>Dell</strong>".<br />
18
Deploying <strong>vSphere</strong> 5—Important Information<br />
• <strong>On</strong> <strong>Dell</strong> <strong>PowerEdge</strong> systems having Intel Xeon E5-2600 processor series, with ESXi 5.0 and later updates, it is<br />
recommended that you upgrade to BIOS version 1.2.6 or later.<br />
NOTE: BIOS version 1.2.6 contains critical fix for the issue which can result in a Purple Screen.<br />
• With the introduction of <strong>vSphere</strong> v5.1, vRAM licensing and entitlement requirements have been removed, along<br />
with core or memory counts. The only licensing consideration for <strong>vSphere</strong> is per physical socket.<br />
• <strong>Dell</strong> <strong>PowerEdge</strong> systems shipped with BCM 5709 LOMs (with iSCSI offload enabled through the hardware key)<br />
support iSCSI Boot Firmware Table (iBFT).<br />
• <strong>PowerEdge</strong> systems shipped with Intel Xeon 5600 series processor and later versions support Intel Trusted<br />
Execution Technology (TXT) with the latest shipping BIOS.<br />
• While installing <strong>VMware</strong> ESXi on a <strong>PowerEdge</strong> system, ensure that iDRAC vFlash is disabled. When vFlash is<br />
enabled, iDRAC may expose different USB partitions which may result in an installation failure.<br />
• You cannot automatically pre-activate the Microsoft Windows Server 2008 operating system installed on virtual<br />
machines by using the product activation code in the <strong>Dell</strong> OEM installation media. You must use a virtual product<br />
key to activate the guest operating system. For more information, see the whitepaper, <strong>Dell</strong> OEM Windows Server<br />
2008 Installation on Virtual Machines Using <strong>Dell</strong> OEM Media at dell.com.<br />
• The ESXi image pre-installed on your <strong>PowerEdge</strong> system may not contain all the drivers required for peripherals.<br />
Additional drivers need to be installed to enable certain add-on peripherals. You can download the drivers from<br />
dell.com/support.<br />
• Storage logical unit numbers (LUNs) (internal storage) are supported only with PERC/CERC/SAS-hardwarebased<br />
RAID configurations.<br />
• ESXi installation using the DRAC/iDRAC virtual media is supported. You must use <strong>Dell</strong>-customized ESXi images<br />
from dell.com/support.<br />
• <strong>vSphere</strong> 5 supports booting ESXi hosts in Unified Extensible Firmware Interface (UEFI) mode. With UEFI, systems<br />
can be booted from local hard drives, CD/DVD drives, or USB media. Booting over the network requires the<br />
legacy BIOS firmware and is not available with UEFI.<br />
• <strong>On</strong> Non-Uniform Memory Access (NUMA) enabled systems installed with ESXi, it is recommended that you<br />
populate all processor nodes with similar memory to enable balanced distribution of memory across nodes. With<br />
unbalanced memory distribution across nodes, you may face performance degradation issues or ESXi may fail<br />
to boot.<br />
NOTE: For more information about NUMA, see <strong>VMware</strong> knowledge base articles: kb.vmware.com/kb/<br />
1003690 and kb.vmware.com/kb/1570. Also, see <strong>VMware</strong>'s Resource Management Guide for <strong>vSphere</strong> 4 at<br />
vmware.com/support/pubs/.<br />
• ESXi requires a minimum system memory of 4 GB on all supported systems.<br />
Best Practices Checklist For Deploying ESXi<br />
1. Rack and connect your <strong>PowerEdge</strong> system.<br />
2. Turn off your system.<br />
3. Connect your ESXi management network to the first onboard network adapter.<br />
4. Connect your virtual machine network to the second onboard network adapter.<br />
5. Optionally, connect your iSCSI-based network connection to the third onboard network adapter (if applicable).<br />
4<br />
19
NOTE: For systems with only two onboard network adapters, it is recommended that you add a supported<br />
network adapter.<br />
6. Turn on your system.<br />
7. To enter the system setup, press when you turn on the system.<br />
For more information, see the documentation that ships with your system.<br />
8. Enable the Virtualization Technology (VT) feature, if available, in the <strong>PowerEdge</strong> system.<br />
NOTE: To run 64 bit virtual machines on Intel processor based servers, the VT feature is required to be<br />
enabled.<br />
9. Set the universal serial bus (USB) controller to USB on with BIOS <strong>Support</strong>, if available, in the <strong>PowerEdge</strong> system.<br />
This setting enables support for USB devices both during and after the ESXi boot process.<br />
10. Set the ESXi keyboard language.<br />
11. Set the ESXi password.<br />
For more information, see the topic "Configuring the Password".<br />
12. Set a static IP address, subnet mask, gateway, and VLAN for the management connection(s) in the Direct Console<br />
User Interface (DCUI).<br />
13. Set host name and Domain Name System (DNS) settings.<br />
14. Set DNS suffix(es).<br />
15. Install <strong>vSphere</strong> Client to manage your system.<br />
16. Replace the Single Server Edition license key with the license key that you have purchased.<br />
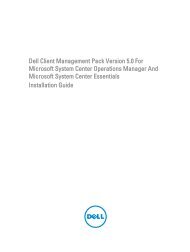
<strong>vSphere</strong> Configuration Using <strong>Dell</strong> Fibre Channel SAN<br />
The figure, “Configuring <strong>vSphere</strong> Using <strong>Dell</strong> Fibre Channel SAN” shows the <strong>vSphere</strong> configuration using Fibre Channel<br />
SAN. If you use Fibre Channel storage, you can connect a single Fibre Channel Host Bus Adapter (HBA) to a Fibre<br />
Channel switch that provides paths to both the storage processors (SPs) on the Fibre Channel storage unit. To provide<br />
maximum protection against a single failure at the HBA, Fibre Channel switch, or SP level, it is recommended that you<br />
use two Fibre Channel HBAs on the ESXi host connected to separate Fibre Channel switches. The Fibre Channel<br />
switches provide redundant paths to the SPs on the storage unit.<br />
20
Figure 3. Configuring <strong>vSphere</strong> Using <strong>Dell</strong> Fibre Channel SAN<br />
<strong>vSphere</strong> Configuration Using iSCSI SAN<br />
The figure, “Configuring <strong>vSphere</strong> With iSCSI SAN” shows a <strong>vSphere</strong> configuration using iSCSI SAN. The iSCSI SAN<br />
provides a cost-effective solution. It is recommended to use two iSCSI initiators on the ESXi host connected to two<br />
separate ethernet switches to provide redundant paths to the storage processors on the storage system.<br />
NOTE: For more information on <strong>Dell</strong>-supported storage arrays on <strong>VMware</strong>, see <strong>VMware</strong> <strong>vSphere</strong> 5 on <strong>Dell</strong><br />
<strong>PowerEdge</strong> and Storage <strong>Systems</strong> Compatibility Matrix at dell.com/support/manuals.<br />
21
Figure 4. Configuring <strong>vSphere</strong> With iSCSI SAN<br />
Booting ESXi<br />
This section describes how to perform the basic setup of your system based on the following assumptions:<br />
• You have already connected a keyboard, monitor, and mouse.<br />
• You have connected the first onboard NIC to your management network.<br />
• Ensure that the infrastructure between the two systems is working correctly prior to working with your system<br />
and the <strong>VMware</strong> management software.<br />
To set up your system:<br />
1. Turn on your system.<br />
2. Press at boot and select the internal storage device as the one-time boot device located under Hard Drives<br />
in the menu.<br />
22<br />
NOTE: If you ordered ESXi as the primary operating system, the boot order of the system is already set to boot<br />
from ESXi.<br />
NOTE: If you ordered ESXi as an included hypervisor, with zero years of technical support service and did not<br />
request a hard-disk based operating system, your system may boot to a No Operating System Found message.<br />
Set the system boot order to make the storage device containing ESXi (USB or SD card) as the first boot<br />
device.<br />
In the first phase of booting, the compressed ESXi modules are loaded into memory and a progress bar is displayed.<br />
In the second phase, the modules are expanded and executed from memory. As the modules load, the DCUI briefly<br />
displays the module names on the screen.<br />
After all ESXi modules have expanded and executed, the system is ready to begin servicing workloads as illustrated<br />
in the figure below. If there is a Dynamic Host Configuration Protocol (DHCP) system or DHCP proxy configured on<br />
your network subnet, ESXi displays the address acquired by the DHCP system.
NOTE: When the address is being acquired, 0.0.0.0 is displayed by default.<br />
To install <strong>vSphere</strong> Client, see Installing <strong>vSphere</strong> Client. If a warning is displayed, the ESXi host was unable to obtain<br />
an IP address from your DHCP system. For information on configuring the setting, see Managing The Management<br />
Network Services.<br />
Figure 5. ESXi (Running With DHCP)<br />
Figure 6. ESXi (Running With DHCP and No Address)<br />
Configuring The Password<br />
You can use DCUI to change the password for the administrator account. The administrative user name for the ESXi 5<br />
host is root.<br />
To change the password:<br />
1. Press in the main ESXi Server host screen that is displayed after your system boots.<br />
The Authentication Required screen is displayed.<br />
2. Select Configure Password and then press .<br />
3. Enter the old and new passwords.<br />
If the password is accepted, the main DCUI screen is displayed. The new password is now set.<br />
4. Press to logout.<br />
23
Configuring Lockdown Mode<br />
Lockdown mode prevents remote personnel from logging in to the ESXi host by using the root login name. By default,<br />
lockdown mode is disabled. If you enable lockdown mode and do not configure other local host user accounts to have<br />
standalone host access through the <strong>vSphere</strong> Client, the root user does not have access through the <strong>vSphere</strong> API and<br />
CLI.<br />
You can still access the host through the direct console or through an authorized, centralized management application,<br />
such as vCenter Server.<br />
1. Select Configure Lockdown Mode and press .<br />
2. Press the to select Enable Lockdown Mode and press twice.<br />
Managing The Management Network Services<br />
The ESXi 5 kernel supports IPv4, IPv6, and IEEE 802.1Q (VLAN tagging) for all management network connections.<br />
Configuration of parameters including IP address, gateway, subnet mask, host name, and DNS systems occurs through<br />
the DCUI. All virtual machine network configuration is performed from the <strong>VMware</strong> management software. Virtual<br />
machine networks configurations from the DCUI is not supported.<br />
1. Press in the main ESXi host screen that is displayed after your system boots.<br />
The Authentication Required screen is displayed.<br />
2. Press twice.<br />
The main DCUI configuration screen is displayed.<br />
3. Select Configure Management Network in the main DCUI customization screen, and press .<br />
The Management network configuration screen is displayed.<br />
4. For the <strong>PowerEdge</strong> M-series modular systems enabled with FlexAddress:<br />
a) Ensure that the variable Net.FollowHardwareMac is set to 1.<br />
b) Use the <strong>vSphere</strong> Client to connect to the ESXi host.<br />
c) Navigate to Configuration → Software → Advanced Settings → Net.<br />
d) Set Net.FollowHardwareMac to 1 and reboot the ESXi host.<br />
5. Backup your configuration settings using the procedures in the topic "Configuration Backup and Restore<br />
Procedures"<br />
6. Record your license key.<br />
24
Configuration Backup And Restore Procedures<br />
NOTE: It is recommended that you back up your <strong>VMware</strong> ESXi configuration after you complete the initial setup on<br />
a routine schedule that fits your datacenter environment. Backing up your configuration captures the license code<br />
(host serial number). You need the license code if you use the installer media to restore the ESXi image.<br />
To backup or restore the configuration information, you must use the <strong>VMware</strong> <strong>vSphere</strong> CLI. The <strong>vSphere</strong> CLI is available<br />
in:<br />
• <strong>vSphere</strong> CLI package—<strong>vSphere</strong> CLI package can be installed on either Linux or on Microsoft Windows<br />
operating systems.<br />
• <strong>vSphere</strong> Management Assistant (vMA)—vMA can be deployed on an ESXi host.<br />
Both of these packages are available for download from vmware.com. For more information on setting up and running<br />
the <strong>vSphere</strong> CLI, see the <strong>VMware</strong> <strong>vSphere</strong> Command-Line Interface Installation and Reference Guide and <strong>VMware</strong> ESXi<br />
Embedded and vCenter Server Setup Guide at vmware.com/support/pubs.<br />
The backup and restore steps are given in this section considering that:<br />
• You have already imported the <strong>vSphere</strong> CLI to a system other than the one you want to backup or restore.<br />
• You have installed the Windows or Linux management Application Programming Interfaces (APIs).<br />
Backing Up The Configuration Of Your ESXi Host<br />
To back up configuration data of a host:<br />
1. Start the <strong>vSphere</strong> CLI.<br />
2. Run the vicfg-cfgbackup command with the -s flag to save the host configuration to the specified backup filename:<br />
vicfg-cfgbackup --server< ESXi-host-ip> -- portnumber -protocol<br />
--username root --password root_password [-s<br />
<br />
The -portnumber and -protocol options are optional. If you exclude them, the defaults are port 443 and protocol<br />
HTTPS.<br />
NOTE: If you do not specify a password in the command line, you are prompted for one when the command<br />
executes. For example: vicfgcfgbackup --server 172.17.13.211 --username root –s<br />
backupdate.dat<br />
NOTE: If your administrative password includes special characters, such as $ or &, you must include a<br />
backslash escape character (\) before each special character.<br />
Restoring The Configuration Of Your ESXi Host<br />
To restore the configuration data of a host:<br />
1. Turn off any virtual machines that are running on the host you want to restore.<br />
2. Optionally, restore the host to the ESXi build number used when the backup file was created.<br />
5<br />
25
The backup process does not support restoring to later builds. This requirement can be overridden by using the –f<br />
option.<br />
3. Start the <strong>vSphere</strong> CLI on a host other than the host you want to restore and log in.<br />
4. Run the vicfg-cfgbackup command with the –l flag to load and restore the backup file to the host.<br />
vicfg-cfgbackup --server -- portnumber -protocol<br />
-- username --password -l<br />
<br />
The -portnumber and -protocol options are optional. If you exclude them, the defaults are port 443 and protocol<br />
HTTPS.<br />
NOTE: If you do not specify a password in the command line, you are prompted for one when the command<br />
executes. For example:<br />
vicfgcfgbackup --server 172.17.13.211 --username root –l backupdate.dat<br />
After a successful restore, the system reboots using the new configuration. For complete instructions on backup<br />
and restore commands, see the <strong>VMware</strong> ESXi Embedded and vCenter Server Setup Guide at vmware.com/support/<br />
pubs.<br />
Image Recovery<br />
The procedure described in this section restores your system to a bootable state, but does not restore the per-system<br />
licensing activation information. If you have a valid support subscription, <strong>Dell</strong> <strong>Support</strong> can help you with the re-imaging<br />
process and with any licensing issues. To contact <strong>Dell</strong> <strong>Support</strong>, see "Contacting <strong>Dell</strong>".<br />
If you require a new license from <strong>Dell</strong> <strong>Support</strong>, but need to have the system up and running as soon as possible, you may<br />
use the one-time 60-day trial of all enterprise-level features including HA, DRS, and vCenter Server. It is recommended<br />
to request the new license as soon as possible following an image recovery to ensure you have your new license before<br />
the 60-day trial period expires. This process takes less than 60 days.<br />
Image Recovery For ESXi Embedded Edition<br />
Image recovery reinstalls or recovers the ESXi embedded image. To perform image recovery for flash-based systems:<br />
1. Download the <strong>Dell</strong> customized ESXi ISO image from dell.com/support .<br />
2. Burn the ISO image to an optical media.<br />
3. Turn on the system and press (one-time boot menu) during the POST.<br />
The system displays Entering Boot Menu… in the upper right corner of the screen. Continue with the POST<br />
process. After the initial boot is complete, a text menu of all bootable storage devices is displayed.<br />
4. Select the optical drive where your installer media is located. For internal optical drives, select the device and<br />
press .<br />
The recovery environment starts.<br />
5. Follow the on-screen instructions to complete the recovery process.<br />
NOTE: If you see a fatal error, double check that no other USB-based storage devices are connected to the<br />
system.<br />
The system reboots and launches ESXi. If this does not happen, reassign the order of your boot devices placing the<br />
internal storage highest in the boot order list. For more information, see the manual that shipped with your system.<br />
6. Set the correct licensing mode.<br />
7. After reimaging, reconfigure ESXi and import any virtual machines you would like to run on this system.<br />
26
Licensing Information<br />
This section discusses the different modes of obtaining license for your <strong>Dell</strong> <strong>PowerEdge</strong> system.<br />
NOTE: ESXi Single Server Edition licence has been discontinued from <strong>vSphere</strong> 5.0 Update 2 onwards.<br />
NOTE: For more information about the different editions, see vmware.com.<br />
ESXi Single Server Edition Licensing For <strong>vSphere</strong> 5.0<br />
The ESXi ordered with your system is pre-installed and activated with the ESXi Single Server edition license key. Note<br />
down the license key and store it safely. To retrieve the license key:<br />
1. Log in to the Direct Console User Interface (DCUI).<br />
2. Go to View <strong>Support</strong> Information and note down the displayed license key.<br />
Alternatively, connect to the ESXi system using <strong>vSphere</strong> Client. Go to Configuration → Software → Licensed<br />
Features and record the displayed license key.<br />
NOTE: The ESXi 5.0 ordered with your system is pre-installed and activated with the ESXi Single Server edition<br />
license. If you ordered the ESXi hypervisor-based <strong>vSphere</strong> Essentials Plus, Standard, Enterprise, or Enterprise<br />
Plus edition, replace the pre-installed ESXi Single Server edition license key with the <strong>vSphere</strong> Essentials Plus,<br />
Standard, Advanced, Enterprise, or Enterprise Plus edition license key.<br />
NOTE: You can choose to evaluate the enterprise-level features during the first 60-day free evaluation period.<br />
At the end of the 60-day evaluation period, reassign the recorded ESXi 5.0 Single Server edition license key to<br />
enable your system to function in that mode.<br />
License Evaluation<br />
<strong>VMware</strong> allows a 60-day free evaluation period for all enterprise-level features of <strong>vSphere</strong> 5. At the end of the<br />
evaluation period, your ESXi hypervisor may stop managing all virtual machines in the inventory. To continue managing<br />
the virtual machines, upgrade the evaluation license to the <strong>vSphere</strong> Essentials Plus, Standard, Enterprise, or Enterprise<br />
Plus edition license that you purchased.<br />
<strong>vSphere</strong> Licensing<br />
If you ordered any <strong>vSphere</strong> license (Essentials Plus, Standard, Enterprise, Enterprise Plus, an Acceleration Kit, or<br />
vCenter Server) with your server, the license certificate is shipped on a media with the server. To use the software and<br />
receive the subscription services, you must register and exchange the Partner Activation Code (PAC) printed on the<br />
license certificate for a license key or license activation code. The registration must be completed within 30 days from<br />
the date of product purchase. Be aware that with registration of the licensing or use of the ESXi hypervisor, you are<br />
agreeing to the <strong>VMware</strong> ESXi and / or <strong>VMware</strong> vCenter Server End User License Agreement (EULA) posted at<br />
vmware.com/download/eula/.<br />
For information about product features and licensing methods, see vmware.com.<br />
6<br />
27
Administering License Keys<br />
You can administer the license key using <strong>vSphere</strong> Client to manage the licenses individually on the ESXi system.<br />
Alternatively, you can use vCenter Server to manage the licenses centrally.<br />
28<br />
NOTE: For more information on administering license keys and <strong>VMware</strong> software licensing configuration, see<br />
vmware.com/support/pubs.<br />
NOTE: If you receive a warning that you are disabling certain features by switching out of evaluation mode, click<br />
OK, and then click Yes.<br />
NOTE: You must use all licensing information according to <strong>VMware</strong>’s End User Licensing Agreement.
<strong>Support</strong>ed <strong>PowerEdge</strong> Configurations For<br />
<strong>vSphere</strong> 5<br />
For complete information about all the supported <strong>Dell</strong> <strong>PowerEdge</strong> systems with <strong>VMware</strong> ESXi, see <strong>VMware</strong> <strong>vSphere</strong> 5<br />
on <strong>Dell</strong> <strong>PowerEdge</strong> and Storage <strong>Systems</strong> Compatibility Matrix at dell.com/support/manuals.<br />
The following table lists the currently shipping <strong>PowerEdge</strong> systems that support ESXi 5.x.<br />
NOTE: SAS/SATA drives mentioned in below table also include SSDs.<br />
<strong>PowerEdge</strong> M820 Configuration<br />
<strong>PowerEdge</strong> M820<br />
Processor Intel Xeon E5-4600 product family<br />
Minimum Memory 4 GB<br />
Internal Storage Up to four 2.5 inch SAS/SATA disks<br />
Internal Flash Memory <strong>Support</strong>ed SD memory card<br />
Internal Storage Adapter <strong>PowerEdge</strong> RAID Controller (PERC) H710, PERC H710P,<br />
and PERC H310 adapters<br />
External Disks Storage Adapter Not applicable<br />
Fibre Channel HBA All supported HBAs<br />
Networking Broadcom 57810S bNDC, Intel X520 bNDC, Qlogic<br />
QMD8262-k bNDC and supported peripheral NICs<br />
Remote Access Integrated <strong>Dell</strong> Remote Access Controller (iDRAC) 7<br />
<strong>PowerEdge</strong> M620 Configuration<br />
<strong>PowerEdge</strong> M620<br />
Processor Intel Xeon E5-2600 product family<br />
Minimum Memory 4 GB<br />
Internal Storage Up to two 2.5 inch SAS/SATA disks<br />
Internal Flash Memory <strong>Support</strong>ed SD memory card<br />
Internal Storage Adapter PERC H310, PERC H710, and PERC H710P<br />
External Disks Storage Adapter Not applicable<br />
Fibre Channel HBA All supported HBAs<br />
7<br />
29
<strong>PowerEdge</strong> M620<br />
Networking Broadcom 57810S bNDC, Intel X520 bNDC, Qlogic<br />
QMD8262-k bNDC, and supported peripheral NICs<br />
Remote Access iDRAC7<br />
<strong>PowerEdge</strong> M520 Configuration<br />
<strong>PowerEdge</strong> M520<br />
Processor Intel Xeon E5-2400 product family<br />
Minimum Memory 4 GB<br />
Internal Storage Up to two 2.5 inch SAS/SATA disks<br />
Internal Flash Memory <strong>Support</strong>ed SD memory card<br />
Internal Storage Adapter PERC H310 Mini Blade, PERC H710 Mini Blade, and PERC<br />
H710P Mini Blade<br />
External Disks Storage Adapter Not Applicable<br />
Fibre Channel HBA All supported HBAs<br />
Networking Four integrated network ports and all supported peripheral<br />
NICs<br />
Remote Access iDRAC7<br />
<strong>PowerEdge</strong> M420 Configuration<br />
<strong>PowerEdge</strong> M420<br />
Processor Intel Xeon CPU E5-2400 product family<br />
Minimum Memory 4 GB<br />
Internal Storage Up to two 1.8 inch uSATA disks<br />
Internal Flash Memory <strong>Support</strong>ed SD memory card<br />
Internal Storage Adapter PERC H310 adapter<br />
External Disks Storage Adapter Not Applicable<br />
Fibre Channel HBA All <strong>Support</strong>ed HBA<br />
Networking Two integrated network ports and all supported peripheral<br />
NICs<br />
Remote Access iDRAC7<br />
30
<strong>PowerEdge</strong> M915 Configuration<br />
<strong>PowerEdge</strong> M915<br />
Processor AMD Opteron 6100/6200/6300 series<br />
Minimum Memory 4 GB<br />
Internal Storage Two 2.5 inch SAS/SATA disks<br />
Internal Storage Adapter PERC H200 Modular and PERC H700 Modular<br />
External Disks Storage Adapter Not applicable<br />
Fibre Channel HBA (SAN connectivity) All supported HBAs<br />
Networking Four 1 GbE or 10 GbE integrated network ports and all<br />
supported peripheral NICs<br />
Remote Access iDRAC6<br />
<strong>PowerEdge</strong> M910 Configuration<br />
<strong>PowerEdge</strong> M910<br />
Processor Intel Xeon 6500 series or Intel Xeon 7500 series or Intel<br />
Xeon E7- 2800/4800/8800 product family<br />
Minimum Memory 4 GB<br />
Internal Storage Two 2.5 inch SAS/SATA disks<br />
Internal Flash Memory <strong>Support</strong>ed SD memory card<br />
Internal Storage Adapter PERC H200 Modular and PERC H700 Modular<br />
External Disks Storage Adapter Not applicable<br />
Fibre Channel HBA (SAN connectivity) All supported daughter cards<br />
Networking Four integrated network ports and all supported peripheral<br />
NICs<br />
Remote Access iDRAC6<br />
<strong>PowerEdge</strong> M710HD Configuration<br />
<strong>PowerEdge</strong> M710HD<br />
Processor Intel Xeon 5500/5600 series<br />
Minimum Memory 4 GB<br />
Internal Storage Two 2.5 inch SAS/SATA disks<br />
Internal Flash Memory <strong>Support</strong>ed SD memory card<br />
Internal Storage Adapter PERC H200 Embedded<br />
31
<strong>PowerEdge</strong> M710HD<br />
External Disks Storage Adapter Not applicable<br />
Fibre Channel HBA (SAN connectivity) All supported daughter cards<br />
Networking Four 1 GbE or two 10 GbE integrated network ports and all<br />
supported peripheral NICs<br />
Remote Access iDRAC6<br />
<strong>PowerEdge</strong> M710 Configuration<br />
<strong>PowerEdge</strong> M710<br />
Processor Intel Xeon 5500/5600 series<br />
Minimum Memory 4 GB<br />
Internal Storage Up to two 2.5 inch SAS/SATA disks<br />
Internal Flash Memory <strong>Support</strong>ed SD memory card<br />
Internal Storage Adapter SAS 6/iR Integrated, Cost-Effective RAID Controller (CERC)<br />
6/i, PERC 6/i Integrated, PERC H200 Modular, and PERC<br />
H700 Modular<br />
External Disks Storage Adapter Not applicable<br />
Fibre Channel HBA (SAN connectivity) All supported daughter cards<br />
Networking Four integrated network ports and all supported peripheral<br />
NIC daughter cards<br />
Remote Access iDRAC6<br />
<strong>PowerEdge</strong> M610x Configuration<br />
<strong>PowerEdge</strong> M610x<br />
Processor Intel Xeon 5500/5600 series<br />
Minimum Memory 4 GB<br />
Internal Storage Two 2.5 inch SAS/SATA disks<br />
Internal Flash Memory <strong>Support</strong>ed SD memory card<br />
Internal Storage Adapter PERC H200 Modular and PERC H700 Modular<br />
External Disks Storage Adapter PERC H800<br />
Fibre Channel HBA (SAN connectivity) All supported daughter cards<br />
Networking Four integrated network ports and all supported peripheral<br />
NIC daughter cards<br />
Remote Access iDRAC6<br />
32
<strong>PowerEdge</strong> M610 Configuration<br />
<strong>PowerEdge</strong> M610<br />
Processor Intel Xeon 5500/5600 series<br />
Minimum Memory 4 GB<br />
Internal Storage Two 2.5 inch SAS/SATA disks<br />
Internal Flash Memory <strong>Support</strong>ed SD memory card<br />
Internal Storage Adapter SAS 6/iR Integrated, CERC 6/i, PERC 6/i Integrated, PERC<br />
H200 Modular, and PERC H700 Modular<br />
External Disks Storage Adapter Not Applicable<br />
Fibre Channel HBA (SAN connectivity) All supported daughter cards<br />
Networking Two integrated network ports and all supported peripheral<br />
NIC daughter cards<br />
Remote Access iDRAC6<br />
<strong>PowerEdge</strong> R820 Configuration<br />
<strong>PowerEdge</strong> R820<br />
Processor Intel Xeon E5-4600 product family<br />
Minimum Memory 4 GB<br />
Internal Storage Up to 16 2.5 inch SAS/SATA disks<br />
Internal Flash Memory <strong>Support</strong>ed SD memory card<br />
Internal Storage Adapter PERC H310, PERC H710, and PERC H710P<br />
External Disks Storage Adapter PERC H810, 6Gbps SAS HBA<br />
Fibre Channel HBA All supported HBAs<br />
Networking Broadcom 57800S QP rNDC, Broadcom 5720 QP rNDC,<br />
Intel X540 QP rNDC, Intel i350 rNDC, and supported<br />
peripheral NICs<br />
Remote Access iDRAC7<br />
<strong>PowerEdge</strong> R720 Configuration<br />
<strong>PowerEdge</strong> R720<br />
Processor Intel Xeon E5-2600 product family<br />
Minimum Memory 4 GB<br />
Internal Storage Up to sixteen 2.5 inch or eight 3.5 inch SAS/SATA disks<br />
33
<strong>PowerEdge</strong> R720<br />
Internal Flash Memory <strong>Support</strong>ed SD memory card<br />
Internal Storage Adapter PERC H310, PERC H710, and PERC H710P<br />
External Disks Storage Adapter PERC H810, 6Gbps SAS HBA<br />
Fibre Channel HBA All supported HBAs<br />
Networking Broadcom 57800S QP rNDC, Broadcom 5720 QP rNDC,<br />
Intel X540 QP rNDC, Intel i350 rNDC, and supported<br />
peripheral NICs<br />
Remote Access iDRAC7<br />
<strong>PowerEdge</strong> R720xd Configuration<br />
<strong>PowerEdge</strong> R720xd<br />
Processor Intel Xeon E5-2600 product family<br />
Minimum Memory 4 GB<br />
Internal Storage Up to twenty six 2.5 inch or twelve 3.5 inch SAS/SATA<br />
disks<br />
Internal Flash Memory <strong>Support</strong>ed SD memory card<br />
Internal Storage Adapter PERC H310, PERC H710, and PERC H710P<br />
External Disks Storage Adapter PERC H810, 6Gbps SAS HBA<br />
Fibre Channel HBA All supported HBAs<br />
Networking Broadcom 57800S QP rNDC, Broadcom 5720 QP rNDC,<br />
Intel X540 QP rNDC, Intel i350 rNDC, and supported<br />
peripheral NICs<br />
Remote Access iDRAC7<br />
<strong>PowerEdge</strong> R620 Configuration<br />
<strong>PowerEdge</strong> R620<br />
Processor Intel Xeon E5-2600 product family<br />
Minimum Memory 4 GB<br />
Internal Storage Up to ten 2.5 inch SAS/SATA disks<br />
Internal Flash Memory <strong>Support</strong>ed SD memory card<br />
Internal Storage Adapter PERC H310, PERC H710, and PERC H710P<br />
External Disks Storage Adapter PERC H810, 6Gbps SAS HBA<br />
Fibre Channel HBA All supported HBAs<br />
34
<strong>PowerEdge</strong> R620<br />
Networking Broadcom 57800S QP rNDC, Broadcom 5720 QP rNDC,<br />
Intel X540 QP rNDC, Intel i350 rNDC, and supported<br />
peripheral NICs<br />
Remote Access iDRAC7<br />
<strong>PowerEdge</strong> R520 Configuration<br />
<strong>PowerEdge</strong> R520<br />
Processor Intel Xeon CPU E5-2400 product family<br />
Minimum Memory 4 GB<br />
Internal Storage Up to eight 3.5 inch or 2.5 inch SAS/SATA disks<br />
Internal Flash Memory <strong>Support</strong>ed SD memory card<br />
Internal Storage Adapter PERC H710, PERC H710P and PERC H310 adapters<br />
External Disks Storage Adapter PERC H810 adapter<br />
Fibre Channel HBA All supported HBA<br />
Networking Two integrated network ports and all supported peripheral<br />
NICs<br />
Remote Access iDRAC7<br />
<strong>PowerEdge</strong> R420 Configuration<br />
<strong>PowerEdge</strong> R420<br />
Processor Intel Xeon CPU E5-2400 product family<br />
Minimum Memory 4 GB<br />
Internal Storage Up to eight 2.5 inch or four 3.5 inch SAS/SATA disks<br />
Internal Flash Memory <strong>Support</strong>ed SD memory card<br />
Internal Storage Adapter PERC H710, PERC H710P and PERC H310 adapters<br />
External Disks Storage Adapter PERC H810 adpater<br />
Fibre Channel HBA All supported HBA<br />
Networking Two integrated network ports and all supported peripheral<br />
NIC daughter cards<br />
Remote Access iDRAC7<br />
35
<strong>PowerEdge</strong> R320 Configuration<br />
<strong>PowerEdge</strong> R320<br />
Processor Intel Xeon CPU E5-2400 product family<br />
Minimum Memory 4 GB<br />
Internal Storage Up to eight 2.5 inch or four 3.5 inch SAS/SATA disks<br />
Internal Flash Memory <strong>Support</strong>ed SD memory card<br />
Internal Storage Adapter PERC H710, PERC H710P and PERC H310 adapters<br />
External Disks Storage Adapter PERC H810 adapter<br />
Fibre Channel HBA All supported HBA<br />
Networking Two integrated network ports and all supported peripheral<br />
NICs<br />
Remote Access iDRAC7<br />
<strong>PowerEdge</strong> R910 Configuration<br />
<strong>PowerEdge</strong> R910<br />
Processor Intel Xeon 7500 series or Intel Xeon E7- 4800/8800 product<br />
family<br />
Minimum Memory 4 GB<br />
Internal Storage Up to 16 2.5 inch SAS/SATA disks<br />
Internal Flash Memory <strong>Support</strong>ed SD memory card<br />
Internal Storage Adapter SAS 6/iR Integrated, PERC 6/i Integrated, PERC H200<br />
Integrated, and PERC H700 Integrated<br />
External Disks Storage Adapter SAS 5/E, 6 Gbps SAS HBA, and PERC H800<br />
Fibre Channel HBA (SAN connectivity) All supported HBAs<br />
Networking Four integrated network ports and all supported peripheral<br />
NICs<br />
Remote Access iDRAC6 Enterprise<br />
<strong>PowerEdge</strong> R815 Configuration<br />
<strong>PowerEdge</strong> R815<br />
Processor AMD Opteron 6100/6200/6300 series<br />
Minimum Memory 8 GB<br />
Internal Storage Up to six 2.5 inch SAS/SATA disks<br />
36
<strong>PowerEdge</strong> R815<br />
Internal Flash Memory <strong>Support</strong>ed SD memory card<br />
Internal Storage Adapter PERC H200 Integrated and PERC H700 Integrated<br />
External Disks Storage Adapter SAS 5/E, 6 Gbps SAS HBA, and PERC H800<br />
Fibre Channel HBA (SAN connectivity) All supported HBAs<br />
Networking Up to four integrated network ports and all supported<br />
peripheral NICs<br />
Remote Access iDRAC6 Enterprise<br />
<strong>PowerEdge</strong> R810 Configuration<br />
<strong>PowerEdge</strong> R810<br />
Processor Intel Xeon 6500 series or Intel Xeon 7500 series or Intel<br />
Xeon E7- 2800/4800/8800 product family<br />
Minimum Memory 4 GB<br />
Internal Storage Up to six 2.5 inch SAS/SATA disks<br />
Internal Flash Memory <strong>Support</strong>ed SD memory card<br />
Internal Storage Adapter PERC H200 Integrated and PERC H700 Integrated<br />
External Disks Storage Adapter SAS 5/E, 6 Gbps SAS HBA, and PERC H800<br />
Fibre Channel HBA (SAN connectivity) All supported HBAs<br />
Networking Four integrated network ports and all supported peripheral<br />
NICs<br />
Remote Access iDRAC6 Enterprise<br />
<strong>PowerEdge</strong> R715 Configuration<br />
<strong>PowerEdge</strong> R715<br />
Processor AMD Opteron 6100/6200/6300 series<br />
Minimum Memory 8 GB<br />
Internal Storage Up to six 2.5 inch SAS/SATA disks<br />
Internal Flash Memory <strong>Support</strong>ed SD memory card<br />
Internal Storage Adapter PERC H200 Integrated and PERC H700 Integrated<br />
External Disks Storage Adapter SAS 5/E, 6 Gbps SAS HBA, and PERC H800<br />
Fibre Channel HBA (SAN connectivity) All supported HBAs<br />
Networking Four integrated network ports and all supported peripheral<br />
NICs<br />
Remote Access iDRAC6 Enterprise<br />
37
<strong>PowerEdge</strong> R710 Configuration<br />
<strong>PowerEdge</strong> R710<br />
Processor Intel Xeon 5500/5600 series<br />
Minimum Memory 4 GB<br />
Internal Storage Up to eight 2.5 inch SAS/SATA or six 3.5 inch SAS/SATA<br />
disks<br />
Internal Flash Memory <strong>Support</strong>ed SD memory card<br />
Internal Storage Adapter PERC 6/i Integrated, SAS 6/iR Integrated, PERC H200<br />
Integrated, and PERC H700 Integrated<br />
External Disks Storage Adapter SAS 5/E, PERC 6/E, 6 Gbps SAS HBA, and PERC H800<br />
Fibre Channel HBA (SAN connectivity) All supported HBAs<br />
Networking Four integrated network ports and all supported peripheral<br />
NICs<br />
Remote Access iDRAC6 Enterprise<br />
<strong>PowerEdge</strong> R610 Configuration<br />
<strong>PowerEdge</strong> R610<br />
Processor Intel Xeon 5500/5600 series<br />
Minimum Memory 4 GB<br />
Internal Storage Up to six 2.5 inch SAS/SATA disks<br />
Internal Flash Memory <strong>Support</strong>ed SD memory card<br />
Internal Storage Adapter SAS 6/iR Integrated, PERC 6/i Integrated, PERC H200<br />
Integrated, and PERC H700 Integrated<br />
External Disks Storage Adapter SAS 5/E, PERC 6/E, 6 Gbps SAS HBA, and PERC H800<br />
Fibre Channel HBA (SAN connectivity) All supported HBAs<br />
Networking Four integrated network ports and all supported peripheral<br />
NICs<br />
Remote Access iDRAC6 Enterprise<br />
<strong>PowerEdge</strong> R515 Configuration<br />
<strong>PowerEdge</strong> R515<br />
Processor AMD Opteron 4100/4200/4300 series<br />
Minimum Memory 4 GB<br />
Internal Storage Up to 12 3.5 inch SAS/SATA hard drives<br />
38
<strong>PowerEdge</strong> R515<br />
Internal Flash Memory <strong>Support</strong>ed internal USB memory key<br />
Internal Storage Adapter PERC H200 Integrated, and PERC H700 Integrated<br />
External Disks Storage Adapter PERC H800, and 6 Gbps SAS HBA<br />
Fibre Channel HBA (SAN connectivity) All supported HBAs<br />
Networking Two integrated network ports and all supported peripheral<br />
NICs<br />
Remote Access iDRAC6 Enterprise<br />
<strong>PowerEdge</strong> R510 Configuration<br />
<strong>PowerEdge</strong> R510<br />
Processor Intel Xeon 5500/5600 series<br />
Minimum Memory 4 GB<br />
Internal Storage Up to 12 3.5 inch SAS/SATA hard drives<br />
Internal Flash Memory <strong>Support</strong>ed internal USB memory key<br />
Internal Storage Adapter SAS 6i/R Integrated, PERC 6/i Integrated, PERC H200<br />
Integrated, and PERC H700 Integrated<br />
NOTE: The x12 backplanes support only PERC H200<br />
and PERC H700 adapters.<br />
External Disks Storage Adapter SAS 5/E, PERC 6/E, 6 Gbps SAS HBA, and PERC H800<br />
Fibre Channel HBA (SAN connectivity) Two integrated network ports and all supported peripheral<br />
NICsAll supported HBAs<br />
Networking Four integrated network ports and all supported peripheral<br />
NICs<br />
Remote Access iDRAC6 Enterprise<br />
<strong>PowerEdge</strong> R415 Configuration<br />
<strong>PowerEdge</strong> R415<br />
Processor AMD Opteron 4100/4200/4300 series<br />
Minimum Memory 4 GB<br />
Internal Storage Four 3.5 inch SAS/SATA disks<br />
Internal Storage Adapter PERC H200 Integrated, and PERC H700 Integrated<br />
External Disks Storage Adapter PERC H800, and 6 Gbps SAS HBA<br />
Fibre Channel HBA (SAN connectivity) All supported HBAs<br />
39
<strong>PowerEdge</strong> R415<br />
Networking Two integrated network ports and all supported peripheral<br />
NICs<br />
Remote Access iDRAC6 Enterprise<br />
<strong>PowerEdge</strong> R410 Configuration<br />
<strong>PowerEdge</strong> R410<br />
Processor Intel Xeon 5500 /5600 series<br />
Minimum Memory 4 GB<br />
Internal Storage Four 3.5 inch SAS/SATA disks<br />
Internal Storage Adapter SAS 6/iR Integrated, PERC 6/i Integrated, PERC H200<br />
Integrated, and PERC H700 Integrated<br />
External Disks Storage Adapter SAS 5/E, PERC 6/E, 6 Gbps SAS HBA, and PERC H800<br />
Fibre Channel HBA (SAN connectivity) All supported HBAs<br />
Networking Two integrated network ports and all supported peripheral<br />
NICs<br />
Remote Access iDRAC6 Enterprise<br />
<strong>PowerEdge</strong> R310 Configuration<br />
<strong>PowerEdge</strong> R310<br />
Processor Intel Xeon 3400 series or Intel Core i3 series<br />
Minimum Memory 4 GB<br />
Internal Storage Upto four 3.5 inch or 2.5 inch SAS/SATA disks<br />
Internal Storage Adapter SAS 6/iR Integrated, PERC H200, and PERC H700<br />
External Disks Storage Adapter SAS 5/E, PERC 6/E, 6 Gbps SAS, and PERC H800<br />
Fibre Channel HBA (SAN connectivity) All supported HBAs<br />
Networking Two integrated network ports and all supported peripheral<br />
NICs<br />
Remote Access iDRAC6 Enterprise<br />
<strong>PowerEdge</strong> R210 II Configuration<br />
<strong>PowerEdge</strong> R210 II<br />
Processor Intel Xeon E3-1200 product family or Intel Xeon E3-1200 v2<br />
product family or Intel Core i3 series<br />
Minimum Memory 4 GB<br />
40
<strong>PowerEdge</strong> R210 II<br />
Internal Storage Two 3.5 inch SAS/SATA disks<br />
Internal Storage Adapter PERC H200<br />
External Disks Storage Adapter PERC H800<br />
Fibre Channel HBA (SAN connectivity) Not applicable<br />
Networking Two integrated network ports and all supported peripheral<br />
NICs<br />
Remote Access iDRAC6 Enterprise<br />
<strong>PowerEdge</strong> T320 Configuration<br />
<strong>PowerEdge</strong> T320<br />
Processor Intel Xeon E5-2400 product family<br />
Minimum Memory 2 GB<br />
Internal Storage Up to sixteen 2.5 inch or eight 3.5 inch hot-plug SAS/SATA<br />
disks<br />
Internal Flash Memory <strong>Support</strong>ed SD memory card<br />
Internal Storage Adapter PERC H710, PERC H710P, and PERC H310<br />
External Disks Storage Adapter PERC H810<br />
Fibre Channel HBA All supported HBA<br />
Networking Two integrated network ports and all supported peripheral<br />
NICs<br />
Remote Access iDRAC7<br />
<strong>PowerEdge</strong> T420 Configuration<br />
<strong>PowerEdge</strong> T420<br />
Processor Intel Xeon E5-2400 product family<br />
Minimum Memory 2 GB<br />
Internal Storage Up to sixteen 2.5 inch or eight 3.5 inch hot-plug SAS/SATA<br />
disks<br />
Internal Flash Memory <strong>Support</strong>ed SD memory card<br />
Internal Storage Adapter PERC H710, PERC H710P, and PERC H310<br />
External Disks Storage Adapter PERC H810<br />
Fibre Channel HBA All supported HBA<br />
Networking Two integrated network ports and all supported peripheral<br />
NICs<br />
41
<strong>PowerEdge</strong> T420<br />
Remote Access iDRAC7<br />
<strong>PowerEdge</strong> T620 Configuration<br />
<strong>PowerEdge</strong> T620<br />
Processor Intel Xeon E5-2600 series<br />
Minimum Memory 4 GB<br />
Internal Storage Up to twenty four 2.5 inch or twelve 3.5 inch SAS/SATA<br />
disks<br />
Internal Flash Memory <strong>Support</strong>ed SD memory card<br />
Internal Storage Adapter PERC H310, PERC H710, and PERC H710P<br />
External Disks Storage Adapter PERC H810, 6Gbps SAS HBA<br />
Fibre Channel HBA All supported HBAs<br />
Networking Two integrated network ports, and all supported<br />
peripheral NICs<br />
Remote Access iDRAC7<br />
<strong>PowerEdge</strong> T710 Configuration<br />
<strong>PowerEdge</strong> T710<br />
Processor Intel Xeon 5500/5600 Series<br />
Minimum Memory 4 GB<br />
Internal Storage Up to sixteen 2.5 inch SAS/SATA disks or up to eight 3.5<br />
inch SAS/SATA disks<br />
Internal Flash Memory <strong>Support</strong>ed SD memory card<br />
Internal Storage Adapter PERC 6/i Integrated, SAS 6/iR Integrated, PERC H200<br />
Integrated, and PERC H700 Integrated<br />
External Disks Storage Adapter SAS 5/E, PERC 6/E, 6 Gbps SAS HBA, and PERC H800<br />
Fibre Channel HBA (SAN connectivity) All supported HBAs<br />
Networking Two integrated network ports and all supported peripheral<br />
NICs<br />
Remote Access iDRAC6 Enterprise<br />
42
<strong>PowerEdge</strong> T610 Configuration<br />
<strong>PowerEdge</strong> T610<br />
Processor Intel Xeon 5500/5600 series<br />
Minimum Memory 4 GB<br />
Internal Storage Up to eight 2.5 inch SAS/SATA or 3.5 inch SAS/SATA disks<br />
Internal Flash Memory <strong>Support</strong>ed SD memory card<br />
Internal Storage Adapter SAS 6/iR Integrated, PERC 6/i Integrated, PERC H200<br />
Integrated, and PERC H700 Integrated<br />
External Disks Storage Adapter SAS 5/E, PERC 6/E, 6 Gbps SAS HBA, and PERC H800<br />
Fibre Channel HBA (SAN connectivity) All supported HBAs<br />
Networking Two integrated network ports and all supported peripheral<br />
NICs<br />
Remote Access iDRAC6 Enterprise<br />
<strong>PowerEdge</strong> T410 Configuration<br />
<strong>PowerEdge</strong> T410<br />
Processor Intel Xeon 5500/5600 Series<br />
Minimum Memory 4 GB<br />
Internal Storage Six 3.5 inch SAS/SATA disks<br />
Internal Flash Memory <strong>Support</strong>ed SD memory card<br />
Internal Storage Adapter PERC 6/i , SAS 6/iR, PERC H200, and PERC H700<br />
External Disks Storage Adapter SAS 5/E, PERC 6/E, 6 Gbps SAS HBA, and PERC H800<br />
Fibre Channel HBA (SAN connectivity) Not applicable<br />
Networking Two integrated network ports and all supported peripheral<br />
NICs<br />
Remote Access iDRAC6 Enterprise<br />
<strong>PowerEdge</strong> T310 Configuration<br />
<strong>PowerEdge</strong> T310<br />
Processor Intel Xeon 3400 series or Intel Core i3 series<br />
Minimum Memory 4 GB<br />
Internal Storage Four 3.5 inch SAS/SATA disks<br />
Internal Storage Adapter SAS 6/iR, PERC 6/i, PERC H200, and PERC H700<br />
43
<strong>PowerEdge</strong> T310<br />
External Disks Storage Adapter SAS 5/E, PERC 6/E, 6 Gbps SAS HBA, and PERC H800<br />
Fibre Channel HBA (SAN connectivity) Not applicable<br />
Networking <strong>On</strong>e integrated network port and all supported peripheral<br />
NICs<br />
Remote Access iDRAC6 Enterprise<br />
<strong>PowerEdge</strong> T110 II Configuration<br />
<strong>PowerEdge</strong> T110 II<br />
Processor Intel Xeon E3-1200 product family or Intel Xeon E3-1200 v2<br />
product family or Intel Core i3 series<br />
Minimum Memory 4 GB<br />
Internal Storage Four 3.5 inch SAS/SATA disks<br />
Internal Storage Adapter PERC H200<br />
External Disks Storage Adapter Not applicable<br />
Fibre Channel HBA (SAN connectivity) Not applicable<br />
Networking <strong>On</strong>e integrated network port and all supported peripheral<br />
NICs<br />
Remote Access iDRAC6 Enterprise<br />
44